Logic Pro Automation: A Practical Beginner’s Guide
A practical Logic Pro automation guide: add effects to one section, choose track or region data, use modes safely, draw clean moves, and fix lanes.

Automation tells Logic Pro how a control should change over time. It can ride a vocal, pan a sound, open a filter, mute a track, or send one word into delay. Reliable automation starts with two choices: where the data should live and how a new move should interact with what is already written.
Checked September 12, 2026 against Apple’s current Mac automation documentation. Start with volume and one effect send. Once Track versus Region and Read versus Touch are clear, you can use the same approach for the plug-in controls you need.
Fast answer: press A to show automation, keep the lane set to Track for mix moves, choose the parameter, add points and drag the curve, then leave the track in Read. Use Touch to perform a move over existing automation. Avoid Write until you understand that it can replace automation continuously.
What Logic Pro can automate
| Parameter | Typical use | Good first method |
|---|---|---|
| Volume | Lift quiet words, shape sections, control entries | Draw points or ride in Touch |
| Pan | Move effects, create call-and-response space | Draw a deliberate curve |
| Mute | Switch a track on or off at exact moments | Use stepped points |
| Send level | Create reverb changes or delay throws | Draw or perform in Touch |
| Plug-in parameter | Open filters, change distortion, alter modulation | Select the named parameter and draw |
| Smart Control | Move several mapped sound controls from one macro | Automate the mapped Smart Control |
Apple’s automation overview confirms that Logic can record and play movements for volume, pan, and plug-in settings on every track type. Its current view guide documents Mix → Show Automation, the A shortcut, parameter selection, and the Track/Region switch. If repeated fader, pan and transport moves are the real bottleneck, compare Logic Pro control surfaces by protocol, motorized-fader needs and the controls you will actually touch.
Start with one audible change: lift a quiet word, open a filter through a build, or lower a delay send before the next lyric. Add points for that change, then listen before adding another.
Track automation versus region automation
Track automation belongs to a position on the project timeline. Move an audio or MIDI region and the automation normally stays at its original time unless your move settings tell Logic to bring it along.
Region automation belongs to a specific region. Copy or move that region and the data travels with it. Re-record or replace the region and that automation can be lost. It’s especially useful for instrument and MIDI performance parameters that should remain part of a repeating musical object.
Apple’s current track-versus-region explanation also confirms that Logic can convert visible or all automation between the two types.
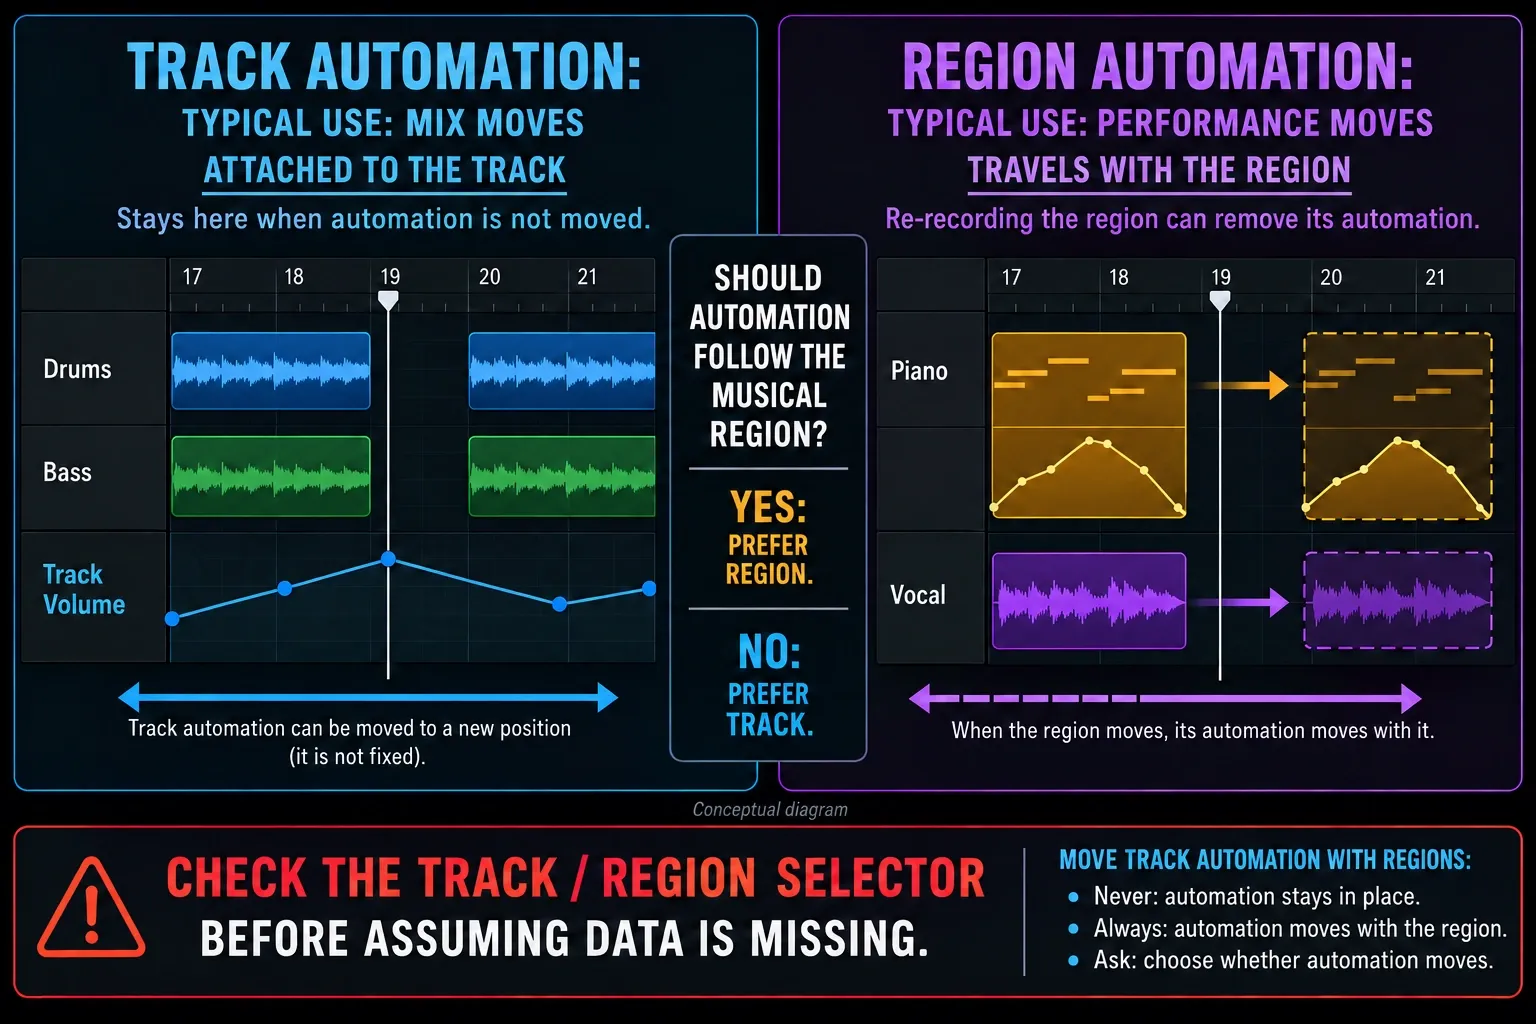
Which type should a beginner choose?
- Use Track automation for mix volume, pan, mute, reverb sends, and song-level effects.
- Use Region automation when the movement should travel with a MIDI or instrument region.
- Check the Track/Region selector before assuming missing automation was deleted.
In Logic Pro → Settings → Automation, set Move Track Automation with Regions to Ask while learning. Apple documents Never, Always, and Ask behavior in the Automation settings reference.
Automation modes: Read, Touch, Latch, and Write
| Mode | What happens | Use it for |
|---|---|---|
| Off | Existing automation is not read | Temporary diagnosis |
| Read | Track automation plays; control moves are not written to the track | Safe track playback and manual point editing |
| Touch | Writes while you move a control, then returns to existing data after release | Correcting a phrase or performing a ride |
| Latch | Starts writing when you touch a control and continues at the last value until playback stops | Setting a new level from one point onward |
| Write | Erases existing automation as the playhead passes, even if you move nothing | Rare, deliberate replacement passes |
Apple’s live-automation guide confirms that Touch and Latch can write during playback; you do not need to record new audio. With playback stopped, moving a control does not write track automation. Write can erase existing data as the playhead passes, including other enabled parameter types: check Write Automation For in Automation settings rather than assuming only the visible lane is affected. Return to Read after the pass. Read has a separate exception: the automation-mode reference says Record Automation with Audio Regions or Record Automation with MIDI Regions can record region data in Read. These options are on by default in the track’s Automation Mode menu; disabling one can apply to the current track or all tracks of that type.
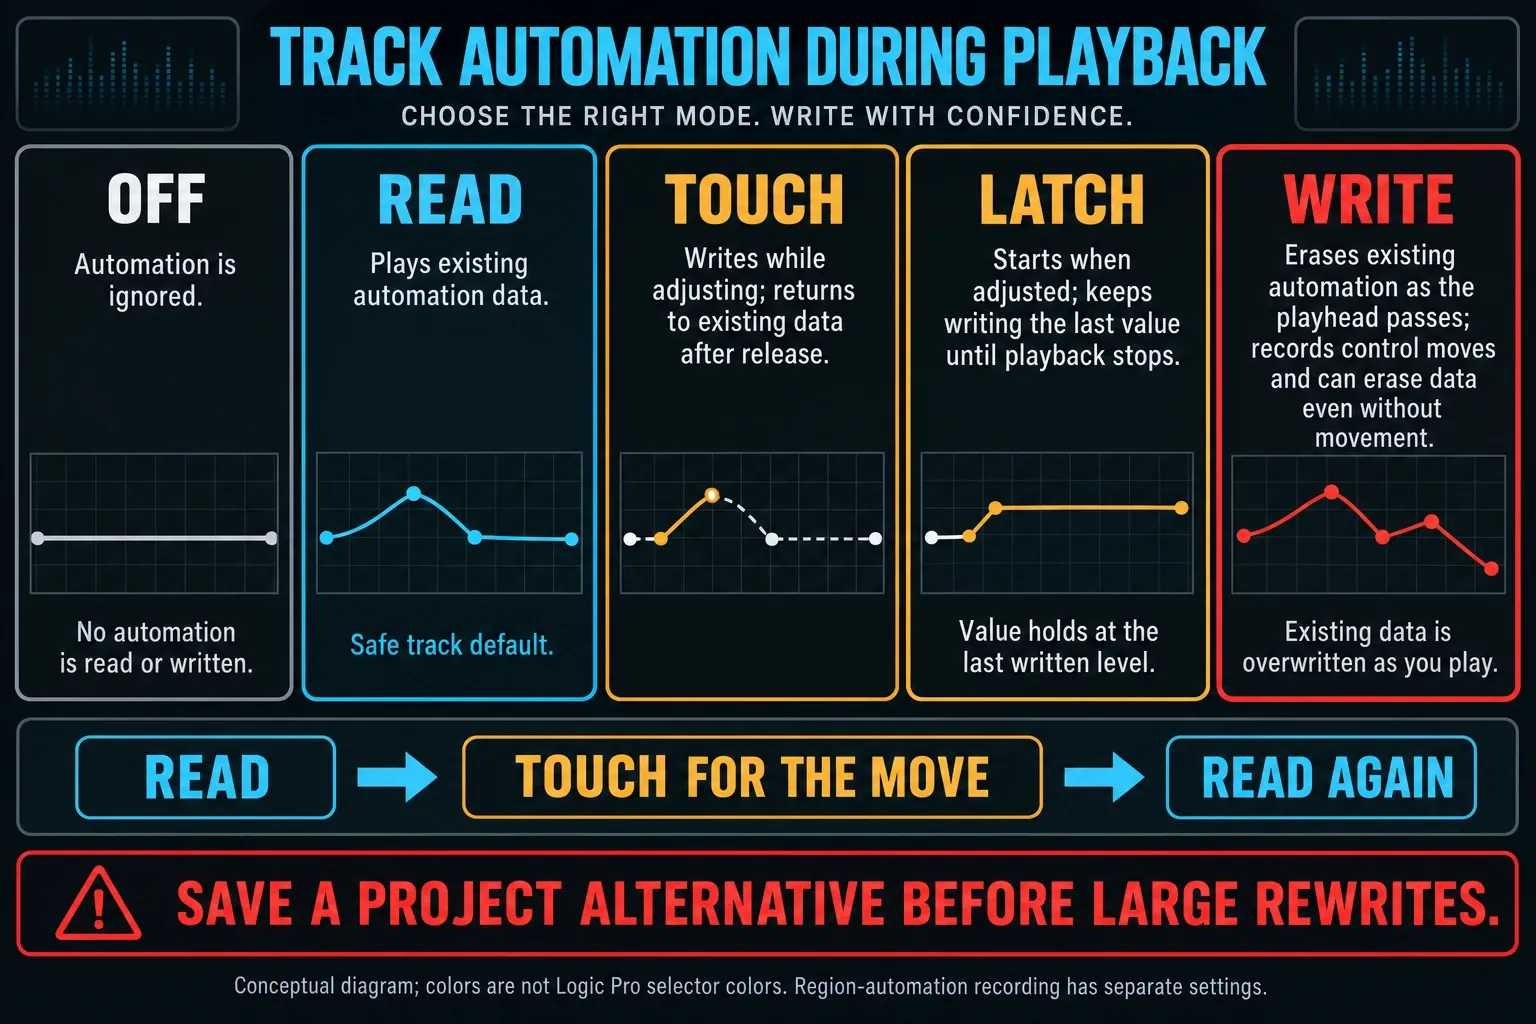
If Write was enabled by mistake: stop playback immediately, use Undo before making another edit, and compare against the project alternative or backup you made before the pass. Do not continue playing while trying to diagnose what changed.
How to create automation in Logic Pro
- Save a project alternative before changing existing automation.
- Click the Tracks area and press A to show automation.
- Choose Track or Region, then select the parameter from the automation parameter menu.
- Leave the mode in Read when drawing points manually.
- On an empty lane, click to create the initial point at the project start; then click the line at the positions where the change should begin and end.
- Drag points vertically for value or horizontally for timing.
- Play across the move and adjust it in musical context.
- For a performed correction, choose Touch, start playback, and move the control.
- Stop playback and return the track to Read after recording the move.
An empty lane’s first click establishes a point at the project start, not necessarily where you clicked; Apple explains this in adding automation points. Once the curve exists, clicks on it add points at the clicked position. The Audio Track Editor can also show Track or Region automation over the waveform. Click the area you mean to control before using A.
Find a plug-in parameter without hunting menus
When a plug-in exposes a long parameter list, set the track to Read and choose Mix → Autoselect Automation Parameter in Read Mode. Click the control you want in the plug-in window and Logic shows that parameter on the main automation lane. Apple’s current automation-curve guide confirms that Auto-Select needs the main lane visible and the track in Read. Check the lane name before adding points, and turn Auto-Select off when ordinary plug-in clicks should stop changing the displayed lane.
Draw clean automation curves
For a basic volume change, including a longer fade, make four points: two define the original value, and two define the changed section. This protects the surrounding mix. Put points at musical boundaries only when the transition should be abrupt. Otherwise allow enough ramp time to avoid a noticeable jump.
Use the Marquee tool to select a time range, then adjust the selected automation as a block. For a whole lane that’s correct in shape but wrong in level, use Logic’s trim behavior instead of redrawing every point. Apple’s range-adjustment guide explains how the track-header value becomes a Trim control for a selected range.
To bend a ramp, drag it with the Automation Curve tool, or hold Control-Shift while dragging with the Pointer tool. Apple’s curve-editing instructions also document stepped changes. Begin playback before the first point and listen beyond the last so you catch an early entrance or an abrupt return.
Copy automation without replacing the wrong moves
Select the points or curve, then Option-drag to copy the move elsewhere on the same track. Existing points at the destination are deleted, so inspect that section first. For another track, Shift-drag a selection in the automation area, choose Edit → Copy, select the destination track, and choose Edit → Paste. Check the target parameter and timing before playback. Apple’s automation copying instructions distinguish these operations from copying the region itself.
Delete points or clear just one parameter
Select an unwanted point and press Delete, or double-click the point. To clear a lane, first select the intended track and parameter, then choose Mix → Delete Automation → Delete Visible Automation on Selected Track. This removes the active parameter’s data. Delete All Automation on Selected Track has a wider scope, and Delete All Track Automation affects every track. Save a project alternative before either broad command. Apple lists the exact scopes in its automation deletion guide. Hiding an automation lane is different: it leaves the data intact.
Three automation moves worth practicing
Vocal volume ride
Loop a verse and automate only the words that disappear or jump out. Use small movements, listen at low monitor level, and keep compression active so the automation works with the finished vocal mix.
Delay throw
Put the delay on an aux, select the vocal send parameter, and raise it only for the final word of a line. Bring it back down before the next lyric. This creates space without washing every phrase in repeats.
Filter transition
Automate a filter cutoff on a synth, drum bus, or effect return through a build. Check the exact parameter name: plug-ins can expose many similarly named controls, and automating the wrong one can look like it does nothing.
How to add an effect only in the middle of a song
Use Track automation when an effect should change during playback and remain editable. Put the plug-in on the track or an aux, press A, leave the track in Read, choose the plug-in parameter or send level, then draw the move around the section you want. Apple’s automation-parameter guide confirms that each plug-in on a track gets its own submenu.
- Add the plug-in or send and set a useful active sound first.
- Press A, choose Track, and select the exact parameter: send level, Mix/Wet, cutoff, drive, output, or another control the plug-in exposes.
- Create two points before the effect change and two after it. The outside points protect the sound before and after the section.
- Move the line between the inner points to the active value. Use a slope for a transition or stepped points for an intentional switch.
- Start playback before the first point and listen past the last one. Adjust the entry, exit, and effect tail in context.
For reverb or delay, automate the send level when you want the last repeat or reverb tail to continue after the source stops feeding the effect. On an insert, a Mix or Wet control often gives a smoother transition. If the plug-in exposes a Bypass automation parameter, stepped bypass data can switch the whole insert, but listen across both boundaries; a hard change can sound abrupt or stop a tail.
If you want to render an effect into only part of an audio recording, use a different tool. Select an audio region or a Marquee range, choose Functions > Selection-Based Processing or press Option-Shift-P, add and preview the plug-ins, then apply the process. Apple’s current Selection-Based Processing guide also documents Create New Take and Add Effect Tail. Use automation for a live, reversible change; use Selection-Based Processing when you deliberately want a new processed audio file.
Relative and trim automation
Volume, pan, and send levels can have an absolute curve plus a relative curve that offsets it. That’s useful when the detailed ride is right but the entire track needs to sit slightly higher or lower. Avoid stacking unexplained absolute, relative, region, and track data. Label the decision in project notes and consolidate when the layering becomes harder to audit than it’s useful.
Apple’s current automation-mode reference limits Relative automation to Volume, Pan, and Send levels. If a plug-in parameter needs a broad offset, edit its points, change the plug-in’s base setting when appropriate, or automate a deliberately mapped Smart Control. Do not assume every lane has a hidden relative layer. When separate absolute and relative curves are no longer useful, Apple documents Consolidate Relative and Absolute [Parameter] Automation; consolidation does not change playback.
The Logic Pro features hub also covers Flex Pitch, Smart Tempo and other production tools. For the balance and routing around these moves, continue with the mixing guides.
Why automation may not work
The individual parameter is muted
A track can be in Read while one parameter curve is off. Select that parameter, hover over its Automation Parameter menu, and check the On/Off button that appears. A muted curve is gray. Turn it back on if that is the move you want to hear; you do not need to redraw it.
The track is in Off mode
Set it to Read. Off stops the lane from controlling the parameter even when points remain visible.
You are looking at the wrong automation type
Switch between Track and Region. Data can exist in one view while the other view looks empty.
The wrong parameter is selected
Open the parameter menu and choose the exact volume, send, Smart Control, or plug-in control you intended to automate.
Touch or Latch is still armed
Return to Read after writing. Leaving a writing mode active makes accidental changes more likely during the next playback.
A region moved but the track automation stayed behind
Use the Automation setting for moving track data with regions, or convert the movement to Region automation when it truly belongs to the region.
The plug-in or route changed
Automation points can remain while the destination plug-in, send, or mapped control no longer exists in the same form. Confirm the receiving parameter and signal path.
If the whole project also has playback, recording, or plug-in symptoms, use the Logic Pro troubleshooting hub rather than editing automation around a wider fault.
Frequently asked questions
How do I add an effect to only part of a song in Logic Pro?
For an editable change, use Track automation and draw four points around the section on the plug-in parameter, Mix/Wet control, or send level. For a rendered change to existing audio, select the region or Marquee range and use Selection-Based Processing. Reverb and delay usually need an effect tail, so audition past the end of the selection or automation move.
What is the shortcut for automation in Logic Pro?
Press A to show or hide automation in the Tracks area. Then choose Track or Region automation and select the parameter you want to edit.
What is the difference between Touch and Latch?
Touch writes while you move the control and returns to existing automation after release. Latch keeps writing the last value after release until playback stops.
Should Logic Pro automation stay in Read mode?
Use Read for track-automation playback and manual point editing. Switch briefly to Touch or Latch when performing a move, then return to Read. If you do not want automation recorded inside Audio or MIDI regions, also check the Record Automation with Audio/MIDI Regions option because it can remain active in Read.
Does Logic Pro automation move with regions?
Region automation moves with its region. Track automation stays on the timeline unless the Move Track Automation with Regions setting is Always or you approve the move when it is set to Ask.
Can Logic Pro automate plug-ins?
Yes. Choose the plug-in and parameter from the automation menu, then draw the curve or record the movement in Touch or Latch mode.
Why does a Logic Pro fader jump back after I move it?
In Read mode, existing track automation takes control when the playhead reaches written data. Region automation can also be recorded in Read when its recording option is enabled. Check the Track/Region view, edit the controlling curve, use an appropriate Relative or Trim workflow for Volume, Pan, or Send level, or temporarily diagnose in Off mode. Do not fight the automated fader without first finding the lane that controls it.


