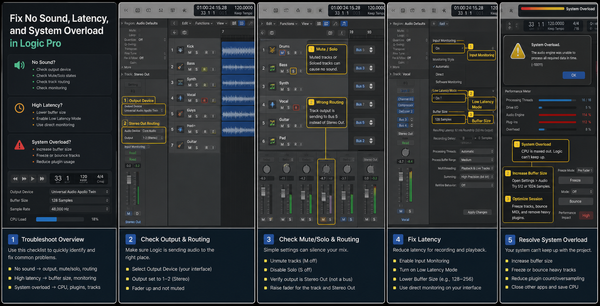
Channel EQ for Vocals in Logic Pro: Clean Cuts Before Boosts
A vocal EQ workflow that starts with the problem you can hear, not a preset curve copied from someone else's voice.

Vocal EQ advice gets repeated like a recipe, but voices are not recipes. The same 3 kHz boost that helps one singer can make another harsh. The same low-cut that cleans one recording can thin another.
Use Channel EQ as a problem solver first. Remove what is clearly not helping, then add presence only if the vocal still needs to step forward in the mix.
Quick answer
If you are in Logic Pro right now, do not start by opening every menu. Set the vocal level roughly before EQ. Listen in the full mix, not only in solo. Then move through the four checks below in order.
The order matters because mixing work usually breaks earlier than it looks. A wrong track, region, input, bus, or range can make the last setting look guilty when it is only receiving a bad setup.
Use this as the short version before reading the full guide.
- Start with rumble, not sparkle: A gentle high-pass can remove stand noise, foot rumble, and low-end junk.
- Find mud in context: Low-mid buildup can make a vocal feel cloudy.
- Control harshness narrowly: Harshness often needs a smaller move than you expect.
- Add presence after cleanup: Once the vocal is clean, a small broad lift can bring articulation forward.
Before you start
- Set the vocal level roughly before EQ.
- Listen in the full mix, not only in solo.
- Bypass often and level-match your decision.
- Use small moves until you know the problem.
A clean pass from start to finish
Run this as one clean pass, not as disconnected tricks. Begin with the first checkpoint: start with rumble, not sparkle. Then move to the second: find mud in context. Those two checks make the project readable before you make detailed changes.
After that, use the next two checkpoints as the decision stage: control harshness narrowly, then add presence after cleanup. This is where you stop guessing and let the screen show whether the sound, timing, routing, or edit is behaving the way the song needs.
If you change more than one thing at once, write down what you changed or save a new version. Logic Pro is fast enough that a session can go from fixed to confusing in under a minute. Small, named moves are easier to trust later.
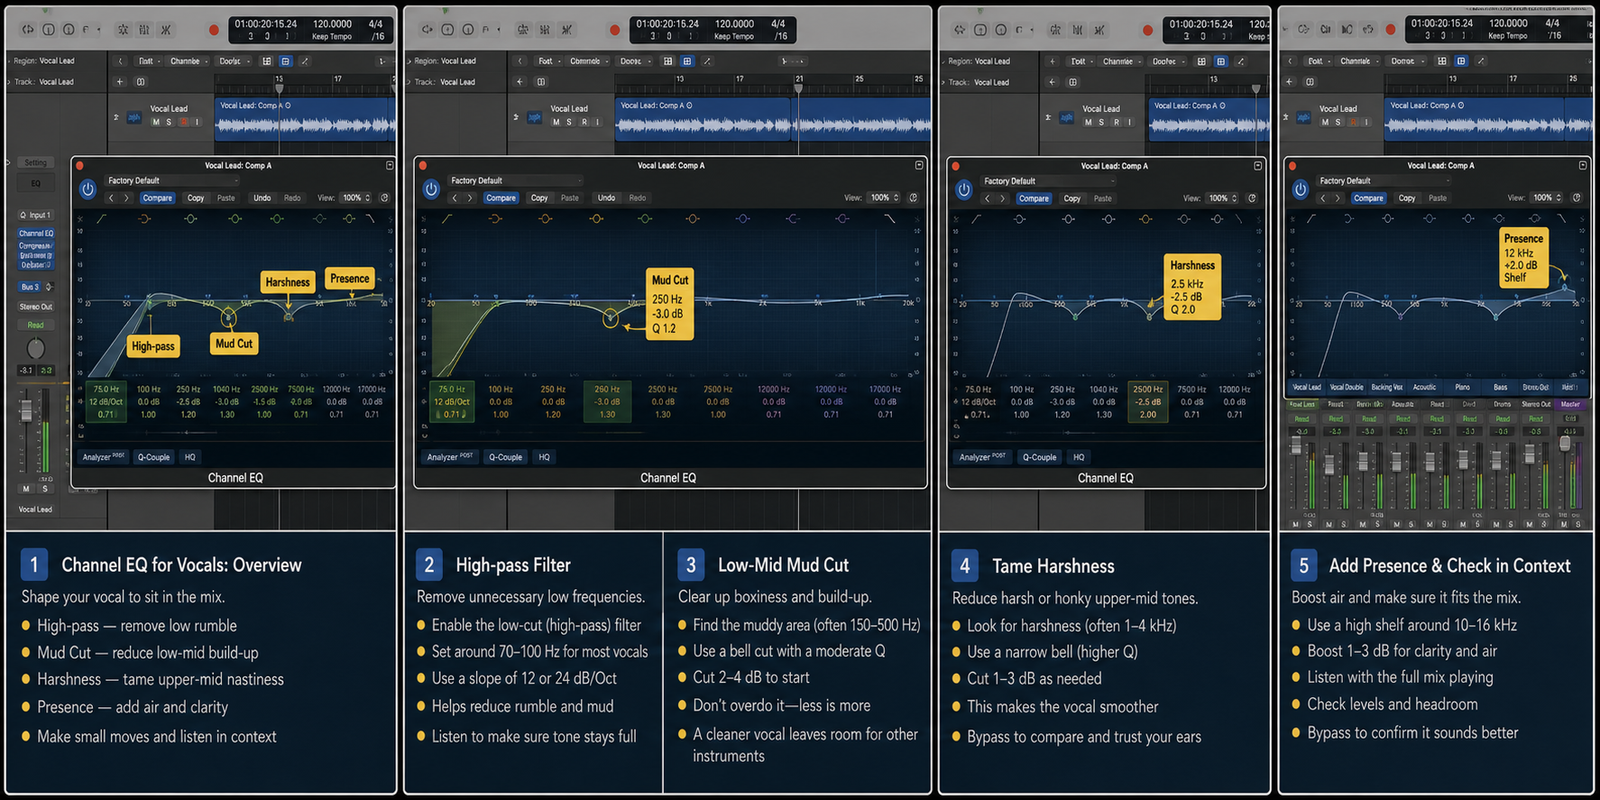
1. Start with rumble, not sparkle
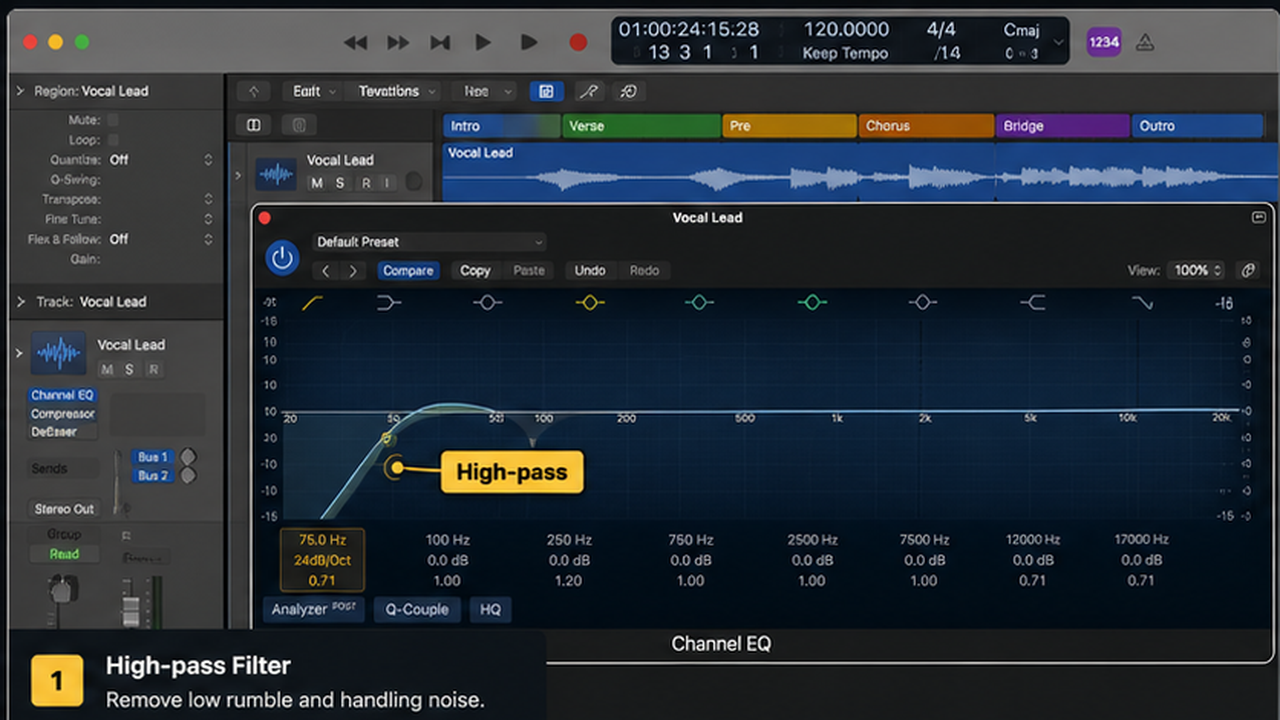
A gentle high-pass can remove stand noise, foot rumble, and low-end junk. Stop before the singer loses chest and authority.
The cutoff depends on the singer and arrangement. Do not high-pass by habit.
2. Find mud in context
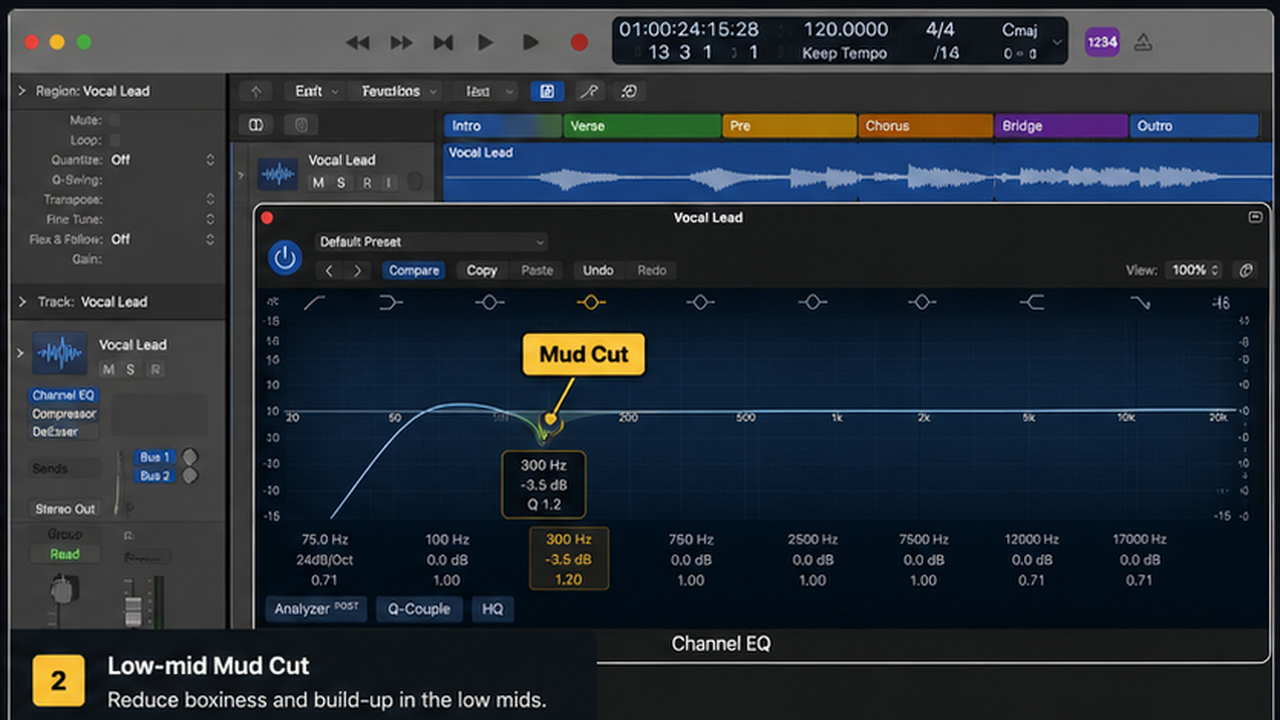
Low-mid buildup can make a vocal feel cloudy. Sweep carefully, cut a little, then listen against the instruments. If the vocal becomes smaller, back off.
A vocal can sound muddy because the keys or guitars are masking it, not because the vocal needs a huge cut.
3. Control harshness narrowly
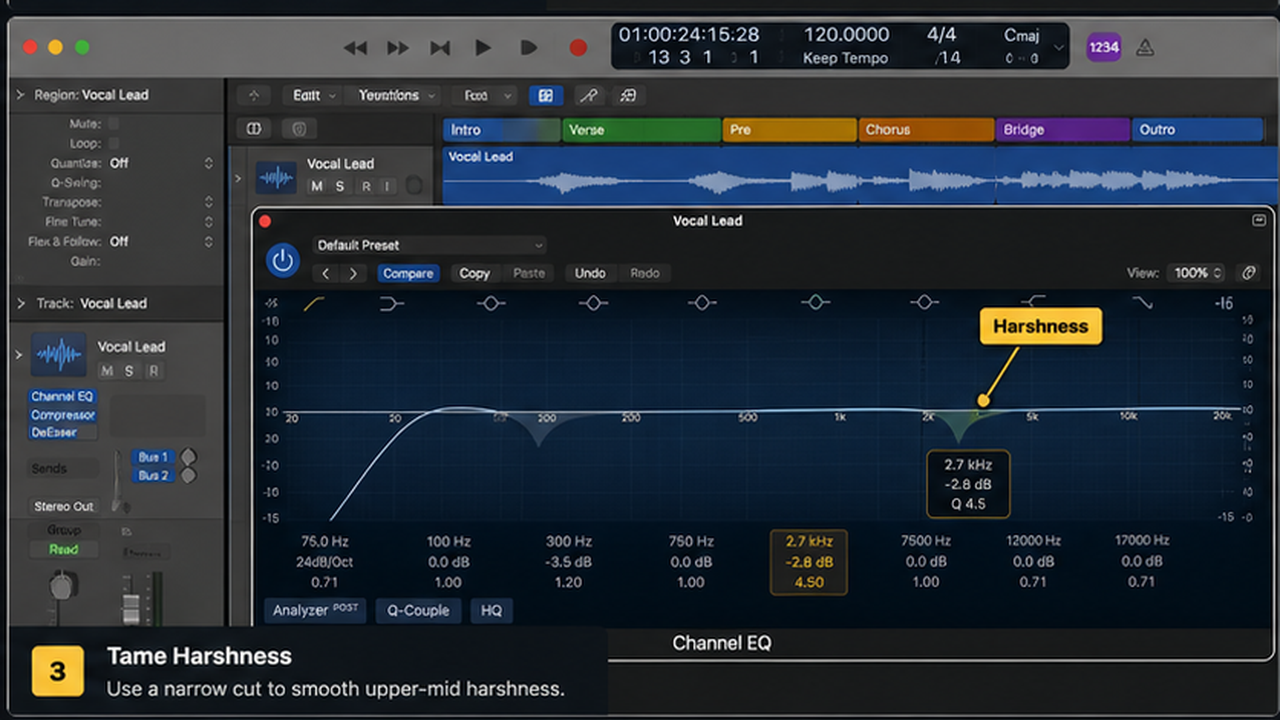
Harshness often needs a smaller move than you expect. Use a narrow cut and check several loud phrases before deciding.
If sibilance is the real issue, a de-esser may be cleaner than carving the whole top end.
4. Add presence after cleanup
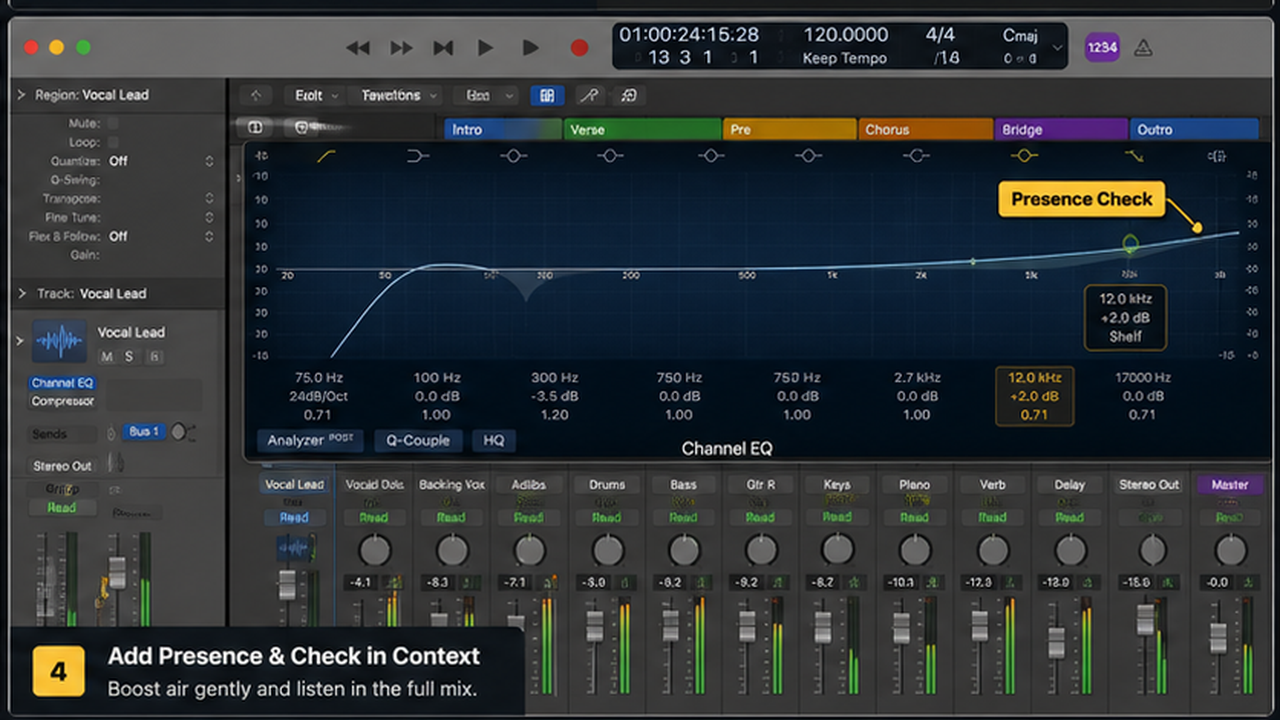
Once the vocal is clean, a small broad lift can bring articulation forward. Compare at matched loudness, because louder top end can fool you.
Presence should make words easier to understand, not make the vocal stab the listener.
Decision table
| Issue | Likely area | Move carefully |
|---|---|---|
| Rumble | Low end | Gentle high-pass |
| Mud | Low mids | Small subtractive cut |
| Harshness | Upper mids | Narrow cut or dynamic control |
| Dull vocal | Presence/top | Small broad boost |
Checkpoint table
| Checkpoint | What should be true | If it is not true |
|---|---|---|
| Start with rumble, not sparkle | The cutoff depends on the singer and arrangement. | Back up and fix the setup before continuing. |
| Find mud in context | A vocal can sound muddy because the keys or guitars are masking it, not because the vocal needs a huge cut. | Do the smaller edit instead of rebuilding the whole part. |
| Control harshness narrowly | If sibilance is the real issue, a de-esser may be cleaner than carving the whole top end. | Check what is selected, then repeat the change deliberately. |
| Add presence after cleanup | Presence should make words easier to understand, not make the vocal stab the listener. | Use the mixer or playback context as the final judge. |
Before and after check
Before the change, make one short playback pass and name the exact problem in plain words: late entrance, dull vocal, wrong input, harsh consonant, missing output, messy routing, clipped bounce, or whatever the session is actually doing. If you cannot name it, you are not ready to fix it yet.
After the change, play the same section at the same volume. Louder almost always sounds better for ten seconds, so level-match when you are judging mixing decisions. The useful question is not whether the edit is impressive. It is whether the part sits better without pulling attention away from the song.
Check the edges of the fix. In Logic Pro, a repair can solve the center of a problem while damaging the bar before it, the breath after it, the bus return, or the export tail. A good before/after pass includes a little lead-in and a little space after the moment you changed.
If the after version only feels better while you are watching the screen, take a break and listen again without touching the mouse. Visual neatness is helpful for editing, but the final test is still playback. Keep the version that makes the project easier to finish.
What not to chase yet
Do not chase polish before the basic workflow is stable. For this topic, the first two checkpoints have to make sense before you worry about the smaller details: start with rumble, not sparkle, then find mud in context. Fancy settings cannot rescue a confused source.
Do not copy numbers blindly from another session. Buffer sizes, EQ points, quantize strength, compression timing, send levels, and bounce choices all depend on the material. Use examples as starting points, then move the control until this project sounds and behaves correctly.
Do not keep editing because the tool is available. Logic Pro gives you enough control to over-fix almost anything. Stop when the problem is gone and the performance still feels like a performance.
What good looks like
The mixing workflow is working when you can explain what changed without pointing at a random plugin window. If the fix depends on luck, the session is not stable yet.
After the main pass, close the editor you were using and play the section from a few bars before the change. A good edit survives context. A bad edit only sounds correct when the screen is zoomed into the problem.
Keep one version before the major change and one version after it. Logic Pro projects can move quickly, and a clean fallback saves more time than trying to reverse a dozen tiny edits later.
If it still feels wrong
If the result still feels wrong, return to the signal chain. Ask whether the source is clean, whether the region edit is correct, whether the track is routed where you think it is, and whether the mixer confirms what your ears are telling you.
Do not add another processor just because the current one did not solve the issue. In Logic Pro, many problems are earlier than the plugin slot: wrong input, messy region boundaries, doubled monitoring, over-quantized MIDI, or a bus that is louder than the dry track.
When you get stuck, simplify the project. Mute everything except the source and the one track or aux it depends on. If the problem disappears, bring the session back one group at a time until the conflict shows itself.
Common mistakes to avoid
- Boosting air before removing mud. Fix it by returning to the first visible control in the chain and confirming it before you touch a plugin.
- EQing in solo and wrecking the vocal in the track. Fix it by listening to the section in context, then changing only the thing that fails the playback test.
- Making the analyzer flat instead of making the vocal useful. Fix it by saving a version, making the edit smaller, and checking whether the song still feels natural.
- Using one saved curve on every singer. Fix it by simplifying the session view until the routing, region, or setting is obvious again.
Practice pass
Duplicate a vocal EQ. On one copy, use only cuts. On the other, use only boosts. Then build a third version with the best of both. The exercise teaches what each move is really doing.
When to move on
You are done when the change helps the song at normal listening volume. Not when the screen looks tidy, not when every meter behaves perfectly, and not when the analyzer is pretty.
Print or bounce a short reference after the fix. Listening outside the edit screen catches problems that are invisible while you are staring at regions, lanes, and meters.
Sources checked
This draft was checked against current Apple Logic Pro documentation and release notes before writing. Source links used for version-sensitive claims on May 16, 2026:
FAQ
What is the best EQ setting for vocals in Logic Pro?
There is no universal setting. Start with a gentle high-pass, fix low-mid buildup if needed, control harshness, then add presence only if the mix needs it.
Should I EQ vocals before compression?
Often yes for cleanup, then compress, then use a second EQ for tone if needed.
Should I use the Channel EQ analyzer?
Use it as a clue, not a decision-maker. Your ears in context matter more.
How much EQ is too much?
If bypass makes the vocal sound more natural or more emotional, you probably over-edited.