How to Record Vocals in Logic Pro: Setup to Comp
A complete Logic Pro vocal-recording workflow from microphone input and gain through monitoring, full passes, take folders and a musical first comp.

Good vocal recording in Logic Pro is less about a secret plug-in chain than a stable signal path, a comfortable headphone mix, and a take system that protects the performance. Get those right before you start comping or tuning.
Last verified August 6, 2026 against the current Apple documentation cited in this guide. It covers a microphone connected through an audio interface on Mac, then follows the session through cycle recording and a first clean comp.
Fast answer: create a mono audio track, choose the microphone input, set interface gain so loud phrases never clip, monitor through the interface or a low-latency Logic path, record full passes before pickups, then build a comp by musical phrase rather than by waveform appearance.
Vocal recording signal path
The basic path is:
Microphone → audio-interface preamp → Logic audio track → headphones.
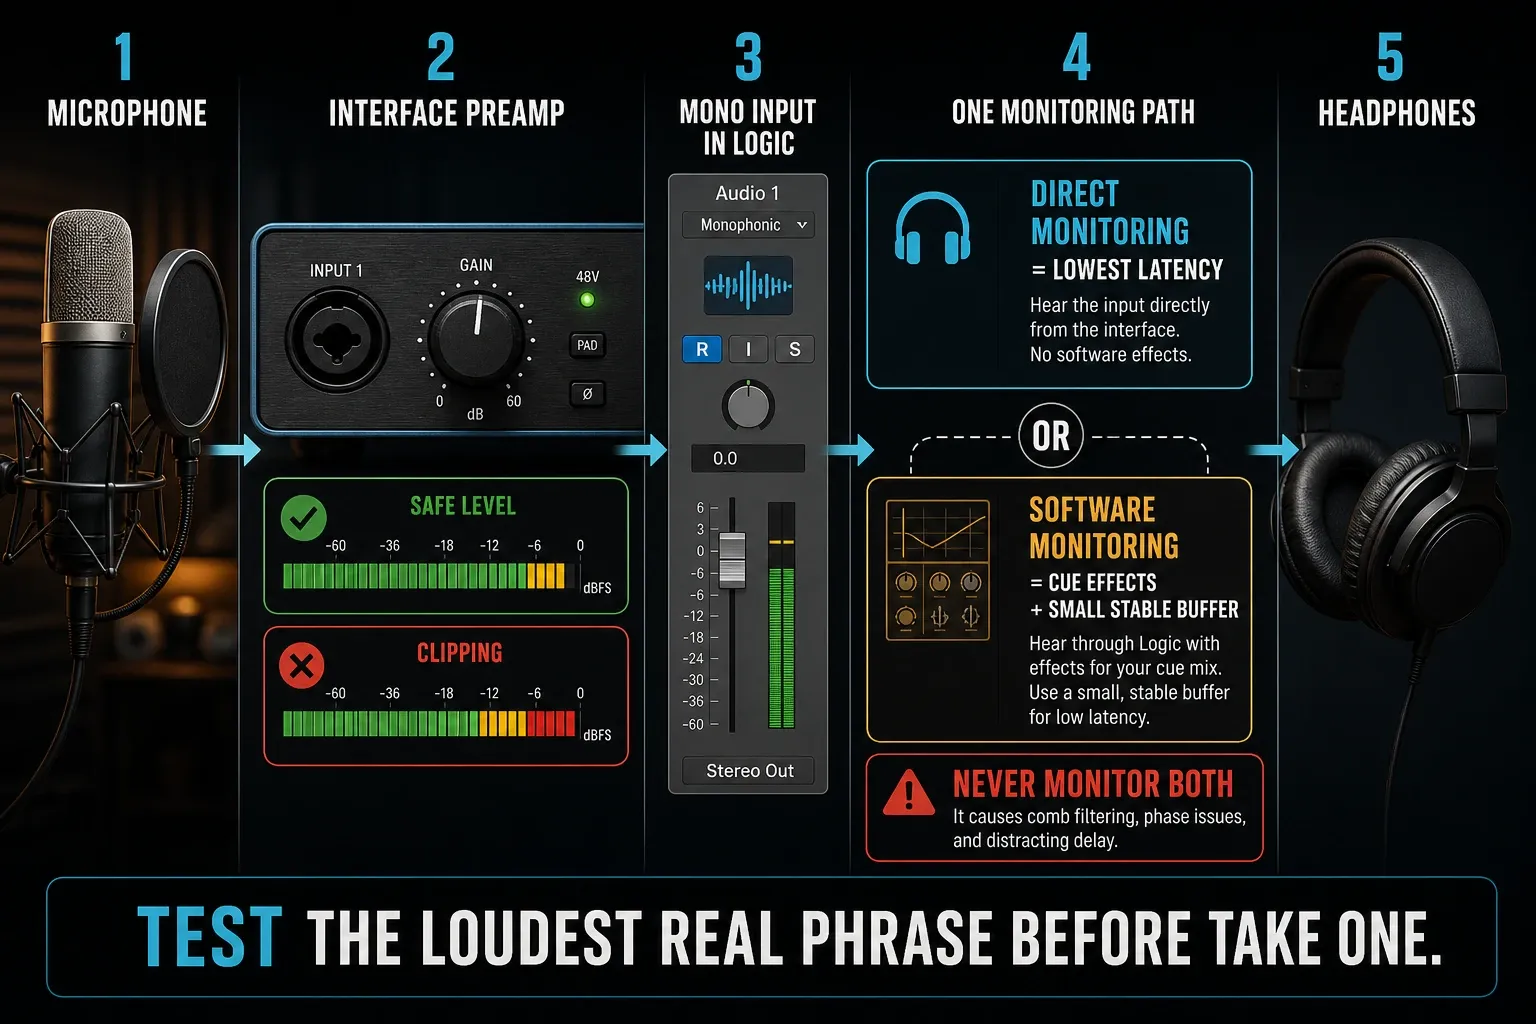
If the meter never moves, work from left to right. Check the microphone cable, required phantom power for the specific microphone, the interface input, interface gain, Logic’s selected audio device, track input, record enable, and macOS microphone permission. The Logic Pro recording checklist covers the full diagnostic path.
Prepare the room and performer
Move away from hard reflective corners and noisy computer fans. A quiet, controlled side of an ordinary room is usually more useful than putting the singer into a tiny untreated closet. Hang absorption behind and around the singer when it genuinely reduces reflections, but keep ventilation and comfort in mind.
Use a stable stand, shock mount where appropriate, and a pop filter. Start with the singer roughly a handspan from the microphone, then adjust for tone, plosives, room sound, and dynamics. Mark the standing position so later takes keep a similar distance.
Record a short spoken slate, a soft phrase, the loudest phrase, and a few sibilant words. Listen on headphones before the session begins. You’ll hear rumble, cable noise, clipping, excessive room reflections, and headphone bleed while fixes are still cheap.
Run a 60-second preflight
| Test | What to listen for | Fix before recording |
|---|---|---|
| Silence with the track armed | Fan, HVAC, electrical hum, headphone spill | Move or mute the source; do not expect a gate to restore lost detail. |
| Soft verse phrase | Noise floor, mouth noise, unstable distance | Adjust position and cue level before adding more preamp gain. |
| Loudest chorus phrase | Preamp or converter overload | Lower interface gain and repeat at real performance intensity. |
| Plosive and sibilant words | Air blasts, harsh esses, capsule angle problems | Move the pop filter or angle the mic slightly off-axis. |
| Ten seconds with the full cue mix | Delay, hollow doubling, distracting reverb, bleed | Choose one monitor path and simplify the headphone mix. |
Create the Logic Pro recording track
- Create a mono audio track.
- Select the interface input connected to the microphone.
- Route the track to the main headphone/output path.
- Turn on Record Enable and, when needed, Input Monitoring.
- Set the project sample rate before recording.
- Save the project with audio assets copied into it.
Apple’s live-audio recording guide confirms the core sequence: select the audio track, position the playhead, optionally set the metronome, press R, perform, and press Space to stop.
Do not change the sample rate after recording has started merely because another number looks more professional. Apple’s sample-rate guidance warns that changing it after audio is recorded or imported can create playback problems. Use the production’s agreed rate from the beginning.
In Logic Pro → Settings → Recording, choose the file type and bit depth for new recordings. Apple’s current recording-settings reference calls 24-bit the most commonly used depth and says to match the setting to the audio device. WAVE (BWF) is the safest interchange choice when another system will receive the files. More bits won’t repair analog preamp clipping, a distorted microphone, or a bad room.
Set input gain without chasing a magic number
Adjust recording gain on the audio interface, not with the Logic track fader. The fader changes playback level. It won’t rescue an overloaded preamp or converter.
- Ask the singer to perform the loudest section at real session intensity.
- Raise interface gain until the signal is healthy and comfortably above room noise.
- Leave clear headroom below 0 dBFS for unexpected peaks.
- If the interface clips, lower its preamp gain and repeat the loud passage.
Modern 24-bit recording gives you room to leave margin. A clean conservative level is easier to mix than a clipped take. If the microphone remains unusually quiet even with correct routing and gain, use the quiet-microphone troubleshooting guide.
Do not chase one internet peak number. Meter behaviour varies with the voice, microphone, interface and whether you’re looking at peak or average level. The rule is simpler: the loudest real phrase must stay clean at the interface and in Logic, with enough margin for a more forceful take.
Build a headphone mix that supports the take
The performer should hear pitch, timing, and emotion without fighting the track. Start with the vocal and one or two anchors—often drums, bass, or piano—then add only what helps.
Direct monitoring
Many interfaces can route the microphone straight to headphones before the signal returns from Logic. This is the most reliable low-latency option, but the monitored vocal may be dry unless the interface provides its own effects. Avoid hearing both direct and software-monitored vocal at once. That tiny timing difference can create a hollow or doubled sound.
Software monitoring
Use Logic input monitoring when the singer needs plug-ins in the headphone path. Keep the I/O buffer small enough for comfortable performance, strip latency-heavy processing out of the path, and turn on Record → Low Latency Mode when you need it.
Apple’s current latency guide explains that smaller buffers reduce monitoring latency and that Low Latency Mode routes around latency-inducing plug-ins. The monitored sound can change when those plug-ins are bypassed, so verify the cue mix after enabling it. For a deeper repair path, use the Logic Pro latency guide.
| What the singer needs | Best starting path | Important limitation |
|---|---|---|
| Maximum timing confidence | Interface direct monitoring | Logic plug-ins may not be audible in the cue. |
| Reverb or pitch context in headphones | Software monitoring with a small stable buffer | Round-trip latency remains and heavy plug-ins can worsen it. |
| A dense mix project that cannot run a small buffer | Direct monitoring, or print/freeze/disable heavy paths | Low Latency Mode can change the monitored processing. |
Record vocals in Logic Pro
- Save the project and name the track clearly.
- Choose the correct mono input and record-enable the track.
- Set interface gain from the loudest real phrase.
- Choose direct monitoring or configure a low-latency Logic cue path.
- Set a count-in or pre-roll and give the singer a useful lead-in.
- Record two or three complete passes before targeting individual phrases.
- Capture pickups for weak sections while the microphone position and vocal tone are unchanged.
- Save, label the takes, and create a protected project copy before comping.
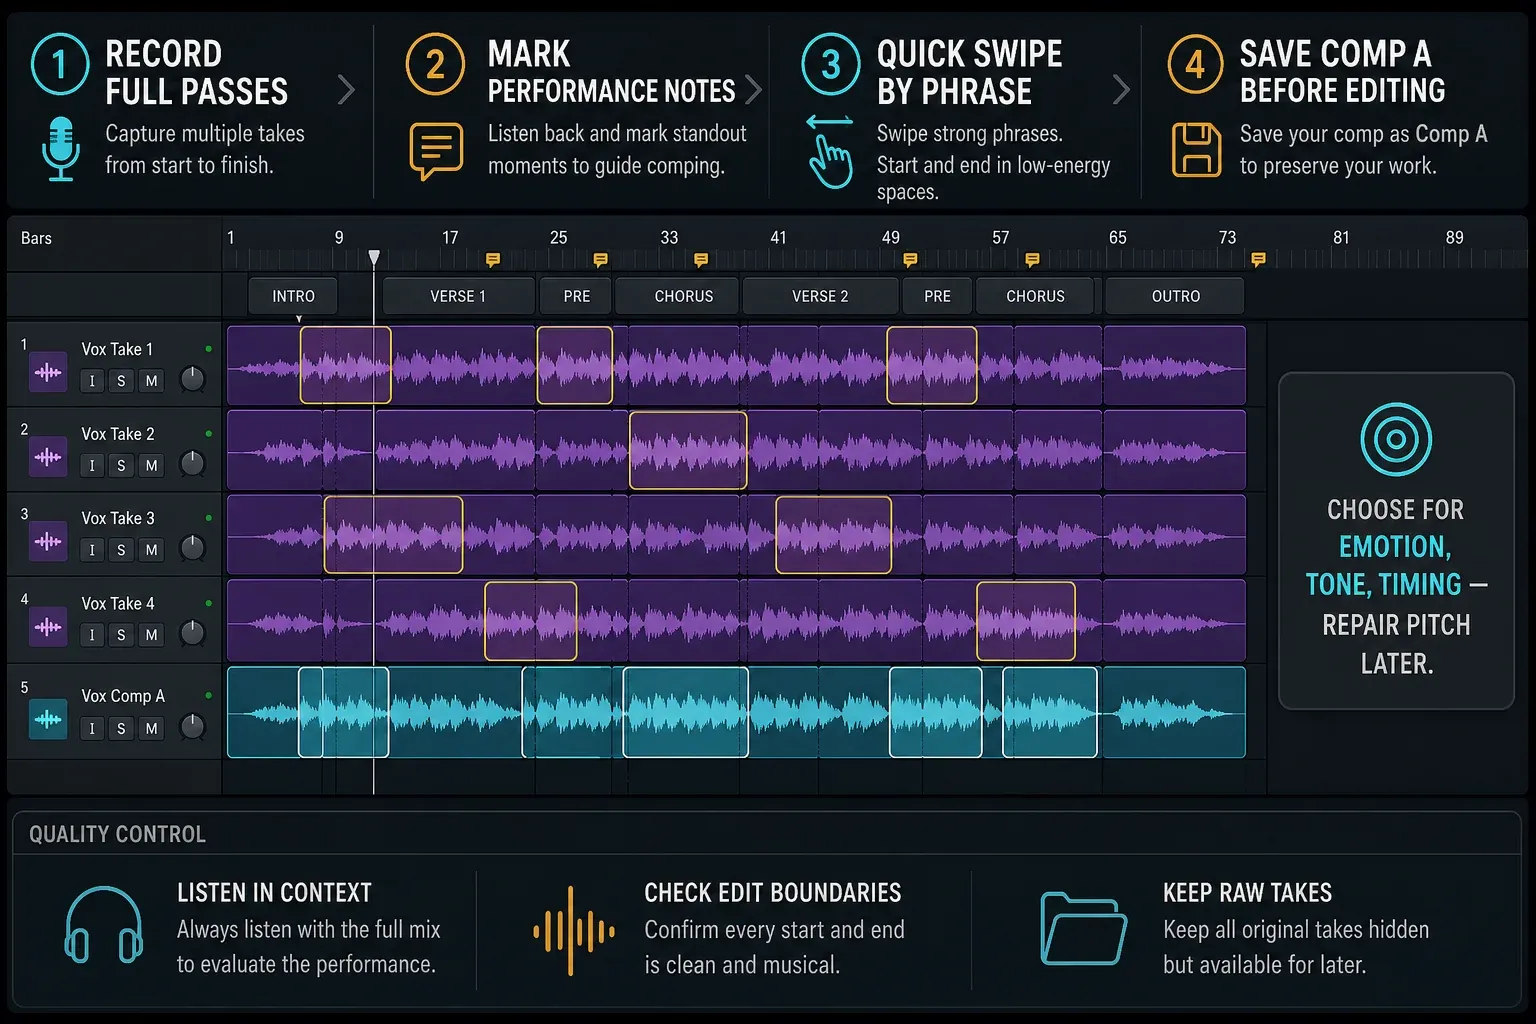
Don’t stop after every minor imperfection. Full passes preserve narrative, breath, and transitions. Pickups solve genuine weak spots afterward. Make brief notes such as “best emotion,” “clean first verse,” or “strong ending” instead of judging only by take number.
If the take happened before Record
Current Logic Pro can recover a recent audio performance with Flashback Capture. For audio, Logic must have been receiving the intended input while the project was playing. The feature temporarily retains eligible incoming performance data. Recover the region immediately, verify its placement and input, and treat it as a safety net—not permission to skip record-enable, routing and level checks.
Use cycle recording and take folders
For a difficult phrase, set a cycle area with enough lead-in and release. In Record → Overlapping Audio Recordings → Cycle, choose Create Take Folder. Press R and let Logic capture repeated passes until you stop.
Apple’s take-recording instructions confirm that a take folder is created after repeated cycle passes and can hold each performance for selection or comping. Avoid an exhausting loop: a few intentional passes followed by a short reset usually produce more useful choices than endless repetition.
Build a musical vocal comp
- Duplicate the take folder or save a new comp before editing.
- Listen to every full take without looking at the waveform.
- Choose the take with the strongest overall performance as the base.
- Open the take folder and use Quick Swipe Comping to select better phrases from other takes.
- Place boundaries in low-energy spaces where possible, not through consonants or sustained vowels.
- Listen across each edit with the instrumental, then solo only to diagnose clicks or breaths.
- Keep alternate comps for major artistic choices instead of destroying the previous version.
Comping is performance editing, not a hunt for the visually smoothest waveform. Pitch can be corrected later. Mismatched emotion, distance, or vocal weight is harder to hide. Choose believable transitions first.
Before the first swipe, use Duplicate Comp from the Take Folder pop-up menu. Apple’s Logic Pro 12 comp guide confirms that duplicating preserves the current comp while later changes create another version. Name choices for their purpose—Comp A emotion, Comp B tight—instead of relying on anonymous numbers.
Clean the comp without over-editing
Trim obvious count-ins, headphone knocks, and unused noise while preserving natural breaths that carry phrasing. Add short fades where edits create clicks. Use clip or region gain for extreme phrase differences before asking a compressor to solve them.
Keep tuning, timing, and mix processing separate from the original recording folder. Once the comp is approved, duplicate or flatten only in a protected copy. Continue with selective Flex Pitch correction only where the performance needs it, then move to the vocal-mixing workflow.
Final vocal-recording QC
- The raw take folder still exists and a named comp was duplicated before destructive editing.
- The loudest sections contain no interface clipping, clicks or unintended monitor doubling.
- Every comp boundary was auditioned before and after the edit in the full mix.
- Breaths support the phrase; obvious noise is faded without chopping natural word starts or tails.
- The project, audio files and a rough reference bounce are saved before tuning or mix processing begins.
More recording and editing lessons are organized in the Logic Pro tutorials hub.
Frequently asked questions
Should I record vocals in mono or stereo in Logic Pro?
Record a single microphone to a mono audio track. A mono source does not gain useful width from being recorded as an empty or duplicated stereo pair.
Why do I hear my voice twice while recording?
You are likely hearing both interface direct monitoring and Logic software monitoring. Disable one monitoring path so the dry and delayed signals do not overlap.
What buffer size should I use for vocals in Logic Pro?
Use the smallest stable buffer your project and Mac can handle while recording, then raise it for mixing. If latency remains, check plug-ins, Low Latency Mode, and the interface’s direct-monitoring option.
How do I record multiple vocal takes in Logic Pro?
Set Overlapping Audio Recordings in Cycle mode to Create Take Folder, define a cycle range, and record repeated passes. Logic stores them in a take folder for selection and comping.
Should I add compression while recording vocals?
Record cleanly unless you understand and intentionally commit hardware or plug-in processing. Monitoring through gentle effects can help performance, but keep the captured signal recoverable when possible.
Can Logic Pro recover a vocal take if I forgot to press Record?
Sometimes. Flashback Capture can recover recent incoming audio when the project was playing and the intended audio input was being received. Add the recovered region immediately and verify its input, timing and level; it is a safety feature, not a replacement for a recording preflight.


