Logic Pro Not Recording Audio: Fix the Signal Path
A signal-path diagnosis for Logic Pro recording failures, from macOS permission and Mic Mode to track input and interface routing.

If Logic Pro is not recording audio, start with the input meter on the audio track you intend to record. Stop playback, select that track, and sing or play into the connected input. A moving output or aux meter can be unrelated to that source. The checks below separate missing input, a recording that never starts, and a recorded region you cannot hear.
For Logic Pro on Mac. Checked September 13, 2026 against Apple’s recording and audio settings documentation and Focusrite’s Mic Mode guidance. Older versions may use Preferences instead of Settings.
First test: allow Logic under System Settings > Privacy & Security > Microphone, select your Input Device in Logic Pro > Settings > Audio > Devices, and assign an audio track to the input you plugged into. Select the track, then click Record in the control bar. The track’s R button makes it ready; it does not start the recording. If macOS offers Mic Mode for Logic, choose Standard.
Logic Pro not recording audio: quick checklist
- Confirm the microphone, cable, interface input, gain, and any required power are correct.
- Quit Logic and enable its macOS microphone permission.
- Reopen Logic and choose the correct Input Device in Audio settings.
- Set Mic Mode to Standard for Logic, if the Mic Modes menu is available.
- Create an audio track, not a software instrument track.
- Set the track’s Input slot to the same physical interface input.
- Select the intended audio track, make it record-ready, and watch its input meter while singing or playing. Stop other playback for this check.
- Click Record in the control bar, perform a short test, then click Stop. A new audio region should appear. If it does not, repeat in a new empty project.
Watch the source input meter on the interface, not its playback or monitor-mix meter. If that input responds but the intended Logic track does not, check the device and track assignments below. If the track responds to your live source, check whether recording actually starts and creates a region before changing drivers.
| Symptom | Check next |
|---|---|
| No signal on source input meter | Microphone, cable, source type, gain, required phantom power, interface routing |
| Source input meter moves; intended Logic track is flat | macOS permission, Input Device, Mic Mode, track Input slot |
| Live input reaches track; no region is created | Audio track, control-bar Record, recording path, storage, new-project test |
| Region is created but cannot be heard | Output Device, channel output, mute/solo, monitoring and playback routing |
| Recording exists but waveform looks tiny | Listen to the saved region; waveform zoom changes the display, not the recording |
1. Allow Logic Pro to use audio inputs in macOS
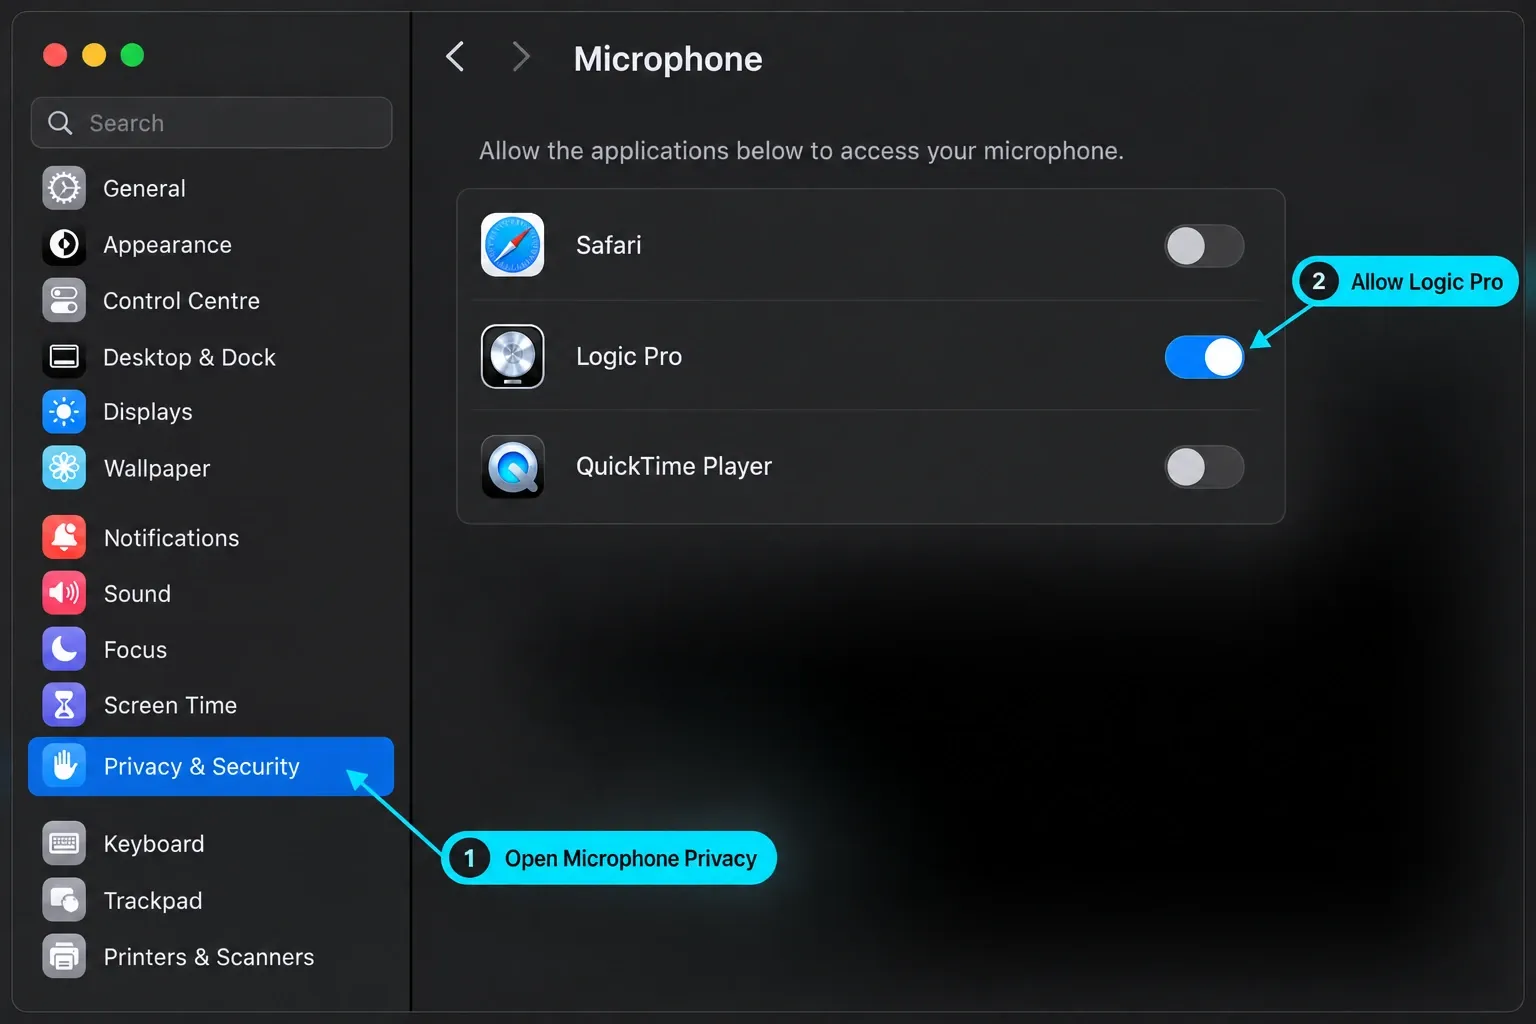
The macOS Microphone permission covers the built-in microphone, USB microphones, and external interface inputs. Without it, the app may report that audio input is inaccessible, or show no input level or waveform when you try to record.
- Quit Logic Pro.
- Open System Settings > Privacy & Security > Microphone.
- Turn on Logic Pro.
- Reopen Logic and record a short test.
Those are Apple’s steps for allowing external audio recording on macOS Ventura or later. On Monterey and earlier supported systems, use System Preferences > Security & Privacy > Privacy > Microphone instead. If Logic is not listed, reopen it and try recording from an audio input so it can request access. Leave preference resets until the device and project checks are done.
2. Select the correct Core Audio input device
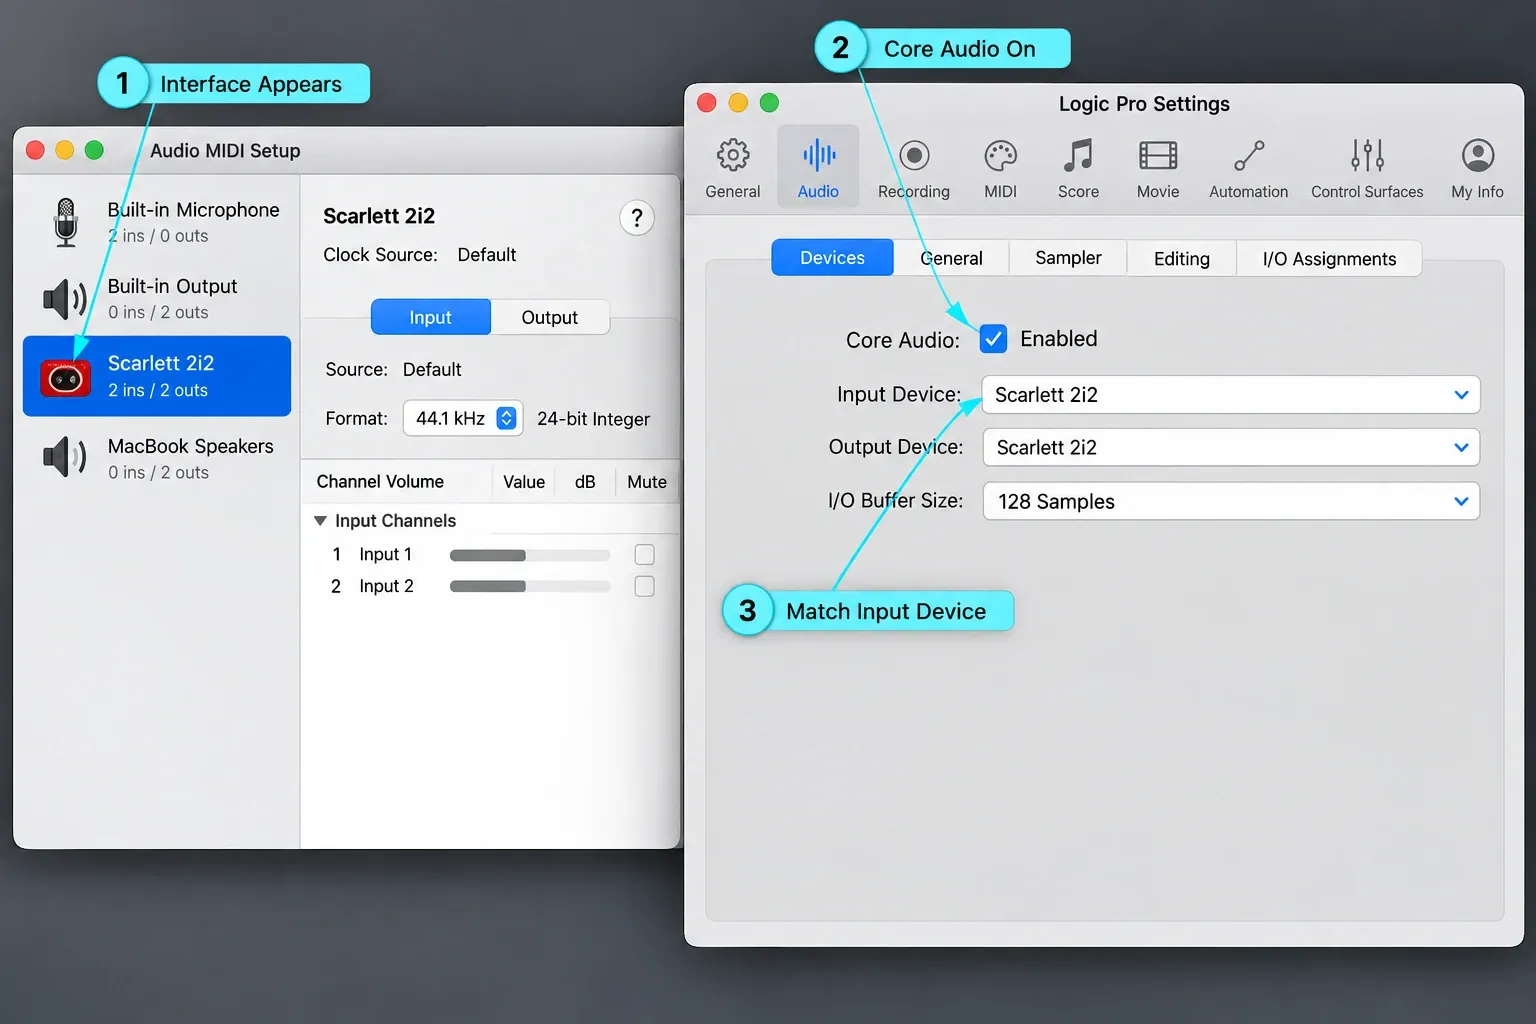
Open Logic Pro > Settings > Audio > Devices. Confirm Core Audio is enabled and choose the interface or USB microphone from the Input Device menu. If the same interface also handles monitoring, selecting it as the Output Device keeps the signal path simple.
Apple’s connected audio device guide says Logic recognises installed Core Audio hardware and uses device settings defined in Audio MIDI Setup. Some class-compliant interfaces need no additional driver. Others require current vendor software. Use the manufacturer’s compatibility page for the exact interface, macOS version, and connection type rather than installing an old driver from an unrelated model.
After changing a device, let Logic apply the change before testing. If the interface doesn’t appear, check whether macOS sees it in Applications > Utilities > Audio MIDI Setup. A device absent there isn’t yet a Logic track-routing problem. Continue with the audio-interface detection checks.
3. Set macOS Mic Mode to Standard
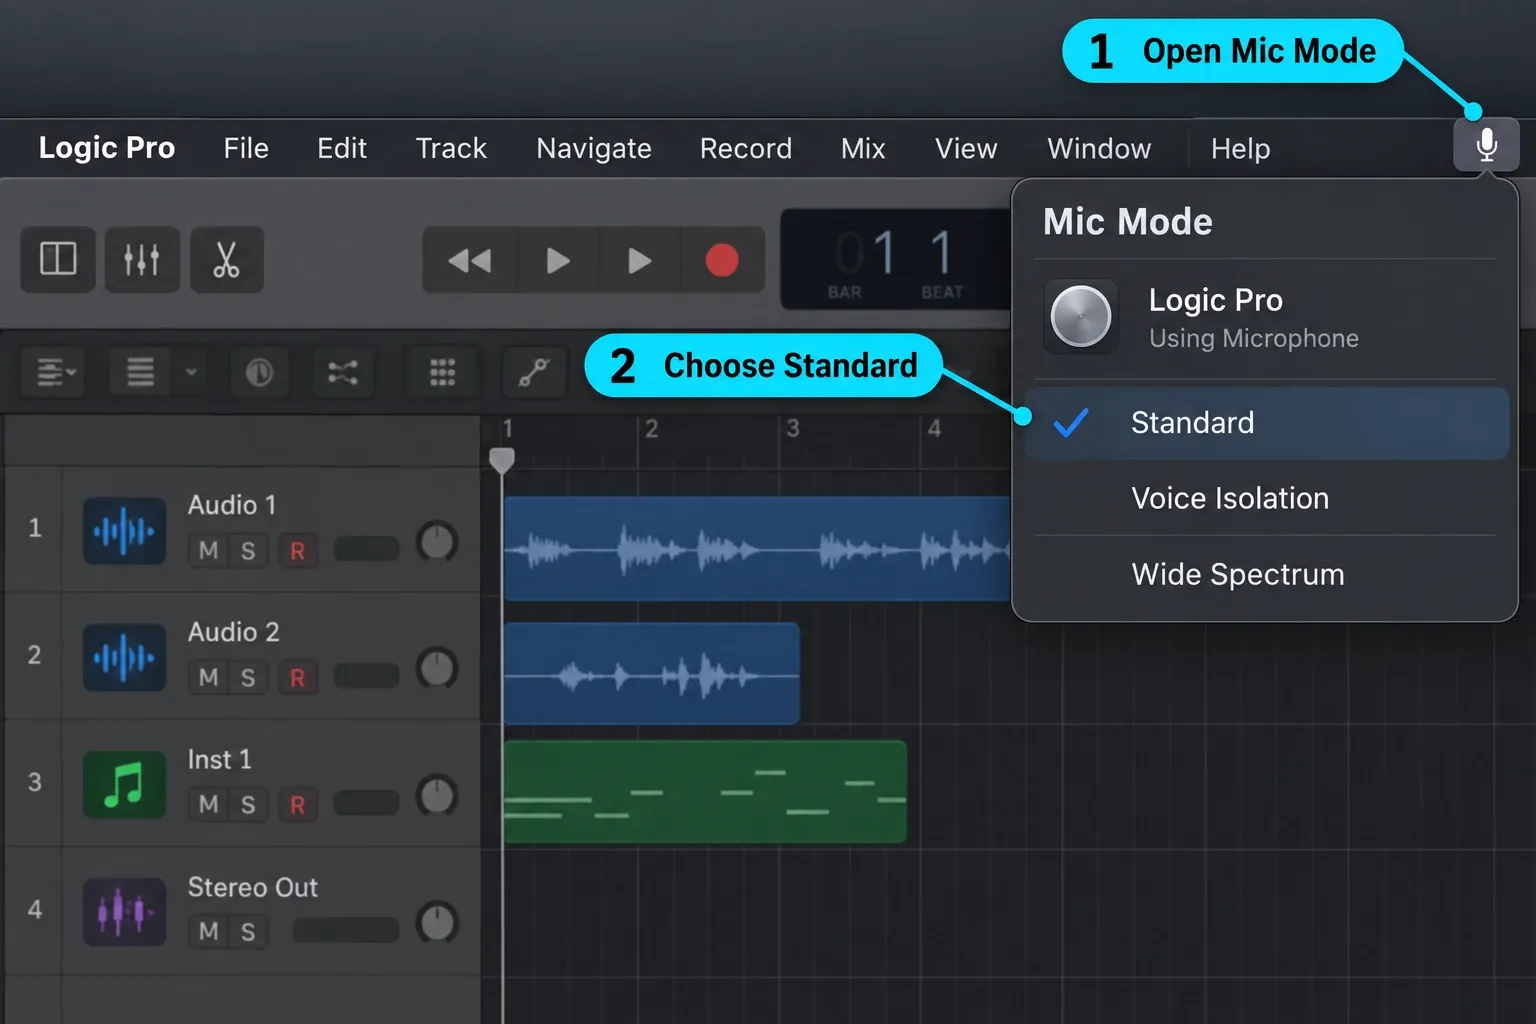
With Logic using an audio input, click the Mic Modes icon in the menu bar. If several apps appear, select Logic, then choose Standard. If no Mic Modes icon appears for the app, Apple says the setting does not apply; continue with the track input checks.
Focusrite documents a channel-mapping problem with Voice Isolation: tracks assigned to different inputs can both receive Input 1, while a source on Input 2 or above may be missing. Voice Isolation can also alter instruments because it is designed to isolate speech. Switch to Standard before changing the track routing to compensate.
That behaviour is documented for Focusrite interfaces in its Sonoma, Sequoia, and Tahoe input guidance. Apple also recommends Standard for creative audio apps using other devices; do not assume every interface has identical channel-mapping behaviour.
4. Match the Logic track to the physical input
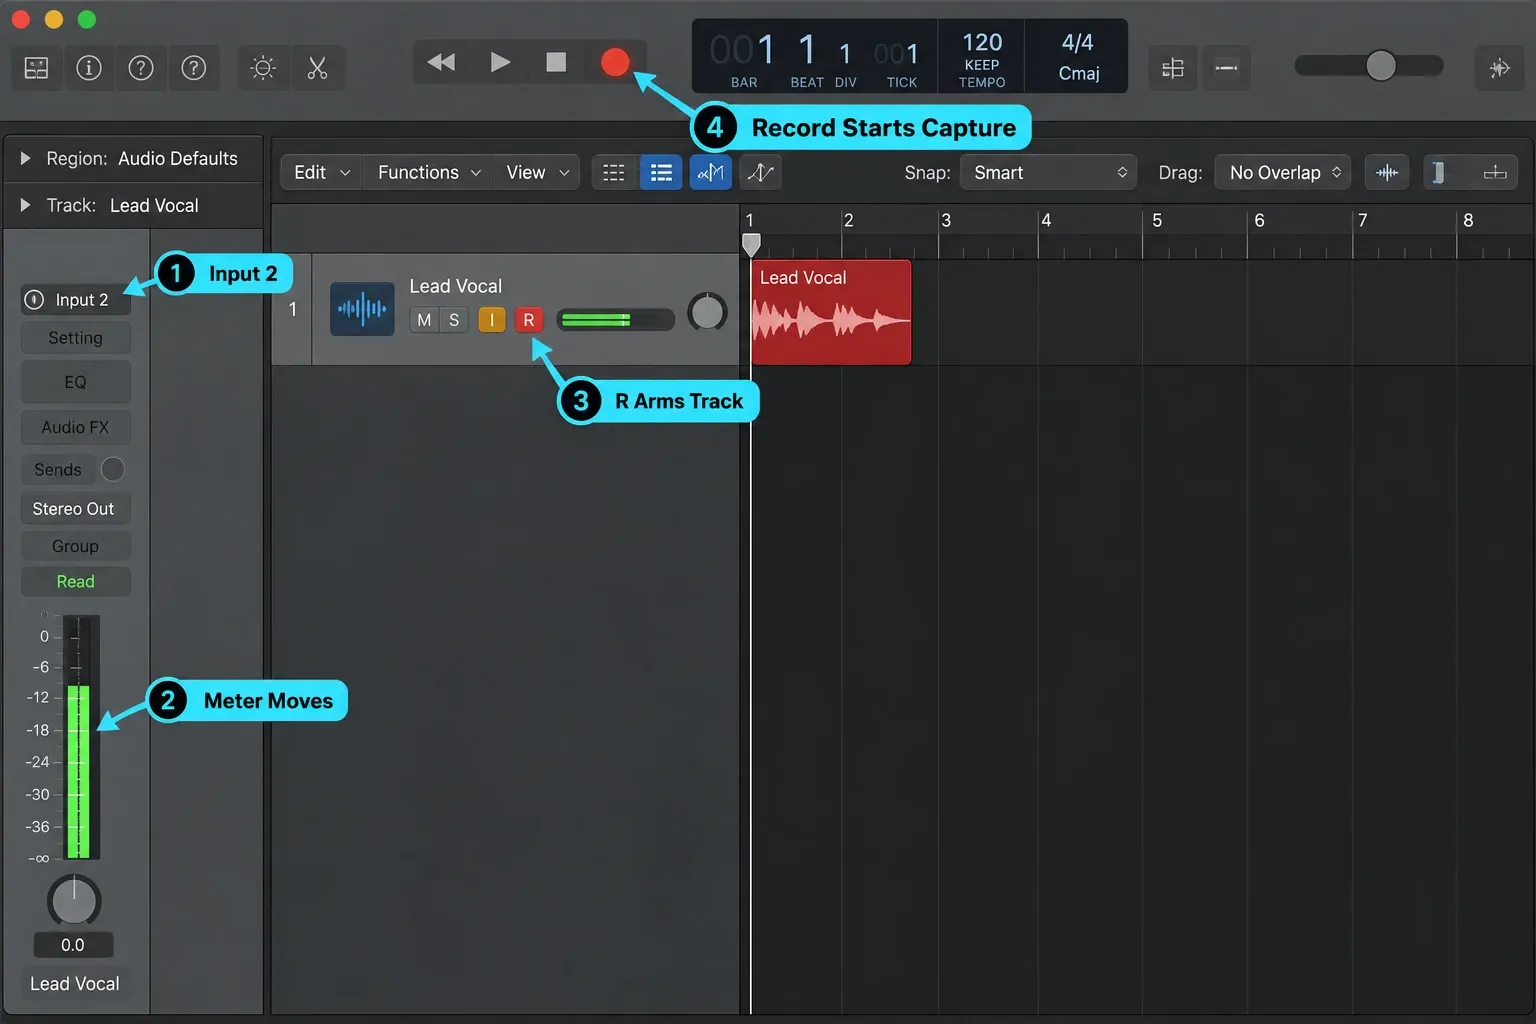
Create a mono audio track for one microphone or guitar input. In the Inspector or Mixer, set its Input slot to the physical socket in use: Input 1, Input 2, and so on. Input 1 means a hardware channel, not track number one. For a stereo source, choose its matching input pair. If you use an aggregate device or a custom interface mixer, check its channel mapping rather than assuming the labels match the socket numbers.
For a single track, select it with no other track manually record-enabled. Apple’s record-ready track guide explains that the focused track can be ready automatically, with a red R on a gray button. You can also click the track’s R to arm it. Then click Record in the control bar to start, perform a short test, and click Stop. With default key commands, R on the keyboard starts recording and Space stops it. For several different input sources, assign each to its own track input and enable each track’s R button.
If R or I is missing, first select a valid audio input instead of No Input. Apple documents hidden buttons for No Input; some versions show unavailable controls dimmed. Also open Track > Configure Track Header and enable the needed buttons under Buttons, as described in the track header controls guide. Do not reset the whole app just to restore a hidden track control.
5. Do not confuse input monitoring with recording
The I button monitors incoming audio; it does not start recording. To hear that input through Logic, Software Monitoring must be enabled in Logic Pro > Settings > Audio > General. Apple’s General Audio settings also include an option to monitor only the focused track. Your interface’s direct-monitor path is separate and can remain audible when Logic receives nothing.
Use the track meter to distinguish those cases:
- You hear direct monitoring, but the intended Logic track shows no live input: return to permission, Input Device, Mic Mode, and the track Input slot.
- Logic's meter moves, but you hear nothing: open the meter-led no-sound guide for Software Monitoring, track/output routing, headphones, and Output Device checks.
- You hear the source twice: both interface direct monitoring and Logic software monitoring may be active. Use one monitoring path unless the hardware workflow requires otherwise.
Logic Pro records a flat line or no visible waveform
First test the saved region, not the live microphone. Stop, turn off I, disarm the track, then play that region through a known working output. If it plays but the waveform looks small, use waveform zoom to inspect it. Zoom changes only the display. Increasing hardware input gain now will not change the file already recorded; it affects the next take. If the new take is genuinely too quiet, follow the low microphone recording-level checks and leave headroom for the loudest part. The channel fader changes monitoring or mix level, not the analog level captured at the interface input.
If the file is silent on a working playback route, recheck the source input meter, intended track input, Mic Mode, and interface mixer. If no region appears at all, confirm you clicked Record in the control bar. Save a new empty project on a writable local drive with free space and try again. Also check File > Project Settings > Recording > Audio Recording Path; Apple’s project asset guide documents that location. An unavailable external recording folder is a different problem from a microphone that sends no signal.
Use phantom power only as specified by the microphone, interface, and any inline equipment. Shure explains phantom power as a supply for condenser microphone electronics. It is not a universal remedy for missing input. Check the manuals for your exact setup before switching it on; a conventional passive dynamic microphone does not need it.
Interface, driver, cable, and USB troubleshooting
If the device still doesn’t work, isolate it without changing several variables at once:
- Save the project and restart the Mac. Turn down monitoring volume before disconnecting equipment.
- Check compatibility first, then install only the software or firmware the manufacturer recommends for your exact interface and macOS version.
- Connect the interface directly to a compatible Mac port for the test, using a known-good cable.
- Disconnect other external devices one at a time.
- If your Mac has a built-in microphone, select it as Logic’s Input Device and use the built-in output for a short recording test. Otherwise use another known working input device.
- Test the interface in a new empty Logic project.
If the alternative input records but the interface does not, compare the interface’s driver, physical input, and routing. This narrows the test; it does not prove the entire interface is faulty. Apple’s Logic troubleshooting sequence includes built-in-audio and new-project tests before preference resets. Use a copy of the original project when investigating project-specific faults.
Buffer size and Low Latency Mode are not no-input fixes
A smaller I/O buffer reduces software-monitoring delay but uses more processing power. Apple's current input-monitoring latency guidance says to use the lowest setting while recording, then increase it one step when a system-overload alert appears. Buffer size isn't a cure for a flat input meter.
Go to Logic Pro > Settings > Audio > Devices and adjust I/O Buffer Size only after the input is working. Low Latency Monitoring mode can help when plug-ins delay live monitoring, but neither setting grants microphone permission, selects the interface, or assigns a track input. Our Logic Pro latency guide covers that separate problem.
If recording stopped after a Logic or macOS update
Recheck microphone permission, Mic Mode, the selected Input Device, and vendor compatibility. Updates can expose an existing driver or plug-in incompatibility, but the update date alone doesn’t identify the cause.
Back up Logic and your projects before another update, and confirm support with the interface and plug-in developers. Our Logic Pro system requirements guide covers the app’s platform requirements; your interface still needs its own compatibility check. Do not delete settings or reformat a recording drive as a shortcut to fixing input.
Logic Pro recording FAQ
Why is Logic Pro not detecting my audio interface?
Check whether the interface appears in Audio MIDI Setup, then select it under Logic Pro > Settings > Audio > Devices. If macOS does not see it, check its cable, port, power, driver, firmware, and current macOS compatibility.
Why is Logic Pro recording a flat line?
If the file is silent on a working playback route, check microphone permission, Input Device, Mic Mode Standard, the track Input slot, and hardware input level. If the recording plays but its waveform looks small, use waveform zoom. Raising hardware gain affects a new take, not the existing file.
Why can I hear my microphone but Logic records nothing?
You may be hearing the interface’s direct-monitor path, not Logic. Stop playback and watch the intended audio track’s live input meter. If it is flat, check permission and input routing. If it responds, select or arm that track and click Record in the control bar. Arming alone does not create a recording.
Why is the Record Enable or Input Monitoring button missing?
Check that the audio track has a valid input rather than No Input. Apple documents hidden buttons for No Input; some versions show unavailable controls dimmed. Then open Track > Configure Track Header and select the required buttons in the Buttons section.
Does Logic Pro work with every USB audio interface?
No universal guarantee applies. Many Core Audio-compliant devices work without a separate driver, while others require vendor software. Check the exact interface against the current macOS and Logic versions.
Why does the mic work in GarageBand but not Logic Pro?
Check Logic’s own microphone permission first. Then compare its Input Device and track input with the working GarageBand setup and test a new empty Logic project. A successful recording in GarageBand narrows the problem, but does not rule out every driver or project-specific fault.
Why does the interface meter move while Logic stays flat?
First confirm that the interface meter is showing the live source input, not a playback or monitor mix. Then check macOS permission, Logic’s Input Device, Mic Mode Standard, interface software routing, and the intended audio track’s Input assignment.
After the test records successfully
Play the new region with live monitoring off and confirm it contains the performance you just recorded. Keep the working input and recording-path settings; there is no reason to keep resetting them. If a different symptom remains, use the Logic Pro troubleshooting hub to choose the matching fix.


