Why Is My Mic So Quiet in Logic Pro? 8 Fixes
Find whether the microphone input, monitor mix, playback path, or only the waveform display is quiet, then fix the right part of the Logic Pro signal path.

If Logic’s input meter barely moves, do not start with the track fader: it does not set the recording level. Choose the interface or USB microphone as Logic’s Input Device, select the matching mono input on the track, use the microphone input rather than a line input, turn off an unnecessary pad, enable 48V only if the microphone manual requires it, then raise the hardware gain while performing at the real volume.
If the input meter is healthy but your headphones are quiet, fix the monitoring path instead. And if playback sounds clean while only the region looks thin, change waveform zoom rather than recording another, hotter take. Watch the meter while you speak, record ten seconds, then play it back. Those checks separate capture, monitoring, and display problems.
Documentation checked September 14, 2026: the menu paths and Logic controls below were checked against Apple’s current microphone-recording guide, channel-strip reference, and current macOS audio documentation. Hardware advice is qualified because gain range, pad attenuation, phantom-power switching, and direct monitoring differ between interfaces.
New to the whole input-to-region workflow? Start with recording audio in Logic Pro. This page assumes the track can record and focuses on why the microphone level is wrong.
Before judging a low Logic meter, select Mix > Pre-Fader Metering and test on an audio track without level-changing plug-ins. Compare with the interface’s input meter or control app if available. Pre-fader means before the channel fader, not necessarily before every processor; do not raise hardware gain merely because a processed or low-fader signal looks quiet.
Diagnose the right problem first
- The input meter barely moves: work from the microphone toward Logic: cable, phantom power if required, pad, mic/line mode, interface gain, audio device, then track input.
- The meter is healthy but headphones are quiet: leave the recording gain alone and check the interface’s headphone level, direct-monitor mix, Logic fader, and output path.
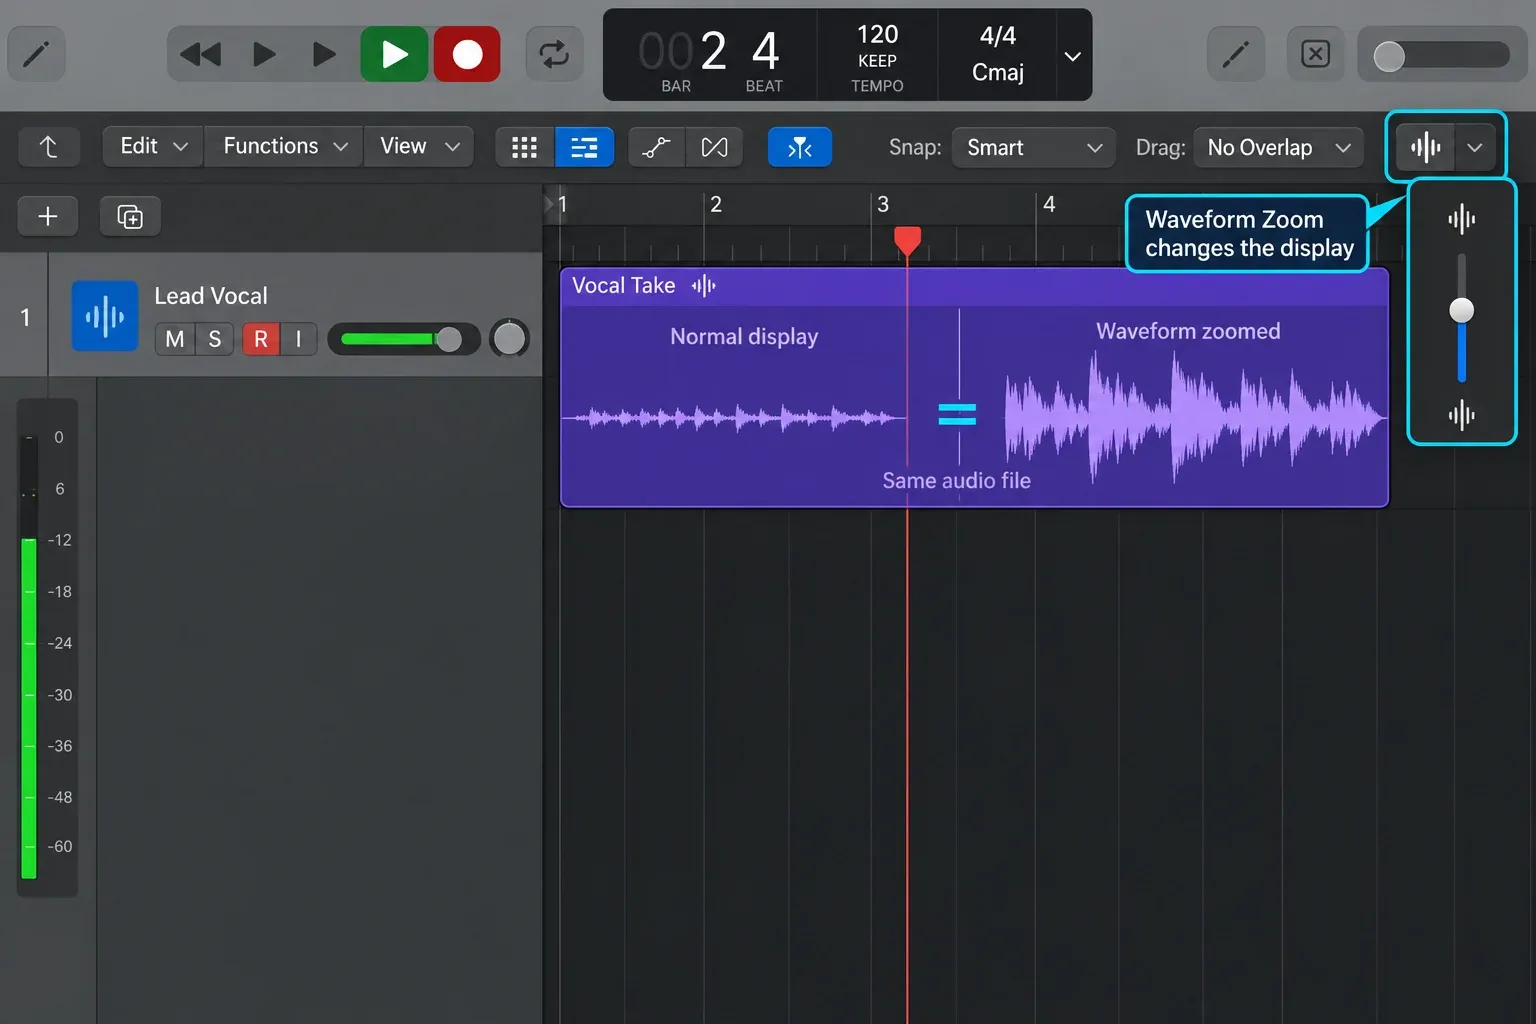
- The new region plays clearly but looks like a thin line: change waveform zoom before changing gain. Display size does not change the audio file.
- The soloed vocal is clear but disappears under the instrumental: the recording may be fine. Lower the backing track while tracking, then use the vocal-mixing workflow instead of recording another unnecessarily hot take.
If the meter never moves or Logic creates no audio region at all, this isn’t a low-level problem. Use the separate Logic Pro recording diagnostic for device, permission, Record Enable, and file-capture failures. If the symptom changes to no input, missing hardware, latency or no playback, use the matching branch in the Logic Pro troubleshooting hub instead of raising gain again.
1. Choose the right device and track input
Open Logic Pro > Settings > Audio > Devices. Set Input Device to the interface or USB microphone you’re actually using. Set Output Device to the device feeding your headphones or monitors. The two devices can differ, so a working output doesn’t prove that Logic is listening to the correct input.
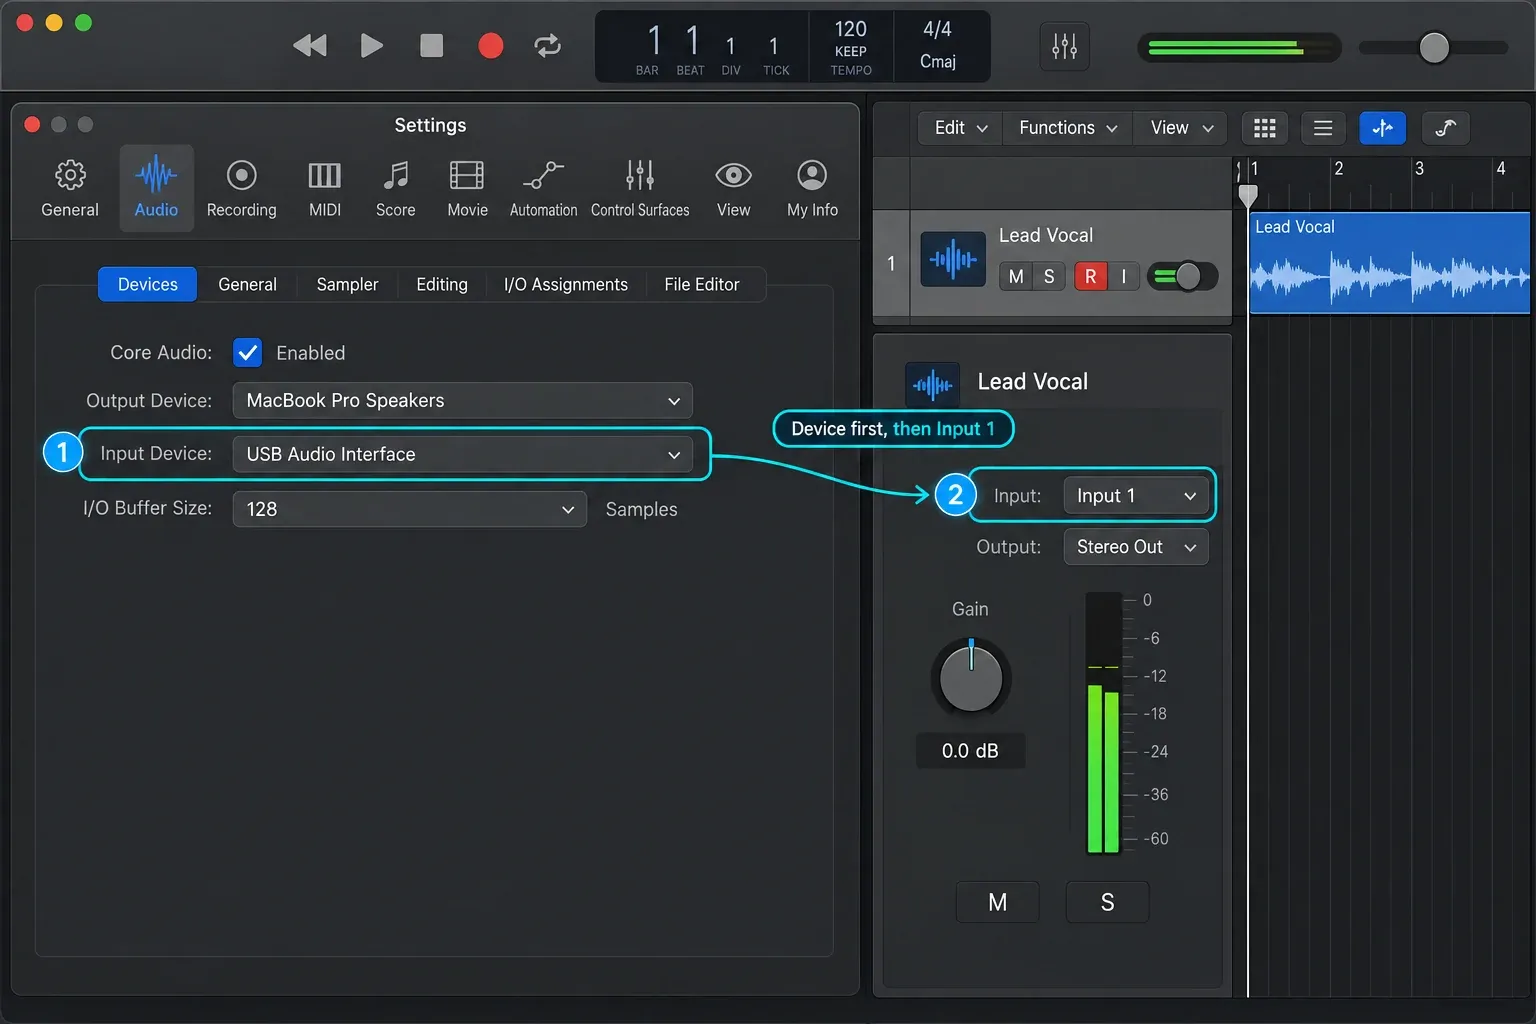
At the device level, make sure Logic isn’t listening to Built-in Microphone unless that’s what you intend to record. Then check the audio track itself. Its Input slot must match the physical socket: a microphone plugged into interface Input 1 normally belongs on a mono track using Input 1, not Input 1–2, Input 2, a bus, or No Input. Apple treats the device choice and the track’s input assignment as separate steps. Both have to be right.
If the recording is faint, distant, and roomy, Logic may be using the Mac’s built-in microphone instead of the mic in front of you. Speak close to the external microphone while watching Logic’s input meter, then repeat close to the Mac. The change is a clue, not proof: confirm the selected Input Device and the interface’s input routing before recording.
If the interface is missing from the Devices menu, stop changing gain. Check power and cabling, confirm that macOS can see the device in Audio MIDI Setup, and follow the audio-interface detection guide.
2. Set recording gain before the Logic fader
For a normal microphone input, the interface preamp sets the analog level before conversion. A USB microphone’s capture-level control may be analog or digital; check its manual rather than assuming where that control sits. Logic’s track fader changes playback and software-monitoring level. It doesn’t repair a weak signal upstream, and it won’t turn down an interface input that’s already clipping.
Once you’ve captured the signal cleanly, the Logic Pro gain-staging guide follows its level through region gain, plug-ins, buses, and Stereo Out.
- Put the microphone at the distance and angle you will actually use.
- Sing or speak the loudest real phrase from the take, not a softer test voice.
- Raise the interface or microphone gain while watching the input meter.
- Leave enough room for the performance to get louder. Apple marks amber and yellow meter activity as safe and red as clipping.
Focusrite’s current gain guidance gives a peak near -12 dBFS as one conservative digital-recording example. Treat that as a useful starting point, not a universal target. A whisper, drum close mic, active bass, and low-output dynamic microphone don’t need the same number. Clean signal, acceptable noise, and no clipping matter more than landing inside a narrow range.
Don’t judge the gain knob by its clock position. Focusrite notes that some microphone preamps provide most of their useful gain near the upper end of the dial. A dynamic microphone needing a high knob position isn’t automatically faulty. The problem is maxed-out gain combined with poor signal-to-noise ratio, distortion, or still-insufficient level.
3. Power the microphone correctly
Check the manual for the exact microphone. Many XLR condenser microphones need phantom power from the interface, commonly labeled 48V. Some condensers use a battery or their own power supply instead. Passive dynamic microphones usually don’t need phantom power. Active ribbon microphones and inline boosters may require it.
If the microphone manual calls for 48V:
- Turn the monitor or headphone level down and confirm phantom power is off before connecting anything.
- Connect the microphone with a proper XLR-to-XLR cable.
- Check every input affected by a shared 48V switch. Lower the input gain before switching it on. Enable the shared bank only when at least one connected device requires phantom power and every affected device and connection supports it. Allow the microphone and interface to stabilize as their manuals specify before raising gain or listening levels.
- Turn phantom power off before unplugging the microphone.
Do not use “condenser equals 48V” as the whole rule. Focusrite’s phantom-power guide and Shure’s balanced-microphone explanation cover different cautions: Focusrite warns about vulnerable equipment and checking microphone documentation; Shure explains why a balanced dynamic microphone generally does not draw phantom-power current. Modern balanced dynamic microphones generally tolerate phantom power under normal conditions, but there’s no benefit in leaving it on when none of the connected equipment needs it.
4. Check pad, mic/line mode, and the cable
A pad deliberately attenuates a source that’s too hot for the preamp. If it’s engaged on a quiet microphone, switch it off and test again. The amount of attenuation varies by device, so read the label or manual instead of assuming every PAD button means -20 dB.
If your interface provides an input-type selector, choose Mic rather than Line or Instrument. On many Focusrite interfaces, using the XLR socket selects the microphone input without a separate Mic switch. A microphone should normally reach the interface’s microphone preamp through XLR. Focusrite’s current low-signal guidance warns that feeding a microphone into a quarter-inch line/instrument input with the wrong cable usually won’t work properly.
Before repatching, turn listening levels down and switch phantom power off. Then simplify the signal path one component at a time, keeping any power supply the microphone requires. Try a known-good XLR cable and another suitable mic input if available. Check the phantom-power requirements again before reconnecting and powering the revised chain. This helps distinguish a routing problem from a cable, preamp-channel or microphone fault.
5. Set Mic Mode to Standard
With Logic Pro open and using an audio input, click the Mic Modes icon in the macOS menu bar. If more than one supported app is open, choose Logic Pro, then select Standard. If the icon is absent, Apple says Mic Modes doesn’t apply to the app in that state.
This check matters most when the microphone suddenly sounds gated, thin, muffled, or processed even though the hardware gain didn’t change. Apple’s Logic Pro Mic Mode warning says non-Standard modes are designed for calls and video conferences and alter external sources as well as the Mac’s built-in microphone. They’re not a substitute for a clean recording path.
6. Allow Logic Pro to use the microphone
Open System Settings > Privacy & Security > Microphone and turn access on for Logic Pro. Save your project, then quit and reopen Logic after changing the permission. Apple’s microphone-access instructions apply this permission to apps using the Mac’s microphone and audio input.
A denied permission normally causes no usable input rather than a reliably “slightly quieter” signal. If you’re still seeing a weak meter after permission is granted, keep working upstream through the device, preamp, pad, cable, and microphone rather than toggling privacy settings repeatedly.
7. Check compatible-interface controls inside Logic
When a compatible audio interface is connected, Logic can show audio-device controls at the top of an audio channel strip. Apple’s current reference includes an Input Type slot, phantom-power button, input-gain display and knob, filter, phase, and direct-hardware-monitoring controls. Your interface may expose all, some, or none of them.
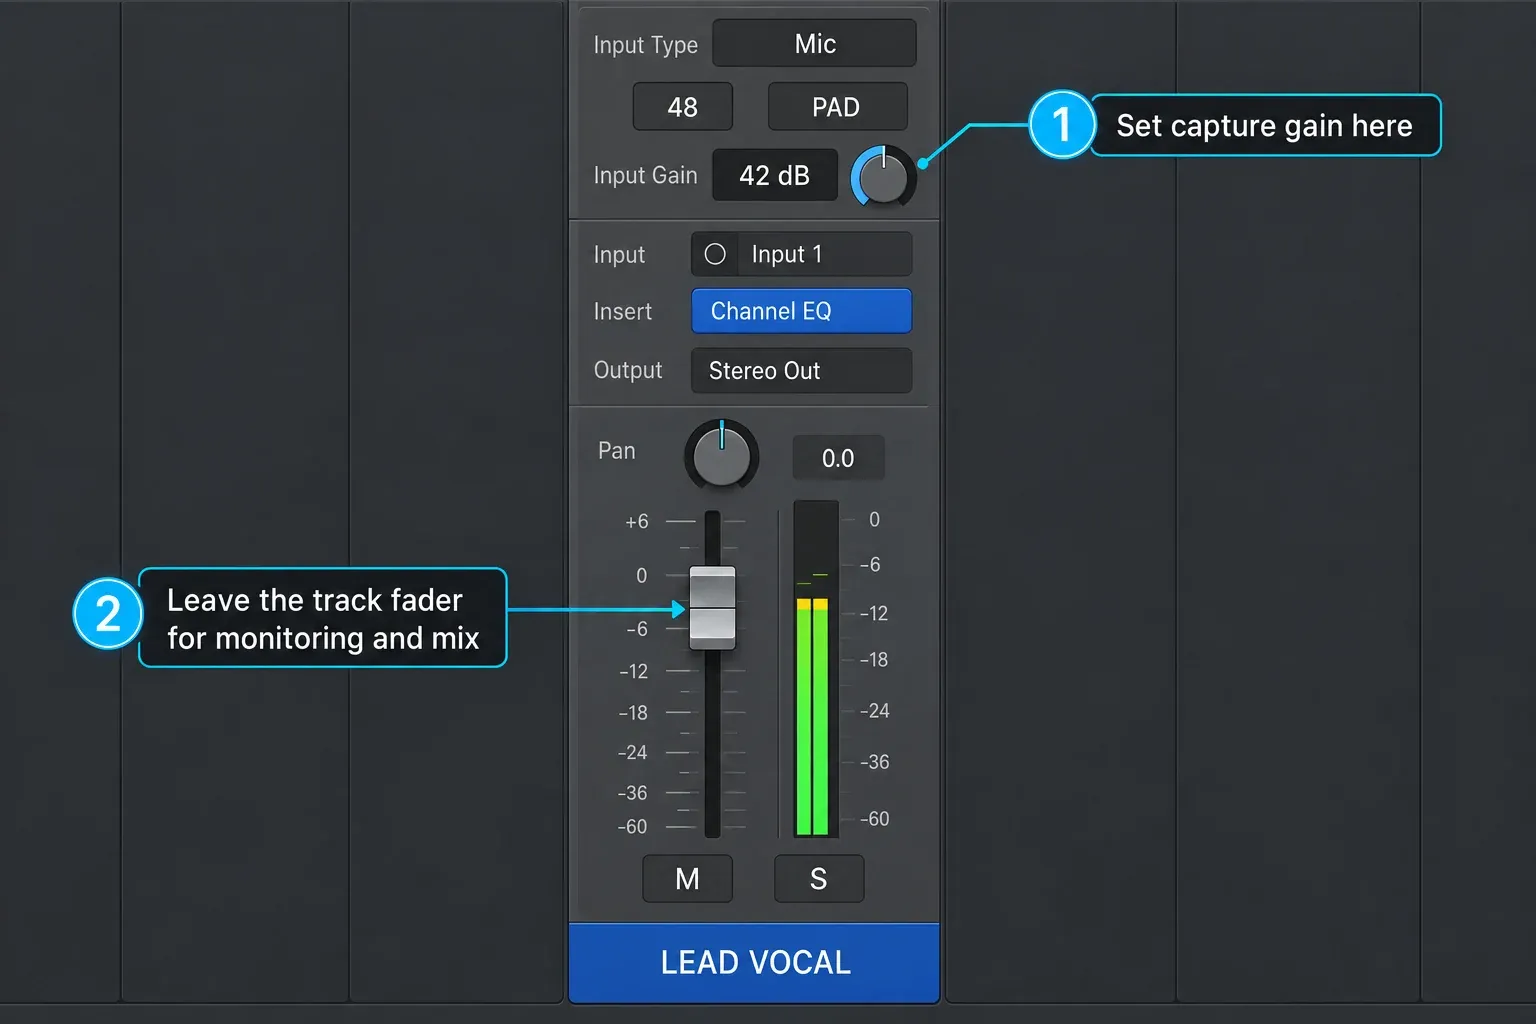
If these controls appear, confirm Mic rather than Line, the required phantom-power state, and sensible input gain. If they don’t appear, use the interface’s hardware controls or companion software. Do not add a Gain plug-in to “fix” the recording path: plug-ins can raise the signal after it reaches Logic, but they can’t improve a noisy preamp capture or undo analog clipping.
8. Check USB or built-in microphone input volume
For a USB microphone or the Mac’s built-in microphone, open System Settings > Sound > Input, select the device, and watch its input meter. If macOS exposes an Input volume slider for that device, raise it while speaking at the real recording distance. Apple’s Sound input guide documents that control. Some USB microphones put gain in a physical knob or their own control app instead, so the macOS slider may be absent or not be the only gain stage.
A USB microphone already contains its own converter and connects directly to the Mac. Phantom power on a separate interface won’t make that USB signal louder. Select the USB microphone itself as Logic’s Input Device, then choose its correct channel or stereo pair according to the microphone’s recording mode.
When the recording is fine but monitoring is quiet
If Logic’s input meter is healthy and the recorded region plays back cleanly when soloed, stop increasing preamp gain. Check the listening path instead:
- Raise the interface’s headphone or monitor-output level gradually to a comfortable listening level.
- If the interface has an Input/Playback blend knob, move it toward Input while recording. If it has a Direct Monitor button instead, use the hardware manual to select the required monitoring mode.
- For monitoring through Logic, enable Software Monitoring in Logic Pro > Settings > Audio > General, then enable the track’s Input Monitoring button. If focused-track-only monitoring is selected, focus that track too. Adjust the track fader or cue send without changing capture gain.
- Lower the instrumental or reference track for the performer rather than forcing the microphone input near clipping.
- Use one monitoring path at a time. Direct and software monitoring together can sound doubled or hollow.
Apple’s pre-recording checklist makes the same separation: monitoring level controls what you hear, not the recorded level. If software monitoring is late, use the Logic Pro latency checklist instead of raising gain.
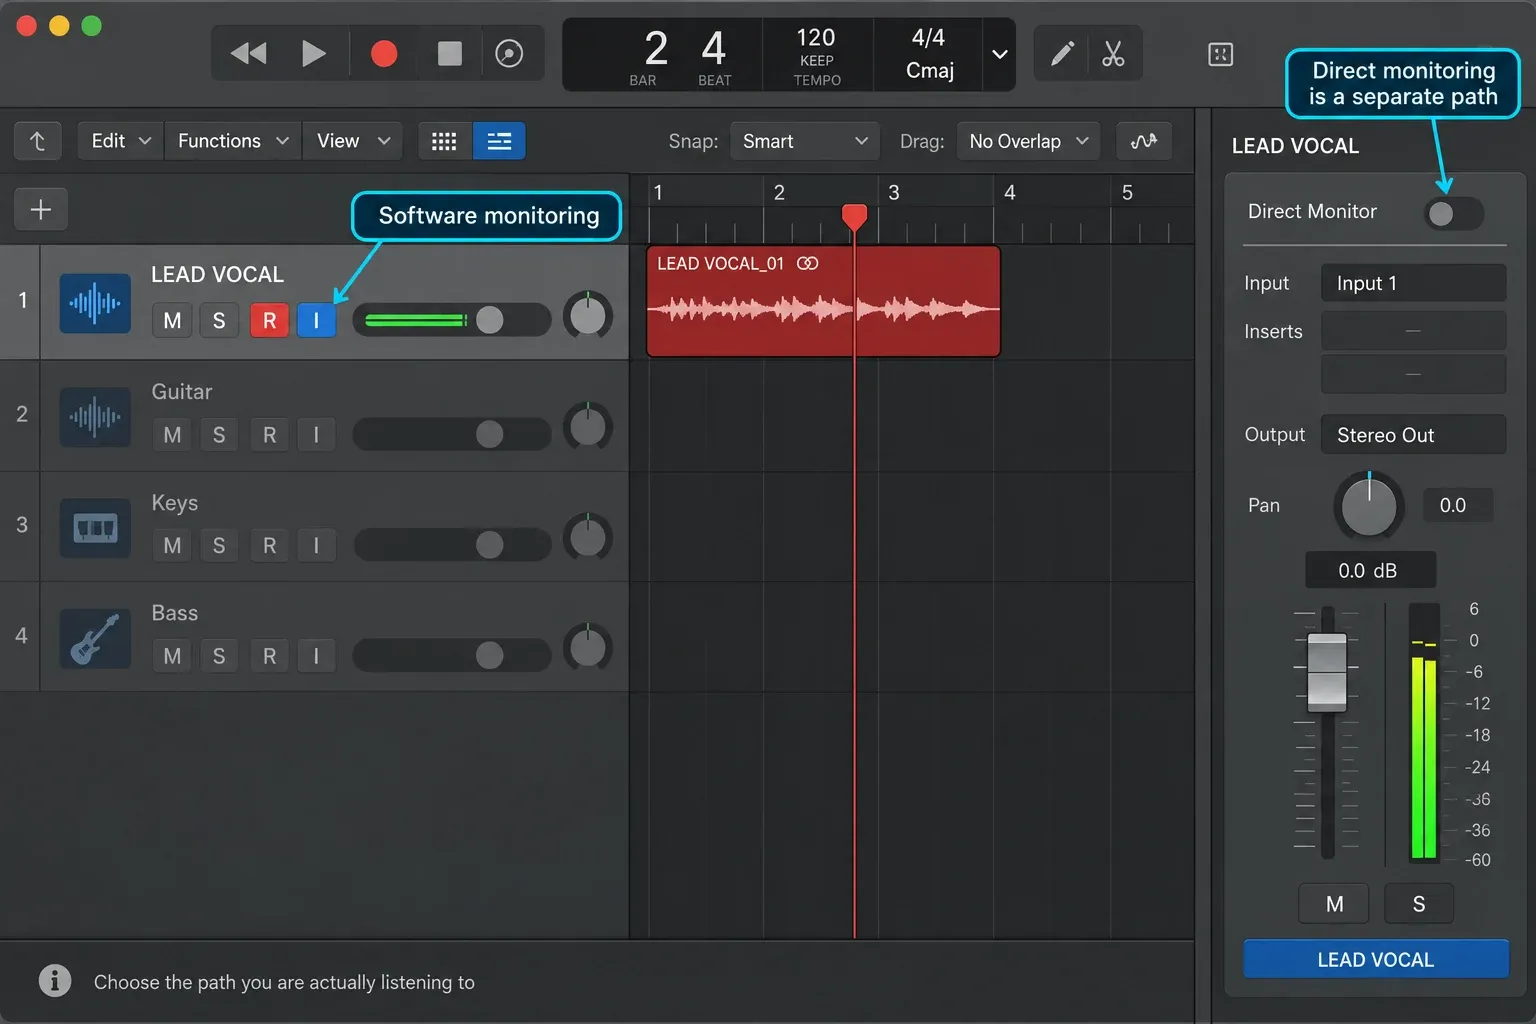
If the level drops after you stop recording, check Logic Pro > Settings > Audio > General > Independent monitoring level for record-enabled channel strips. When enabled, it lets you change the monitoring fader while a track is record-enabled and restores its original level when you disarm it. That change affects listening level, not the captured file.
When the waveform only looks too small
A thin-looking region is evidence to investigate, not a verdict. Logic has waveform and Tracks-area zoom controls that change the drawing without changing a sample in the file. Double-click the recorded audio region to open the Audio Track Editor. In its menu bar, click-hold the Waveform Zoom button, then drag the slider vertically. For a playback-only check, turn off the track’s Input Monitoring and Record Enable buttons and silence the interface’s direct-monitor path. Reset the peak display before replaying the region so you are reading the new playback pass. Solo the recorded region and compare its playback meter and peak display without the live microphone mixed in.
If the file is genuinely clean but lower than the rest of the session, you can adjust Region Gain non-destructively during editing. That’s different from repairing the input path. First make sure the quiet file isn’t carrying excessive room noise or preamp hiss that will become obvious when raised.
Quiet microphone checklist
- Watch the input meter, record ten seconds, and play it back.
- Choose the correct Input Device in Logic’s Audio settings.
- Choose the mono track input matching the physical socket.
- Set gain at the interface, USB microphone, or upstream preamp, not with the Logic fader.
- Check the exact microphone manual for phantom-power requirements.
- Turn off an unnecessary pad and use the microphone input; select Mic if the interface offers an input-type selector.
- Set macOS Mic Mode to Standard.
- Allow Logic Pro under Privacy & Security > Microphone.
- For USB or built-in microphones, check the device’s macOS or manufacturer gain control.
- If the recording is healthy, fix the monitor mix or waveform display instead of adding more input gain.
Frequently Asked Questions
Why is my mic quiet in Logic Pro even with the gain turned up?
Check the signal path rather than the knob position alone: the correct input device and track input, the microphone-level socket or mode, phantom power if the microphone requires it, an unnecessary pad, the XLR cable, and the microphone’s working distance. Some preamps need a high gain setting for low-output dynamic microphones. If maximum gain still produces a noisy, weak signal, test another cable, input, or microphone before adding more equipment.
Does the Logic Pro fader affect recording level?
No. The audio-track fader changes playback and software-monitoring level. Capture level is set upstream by the interface preamp, external preamp, USB microphone control, instrument output, or another hardware source. Compatible interfaces may expose their hardware input-gain control inside Logic.
What level should a microphone record at in Logic Pro?
Use a conservative level that stays above the noise floor and leaves room for the performance to get louder without clipping. A peak around -12 dBFS is a practical starting point from Focusrite’s digital-recording guidance, not a universal rule. Apple’s Logic meter guidance is simpler: amber and yellow are safe; red indicates clipping.
Why is the mic quiet in Logic Pro but not GarageBand?
Compare the selected input device, track input number, Mic Mode, and microphone permission in both apps. Do not assume they opened with identical device and routing choices. If both receive the same hardware input but only Logic is quiet, bypass Logic plug-ins and check its track, monitoring, and output routing. The Logic Pro vs GarageBand comparison explains the broader workflow differences.
Why does the waveform look small if the recording sounds fine?
Track height and waveform zoom can make the same recording look larger or smaller. If playback is clean, the meter is healthy, and the file has usable headroom, do not raise preamp gain just to draw a bigger waveform. Adjust the display, or use non-destructive Region Gain later if the file truly needs level matching.
Why can I hear my mic clearly while recording but playback is quiet?
You may be hearing direct monitoring from the interface at a comfortable headphone level while the preamp sends a low signal to Logic. Check a clean input path and the interface’s input meter during the take. For playback, turn off Input Monitoring and Record Enable and silence hardware direct monitoring. If the recorded input was low, revisit preamp gain; otherwise inspect playback routing and the backing-track level. Also check Independent monitoring level for record-enabled channel strips in Logic’s General Audio settings: when enabled, disarming restores the original fader level.


