How to Replace or Double Drum Sounds in Logic Pro
Turn a recorded kick, snare or tom into checked Sampler triggers. Choose replacement or doubling, catch quiet hits and fix mapping or timing before blending.

To replace a recorded drum in Logic Pro for Mac, select its audio track and choose Track > Replace or Double Drum Track. Logic detects transients and creates a new Sampler track with MIDI trigger notes. Choose Replacement to mute the original regions, or Doubling to keep the recording audible alongside the sampled drum.
I’d start with Doubling and a restrained sample level. It gives you a clear reference while you check the triggers. A better kick sound can’t rescue a missing hit, and a louder snare can hide a false trigger until the next quiet section.
Choose the right source before opening the tool
This workflow is for a recording of one drum or percussion instrument, such as a close kick mic, snare mic or isolated tom track. Apple’s drum replacement instructions describe transient detection on that source. They don’t describe automatic separation of a complete kit into individual instruments.
A stereo drum loop can contain kicks, snares and cymbals at the same time. Choosing Kick in the dialog doesn’t turn that mixture into an isolated kick recording. Start from a separate drum stem where possible. If you already have a MIDI kit and only dislike its sound, there’s no audio performance to detect, so change the instrument or use Drum Machine Designer to edit the kit.
Save a separate working copy of the project before proceeding. Keep the original recording and work from a duplicate if you plan to edit the detection source. The command analyzes all files on the selected audio track, and Replacement mutes all regions on that track when confirmed. Do not assume that selecting one region limits the whole operation to that region.
For sung melodies and other pitched, single-note performances, use audio-to-MIDI conversion with Flex Pitch. Drum replacement produces trigger notes for a chosen drum sound. That’s a different job.
Create the trigger track
- Select the audio track containing the drum you want to reinforce. Check its other regions before running a track-wide command.
- Choose Track > Replace or Double Drum Track. Logic analyzes transients, zooms the source track vertically, creates a software instrument track below it and opens the Library with Sampler selected.
- Choose Kick, Snare, Tom or other in the dialog’s Instrument menu. Choose a suitable Sampler sound in the Library.
- Choose Replacement or Doubling deliberately. Set Timing Offset to 0.0 ms initially, and leave Trigger Note on AUTO for the supported drum types unless the destination needs a different note.
- Put the playhead near a difficult passage, or set a cycle around it. Click Preview, adjust Relative Threshold and inspect the resulting triggers. Include quiet hits and fast fills in this check.
- Click Preview again to stop, then click OK when the detection is usable. Inspect the MIDI region on the new Sampler track before judging the sound in the full mix.
Preview plays the source and replacement tracks from the current playhead position and solos those two tracks. Clicking it again stops playback, restores the previous play position and unsolos them. That’s why the rest of the song goes quiet during the check. The other tracks haven’t been deleted.
Replacement and doubling change the audible paths
Replacement mutes the original track’s regions after you confirm. The audio remains in the project. Doubling leaves those regions audible and adds the sampled instrument beside them. Neither mode is a command to erase the recording.
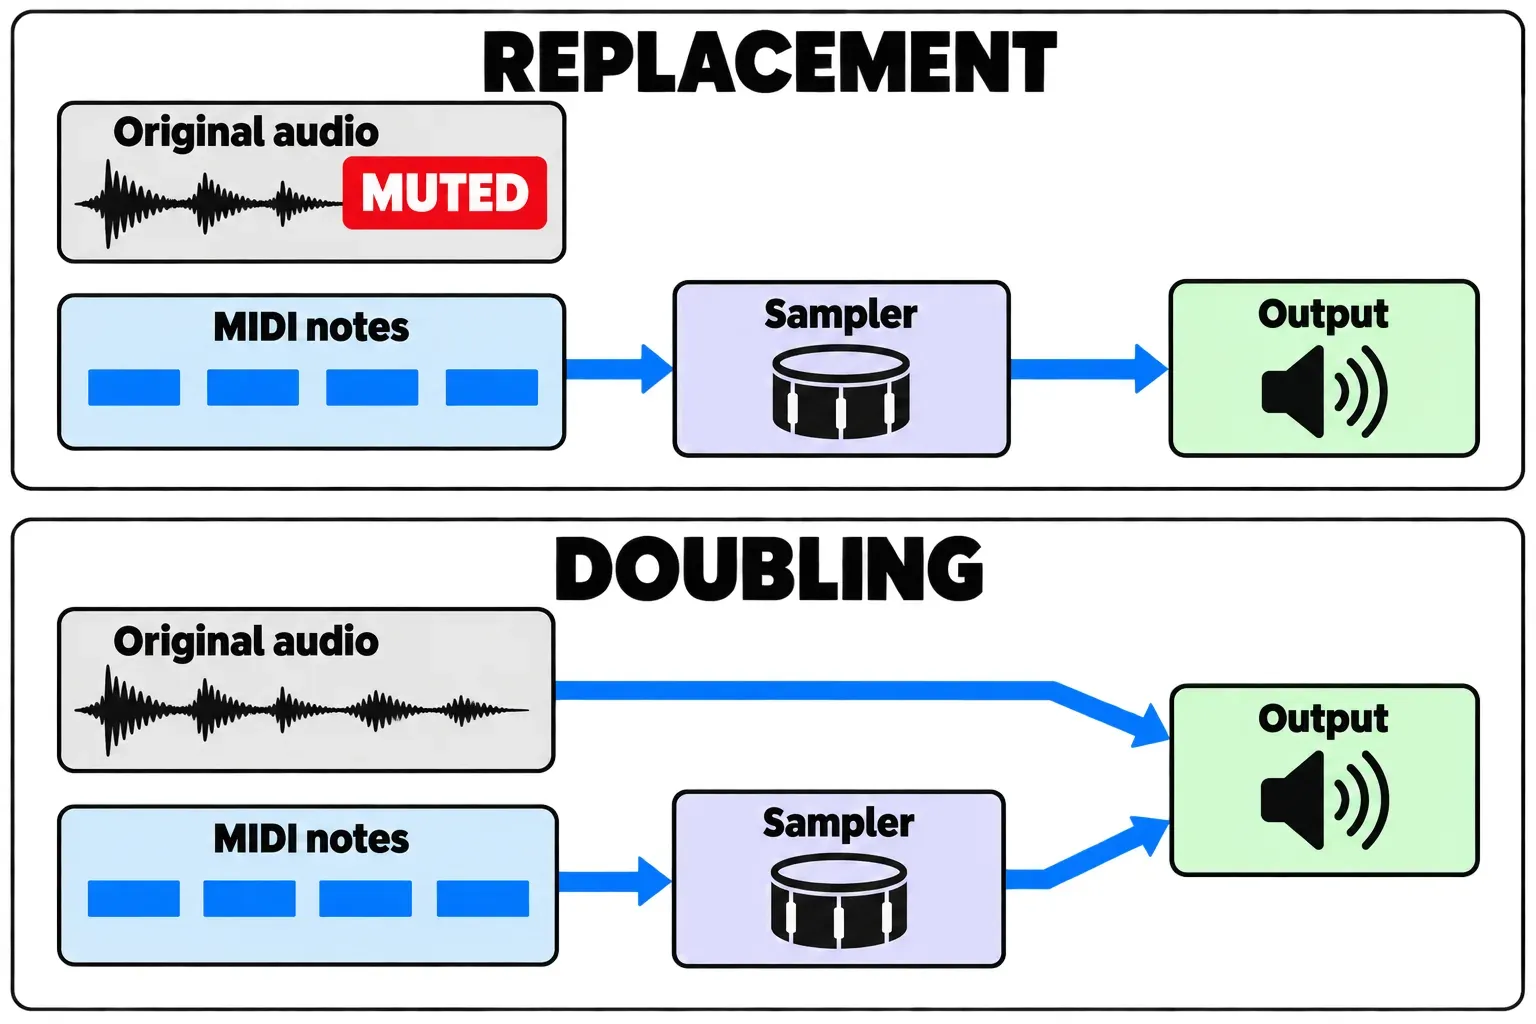
Choose replacement when the close-mic tone is unusable and the sampled part should carry that role. Choose doubling when the recording has a useful performance or texture but needs extra body, attack or consistency. Overheads and room microphones can still contain the original drum in either case. Muting one close-mic track doesn’t remove that drum from the rest of a multitrack recording.
When blending, lower the new instrument first and raise it until it supplies the missing quality. Compare in the song, including a quiet passage. A layer that helps the chorus can overwhelm ghost notes elsewhere.
Set Relative Threshold for the performance
Relative Threshold determines which detected transients generate notes. There’s no useful universal dB setting. The right value depends on the source’s wanted hits and unwanted bleed. I’d aim for one trigger per intended hit, then repair a small number of exceptions in MIDI.
- Quiet hits are missing: lower the threshold and check whether those hits acquire notes. Watch for bleed gaining triggers at the same time.
- Other drums create extra hits: raise the threshold, then check that genuine quieter hits survive.
- The two groups overlap: stop chasing a perfect global setting. Choose the more useful detection result and correct the exceptions in the MIDI region.
For a snare, decide whether the sample should follow ghost notes or reinforce only the main backbeats. Those are different goals. A ghost note missing from the sample layer is acceptable when the original carries it and the layer is deliberately reserved for accents. It’s a defect when you’re replacing the entire snare performance.
Do not assume that inserting a gate changes the detector’s input. Sound On Sound’s replacement walkthrough describes the tool ignoring channel-strip plug-ins and requiring processing to be rendered first. If you need a processed detection source, preserve the original and make a separate audio copy containing that processing. Otherwise, correct a handful of false or missed MIDI notes directly.
Match the trigger note to the instrument
Instrument chooses the drum category; Trigger Note chooses the MIDI pitch sent to the software instrument. Apple documents these AUTO assignments:
| Instrument | Trigger note | MIDI number |
|---|---|---|
| Kick | C1 | 36 |
| Snare | D1 | 38 |
| Tom | A1 | 45 |
| other | C3; AUTO unavailable | 60 |
Changing Trigger Note doesn’t change the Instrument selection. Changing Instrument resets the trigger note to Auto or, for other, C3. Make the category choice first, then verify the note against the destination patch.
If the MIDI is present but the sound is wrong or silent, check the instrument’s mapping before changing the detection threshold. A third-party kit may place its snare on a different key, and a sampler zone may not cover the trigger note at all. Compare MIDI note numbers when instruments display octave names differently.
Separate trigger timing from sample attack
At 0.0 ms, Timing Offset places triggers at the detected transient positions. Negative values move them earlier; positive values move them later. Apple notes that an offset can be needed with your own or third-party instruments. Start at zero and make a change only after identifying a consistent mismatch.
Check three things in order: whether each intended hit has a note, whether that note aligns with the intended source transient, and whether the chosen sound starts promptly after the note. A sample with silence or a slow attack can sound late even when its MIDI note is correctly placed.
A global offset suits a consistent early or late layer. It can’t repair random false triggers or one wrongly detected hit, so correct those events individually. The dialog’s Set average attack time button sets an average offset across the source track’s regions. It isn’t a per-hit correction.
Do not quantize the entire trigger region merely to make it look tidy. On a live performance, moving those notes to a rigid grid can separate the sample from the recorded drums. Preserve the detected timing first, then judge any intentional timing edit against the original.
Clean the MIDI before committing to the layer
Open the generated region in the Piano Roll. Work through the beginning, a busy fill, the quietest section and the ending, then check the remaining performance. Remove false notes, add missing ones at the intended hits and correct the destination pitch where needed. Keep the source available as your reference.
Check velocity separately from trigger count. A weak sample layer can come from low MIDI velocities, the patch’s response, its channel level or its mapping. Apple’s Piano Roll velocity controls let you select notes and drag the Velocity slider. Normal multi-note edits retain relative velocity differences until a selected note reaches a limit. Avoid flattening every hit to one value unless that mechanical result is intentional.
Once you click OK, the result is an editable MIDI region and instrument track. It isn’t a permanently running detector, and the new instrument has no threshold control. If you need a new detection pass, preserve the accepted MIDI, return to the source and run the command again deliberately. Avoid leaving two replacement tracks playing unnoticed.
Check the full drum recording
Bring the other tracks back into the comparison. For doubling, listen for flams, a hollow combined hit or an abrupt change in dynamics. Check the alignment and sample choice before increasing the level. For replacement, confirm that the intended source regions are muted and that overheads or rooms still work with the new tone.
Save when the sample follows the performance and contributes a specific improvement. Continue with the surrounding recording tasks in Record & Edit. The useful endpoint is a dependable drum part. A MIDI region that contains a lot of notes isn’t the same thing.


