How to Use Drum Machine Designer in Logic Pro
Open Drum Machine Designer, build a clean custom kit, control each pad, mix the parts separately, and save a patch you can trust later.

To open Drum Machine Designer in Logic Pro for Mac, create a software instrument track, open the Library, choose Electronic Drum Kit and load a kit. Click DMD in the channel strip’s Instrument slot. Drag an audio file onto a pad to replace its sound. To save the whole kit, select the kit name, then use Save in the Library—not the save command for an individual sampler.
Each occupied pad has its own instrument, subtrack and channel strip inside a Track Stack. You can tune one kick, add effects to one snare or process the entire kit. The main thing to check before editing is what you have selected: a pad, its subtrack or the whole kit.
What Drum Machine Designer actually controls
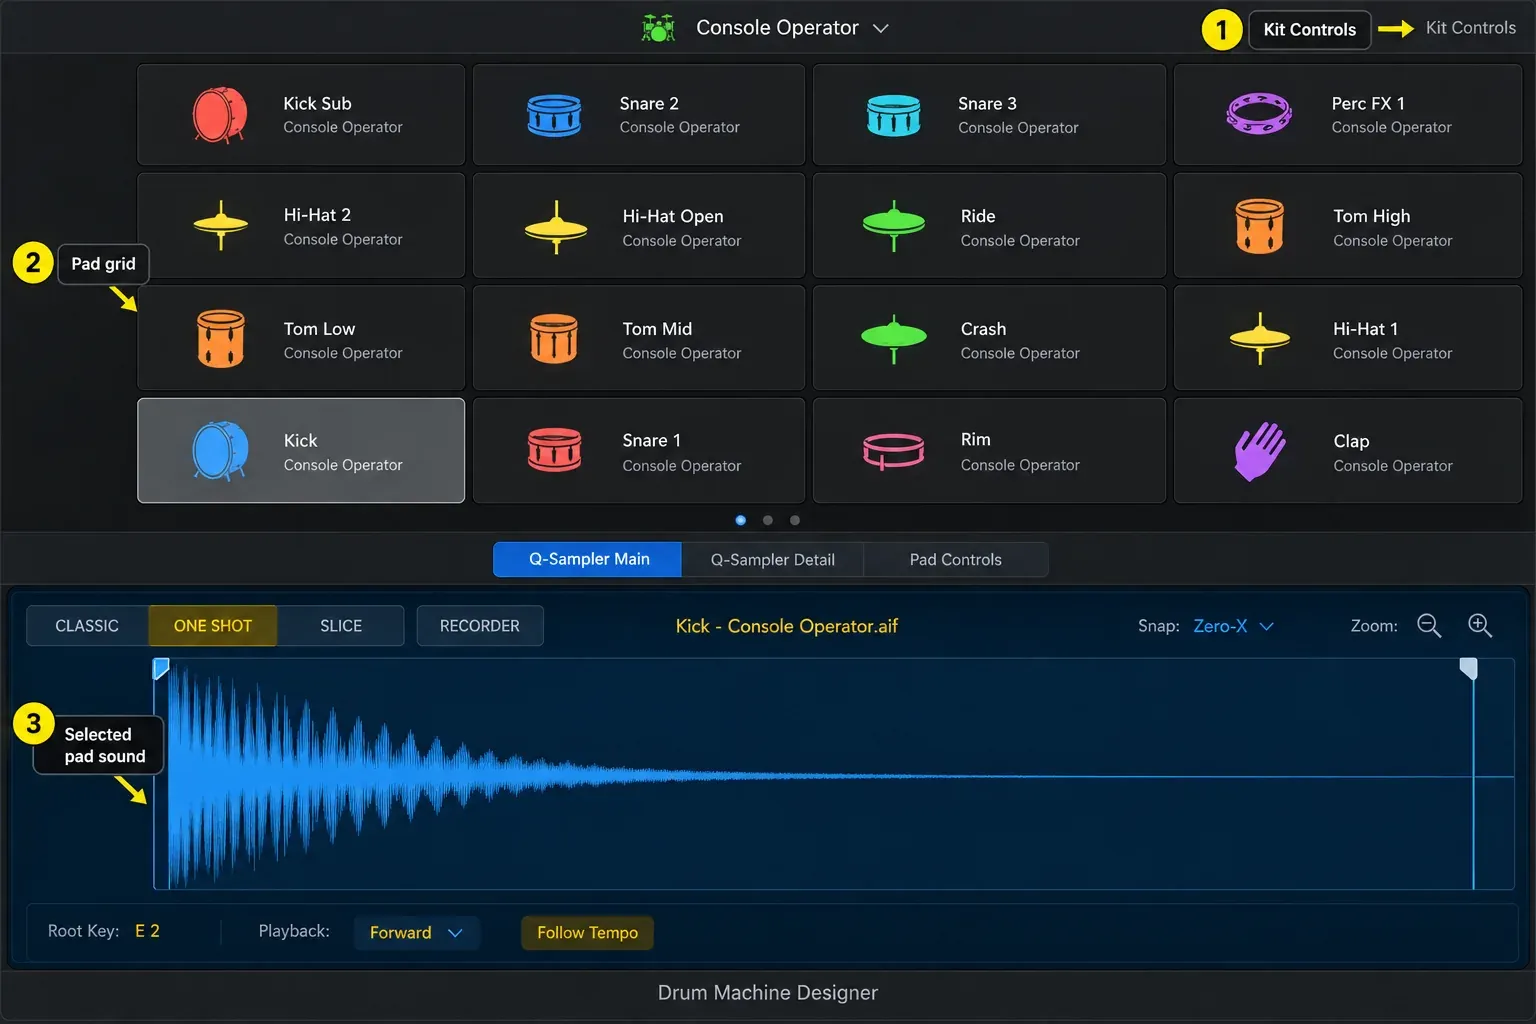
The upper part of the window is the kit. Each pad holds a kit piece: a sample in Quick Sampler, a Drum Synth sound, or another software instrument. The lower pane changes with the selected pad. It can show Q-Sampler Main, Q-Sampler Detail, Drum Synth, or Pad Controls. Select the kit name or Kit Controls when you want to change the complete kit instead of one sound.
Apple’s Drum Machine Designer interface guide identifies four areas: the kit controls bar, pad grid, pad controls bar and plug-in pane. The grid has several pages; you do not need to fill them. For a first custom kit, try a kick, snare and two hats, then add sounds when the pattern needs them. If the plug-in pane is hidden, click the disclosure arrow at the lower left. The Q-Sampler and Drum Synth buttons appear only for pads using those instruments.
Build a custom Drum Machine Designer kit
- Create a Software Instrument track, open the Library, choose Electronic Drum Kit, and load the closest useful factory kit.
- Click DMD in the Instrument slot. Save a kit you want to keep before clearing it. For an empty grid, open the kit’s Action menu and choose Clear All Pads.
- Drag a WAV, AIFF, MP3, Apple Loop, or audio region onto an empty pad. You can drag several files together; Logic assigns each file to a separate pad.
- Click the speaker icon on each pad to audition it, then double-click the pad name and give it a useful label such as Kick Short or Hat Open.
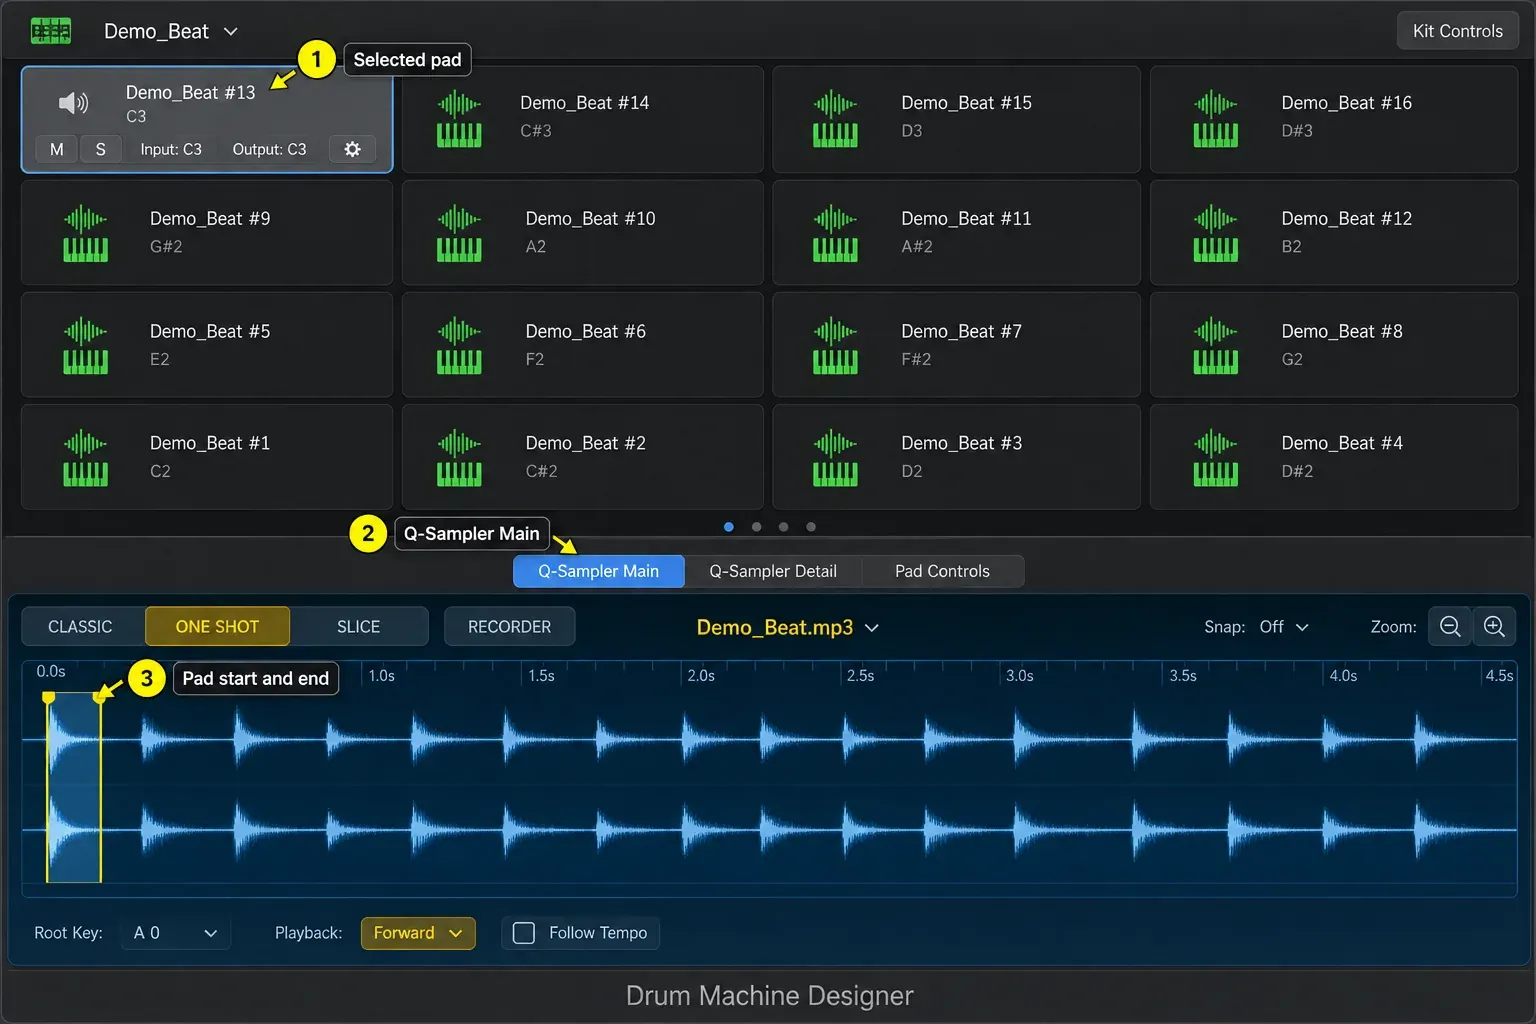
- Select a sample pad and open Q-Sampler Main. Trim unwanted space, check the playback mode, and listen at several velocities before adding processing.
- Assign the pad's Input note to the key or controller pad you want. Change Output only when the instrument on that pad needs a different note.
- Put mutually exclusive sounds, such as open and closed hi-hats, in the same Exclusive Group so one stops the other.
- Open the DMD Track Stack and balance the pad subtracks. Add pad-specific plug-ins only where they solve a clear problem.
- Select the kit name, open the Library and click Save. Enter a filename, choose a location and click Save again to store the complete patch. Save the project too.
A factory kit is a useful starting point if you only want to replace a few sounds. Clear the pads when you want to build from your own samples. Apple’s custom-kit instructions cover both approaches, including replacing an individual pad’s instrument.
Create a DMD track by dragging samples
Drag audio below the last track header—not into an empty lane in the Tracks area—and choose Drum Machine Designer in the Create New Track menu. A looping file is sliced at its transients, with slices assigned to pads in One Shot mode; Logic also creates a MIDI region to play them. Drag one or more one-shot samples instead, and Logic creates a Pattern Region with a Step Sequencer row for each sample. Multiple files go to separate pads. You can edit the region Logic created rather than making another one from scratch.
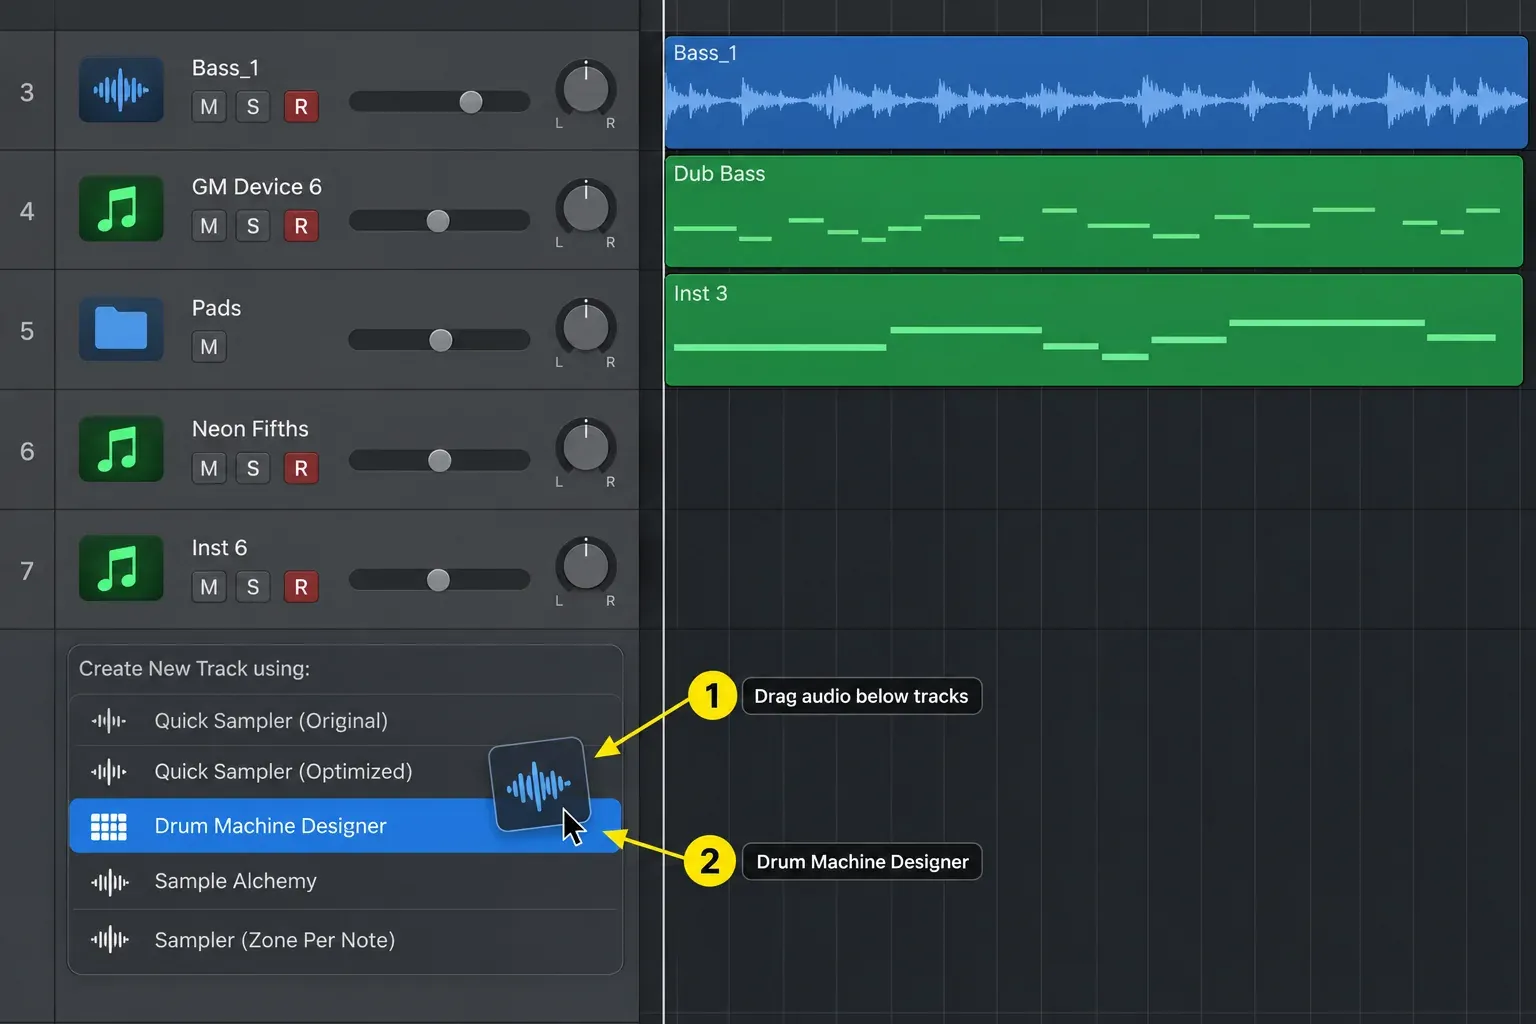
Dragging a region into an instrument can bounce its track processing into the new audio, including MIDI plug-ins, the instrument, audio effects and Flex changes. Drag the source audio file instead if you do not want that processed region bounced. Apple’s drag-and-drop track guide distinguishes these routes.
In an existing kit, drag a file onto an empty pad to add it or onto an occupied pad to replace its sound. Adding or replacing a sample this way sets Quick Sampler to One Shot, so check the playback mode again if you need held notes or looping. Dragging audio onto a pad that uses another instrument replaces that instrument with Quick Sampler; it is not a way to import a sample into the existing synth.
Trim, tune, and control one pad
Select a sample pad and open Q-Sampler Main. Adjust the start and end markers to keep the part of the recording you need, without cutting off its attack. One Shot suits a hit that should continue after a trigger; use the Quick Sampler playback-mode guide for held notes, loops or slices. Listen to the sound after trimming, both by itself and in the pattern.
Q-Sampler Detail contains two LFOs and pitch, filter and amplitude-envelope controls. Use the amplitude envelope when you need to shape how the hit starts or decays, and pitch controls when its tuning needs adjustment. Compare at a similar listening level so a louder edit does not automatically seem better.
Pad Controls exposes the selected kit piece’s Smart Controls. Kit Controls changes tone and effect sends for the whole kit. If only the snare needs a change, select that pad or its subtrack before adjusting processing.
Map a controller, layer pads, and create choke groups
Move the pointer over a pad to see its Input and Output notes. Input is the MIDI note that triggers the pad. Output is the note the pad sends to the instrument on its subtrack. They can be different. Use Learn Note from either pop-up, then strike the controller pad or key you want to assign.
Assign two pads to the same Input note to layer them—for example, a short kick and a lower-pitched body. They keep separate channel strips for individual balance and processing. Resample Pad triggers that input note and records the result into a new Quick Sampler instrument on the first available unassigned pad. It includes all pads on that input note, their channel-strip processing and the main-track plug-ins. Keep the original kit saved, and check the resampled sound before replacing the live layer. Main-track effects are already printed into that sample; consider that when applying further kit processing. Apple’s pad-controls reference describes what resampling includes.
For open and closed hats, choose the same Exclusive Group from each pad’s Action menu. Triggering one member stops the others, so the closed hat cuts off the open hat’s tail. Do not put sounds that need to ring together in that same group.
Before dragging pads into a new order, check the kit’s Action menu > Reorder Pads. Visual Only moves pads with their note assignments, keeping existing MIDI playback unchanged. Change Sounds moves the sounds while the note assignments stay in their grid positions, so an existing pattern can trigger different pieces. Reorder by GM and Reorder Chromatically are display-order commands, not ways to remap incoming notes. Apple documents these choices under kit controls.
Use DMD with Drummer, or play one sound chromatically
Drummer Session Player uses Drum Kit Designer for acoustic patches and Drum Machine Designer for electronic patches. Create or select an electronic Drummer track if you want Logic to generate the performance while you choose its sounds. The Session Player Editor changes the performance; DMD changes the kit and its processing. Apple’s Session Players overview explains the instrument choices.
Selecting the main DMD track distributes incoming notes to pads according to their Input and Output assignments. Selecting one pad's subtrack sends incoming MIDI directly to that subtrack instrument, so you can play a tuned kick, 808, or hat across the keyboard. This only works as expected when the instrument has key tracking enabled. Polyphonic playing also requires more than one voice. Apple's current DMD support guide documents the master-track and subtrack behavior.
Mix the pad, the subtrack, or the whole kit
Click the disclosure triangle beside the main DMD track to expand its Track Stack. Each occupied pad has a subtrack and channel strip, so you can balance or process that piece separately.
- Edit the pad instrument when the source itself needs trimming, tuning, envelope changes, or a different sample.
- Edit the pad subtrack when one piece needs EQ, compression, saturation, level, pan, or a send.
- Edit the main DMD track when the entire kit needs shared processing or level control.
Balance the pieces before deciding which need more processing. A problem with one sample may be easier to fix in that pad than with an EQ on the whole kit. For bass, musical parts, arrangement and export after the drums, follow the Logic Pro beat-making guide.
Save the kit separately from the project
Select the kit name at the top of DMD, open the Library and click Save. Enter a descriptive filename, choose a location and click Save again. Selecting a pad instead saves that kit piece, not the complete kit. Save the project as well: the patch lets you reuse the kit, while the project keeps the song and its regions.
To find the kit under User Patches, save its PATCH file in ~/Music/Audio Music Apps/Patches/Instrument. The complete-kit patch preserves the multi-channel setup. An individual Quick Sampler setting is not a replacement for that kit patch.
Moving a custom kit to another Mac requires the PATCH file and its sample files. Apple’s custom-kit transfer instructions use this collection and folder-naming procedure:
- Save the complete kit patch, then load it from User Patches on a software instrument track in a new empty project.
- Choose File > Save. Select Folder, enable Sampler audio data, choose a name and location, and save the project.
- In Finder, open that project folder. Its Quick Sampler subfolder contains the kit’s collected samples. Copy that folder and the kit’s PATCH file to the other Mac.
- Rename the copied Quick Sampler folder to match the PATCH file’s basename: for MyDrumKit.patch, name the folder MyDrumKit.
- Place the PATCH file and that renamed folder together in ~/Music/Audio Music Apps/Patches/Instrument/ on the destination Mac. Load the kit from User Patches and check it plays before removing the originals.
DMD vs Drum Kit Designer vs Step Sequencer
| Tool | Use it for | What it controls |
|---|---|---|
| Drum Machine Designer | Electronic kits, personal samples, layered or mixed instruments | Pads, instruments, MIDI mapping, pad subtracks and full-kit processing |
| Drum Kit Designer | Acoustic drum kits and multi-channel microphone/room workflows | Acoustic kit pieces; microphone and room choices in multi-channel kits |
| Step Sequencer | Writing a repeating MIDI pattern | Steps, rows, velocity, repeats, chance and automation |
DMD supplies and routes the sounds; Step Sequencer writes the pattern that triggers them. To start a new pattern, Control-click an empty part of the DMD instrument track’s lane and choose Create Pattern Region, then turn on steps for the sounds you want. Apple’s Step Sequencer instructions cover the basic controls. For row settings, velocity, repeats, chance and automation, use the Step Sequencer guide. Drum Kit Designer’s microphone and room choices belong to its multi-channel acoustic kits, not the DMD pad grid.
Fix the common DMD problems
I cannot find Drum Machine Designer
Create or select a Software Instrument track, open the Library, choose Electronic Drum Kit, and load a kit. Then click DMD in the channel strip's Instrument slot. Do not look for it inside Drum Kit Designer. That's a different instrument.
A controller pad triggers the wrong sound
Check the DMD pad's Input note, then use Learn Note and strike the physical pad you want. Check Output only if the correct DMD pad lights up but the instrument on its subtrack plays the wrong pitch.
The open hi-hat keeps ringing
Put the open and closed hats in the same Exclusive Group. Triggering either sound will stop the other members of that group.
I replaced a pad and lost its effects
Choosing a Library replacement changes the selected pad’s complete software instrument channel strip, including its effects. Save a copy of the current project before opening an older kit or project to recover the processing. If you only want to change a Quick Sampler pad’s sample, drag the audio file onto that pad instead; then check its playback mode, which resets to One Shot.
The whole kit changes when I edit one sound
Make sure the pad or its subtrack is selected, not the kit name or main DMD track. Pad Controls and a pad channel strip affect one piece. Kit Controls and main-track plug-ins affect the full kit.
Frequently asked questions
Where is Drum Machine Designer in Logic Pro?
Create a Software Instrument track, open the Library, choose Electronic Drum Kit, and load a kit. Click DMD in the Instrument slot to open the pad grid.
Can I use my own samples in Drum Machine Designer?
Yes. Drag WAV, AIFF, MP3, Apple Loop, or audio-region material onto a pad. Dragging several files at once maps each file to a separate pad.
What is the difference between Drum Machine Designer and Drum Kit Designer?
Drum Machine Designer is a pad-based Track Stack for samples, Drum Synth and other instruments, with separate pad channels. Drum Kit Designer focuses on acoustic drum kits; its multi-channel kits provide microphone and room choices.
Can each DMD pad have its own effects?
Yes. Each occupied pad has a corresponding subtrack and channel strip, so you can process one piece without applying the same plug-ins to the whole kit.
How do I stop one DMD pad when another plays?
Assign both pads to the same Exclusive Group from their Action menus. This is useful for open and closed hi-hats or any sounds that should choke one another.
How do I save a custom Drum Machine Designer kit?
Select the kit name at the top of DMD, open the Library and click Save. Enter a filename, choose a location and click Save again. Use ~/Music/Audio Music Apps/Patches/Instrument to make the kit available under User Patches. Save the project too, and keep the sample files with the kit when transferring it.
Build the pattern after the kit works
Save the kit, record or program a short pattern, and listen to how the pieces work together. Adjust the sounds in that context before adding more pads. The Create Music in Logic Pro hub links to the next steps, including instruments, beat-making and arrangement.


