How to Use Step Sequencer in Logic Pro
Open Step Sequencer, build a one-bar drum pattern, shape the groove, add automation, and move to Piano Roll when the grid stops helping.

To open Step Sequencer in Logic Pro for Mac, Control-click an empty part of a software instrument track and choose Create Pattern Region. Double-click the new region if the editor is not already open, choose Step Sequencer, select Step On/Off and click cells in the grid. Press Space to hear it with the project, or use Preview to audition the pattern while the project is stopped.
Start with a drum kit and a one-bar pattern. The instructions below cover placing hits, changing their velocity and timing, adding automation, saving the pattern and converting it to MIDI. The chord-following and expanded randomization controls described later are Logic Pro 12 additions; older versions have a different set of controls.
When Step Sequencer is the right editor
Step Sequencer programs repeating parts as rows and time steps. A note row triggers a drum kit piece or a pitched note; an automation row changes a parameter. It suits drum patterns, percussion, repeating bass figures and short synth sequences. An inactive step normally still takes up time, while Skip removes that step from the row’s cycle.
For a recorded MIDI performance, you may find individual note starts, lengths and overlaps easier to edit in Piano Roll. You can begin a rhythm in Step Sequencer and convert it later. The Logic Pro beat-making guide covers bass, arrangement, rough mix and bounce after the pattern is ready.
Build your first Step Sequencer pattern
- Create a software instrument track and load a drum kit. Drum Machine Designer gives you separate rows for the kit pieces.
- Control-click an empty part of that track in the Tracks area and choose Create Pattern Region.
- Double-click the pattern region if needed, then choose Step Sequencer in the Editors area.
- Select Step On/Off. Turn Mono Mode off so you can place several drum hits in the same column, then click cells to activate them.
- For this 4/4 example, set Pattern Length to 16 steps and Pattern Step Rate to /16. Use Forward playback, with all three rows following that rate and using all 16 steps. Place kick on steps 1 and 9, snare on 5 and 13, and closed hat on the odd-numbered steps.
- Choose Velocity/Value and drag vertically on active steps. Lower some supporting hats and listen to how your chosen kit responds.
- Try Note Repeat on one hat step. Extend the right edge of the Pattern Region if it ends before the complete pattern has played.
- Save the project. If you want to edit the result in Piano Roll, keep a copy of the original Pattern Region first, then Control-click the region and choose Convert > Convert to MIDI Region.
Apple’s Step Sequencer setup instructions cover this route. For a practice project, choose File > New from Template, select Tutorials > Step Sequencer, then click Choose. In Live Loops, Control-click an empty software instrument cell and choose Create Pattern Cell; double-click it to edit the pattern.
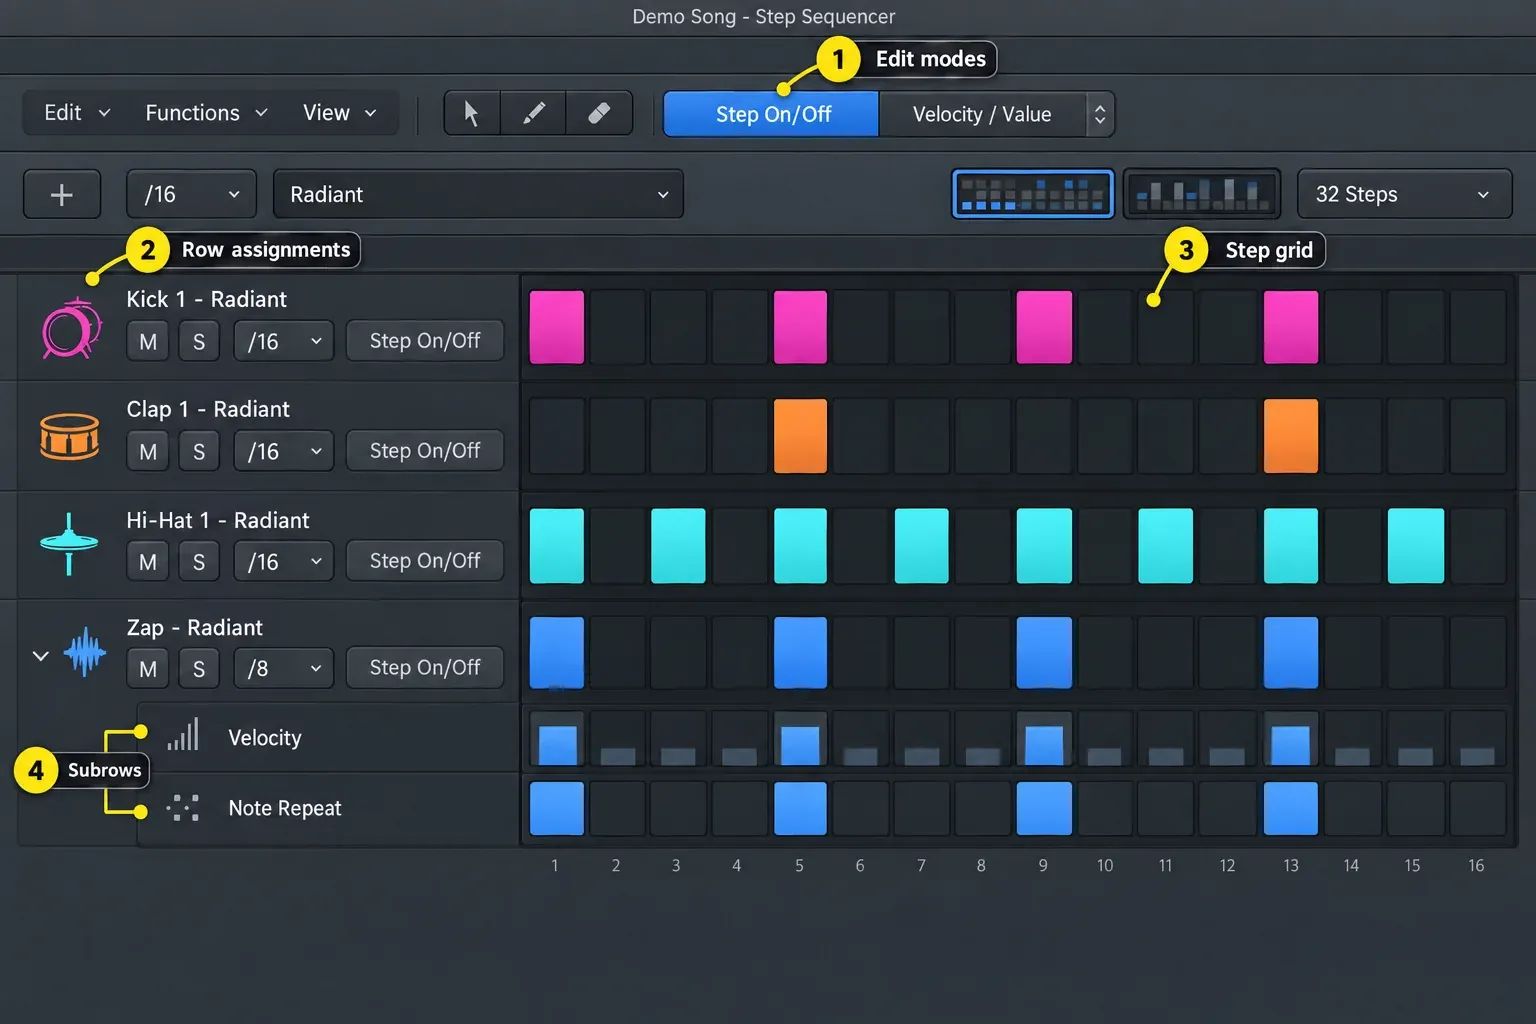
Read the grid before adding more notes
With those settings, each column is a sixteenth note and all 16 steps cover one bar of 4/4. Kick on 1 and 9 lands on beats one and three; snare on 5 and 13 lands on beats two and four. The odd-numbered hats form an eighth-note pulse. This is a practice pattern, not a rule for every genre.
Listen before adding percussion. Try an extra kick just before the second snare, or remove the final hat, then compare with the original. Keep the version that fits the bass line and the section of the song.
Shape the groove with edit modes
Select Velocity/Value and drag vertically on active steps. Velocity runs from 1 to 127, but its effect depends on the instrument: it can change loudness, timbre or other assigned parameters. Lower a few supporting hits and listen. There is no single velocity range that makes every kit sound natural.
For swing, open Step Sequencer’s local inspector with its Inspector button or View > Show Local Inspector—not the main Tracks inspector. Select Pattern, set Swing and choose the eighth- or sixteenth-note setting. Compare with the straight pattern while the bass is playing. Apple’s Step Sequencer inspector reference shows where these controls sit.
Note Repeat divides a step into 1–16 note triggers. Try two or four repeats on one hat step for a short roll. To see several parameters together, expand the row with its disclosure arrow, then use Add Subrow and choose an edit mode for that subrow.
Chance sets the probability that a step will play; it is not a guarantee of a different result every time you restart playback. Try it on an optional percussion hit and listen through the full region. For melodic parts, Gate changes note length as a percentage of the step, while Tie joins adjacent steps into a longer note. The instrument’s playback settings still determine how it responds to note length. Apple documents these distinctions under Step Sequencer edit modes.
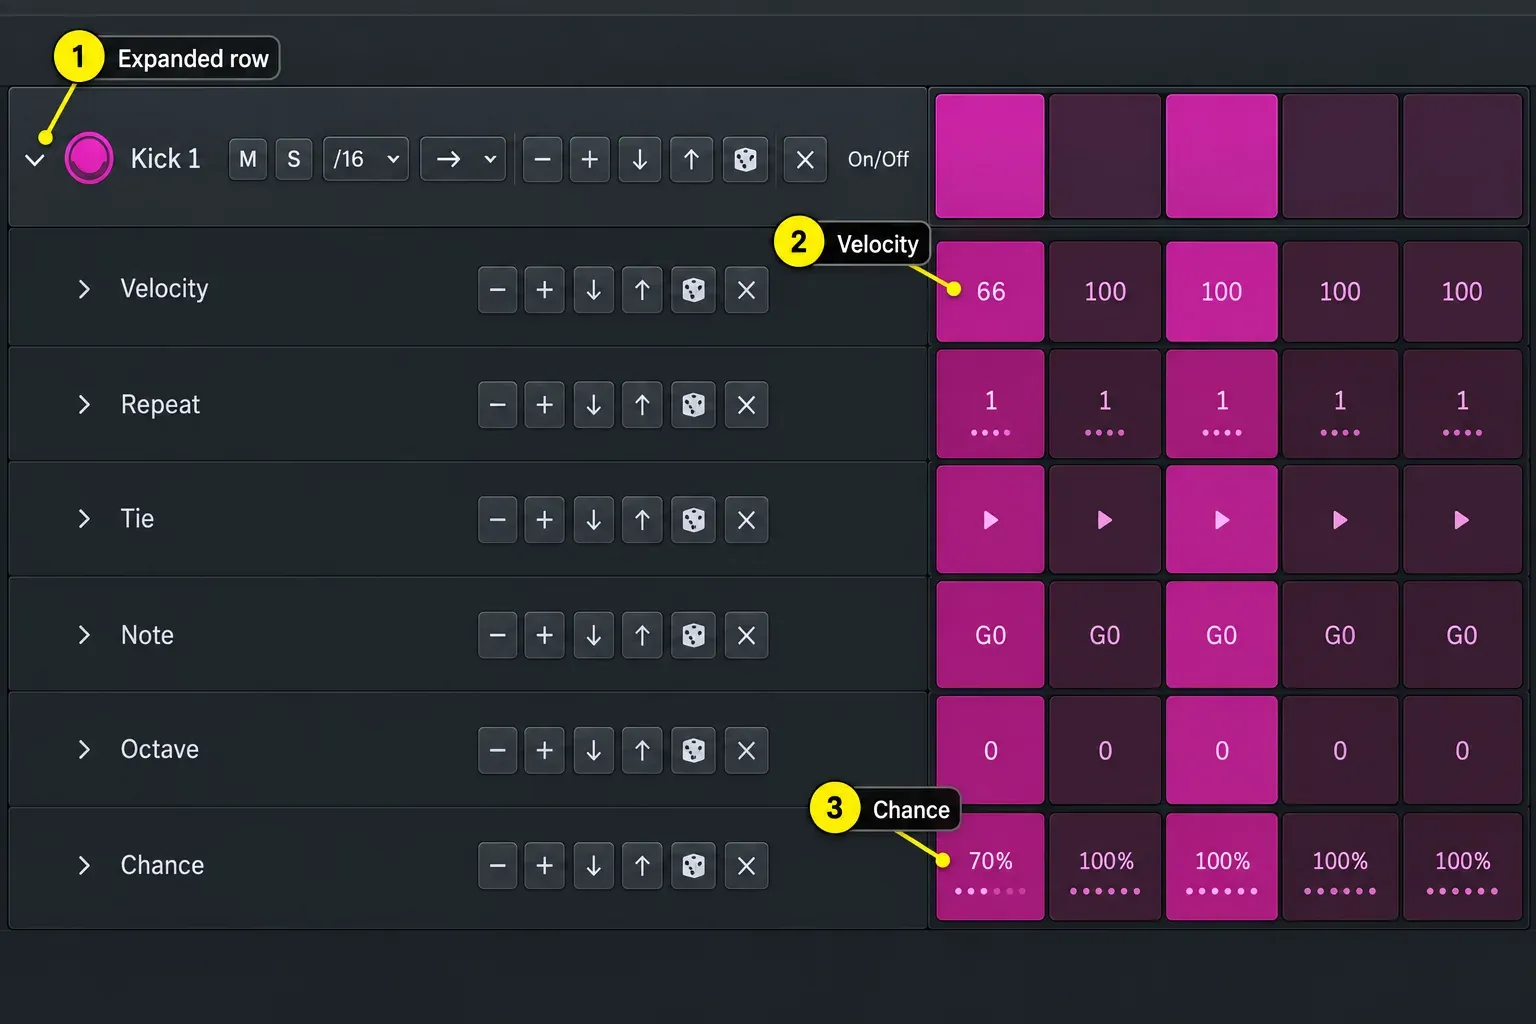
Give one row its own movement
Each row can have its own step rate, playback direction and loop boundaries. Select the row and use the local inspector’s Row settings; the row controls also let you rotate its steps left or right. For example, rotate the hats while leaving the kick and snare unchanged.
Different row lengths or rates can take several cycles to line up again. Listen through that longer cycle before arranging the part. If you want a regular one-bar beat again, restore the rows to the same length and rate, use Forward playback and check that no steps are set to Skip.
Follow chords or randomize selected steps
For a melodic instrument, click Pitch, then choose Pitch Source > Chord Track or Region Chords. Note rows use chord degrees, allowing the sequence to follow the chosen progression. The Pitch button is unavailable with Drum Machine Designer, so do not look for that menu on a DMD drum pattern. Apple’s chords and pitch guide explains the restriction. Chord-degree rows and the expanded randomization options are among the Step Sequencer changes in Logic Pro 12.
Randomize edits the values of the active edit mode; it is different from setting a step’s playback Chance. Use the main Randomize button for the pattern or a row’s Randomize button for that row. Control-click the button to open its settings. Probability applies to On/Off, Tie and Skip; other modes offer Offset or Range controls. For velocity, a limited Range lets you constrain the values instead of randomizing the entire pattern. Apple’s randomization instructions distinguish the pattern, row and subrow controls.
Add one automation row
An automation row can control an instrument parameter, plug-in parameter, Smart Control or channel-strip control. Learn (Add) creates a row from a control you move:
- Open Add Row above the row headers and choose Learn (Add). Older versions label this command Learn.
- Move the control you want to automate, such as filter cutoff or channel pan. Logic creates a row for it.
- Click the Learn button again to stop learning after the required row appears.
- Select Step On/Off and activate the automation row’s steps. Choose Velocity/Value, then drag vertically to set the parameter values.
Select that row, open the local inspector’s Row tab and set Automation Mode. Latch holds each value until the next active step; Slide interpolates between values for a gradual change. Start with two clearly different values so you can hear the result. Apple’s pattern creation guide also distinguishes Learn (Add), which creates rows, from Learn (Assign), which reassigns an existing row.
Why the last steps do not play
The pattern's musical length and the region's length are separate. Step Sequencer can contain more steps than the region has time to play. When the region ends first, Logic stops there, even if later cells remain visible in the grid.
Drag the right edge of the Pattern Region to give the later steps time to play. For a regular Forward pattern, a longer region lets the pattern repeat. Pattern Length changes the number of available steps; increasing it duplicates the existing steps into the added space rather than leaving that space blank. Longer patterns may span several grid pages. Check Loop Start/End, row rates, playback modes and Skip as well. Apple’s pattern-length guide explains how those settings combine.
If the whole song feels too fast or slow, change the project tempo. If only this pattern feels wrong, check Pattern Step Rate first. The Logic Pro tempo guide covers a fixed BPM, tempo changes, and what happens to audio.
Use the Pattern Browser without losing your own version
Save your own version before loading another pattern: open the Pattern Browser and choose Action > Save Pattern. Save Template keeps the pattern, row and step setup without the note events and values. A saved pattern is not a saved instrument patch. Save the sound separately in the Library; the Drum Machine Designer guide explains how to keep a complete custom kit and its samples.
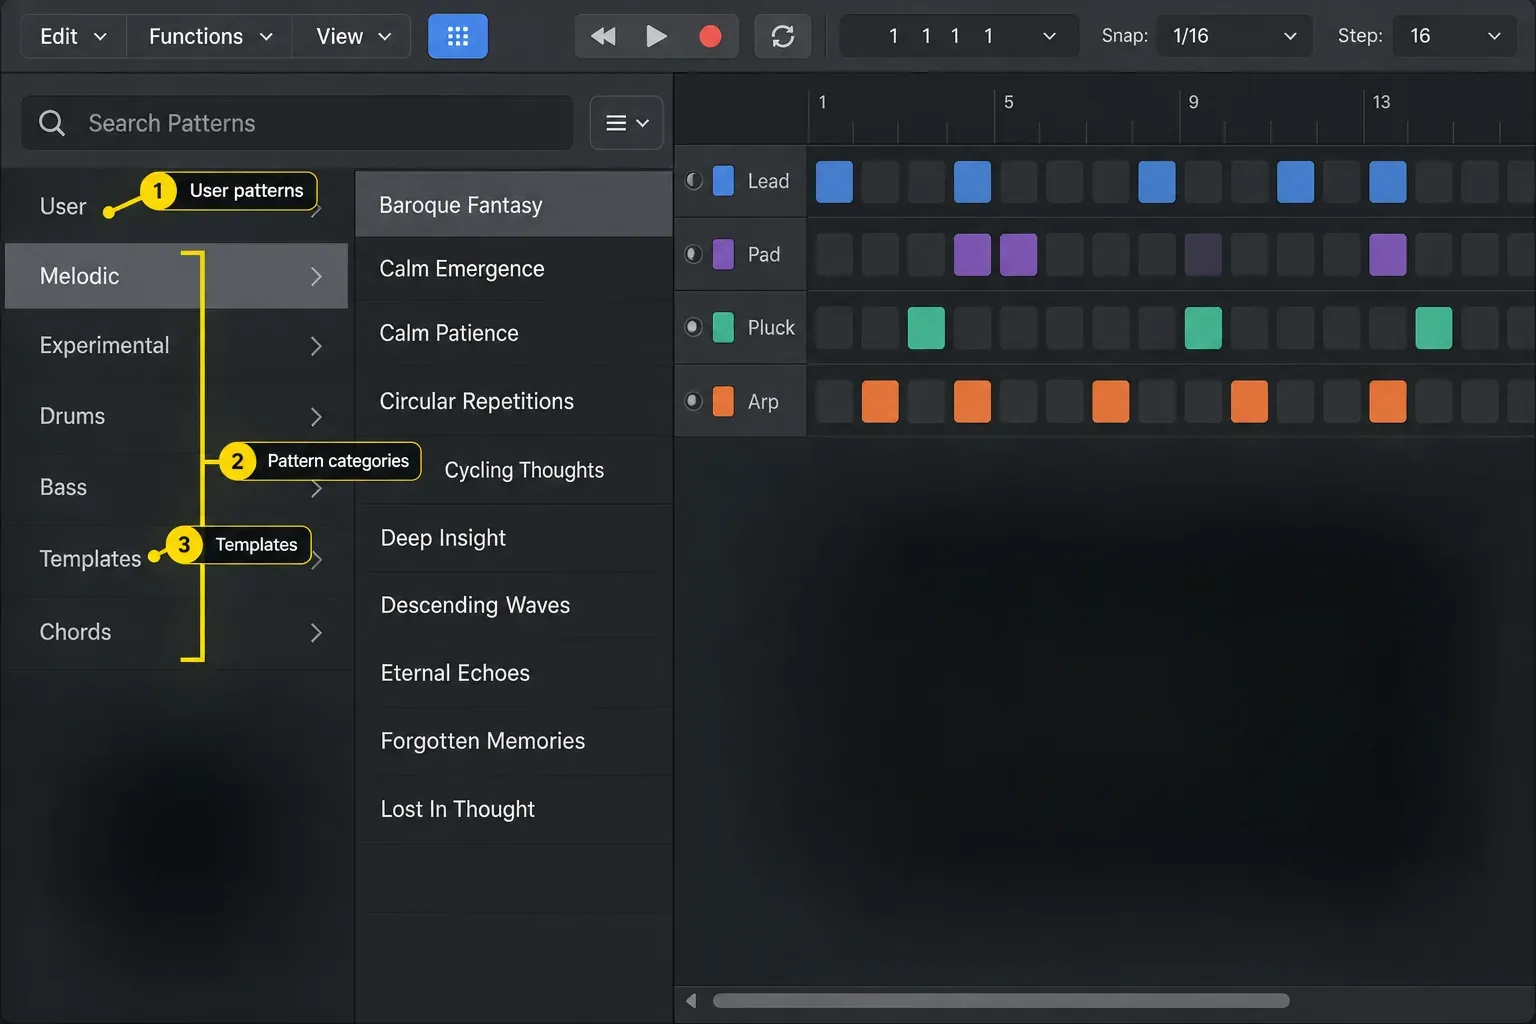
Apple’s pattern loading and saving guide distinguishes these files from Pattern Loops, which include patch information as well as pattern data. To study a factory pattern, load it after saving your own, mute individual rows and compare its velocity, repeat and timing settings.
Convert the pattern to a MIDI region
Before converting, save the project and keep a copy of the original Pattern Region if you want to retain its row settings. Then Control-click the region in the Tracks area and choose Convert > Convert to MIDI Region. Open the resulting MIDI region in Piano Roll to edit individual notes. Listen to the converted part against the original, particularly if you used swing or Chance; do not assume conversion is a lossless round trip for every pattern setting.
Conversion also works in the other direction: Control-click a MIDI region and choose Convert > Convert to Pattern Region. You do not need to delete the performance and start again. Apple recommends regions no longer than four bars of 4/4, with successive notes at least a sixteenth note apart, for the best results; the converted pattern can contain up to 64 steps. These are conversion guidelines, not a reason to discard the original MIDI. Keep that original and compare the result. Use the Piano Roll guide for detailed note editing.
Quick fixes when Step Sequencer is not behaving
The Step Sequencer option is missing
For notes, select a software instrument or External MIDI track and create or select a Pattern Region. A normal audio region does not become a note pattern by opening this editor. Audio tracks can use Pattern Regions for effects automation, but not Live Loops Pattern Cells. Apple’s Step Sequencer overview explains that distinction.
A row plays the wrong sound
Open the assignment pop-up in the row header and choose the intended note or kit piece. If the sound has no row yet, use Add Row instead of overwriting another row’s assignment. With Drum Machine Designer, choose the kit piece; with a melodic instrument, check the note or chord degree.
The pattern sounds rigid
Compare the strong and supporting velocities first, then adjust swing if the straight timing does not fit. Change one setting at a time so you can hear its effect.
Adding a hat turns off the kick
Check Mono Mode if adding a hit switches off another hit in the same column. With it enabled, a newly activated step switches off other steps in that column; merely turning it on does not clear hits you already placed. Turn it off when you want several drum pieces to play together.
The pattern is correct but the song still feels static
Duplicate the region and edit the copy for a section change. You could remove a kick, change the final hat group or rotate a quiet percussion row. Compare the transition in the arrangement, not just the isolated loop.
Frequently asked questions
How do I open Step Sequencer in Logic Pro?
Create or select a Software Instrument track, Control-click empty space on that track, and choose Create Pattern Region. Double-click the region if needed, then choose Step Sequencer in the Editors area.
Does Logic Pro have a Step Sequencer?
Yes. Logic Pro for Mac includes Step Sequencer for pattern regions and Live Loops pattern cells. It can trigger drum kit pieces, pitched notes, external MIDI, and automation rows.
Can I convert a Step Sequencer pattern to MIDI?
Yes. Keep a copy of the original Pattern Region, then Control-click the region in the Tracks area and choose Convert > Convert to MIDI Region. Open the result in Piano Roll to edit individual notes and compare playback with the original.
Why does Logic Pro stop before the end of my pattern?
First check whether the Pattern Region ends before the pattern has time to finish, and extend its right edge if needed. Also check Loop Start/End, row rates, playback modes and Skip; visible steps alone do not determine the played length.
Is Step Sequencer better than Piano Roll?
Use Step Sequencer when rows and repeated time steps help you program the part. Piano Roll may be easier for editing a recorded performance or individual note starts, lengths and overlaps. You can convert a pattern to MIDI when you want to work there.
Can Step Sequencer control instruments other than drums?
Yes. Step Sequencer works with software instruments and External MIDI tracks. Melodic rows can use fixed notes or, with the chord-following controls, chord degrees. Drum Machine Designer uses kit-piece rows and does not expose the Pitch button for chord following.
Turn the pattern into a song
Save the pattern and its instrument sound, make a variation for the next section, then add the other parts of the song. The Create Music in Logic Pro hub links to instruments, beat-making and arrangement guides.


