How to Make Tech House in Logic Pro
Write a bassline with deliberate gaps, let percussion answer it, then make one short hook carry a sixteen-bar drop. No paid template or third-party synth required.

To make tech house in Logic Pro, start with a steady kick, a short bass phrase with deliberate gaps, and one hook that is easy to recognize. Let the percussion answer the bass, then change which parts are present across the drop. More tracks can wait.
This walkthrough uses Drum Machine Designer, Step Sequencer and Retro Synth to build an original example at 128 BPM in 4/4, centred on F minor. Those are choices for this sketch. They aren’t rules for the genre. You’ll write a two-bar groove, develop a sixteen-bar drop and give it a full-track structure. You don’t need a paid template or third-party synth.
Give each part one job
Create a Drum Machine Designer track for the kick, clap and hat, a Retro Synth track for bass, and another software instrument track for a short synth hook. Use a second Drum Machine Designer track with a rim or woodblock for percussion, so its timing can change without moving the kick. The first-beat walkthrough covers the track and kit setup if those controls are new to you.
Choose a kick with a tail that leaves room for repeated bass notes, a short clap, and a hat that doesn’t wash across the whole bar. For the bass, start with a dry, simple patch. I’d settle the rhythm before adding a second bass layer: two sounds playing an unclear phrase still leave an unclear phrase.
Keep the backbone steady
On the drum track, Control-click an empty area and choose Create Pattern Region. In Step Sequencer, use 16 Steps, a /16 step rate and Forward playback. With matching full-length rows and no Skip or rate changes, that makes one bar in 4/4. Apple explains how row length and step rate determine the actual pattern length.
Turn on kick steps 1, 5, 9 and 13, clap steps 5 and 13, and open-hat steps 3, 7, 11 and 15. The kick lands on every beat, the clap on beats two and four, and the hat halfway between kicks. Use the kit-piece names in the row assignments. With Drum Machine Designer, the Note edit mode transposes a pad rather than choosing another drum sound.
Leave the main drum pattern straight for now. A dense shaker loop is an easy way to hide an unfinished bass rhythm. Keep it out until the kick and bass can carry the section together.
Write a bass phrase with a different second bar
Make a two-bar MIDI region on the bass track and double-click it to open Piano Roll. Use a sixteenth-note grid and choose a low F that the patch can reproduce clearly. The octave number shown in Logic can vary with the middle-C display setting, so keep every F below on the same keyboard row.
Count each bar as 1 e & a, 2 e & a, 3 e & a, 4 e & a. The numbered steps below run from 1 to 16 within each bar. Create only these notes; every unlisted step is empty.
| Step | Beat position | Bar A | Bar B |
|---|---|---|---|
| 3 | 1 & | F | F |
| 6 | 2 e | F | F |
| 8 | 2 a | F | F |
| 11 | 3 & | F | F |
| 14 | 4 e | F | C |
| 16 | 4 a | E flat | Rest |
Use the C and E flat below that F. Start with notes one sixteenth long, then shorten any that blur into the next kick. Apple documents adding notes with the Pencil tool and changing their length by dragging an edge. Watch the position and length help tags instead of estimating at a distant zoom level.
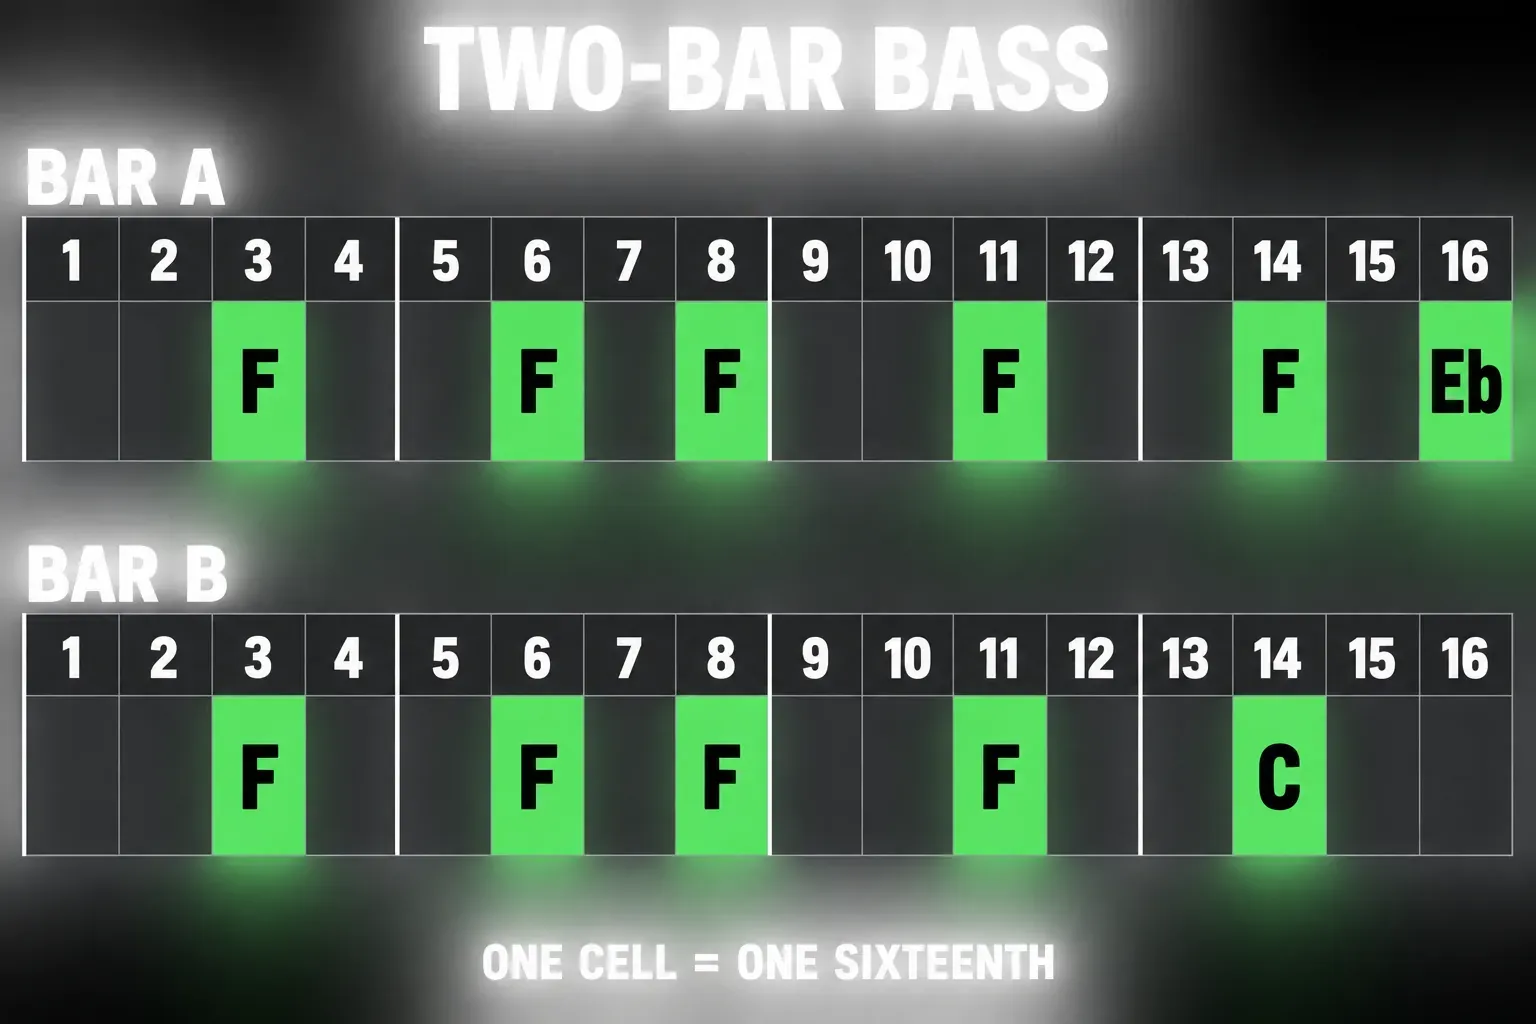
The important difference is at the end. Bar A pushes toward the next bar; Bar B leaves a gap before the pattern returns. If the E flat distracts from the rhythm, change it to F. Keep the pause in Bar B while deciding whether the pitch change earns its place.
As an initial accent pattern, give the notes on steps 3 and 11 velocity 100, steps 6 and 14 velocity 80, step 8 velocity 90, and the E flat velocity 75. Select each note and adjust the Velocity slider in Piano Roll. These are editable starting values. A patch may map velocity to volume, tone or both. If the accents barely change, check its velocity response before exaggerating the numbers.
Make the sound respect the gaps
In Retro Synth, shape AMP ENV with a quick attack, a decay that gives the note a short body, and a release short enough to stop the tail filling the gaps. Lowering sustain alone doesn’t determine the whole shape. Apple’s envelope controls separate attack, decay, sustain, release and velocity sensitivity.
Check the pickup at step 16 particularly closely: its release can continue into the next kick even though the MIDI note ends at the bar line. Shorten the note or release, choose a shorter kick, or reduce the bass level before reaching for more processing. If the overlap still needs deliberate ducking, use the separate sidechain compression guide for the routing. No compressor setting suits every kick and bass patch.
Let percussion answer, then adjust the timing
On the separate percussion track, make two adjacent one-bar pattern regions, A and B. Use 16 Steps at /16 with the same row-length conditions as the main drums. Put a short rim or woodblock on steps 4 and 12 in A, and steps 4 and 15 in B. These land after selected bass hits. Keep the rim quieter than the clap, because it’s a reply and shouldn’t become another backbeat.
Start straight. Then, in the percussion pattern’s local inspector, select Pattern and try Swing 55%, 16th. That’s one comparison setting. Apple documents the Swing percentage and 8th/16th selection. It’s separate from the pattern’s Step Rate. Apply the same choice to both percussion patterns, then compare it with the straight version.
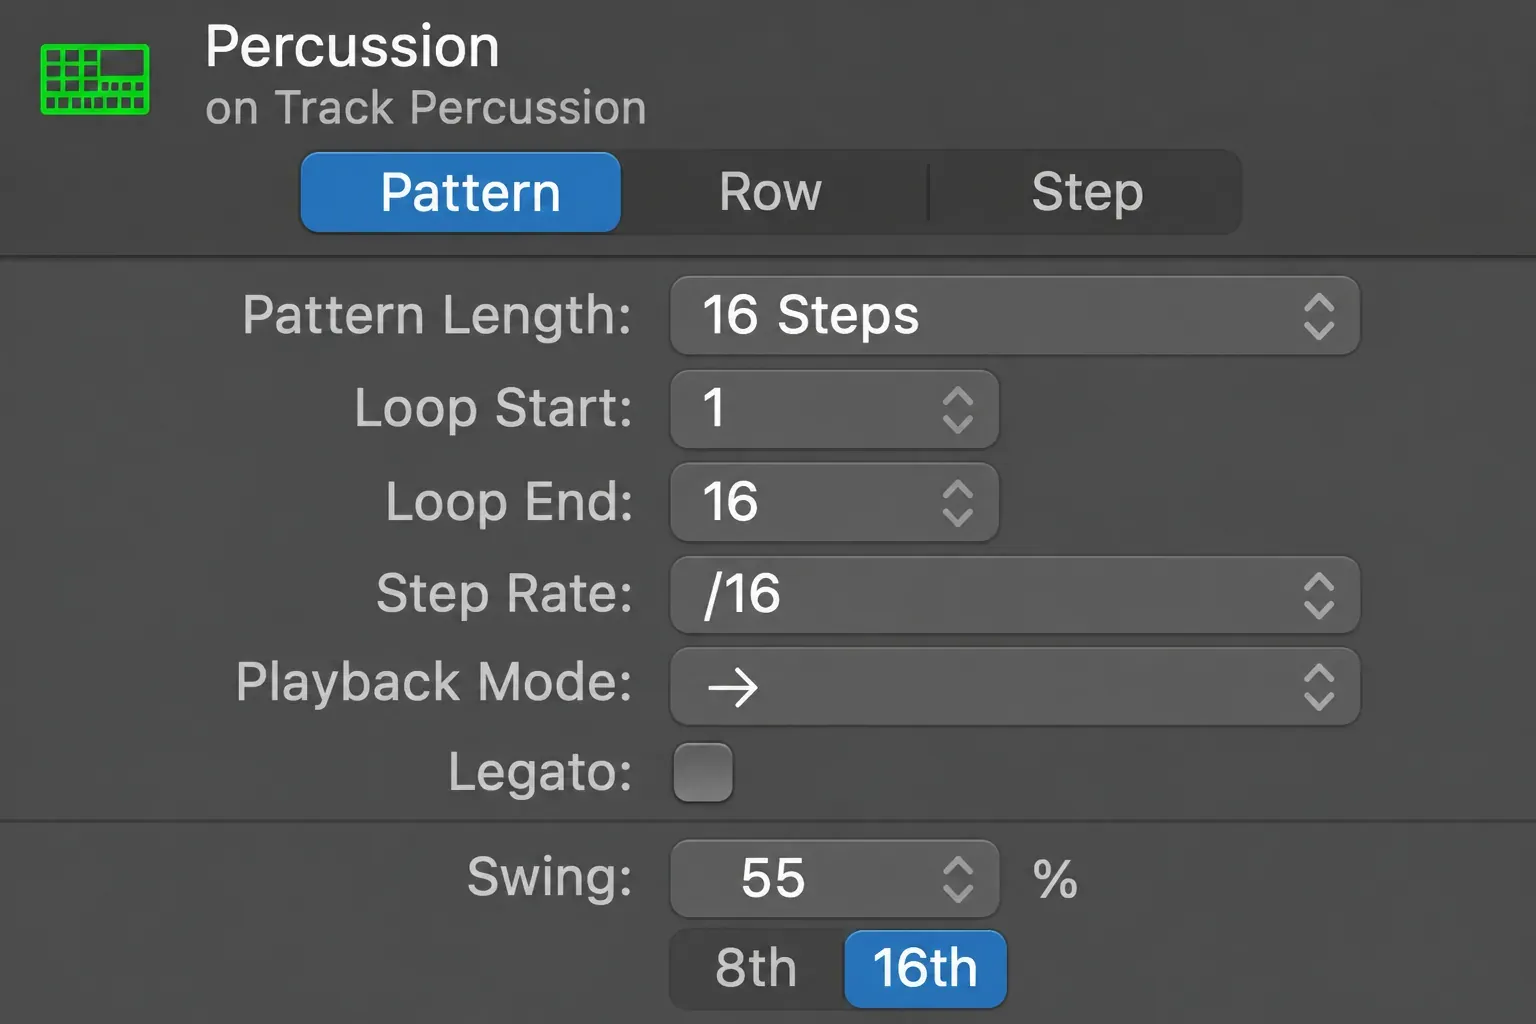
Changing that pattern doesn’t swing the separate bass MIDI region. For bass, select the notes in Piano Roll and use its Time Quantize, Strength and Swing controls. Apple describes this as non-destructive timing quantization. Decide whether the bass should follow the percussion or stay straighter. Don’t assume matching numbers across different controls guarantee the same feel.
To borrow a feel that already lives in an audio loop or a MIDI region, select that region and choose Quantize > Make Groove Template in the Region inspector. The new groove template appears near the bottom of the Quantize pop-up menu, so select the bass region and choose it there. A source MIDI region needs a note at every position the groove should define, and an audio source needs Flex turned on for its track. Keep the source region in the project. If you delete it, the template name stays in the menu, but choosing it won’t do anything.
If the groove becomes lopsided, return one layer to straight timing and compare again. Avoid combining shifted notes, region swing and pattern offsets without knowing which stage is moving what. The complete Step Sequencer guide covers those editing controls beyond this pattern.
Choose one short hook
Use a dry synth stab on F an octave above the bass. Put one short note on beat one of Bar A, leave Bar B empty, and repeat the pair. This gives the bass pickup and percussion reply room to register. If the synth has a long release or delay, shorten it until the bar meant to stay empty sounds sparse.
A vocal can replace that stab, but use your own recording or material whose license permits the intended use. A pitched vocal should fit the key. A spoken phrase still needs its rhythm and tail checked. Do not add the vocal and a competing lead just because both are available. I’d keep the hook that remains recognizable when the decorative layers are muted.
Develop the groove over sixteen bars
Repeat the A/B pair eight times, then edit four phrases. The bars below are local drop bars 1 to 16. They aren’t the project’s absolute bar numbers.
| Drop bars | Change | What stays recognizable |
|---|---|---|
| 1 to 4 | Kick, clap, bass and hook; leave out the hat and rim | The bass A/B shape and the hook on alternate bars |
| 5 to 8 | Add the hat and rim replies | The same bass rhythm, with more movement above it |
| 9 to 12 | Remove the synth hook for four bars | The bass and percussion carry the identity |
| 13 to 16 | Bring the hook back; remove all drum, bass and hook notes during the last beat of bar 16 | A clear gap before the next section starts |
Make real copies for phrases you intend to alter, using Option-drag or Edit > Copy and Paste. A source region’s loops won’t become independent on their own. For the last gap, turn off drum and percussion steps 13 to 16 in those final copies and remove any bass or hook note beginning on beat four or later. Check releases and effects too: deleting note starts doesn’t silence tails already playing.
If the return feels weak, compare the last phrase before it with the first phrase after it. Removing a part for a few bars often creates clearer contrast than adding another riser over an already busy section. Keep the main motif intact while changing one aspect at a time.
Build the track around that drop
Here is one 128-bar sketch. Each 32-bar drop can contain the sixteen-bar development above followed by a changed second pass. You can shorten or lengthen sections after comparing them with the music you want to make.
| Project bars | Section | Focus |
|---|---|---|
| 1 to 16 | Intro | Drums and a restrained hint of the hook |
| 17 to 32 | Preparation | Introduce fragments of bass; reserve the full combination |
| 33 to 64 | First drop | Develop the A/B groove, then vary the second pass |
| 65 to 80 | Break | Remove the kick and bass; leave space around the hook |
| 81 to 112 | Return | Restore the core; change percussion or hook placement |
| 113 to 128 | Outro | Remove the hook and bass in stages |
Use arrangement markers to keep those boundaries visible. New markers start eight bars long, so resize and rename them for the sections above. The arrangement walkthrough covers moving and developing sections when the sketch needs larger changes.
Compare a level-matched reference for phrase length, low-end balance and how long the hook disappears. Avoid matching its loudness while the arrangement is unfinished. If every section contains every part, fix that contrast before adding a mastering chain.
For a listening copy, choose File > Bounce > Project or Section. Check Start and End explicitly: an active cycle limits the initial bounce range. Apple’s bounce options include audio tails when needed. Check the exported ending as well as the first drop. A good loop doesn’t tell you whether the whole arrangement holds together.


