How to Make a Beat in Logic Pro
Build a complete Logic Pro beat with stock instruments: drums, bass, harmony, arrangement, a practical rough mix, and a finished bounce.

Start with a kit in Drum Machine Designer and build a drum pattern in Step Sequencer. Then give it a bass line and one musical part, arrange the loop into sections, balance the levels and bounce the finished beat. Logic Pro's included instruments and a mouse are enough; a MIDI keyboard and third-party plug-ins can wait.
We'll use a one-bar groove in 4/4 to get the controls under your fingers. Once it plays, change the sounds and rhythm until it belongs to your track. The goal is an instrumental beat you can listen to from start to finish, not a drum loop that stops after one bar.
Before you touch the grid
Open an Empty Project and save it with File > Save before you build anything. Pick a reference track, then listen for the tempo, the main drum accents and the space between its kick and bass. Use those observations to choose sounds and timing; the recording itself doesn't belong in your final mix.
Set the starting tempo in the control-bar LCD. If the tempo field is hidden, open the LCD menu and choose Beats & Project. Drag the tempo value up or down, or double-click it and type a number, as described in Apple’s project-tempo guide. Keep 4/4 for this exercise. If recorded audio should determine the tempo, use the Smart Tempo guide.
Choose a kick, a snare or clap, a closed hat, a bass and one chord or lead sound. That's enough to find out whether the beat works. Add percussion when you can hear a place for it.
1. Load Drum Machine Designer
- Choose Track > New Software Instrument Track.
- Open the Library and choose Electronic Drum Kit.
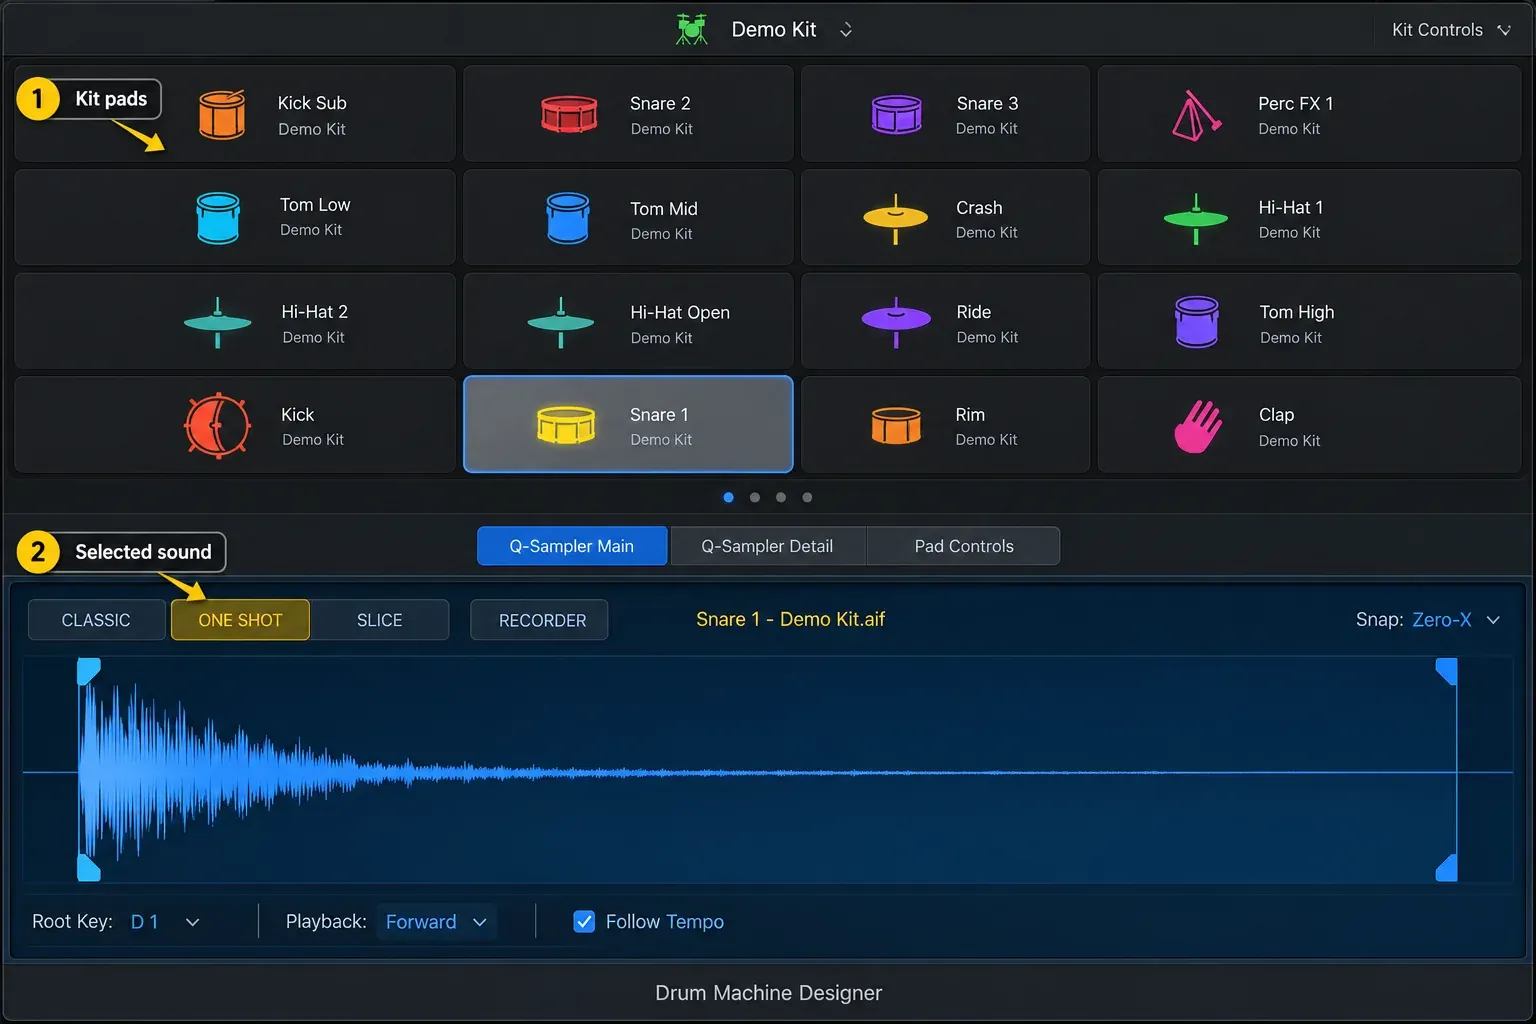
- Select a kit, then click DMD in the instrument slot if you want to open the pad view.
Drum Machine Designer gives each assigned sound its own pad and channel strip, so the kick can change without changing the whole kit. Apple's Drum Machine Designer instructions explain how to replace sounds and save a custom kit. The Drum Machine Designer guide goes further into the controls. Would you rather have Logic play the drums for you? Start with the Logic Pro Drummer workflow.
2. Create a pattern region
Control-click an empty area on the Drum Machine Designer track and choose Create Pattern Region. Open the Editors button and select Step Sequencer if the grid isn't visible. A pattern region is different from a conventional Piano Roll MIDI region: its rows trigger kit sounds, notes or automation when their steps are active.
Set Pattern Length to 16 steps and Pattern Step Rate to /16. Check that each drum row also runs forward at /16. In 4/4, that gives you one bar: beats 1, 2, 3 and 4 start on steps 1, 5, 9 and 13. Preview plays the pattern alone; Space plays it with the project. Make the region long enough to hear all 16 steps.
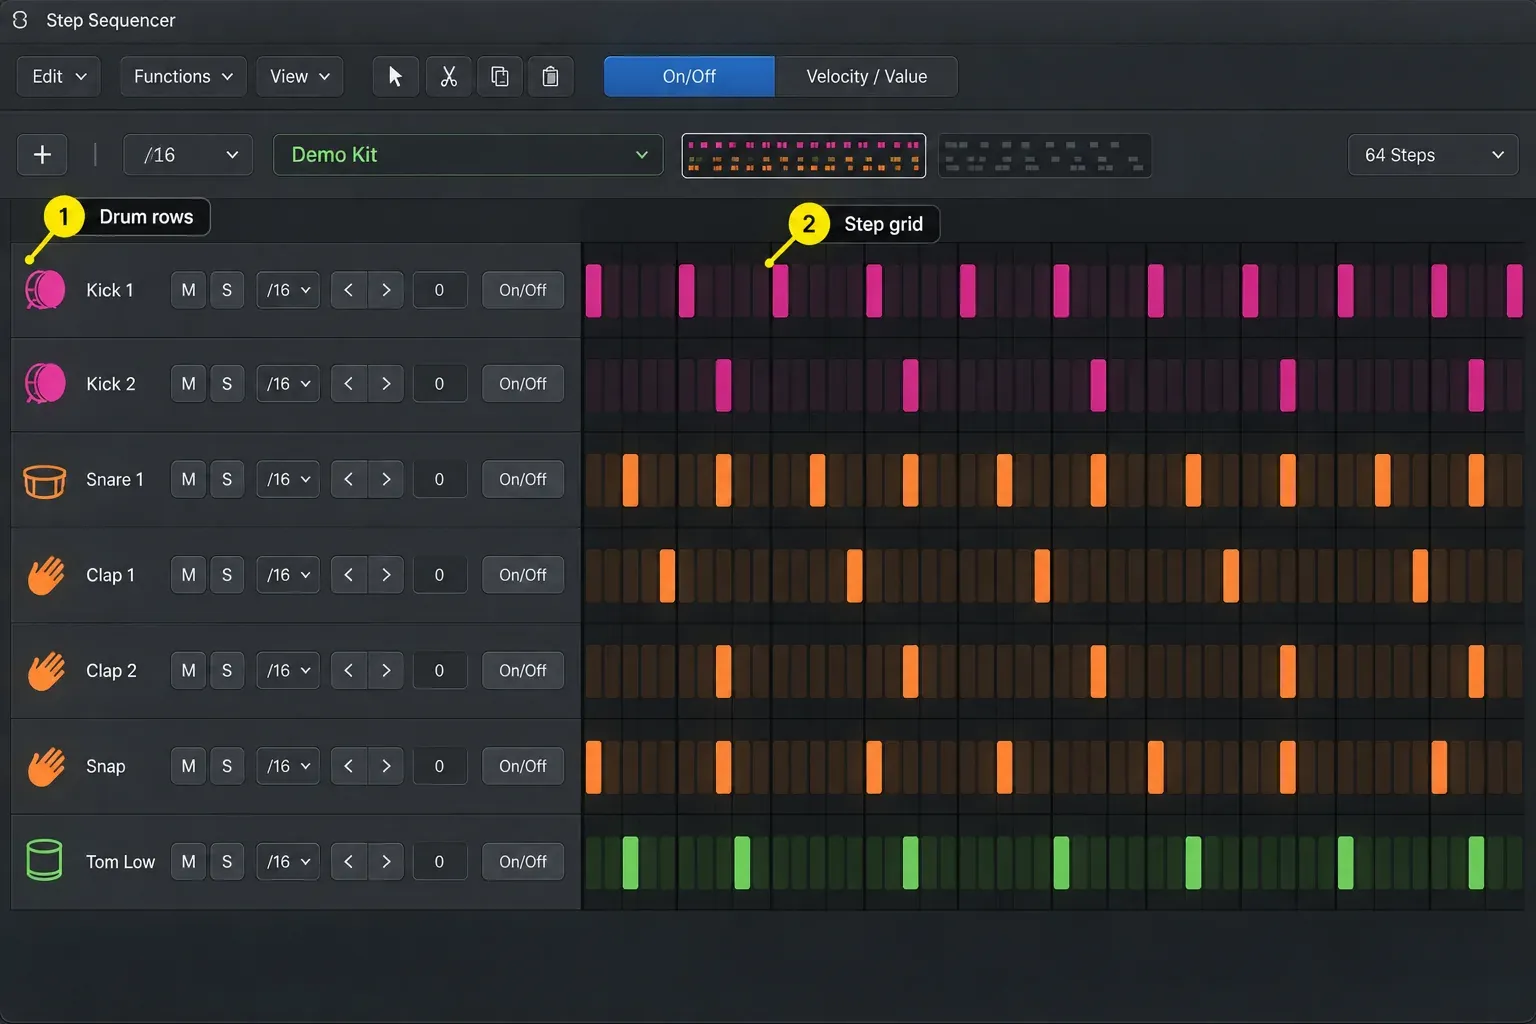
Apple’s Step Sequencer instructions explain these controls. For a practice project, choose File > New from Template, click Tutorials, select Step Sequencer and click Choose. The full Step Sequencer guide covers row rates, repeats and longer patterns.
3. Program a drum groove that leaves room
Leave Mono Mode off in the Step Sequencer menu bar so kick, snare and hat can share a time position. Apple’s pattern-editing guide explains that, with Mono Mode on, activating a new step turns off other active steps in that column; switching the mode on alone does not clear existing overlaps. With the 16-step setup above, choose Step On/Off and click the following cells in an empty pattern. Count from the left, starting at 1:
- Kick: steps 1 and 9, which fall on beats 1 and 3.
- Snare or clap: steps 5 and 13, on beats 2 and 4.
- Closed hat: steps 1, 3, 5, 7, 9, 11, 13 and 15 for eighth notes.
- Leave other rows empty for now. Add an extra kick or percussion hit only after you can hear what it changes.
This is a starting groove, not a genre rule. Select Velocity/Value, then drag vertically on the active steps to make the offbeat hats quieter and the main accents stronger. Listen at the same level before and after. If an extra hit weakens the pocket, remove it; randomizing the entire pattern won't tell you which change helped.
To edit this drum pattern as individual Piano Roll notes, Control-click its region and choose Convert > Convert to MIDI Region first. The Logic Pro Piano Roll guide covers note placement and length. For recorded pads or keys, the quantize guide explains timing correction without flattening every accent.
4. Add bass without fighting the kick
Create another software instrument track and choose a bass patch in the Library. Control-click its empty Tracks area and choose Create MIDI Region. Select the region, choose View > Show Editors, then select the Pencil tool in the Piano Roll. Click where a note should start and drag horizontally before releasing to set its length. Apple’s Piano Roll note-entry instructions explain the gesture.
For a first bass part, draw a short note on beats 1 and 3, using the same low pitch for now. Listen against the kick. Move one note or shorten it and hear what changes. If you have a chord or sample in mind, choose a pitch that fits. The 808 bass workflow deals with the tuning and envelopes of that particular sound.
Hear the kick and bass together before reaching for EQ. If they blur into one low thump, shorten a sustained note or try a less boomy sound. Listen quietly on headphones or small speakers as well; a bass line carried entirely by deep sub frequencies may disappear there.
5. Add one chord, sample, or melody part
Give the drums and bass one musical companion. Any of these can carry the idea:
- a short chord rhythm;
- a single-note motif;
- an Apple Loop that you edit rather than stack untouched;
- a one-shot sample placed as punctuation;
- a played part captured with Musical Typing or a MIDI keyboard.
Drag an Apple Loop from the Loop Browser into the empty area below your tracks. If it is the first content in an empty project, it can set the project tempo and key; Apple’s Apple Loops instructions explain what changes when other content is already present. Keyed audio, MIDI and pattern Apple Loops default to Pitch Source: Key Signature; unpitched loops default to Off. Session Player loops use region chords or the Chord track instead. Check the Pitch Source setting if a musical loop does not follow the harmony you expect. Use the loop where it supports the beat rather than leaving every part playing throughout.
For drawn notes, create another software instrument track and MIDI region as you did for the bass. Try a short motif or stack notes at the same time position for a chord. Alchemy supplies synth sounds; the Arpeggiator turns held notes into a timed pattern. For a played part, follow the MIDI recording guide.
6. Turn the loop into an arrangement
In the Tracks area, Shift-click the drum, bass and musical regions you want to repeat. Hold Option, drag them to the next section and release at the right bar. This copies the regions on their existing tracks. The arrangement workflow covers section length and transitions. If you want to perform cells before placing them on the timeline, see Live Loops.
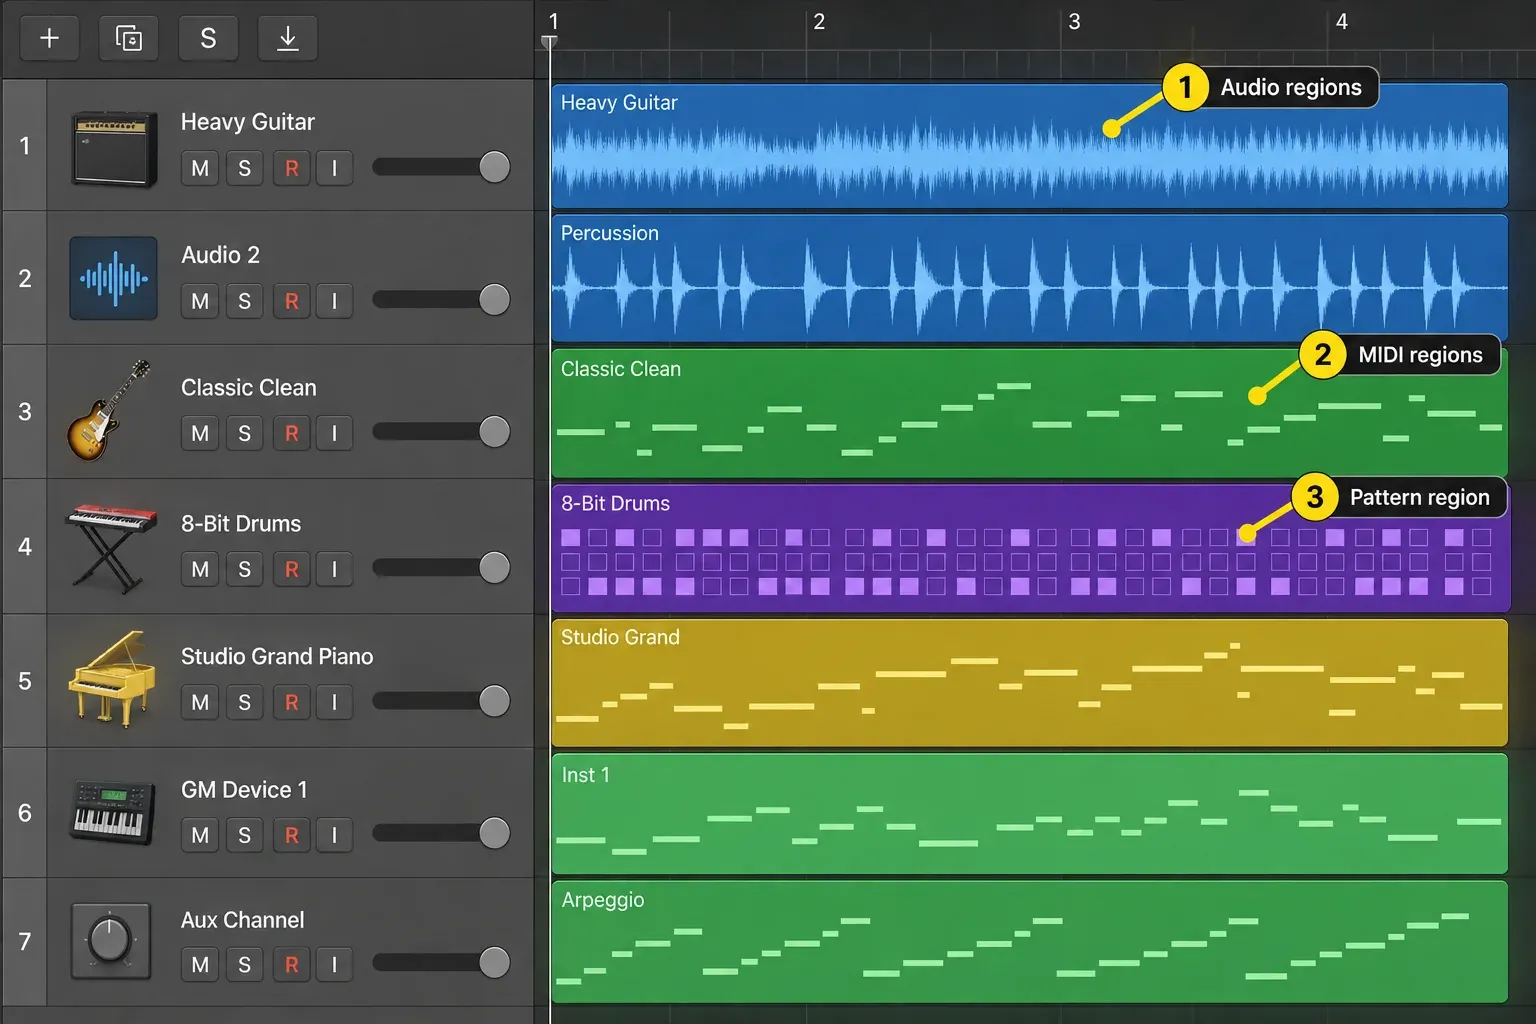
First make the repeated loop change by taking parts away. One pass could:
- open with the main musical idea but fewer drums;
- bring in the full kick and bass for the central section;
- remove the kick briefly before an important return;
- change the final drum or bass phrase at a transition;
- save the brightest or busiest layer for the section that should feel largest.
None of those choices dictates a song form. Play through the transitions and listen for a change you can actually hear. Edit a copied region when a section needs a variation; repeating the same loop won't create one for you.
7. Make a rough mix without killing the idea
Balance the kit sounds, bass and musical part before processing them. Drum Machine Designer has individual sound channels and a parent kit channel; lowering both changes the level at two stages. Keep Stereo Out below clipping, and look upstream if an instrument or effect is already overloaded. The gain-staging guide shows where to check.
Add processing after you can describe what needs fixing:
- Kick and bass mask each other: change the parts, envelopes, octave, or sound choice before making steep EQ cuts.
- Drums feel flat: revisit velocity and arrangement before compressing the whole kit.
- Music covers the snare: lower or simplify the competing part, then EQ if the collision remains.
- The beat is loud but small: bypass the output processing and compare at similar listening level.
Leave the final loudness choice until the arrangement holds together. When output processing makes a version seem better, bypass it and compare at a similar listening level. Volume alone can make the wrong version sound convincing.
8. Bounce the beat and listen away from the grid
- Make sure the tracks you want are unmuted and routed to the main output. Define the whole beat’s range with Cycle, selected regions, or Start and End in the Bounce dialog. Check that you have not left a one-bar practice cycle active.
- Choose File > Bounce > Project or Section.
- For a stereo audio file, choose Uncompressed in Destination, WAVE as File Type and Interleaved as Format. Choose the bit depth and sample rate required by the recipient; for a practice copy, 24-bit at your project’s sample rate is a reasonable starting point, not a universal delivery rule.
- Check Start and End and allow space for the final reverb or delay. Choose Normalize: Off to keep the level you mixed, after checking for overload.
- Click Bounce. Enter a filename in Save As, choose a folder and click Bounce again to save the file.
- Open the resulting file outside Logic and listen from the first hit through the final tail. Check for missing parts, unwanted silence or a cut-off ending.
Apple documents the project-bounce steps and Uncompressed file options. Older releases label this destination PCM. For this exercise, a normal stereo project is sufficient; you do not need a surround or Dolby Atmos export. If the file is wrong, return to the project, fix the range or mix and bounce again.
Step Sequencer or Piano Roll: which should you use?
| Use | Step Sequencer | Piano Roll |
|---|---|---|
| Repeating drum grid | Fast and easy to read | Works, but less immediate |
| Per-step velocity or repeats | Built into the row and step workflow | Editable, with a different view |
| Long bass or chord notes | Possible, but not always the clearest view | Usually easier |
| Played MIDI performance | Best after converting or rebuilding as a pattern | Natural editing home |
| Detailed note length and overlap | More abstract | Clear and precise |
The editor follows the part, not the project. A repeating drum grid is easy to read in Step Sequencer; Piano Roll gives you clearer control over note shape and timing. Use the Tracks area to decide when each region plays.
Five reasons a first beat is not working
There is no sound
Check the software instrument track first. Is the pattern region muted, and does its channel reach Stereo Out? Drum Machine Designer's pad listen button tells you whether that pad has a sound. If everything is silent, use the Logic Pro no sound checks before rebuilding the pattern.
The drums sound robotic
Start with velocity. Quieter repeated hats and a firmer backbeat often help more than shifting every note away from the grid. Add timing variation only where you hear a better pocket; emphasis and phrasing make a groove feel played, random error doesn't.
The low end is muddy
Solo kick and bass together. Shorten one sound, remove an overlapping note, try another octave or choose a sound with a different envelope. Once both parts have room, processing becomes easier to judge.
The loop is good but the song is boring
Hold one important part back at the opening. Try a brief dropout before its return, or change the last phrase of a section. Give the listener a reason to notice the next section before adding another layer.
There are too many sounds
Mute the less important parts, then bring them back one by one. Keep a sound when its rhythm, harmony or texture earns its place; if it only crowds the mix, leave it out.
Frequently asked questions
Do I need a MIDI keyboard to make a beat in Logic Pro?
No. You can enter drums in Step Sequencer and draw bass, chord, or melody notes in the Piano Roll. A MIDI keyboard can make performance-based parts faster, but it is optional.
Can I make a complete beat with only Logic Pro stock plugins?
Yes. Drum Machine Designer, Step Sequencer, the included software instruments, Apple Loops, EQ, compression, and the built-in bounce tools cover the complete workflow in this guide. Third-party plugins can add choices, but they are not required.
Should I use Step Sequencer or Piano Roll for drums?
Use Step Sequencer for pattern regions when a repeating grid and per-step changes help. Use Piano Roll for MIDI regions when note length, detailed placement, or a played performance matters more. If you need to move a pattern into Piano Roll, convert the pattern region to a MIDI region first; both region types can live in the same project.
Why does my Logic Pro beat sound robotic?
Check for identical velocities, a crowded hi-hat row, and every sound landing with the same emphasis. Change velocity first, remove hits that do not help the groove, and move notes only when the timing change serves the feel.
How do I turn a loop into a full beat?
Select the regions and Option-drag copies across the Tracks area. Create contrast between sections by removing or adding drums, changing the bass ending, bringing the main sound in later, or using a short fill or dropout.
How do I export a beat from Logic Pro?
Set the full bounce range, choose File > Bounce > Project or Section and select the needed file settings. Click Bounce, enter a filename and folder, then click Bounce again. Listen to the saved audio file outside Logic to check its start, ending and included parts.
Check the finished beat
Save the project once the changes are in place. Keep the project beside the bounced file: if the listening check catches a missing part or a clipped ending, you can fix the arrangement and export again.
The Create Music in Logic Pro hub leads to deeper work on drums, samples, instruments and arrangement. For recording or editing a performance, use the Logic Pro recording and editing hub. The Logic Pro tutorials hub collects the broader task guides.


