Gain Staging in Logic Pro: A Practical Workflow
A source-to-output Logic Pro gain-staging workflow that separates recording level, Region Gain, plug-in drive, fader balance, buses and Stereo Out.

Gain staging in Logic Pro means keeping the signal at a useful level at every handoff, not forcing every track to hit one magic number. Set live-recording gain before the converter clips, correct unruly audio before it reaches insert effects, feed level-sensitive plug-ins deliberately, match their output for honest A/B tests, then leave enough room on buses and Stereo Out for the mix to move.
This guide was fact-checked against Apple’s current Logic Pro documentation on September 12, 2026. It doesn’t treat −18 dBFS, −12 dBFS, or −6 dBFS as universal track targets. Those figures answer different questions, and they behave differently for a snare transient, sustained vocal, software instrument, and full mix.
Gain staging is the level-control stage inside the complete Logic Pro mixing workflow. Start with the hub if the problem could be balance, routing, EQ, dynamics or mastering rather than raw signal level.
Fast workflow: play the loudest real section, inspect the signal before the fader, lower the source or Region Gain when it’s already too hot, place the first processor at a sensible input level, compensate every processor’s output, build balance with the channel faders, then follow the signal through submix auxes to Stereo Out. Turn the monitor controller up if the session feels quiet. Do not overdrive the mix to fix listening volume.
What gain staging actually controls
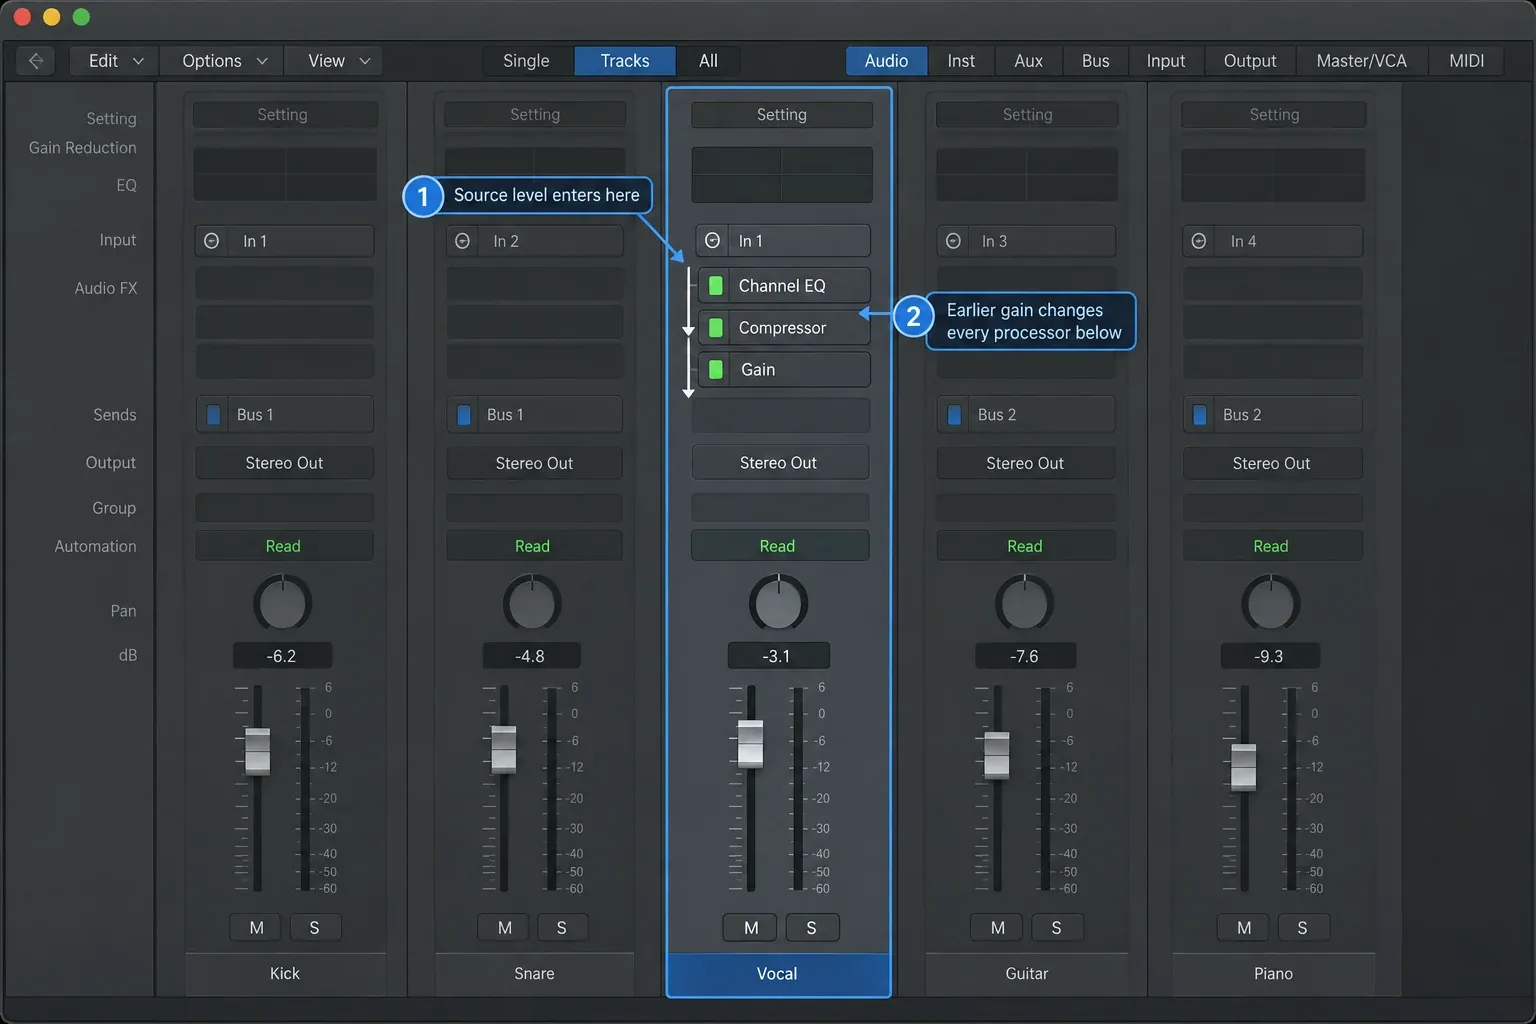
A Logic Pro channel is a chain of level handoffs. Audio can start at a microphone and interface, an audio region, or a software instrument. The main channel path passes through insert plug-ins in series and then the channel fader before reaching its Output destination. Sends branch off at their chosen pre-fader, post-fader or post-pan point and can feed separate aux returns. Those returns and subgroups have their own processing and output paths. A level change at one point affects every downstream stage, but it can’t undo damage that happened earlier.
| Control | Use it for | What it does not fix |
|---|---|---|
| Interface preamp | Setting a clean live input before analog-to-digital conversion | A clipped take already recorded |
| Region Gain or Gain tool | Changing recorded audio before the channel’s insert processing | Software-instrument output or an aux return |
| Instrument output | Lowering an overly loud software-instrument patch at its source | A later plug-in that adds level |
| Gain plug-in | Trimming a signal at a chosen position in the insert chain | Converter clipping that happened during recording |
| Plug-in input/output | Controlling how hard that processor is driven and matching its result | The balance of the complete mix |
| Channel fader | Balancing the processed channel in the mix | An insert plug-in that was overloaded before the fader |
| Aux or bus trim/fader | Managing a subgroup, parallel return, or shared effect | Overload inside an upstream track chain |
| Stereo Out fader | Controlling the final output after the mix reaches it | Poor level relationships or crushed plug-ins upstream |
Do you need to hit −18 dBFS in Logic Pro?
No. −18 dBFS is one common alignment choice where a nominal analog level or 0 VU is mapped below digital full scale. Universal Audio’s metering guide shows why the device or plug-in manual matters: documented calibrations can place 0 VU at −14, −16, −18, or −20 dBFS. None of those values means every Logic track should peak there.
The distinction between peak level and average level matters. A snare can have a high peak with a much lower average. A distorted bass can have a similar peak but far more sustained energy. Telling both tracks to “hit −18” without naming the meter and measurement produces two very different operating levels.
Use a manufacturer’s stated reference when a particular analog-modelled processor documents one. Otherwise, send the plug-in enough level to work predictably, listen for unintended saturation or compression, and use its input and output controls to make a level-matched decision. Digital headroom inside a mix is useful, but it doesn’t make nonlinear plug-ins, external hardware, converters, or the final output immune to overload.
Set recording gain before Logic can repair anything
For a microphone, guitar, or hardware synth, the interface preamp is the first critical stage. Ask the performer to play the loudest realistic passage. A quiet rehearsal can underestimate the level of the actual take. Raise the preamp until the signal sits clearly above the hardware noise floor, but leave room for unexpected peaks. If the interface input clips, reduce the hardware gain. If only Logic’s processed channel meter is hot, check gain-changing inserts before turning down a clean hardware input.
Apple’s input-monitoring documentation confirms that Logic’s input meters warn when the converter input overloads. If the microphone preamp or analog converter stage distorts, turning down Region Gain, a plug-in, or a fader later only makes that damaged waveform quieter.
There’s one important digital exception. With a compatible audio device and 32-bit float recording selected, Apple says digital clipping in the recorded file can be removed by lowering Region Gain. That recovery doesn’t repair analog front-end distortion, so the preamp still needs a clean level.
There’s no single safe peak for every performance. Focusrite’s current interface guidance uses a peak around −12 dBFS as a conservative digital-recording example. Treat that as a starting point. It isn’t a Logic requirement. A controlled direct-input synth and a singer who suddenly projects a chorus need different margins. The real target is a clean capture with useful signal-to-noise ratio and room for the source’s dynamics.
If recording level, monitoring, or the microphone path is still unstable, fix it with the Logic Pro vocal-recording workflow before building a mix chain.
Read Logic’s meters at the right point
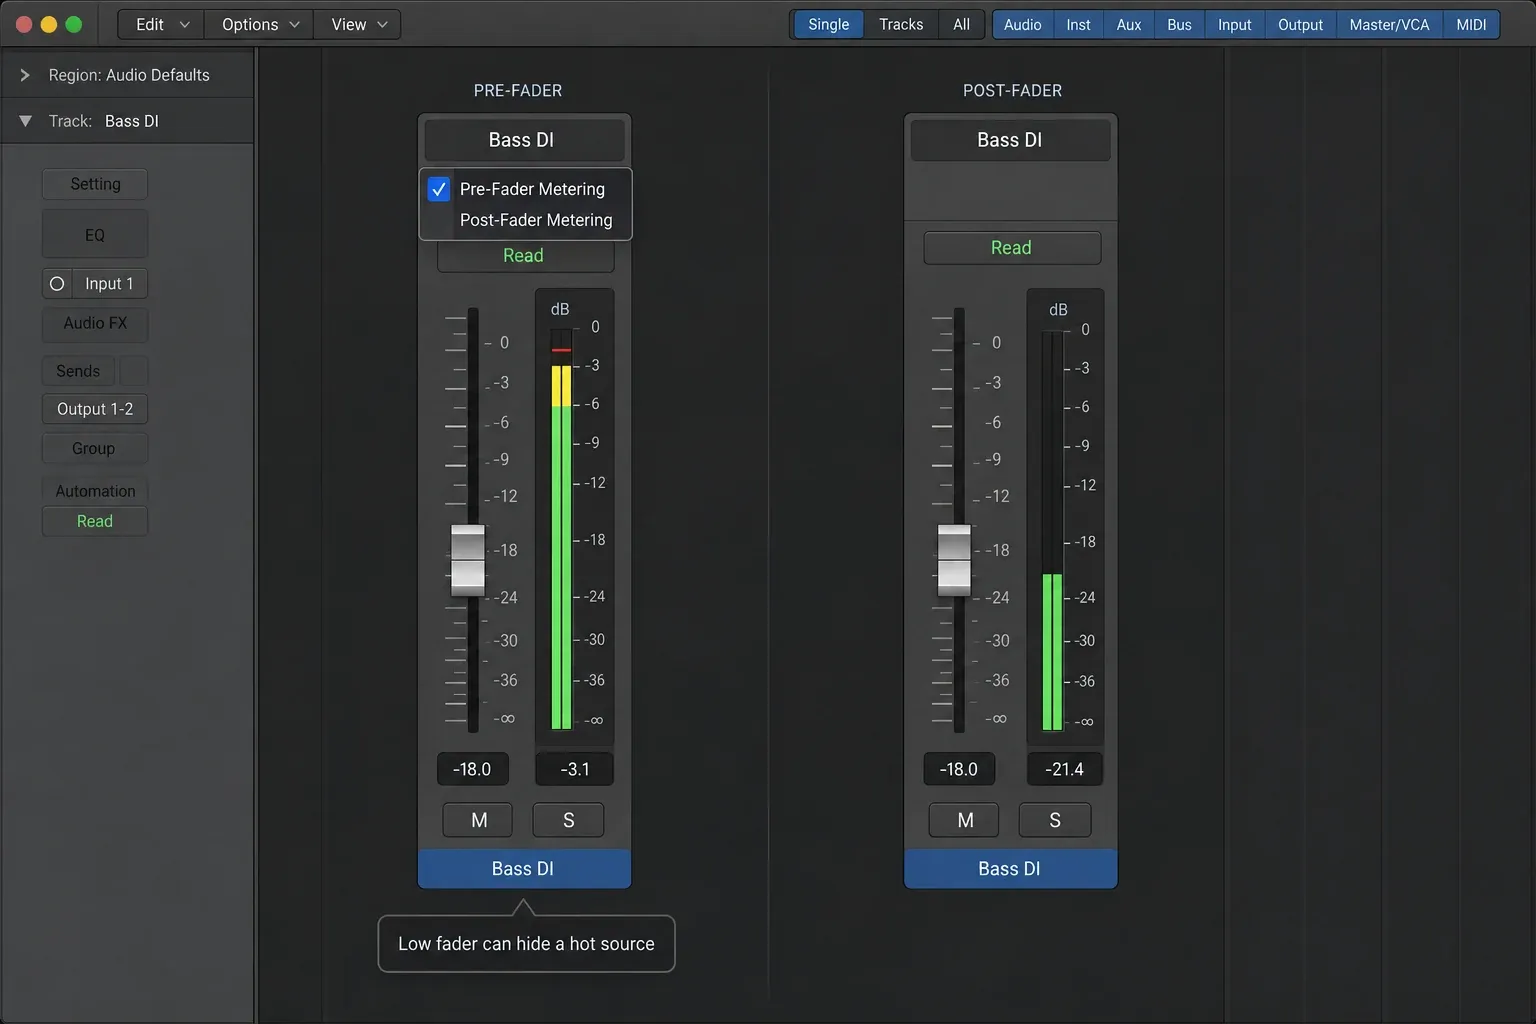
Logic normally shows channel level after the volume fader. Apple calls that the most effective meter view when mixing because it reflects the balance you’re sending onward. Choose Mix → Pre-Fader Metering when you need to inspect what reaches the fader. That matters while you’re setting an incoming hardware level, or when a low fader is hiding a hot signal on a channel. In the normal channel flow, this view sits before the fader but after the insert chain. For a hardware-input check, use the interface’s input meter too, and bypass or inspect gain-changing channel inserts. A pre-fader reading alone does not identify whether the source or an insert caused the overload.
Switch the meter view to suit the task:
- Before recording: check the interface input meter and Logic’s pre-fader meter with gain-changing inserts bypassed or accounted for.
- Before processing: use it to reveal a hot source or insert chain that a low fader makes look safe.
- While balancing: return to normal post-fader metering so the meters reflect the levels actually leaving the channels.
Apple documents all three ways to switch the view: the Mix menu, a control-bar button, or an assigned key command. Click a clipping indicator to clear the overload flags, then replay the loudest section and inspect again. An old peak hold isn’t proof that the current pass still clips.
Use Region Gain before reaching for the fader
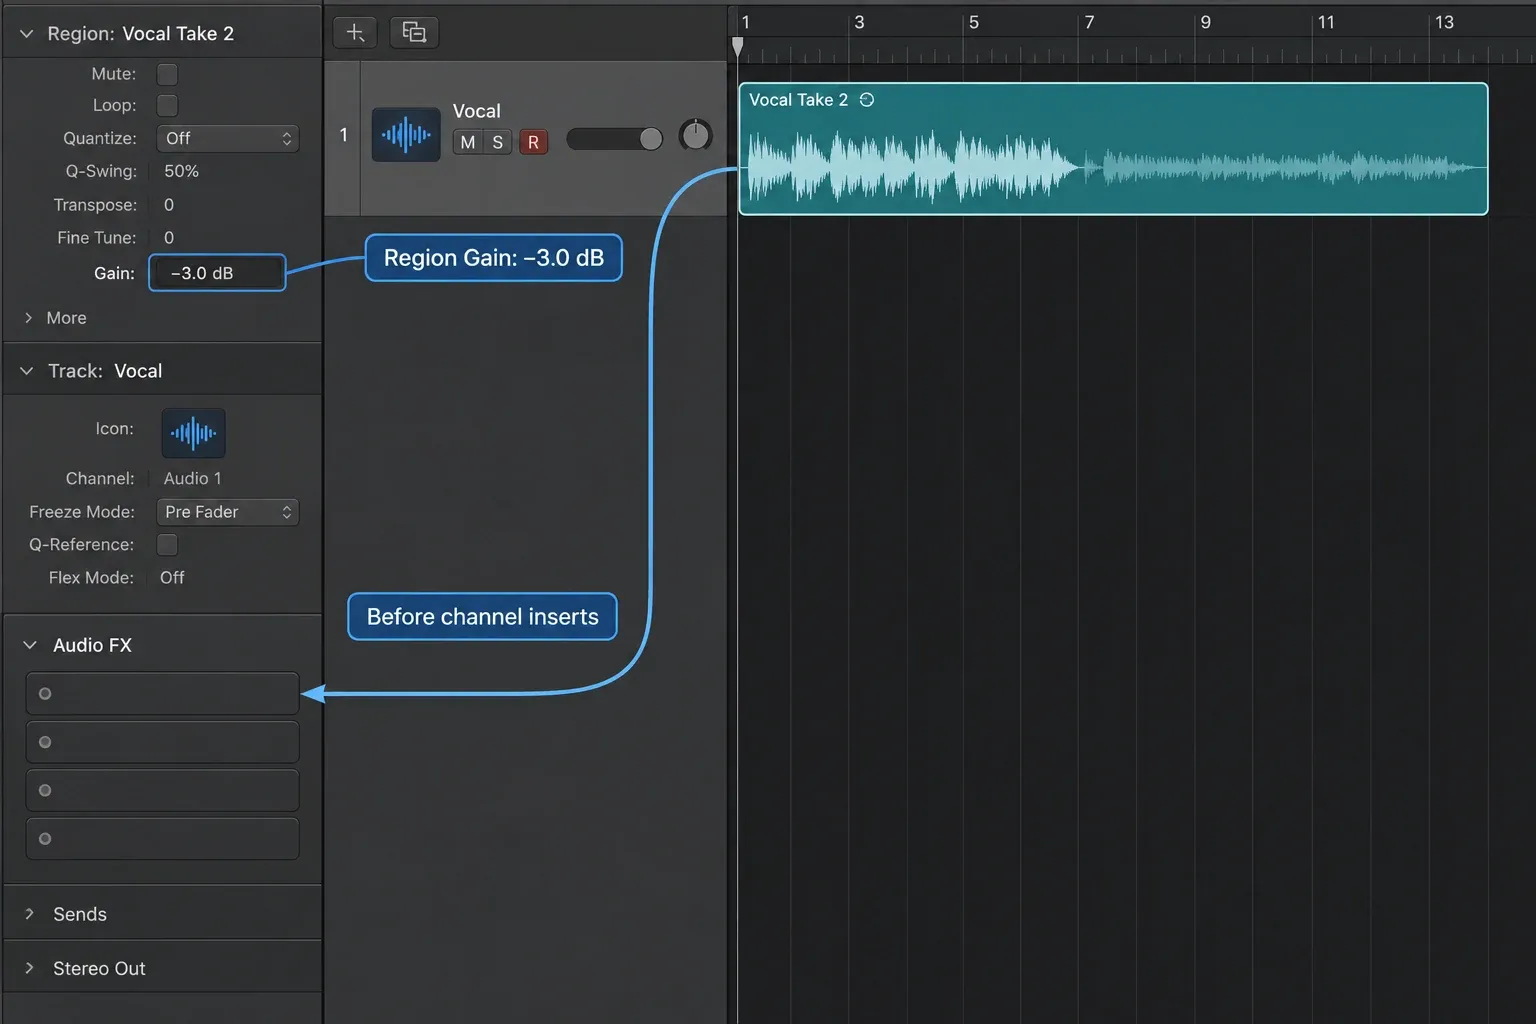
For recorded audio, Region Gain adjusts a region or phrase before the insert chain. Select the region, open the Inspector, expand its region parameters, double-click Gain and enter a dB value; use a minus sign to reduce it. Or choose Gain from the Tracks area Tool menu and drag vertically over the region. If you first make a marquee selection, the Gain tool creates a new region for the adjusted portion. This changes the edit boundaries, so check them afterward.
Apple’s current Region Gain instructions document a −30 dB to +30 dB range and show both the Gain tool and Inspector workflow. The edit changes the region without requiring a permanent rewrite of the source file.
Use Region Gain to reduce a synth loop that arrives near full scale, smooth an unusually loud vocal phrase before compression, or bring several recorded regions into the same practical neighborhood. Do not flatten every natural accent. The goal is to stop extreme differences from making the next processor solve the wrong problem.
Region Gain, normalization, and automation are not interchangeable
- Region Gain changes the audio level before channel processing and is ideal for source preparation.
- Normalize Region Gain can move selected material toward a target, but peak normalization does not make different sounds equally loud or equally useful to a compressor. To use it, select the audio regions and choose Functions → Normalize Region Gain in the Tracks area. Process controls whether they are adjusted together, per track or individually; Method selects Peak or Loudness. Set Target Level, then click Apply. Apple’s Normalize Region Gain instructions describe this nondestructive operation.
- Volume automation usually expresses mix balance after processing. Use it for phrases and sections that should move in the finished mix.
For Read, Touch, Latch, Write, Relative, and Trim behavior, keep the gain-stage repair separate from the Logic Pro automation workflow.
Gain-stage software instruments at the source
Software-instrument presets often vary dramatically in output. If a patch is already driving the next insert too hard, lower the instrument’s own output when that control is predictable and part of the saved patch. That keeps the cause and effect clear: the instrument generates the level and the channel fader balances the processed sound.
If the instrument has no practical output trim, or changing it alters the patch’s tone, insert Logic’s Gain utility immediately after the instrument and before the affected processors. Apple describes the Gain plug-in as a specific dB adjustment and notes where it helps most: when another effect lacks a gain control, or when an automated track needs a separate level change. Choose Utility → Gain from an Audio Effect slot, place it before the processor you need to feed differently, and adjust its Gain knob or field.
Do not insert Gain on every track by habit. It’s a tool for a named level problem. An audio region can often be corrected more transparently with Region Gain. An aux may need its return control. A compressor may already provide input and makeup gain.
Match input and output around every processor
Logic routes multiple insert effects in series: the output of one becomes the input of the next. That’s why a bright move in Logic Pro Channel EQ can make a following compressor reduce more gain, or a compressor’s makeup gain can drive a saturator harder than expected. Apple’s insert-routing guide confirms this serial handoff.
- Loop a representative musical section, including the transition that stresses the processor.
- Set the processor for the tonal or dynamic job you want.
- Use its output, makeup, or a following Gain plug-in so bypass and active states are close in perceived loudness.
- Compare in the full mix instead of relying on solo.
- Keep the processor only if its intended benefit survives the level-matched comparison.
Level matching isn’t cosmetic. A louder bypass comparison can persuade you that an EQ, compressor, or saturator improved clarity when it mostly increased volume. It also reveals accidental gain buildup across a long chain.
Build the mix with faders, then inspect buses and auxes
Once source and insert levels behave, use channel faders for musical balance. Keeping every fader at 0 dB isn’t a goal. Faders exist to place tracks in the mix. Logic gives you more useful control when you’re not stuck at the very bottom of their travel because every source is too loud.
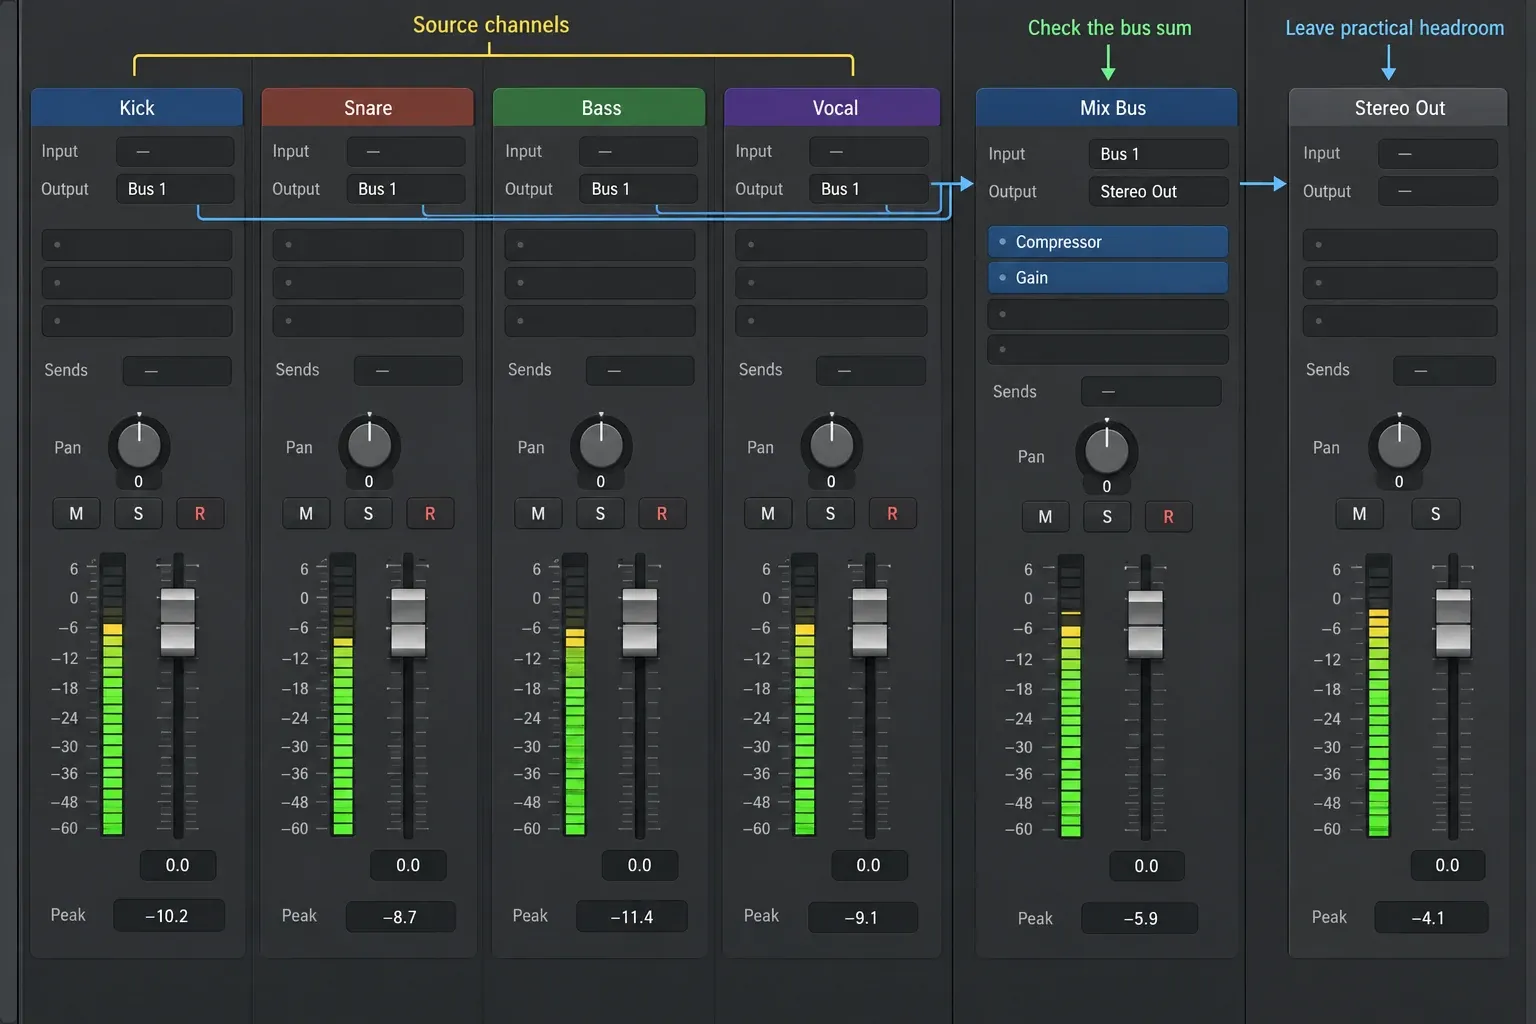
Then follow the combined signal. Ten safe-looking tracks can sum to a hot drum bus. A parallel compressor can add level beside the dry signal. A reverb return can build low-frequency energy that no single source meter explains. Check aux inputs, processors, return faders, submix buses, and Stereo Out in order. The buses, sends and aux routing guide maps those handoffs.
Use the routing guide to separate a subgroup Output from a parallel Send. The vocal-mixing guide then shows fully wet reverb and delay returns in a complete mix.
Check Stereo Out and mastering headroom
Avoid accidental clipping at physical outputs and in fixed-point delivery files. Apple’s peak-level and clipping guide makes an important distinction: an individual channel strip can show an overload indication without the summed output clipping. That doesn’t mean every upstream level is automatically healthy. Nonlinear plug-ins and external stages can still be driven too hard. Trace the signal rather than treating every orange channel indicator as a damaged recording.
Do not force the unmastered mix to peak at exactly −6 dBFS because an internet checklist says so. Leave practical headroom for your intended mastering chain, avoid accidental clipping, and document whether any bus saturation or limiting is an intentional part of the sound. The Logic Pro mastering workflow covers the next steps once the mix has usable headroom.
In a stereo project, Apple recommends leaving the Master channel strip at 0 dB and controlling the overall output with the output channel strip. The Master strip isn’t the same as Stereo Out. Apple explains the difference in its project-volume documentation. For this nondestructive mix experiment, project alternatives preserve another mix state but share the same audio assets; they are not an independent backup of your recordings.
A gain-staging rescue workflow
- Save the project, then choose File → Project Alternatives → New Alternative. Give it a name and click Done before changing established levels.
- Bypass any final limiter used only to make the rough mix loud.
- Click a clipping indicator to clear the overload flags, then play the densest section.
- Choose Mix → Pre-Fader Metering and find the hottest sources and insert chains.
- Reduce recorded audio with Region Gain and software instruments at their source.
- Check each level-sensitive processor from first insert to last.
- Match every processor’s output closely enough for an honest bypass test.
- Return to post-fader metering and rebuild the musical balance.
- Inspect submixes, parallel returns, reverbs, delays, and Stereo Out.
- Raise monitor volume instead of session gain if clean headroom makes playback feel quieter, keeping listening level comfortable. Save the finished alternative with Command-S.
Diagnose gain-staging problems by symptom
| Symptom | Likely checkpoint | First test |
|---|---|---|
| Recorded waveform sounds distorted at any playback level | Mic preamp, analog input stage, converter, or fixed-point recording | Make a new take at lower hardware gain. If a compatible interface recorded clean 32-bit float data above 0 dBFS, test lower Region Gain before assuming the file is damaged. |
| Track meter looks safe only because its fader is very low | Source or insert chain | Switch to pre-fader metering and inspect the level before balance. |
| Compressor reacts before the threshold seems reasonable | Signal entering the compressor | Check Region Gain, earlier EQ boosts, and the processor’s input control. |
| Saturator changes tone dramatically between presets | Level-sensitive plug-in input | Trim into the plug-in and read its documented calibration if provided. |
| Mix bus clips although tracks appear safe | Summing, aux returns, or subgroup processing | Trace buses and parallel returns before lowering Stereo Out. |
| Every bypassed plug-in sounds worse | Unmatched output levels | Compensate output and compare at similar perceived loudness. |
| Clean mix feels too quiet in the room | Monitoring level | Raise the interface or monitor controller, not the Stereo Out signal. |
Gain-staging myths worth dropping
“Every track should peak at −18 dBFS”
−18 dBFS is commonly discussed as an average alignment reference, not a universal peak target. Transient and sustained sources require different readings, and plug-in calibrations vary.
“Pre-fader metering is always more accurate”
It answers a different question. Pre-fader exposes the level before fader balance. Post-fader shows what the balanced channel sends onward. Apple explicitly recommends normal post-fader metering for mixing and pre-fader when checking input level.
“Just lower Stereo Out”
That can prevent the final output from clipping, but it can’t change how earlier compressors, saturators, clippers, or external devices were driven. Repair the first harmful stage.
“A clean DAW means gain staging no longer matters”
Floating-point headroom makes internal level recovery more forgiving, but recording converters, nonlinear processors, fixed-point stages, external hardware, and final delivery still have limits. Gain staging also keeps processors predictable and comparisons honest.
Final checklist before mixing forward
- Live recordings are clean at the converter and preserve margin for real performance peaks.
- Audio regions and instruments reach the first insert at a sensible level.
- No processor changes merely because an earlier stage accidentally became louder.
- Plug-in bypass comparisons are level-matched closely enough to judge tone and dynamics.
- Channel faders are used for balance, not to hide an overloaded insert chain.
- Aux returns and submix buses have been checked, not assumed safe.
- Stereo Out does not clip, and intentional bus processing is documented.
- Monitor loudness is controlled at the listening system, independent of session headroom.
Use the Logic Pro tutorials hub for the surrounding recording, editing, mixing, and export workflows. Once the mix has stable levels, the separate Mastering Assistant guide explains how to analyze and compare a finished stereo mix without confusing loudness with improvement.
Frequently asked questions
What level should tracks be in Logic Pro?
There is no universal per-track number. Keep live input below converter clipping with margin for real peaks, feed level-sensitive plug-ins deliberately, and balance tracks so buses and Stereo Out retain practical headroom.
Should I gain-stage to −18 dBFS in Logic Pro?
Only when −18 dBFS is a useful average alignment reference for a documented workflow or plug-in. Do not force every track’s peak to −18 dBFS; peak and average level are different measurements.
Should I use Region Gain or the Gain plug-in?
Use Region Gain to change recorded audio before the channel insert chain. Use the Gain plug-in when you need trim at a specific point in that chain, on a software instrument or aux, or when automation and other processing should remain intact.
Does lowering the fader reduce the level into plug-ins?
Not for normal channel inserts placed before the fader. Lowering the fader changes the channel’s later playback level, so use Region Gain, instrument output, plug-in input, or an earlier Gain utility to change what reaches those inserts.
Should pre-fader metering stay on while mixing?
Not necessarily. Use it when you need to inspect pre-fader level, then switch views when the task changes. Apple says Logic’s normal post-fader meters are the most effective view for mixing because they reflect the balanced channel output.
How much headroom should I leave for mastering?
Leave enough room to avoid accidental clipping and to operate the intended mix-bus or mastering chain cleanly. Some mastering engineers request a fixed peak ceiling such as −6 dBFS for handoff, but it is not a universal sonic requirement. Follow the actual engineer or downstream service specification.
Can 32-bit float recording fix clipping in Logic Pro?
It can recover digital overs in a 32-bit float file recorded from a compatible device; Apple says to lower Region Gain. It cannot repair distortion that already occurred in the microphone preamp or analog converter stage.
Why does Logic show clipping on a track but not Stereo Out?
Logic can indicate an overload on an individual channel while the final output remains below clipping. Inspect nonlinear plug-ins and external stages for audible overload, but distinguish that from clipping the summed physical output.


