How to Mix Vocals in Logic Pro With Stock Plugins
A decision-led Logic Pro vocal mix using stock EQ, compression, de-essing, reverb, delay, arrangement balance and automation—not magic presets.

A useful Logic Pro vocal chain isn’t a fixed row of presets. It’s a sequence of decisions: make the performance consistent, remove what distracts, control dynamics, place the voice in the arrangement, and automate what still changes from phrase to phrase.
Last verified August 6, 2026 against the current Apple documentation cited in this guide. It deliberately avoids universal EQ frequencies, compression thresholds, and “industry” vocal settings. Those numbers depend on the recording, singer, microphone, arrangement, and level entering each plug-in.
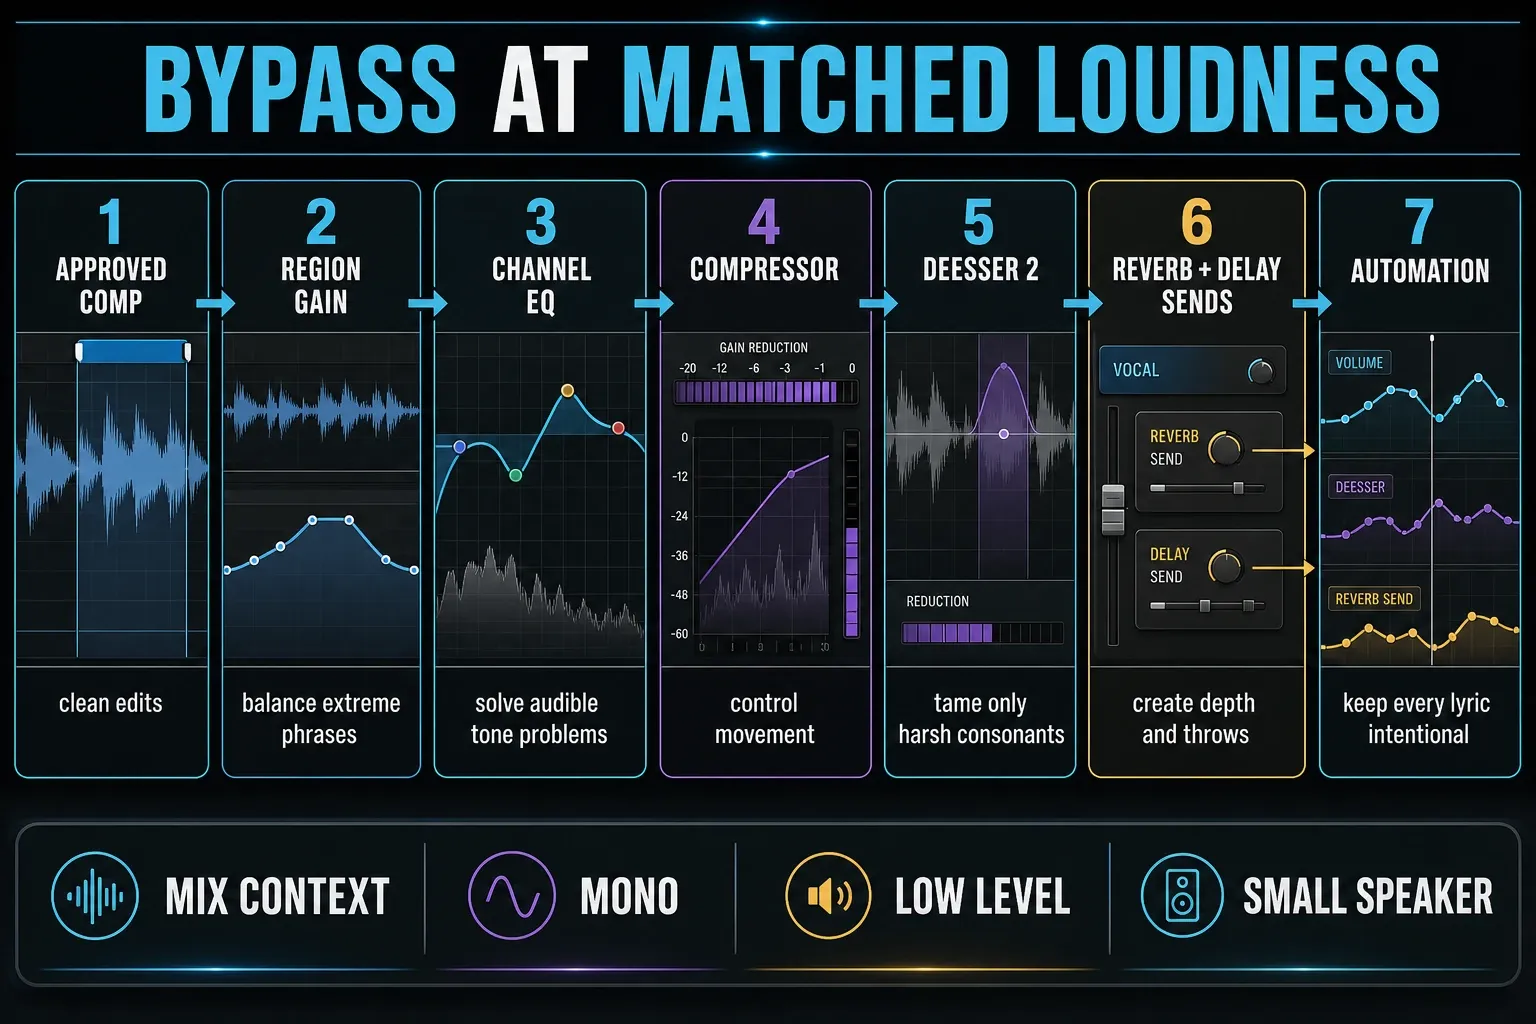
Fast answer: start with an approved comp, edit clip gain before compression, use Channel EQ for specific problems, compress for controlled movement, de-ess only the harsh consonants, send to ChromaVerb or Space Designer and Stereo Delay on aux channels, then use volume and effect-send automation to keep every phrase intentional.
A stock Logic Pro vocal chain
| Stage | Stock tool | Purpose |
|---|---|---|
| Preparation | Region Gain, fades, automation | Even out extreme phrases and clean edits |
| Corrective tone | Channel EQ | Remove rumble, resonance, mud, or excessive edge |
| Dynamic control | Compressor | Keep the vocal stable without flattening expression |
| Sibilance | DeEsser 2 | Reduce distracting S and SH energy |
| Color if needed | Vintage EQ, Exciter, Phat FX | Add deliberate tone rather than repair problems |
| Depth | ChromaVerb or Space Designer on an aux | Place the voice in a believable space |
| Movement | Stereo Delay or Tape Delay on an aux | Add rhythmic repeats and throws |
| Final balance | Volume and send automation | Keep lyrics and effects balanced across the song |
Prepare the vocal before adding plug-ins
Mix the approved comp, not a folder full of undecided performances. Listen for clicks, mismatched edits, doubled breaths, headphone spill, plosives, and phrases that are dramatically louder or quieter than their neighbors.
Use Region Gain or clip-level editing to reduce extreme differences before the compressor. Add short fades to edited boundaries. Remove noise only when it’s distracting. Aggressive gates often cut consonants, tails, or soft breaths and create a more obvious problem than the room tone.
Build a rough vocal balance with the instrumental before inserting anything. If the lyric is already masked by a dense guitar, synth or cymbal layer, note that collision now. A channel-strip chain can change the vocal. But sometimes the cleaner fix is an arrangement move or a small complementary cut in the competing instrument.
Use a controlled A/B test
- Loop a representative verse-to-chorus transition, not only the worst syllable.
- Make one processing decision and compensate its output so bypass is not obviously quieter.
- Compare in the full mix, then solo briefly only to identify artifacts.
- Keep the change only if it improves the intended problem without creating a larger one elsewhere.
If the source still needs recording or comp repair, return to the vocal recording and comping workflow rather than stacking processors on an unfinished performance.
How to mix vocals in Logic Pro with stock plugins
- Choose the approved vocal comp and clean audible edits.
- Balance extreme phrases with Region Gain before compression.
- Use Channel EQ to solve only the tonal problems you can hear in the mix.
- Set Compressor so the vocal becomes steadier without losing phrasing.
- Use DeEsser 2 to reduce distracting sibilance without dulling the whole voice.
- Create separate reverb and delay aux channels and feed them with sends.
- Balance lead, doubles, harmonies, and ad-libs as one vocal arrangement.
- Write volume and send automation for phrases that still move or need emphasis.
- Check the vocal quietly, loudly, in mono, and on a small speaker before printing.
Use Channel EQ in context
Insert Channel EQ and listen with the instrumental playing. A high-pass filter can remove unusable low-frequency noise, but moving it too high thins the body of the voice. Broad cuts can reduce boxiness or mud. Narrow cuts can calm a specific resonance. Presence or air boosts should be earned by the recording, not applied because a preset expects them.
Use the analyzer to locate energy, then decide with your ears. Sweep boosts only as a temporary diagnostic move, and get back to realistic gain before you judge anything. Bypass often at matched loudness.
Separate corrective and creative tone decisions. Corrective EQ removes a problem that follows the recording. A later broad tone move helps the voice belong in this arrangement. Keeping those jobs separate makes it easier to find the stage that caused thinness, harshness or excess brightness.
Compress for movement, not a target meter reading
Logic’s stock Compressor offers several circuit models, but the model matters less than the envelope. Set the threshold so compression happens on the phrases that need control. Use attack to decide how much consonant and transient detail passes. Use release so gain recovers musically before the next phrase.
Start with one compressor doing moderate work. If the vocal needs heavy control, two gentler stages can sound more natural than one stage crushing every peak. Match output level when comparing, because louder usually sounds more impressive even when the balance is worse.
Apple’s Compressor guide documents the available controls and models. Treat its presets as starting points, not decisions made for your singer.
Diagnose attack and release by sound
| What you hear | Likely control interaction | First move to test |
|---|---|---|
| Words lose impact and consonants feel pushed back | Attack may be too fast or gain reduction too deep | Slow the attack or reduce the amount, then level-match. |
| Level pumps between syllables | Release may be fighting the phrase rhythm | Adjust release while listening across whole lines. |
| Breaths jump forward | Compression or makeup gain exposes low-level detail | Edit breath level or reduce compression before adding a gate. |
| Chorus still disappears | The arrangement or automation changes more than compression can solve | Ride the phrase and inspect masking instruments. |
De-ess only what is distracting
Place DeEsser 2 where it reacts to the tone reaching it. Often that’s after corrective EQ and primary compression, but listen: compression can make consonants more obvious, while a bright EQ boost may change the frequency that needs control.
- Loop the harshest S or SH phrase.
- Use Channel EQ’s analyzer to identify the active high-frequency area.
- Set DeEsser 2 to focus on that range.
- Lower the threshold until the consonant becomes controlled.
- Back off if the vocal develops a lisp or loses clarity.
Apple describes DeEsser 2 as a fast compressor that isolates and attenuates a high-frequency band, and recommends using Channel EQ’s analyzer to help locate it. That’s more reliable than copying one frequency from another voice.
Create depth with aux sends
Put reverb and delay on separate aux channel strips at fully wet mix, then feed them from vocal sends. One shared space is easier to balance, automate, EQ, and reuse across leads and harmonies than a separate insert reverb on every track.
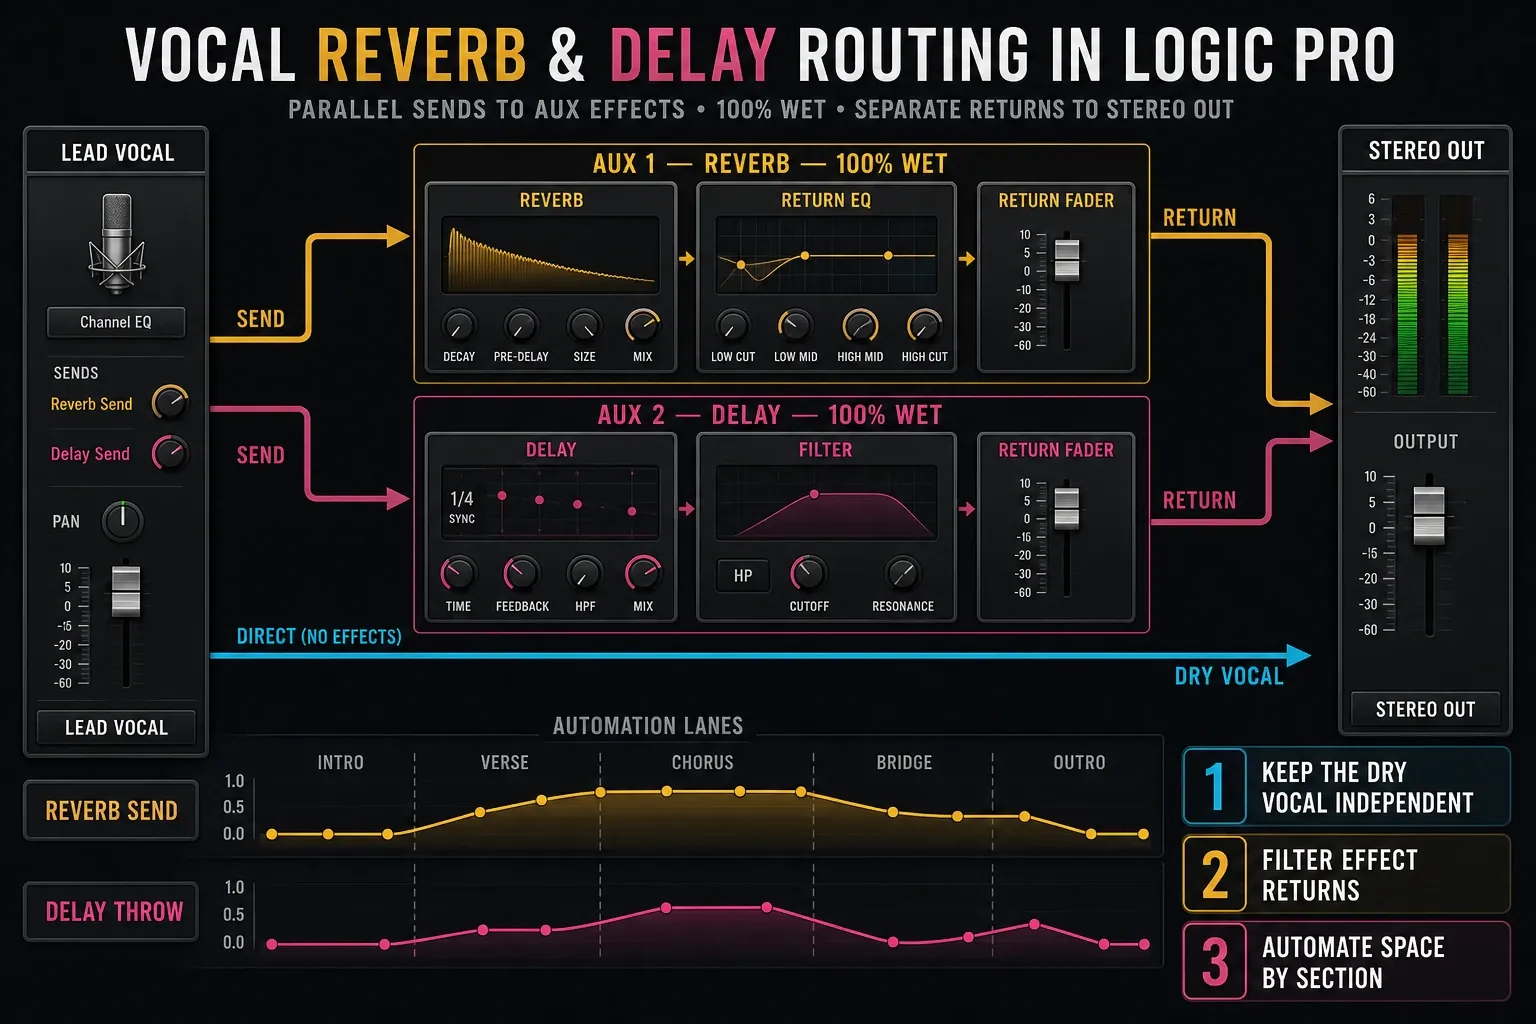
Logic creates an aux channel when you assign a bus from a send. Keep the effect plug-in at 100% wet on that return because the original track already carries the dry signal. Filter the return in context: removing irrelevant lows can prevent buildup, while taming excessive top end can keep repeated sibilance from spreading across the mix.
Reverb
Use ChromaVerb for flexible algorithmic spaces or Space Designer for impulse-response rooms. Set decay to support the song’s pace, pre-delay to keep the direct lyric distinct, and filter the return so lows don’t cloud the mix and highs don’t exaggerate sibilance.
Delay
Stereo Delay and Tape Delay can create width and rhythmic movement without pushing the vocal as far back as a long reverb. Filter the return, sync it when the arrangement benefits, and automate throws on line endings instead of leaving repeats equally loud throughout the song.
Balance the full vocal arrangement
The lead doesn’t exist alone. High-pass and shape doubles according to their job. They usually need less detail and level than the lead. Pan true doubles and harmonies only when it supports the arrangement. Keep ad-libs out of the lyric’s way, and route related vocals to a bus when shared processing helps them feel like one section.
Mute the instrumental elements that fight the lyric and listen to what changes. Sometimes the right vocal EQ move is a small cut or arrangement change in a guitar, synth, or cymbal rather than another boost on the singer. The song has to make space for the vocal. A channel strip can’t solve the arrangement alone.
Automation is the final vocal processor
After EQ and compression, ride the vocal so words remain intelligible without making every phrase equally loud. Automate reverb and delay sends for transitions, emphasized words, and pauses. Pull effects back in dense verses and let them open in exposed endings when the song asks for it.
When one word needs a delay throw, automate the send into the delay rather than raising the whole return. The effect receives only the chosen word, while the existing tail can decay naturally. For broad section changes, automate the send or return deliberately and label the lane so the next mix pass can explain the move.
For the complete Read, Touch, Latch, Write, Relative and Trim workflow, use the separate Logic Pro automation guide. Automation should follow the approved mix decision. It shouldn’t hide an unstable comp.
Final vocal checks
- Can every important lyric be understood at low playback level?
- Does the vocal become painful or spitty when the chorus gets loud?
- Do breaths and room tone change unnaturally between comp edits?
- Do reverb and delay disappear in mono or overwhelm headphones?
- Does bypassing the chain at matched loudness reveal an actual improvement?
- Does the vocal still work on laptop or phone speakers without becoming thin?
When the mix is stable, leave final loudness decisions to the project’s mastering stage rather than pushing a limiter on the vocal bus.
Related editing, timing and production tools are organized in the Logic Pro features hub.
Frequently asked questions
What stock Logic Pro plugins are best for vocals?
Channel EQ, Compressor, DeEsser 2, ChromaVerb or Space Designer, Stereo Delay or Tape Delay, Region Gain, and automation cover the core workflow. Add color tools only for a specific audible purpose.
What order should vocal plugins use in Logic Pro?
A practical start is corrective EQ, compression, and de-essing, with reverb and delay on sends. Change the order when one processor alters what the next processor should detect.
Should reverb be an insert or send on vocals?
Use a send to a fully wet aux for most vocal reverbs. It gives independent control over the dry vocal and effect return and makes automation, return EQ, and sharing across tracks easier.
Can Logic Pro stock plugins produce professional vocals?
Yes. The stock tools cover tonal balance, dynamics, sibilance, depth, delay, and automation. Recording quality, performance, arrangement, and decisions matter more than the brand of processor.
Why does my vocal sound harsh after mixing?
Check bright EQ boosts, compression that exposes consonants, excessive de-esser makeup, distortion, and competing cymbals or guitars. Bypass each stage at matched loudness and fix the first point where harshness appears.
Should EQ or compression come first on a Logic Pro vocal?
Corrective EQ commonly comes first so the compressor does not react strongly to unwanted rumble or resonance, but the order is not a law. If compression changes the tone or exposes sibilance, add a later tone or de-essing stage. Choose the order by how one processor changes what the next one detects.


