How to Autotune Vocals in GarageBand on Mac, iPhone and iPad
GarageBand’s autotune is the Pitch Correction slider on a Mac and Extreme Tuning on iPhone and iPad. Here’s how to set the key, what slider values five guides use, which tuning plugins load in GarageBand and why the effect sometimes does nothing.

GarageBand on a Mac has autotune built in. It’s called Pitch Correction: select the vocal track, open the Audio Editor, click Track in its inspector and drag the Pitch Correction slider to the right. Set the project key first, because new projects start in C major and the Limit to Key checkbox can only pull notes into the scale GarageBand thinks you’re in.
On iPhone and iPad the same job goes to the Extreme Tuning preset in the Audio Recorder. Antares AutoTune isn’t included on either platform, but on a Mac it and other tuning plugins load as Audio Units. Below are the steps for both platforms, the slider settings five published guides recommend, the plugins worth adding and the fixes for a tuner that does nothing.
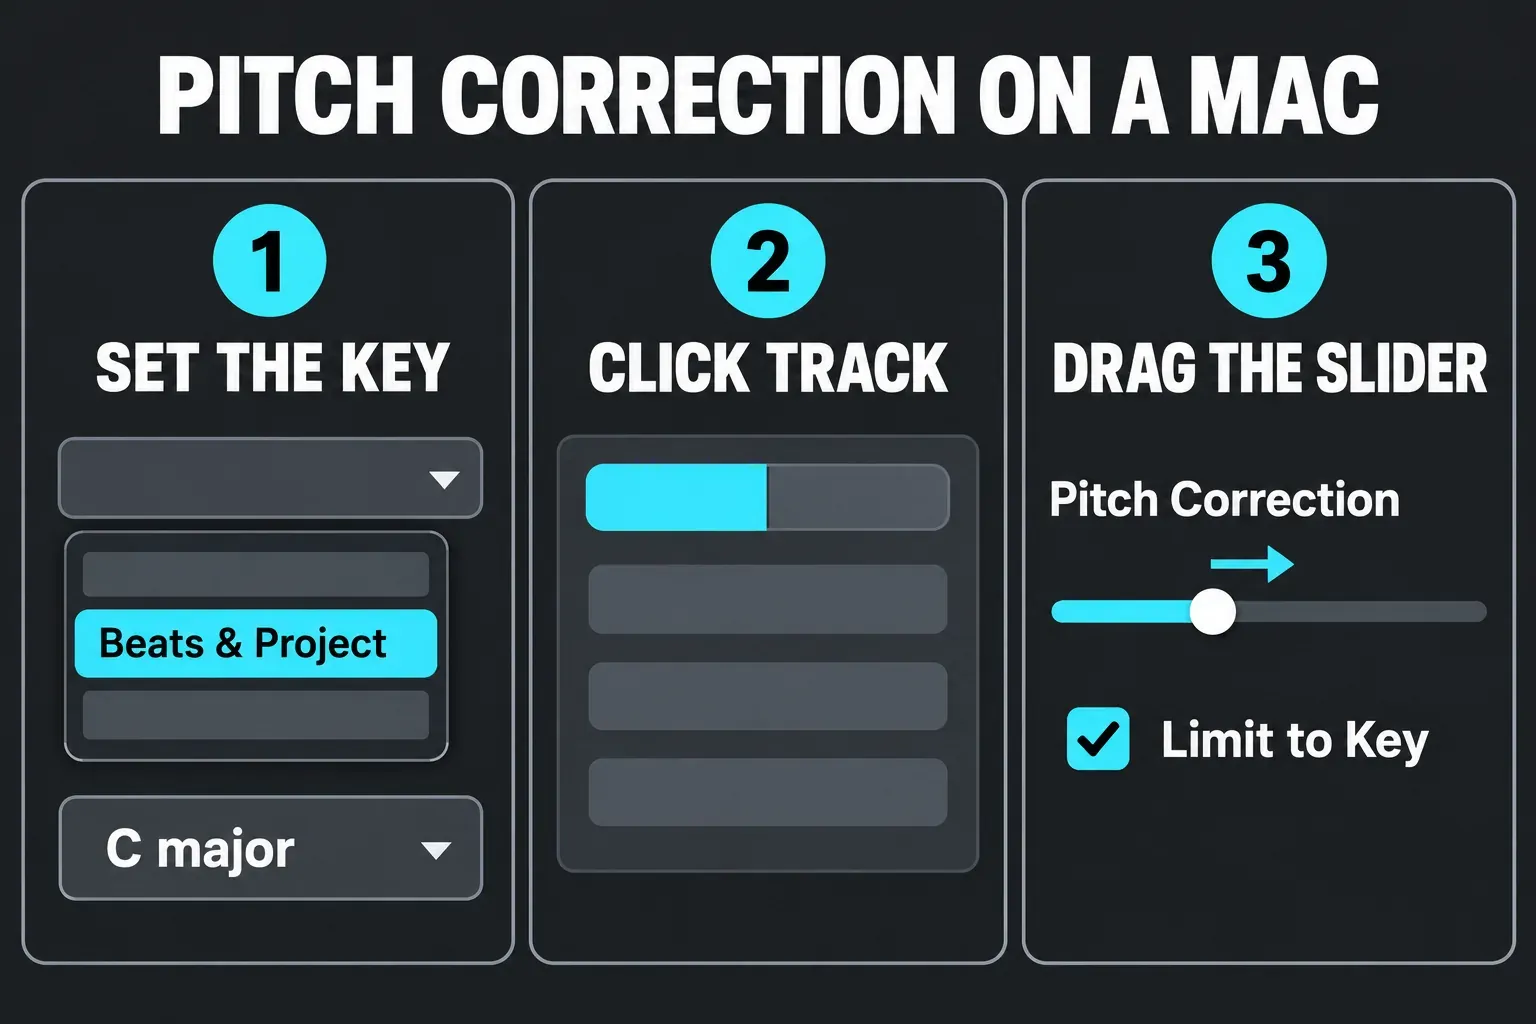
How do you use autotune in GarageBand on a Mac?
Put the vocal on its own track before you start. Pitch Correction is a track setting, and Apple’s guide to correcting pitch in GarageBand says it adjusts all regions on the selected track, your own recordings and loops alike. Then:
- Set the key. Click the triangle on the right side of the LCD, choose Beats & Project, click the key and choose the song’s key from the pop-up menu.
- Select the vocal track in the Tracks area.
- Open the Audio Editor: double-click an audio region on the track, click the Editors button in the control bar or choose View > Show Editor.
- Click Track in the Audio Editor inspector, or click an empty spot so no region is selected. With a region selected, the inspector shows region controls such as Reverse Playback and Time Quantize instead.
- Drag the Pitch Correction slider to the right to add correction, or to the left to reduce it.
- Select Limit to Key to keep the corrected notes inside the project key.
- Loop a sustained phrase and adjust the slider while it plays. Then listen to the full vocal with the backing track, including both the verse and chorus, before settling on the amount.
The key step is the one most tutorials skip. Apple’s page on setting the key and scale in GarageBand confirms that new projects are in C major by default. With Limit to Key off, GarageBand moves each note to the closest of the 12 chromatic notes. With it on and the key still set to C major on a song in E minor, a sharp or flat note can land on a pitch that doesn’t belong in your song. If you don’t know the key, leave Limit to Key off and let the chromatic default do the work.
Two limits matter before you judge the result. Apple says the correction is accurate only for single-note (monophonic) audio, so a track with chords, a doubled harmony on one region or unpitched sounds won’t tune cleanly. And it changes the whole track, so a loop you dropped onto the vocal track gets corrected too. Apple also says edits in the Audio Editor are nondestructive, so the original recording is always there to go back to.
What Pitch Correction setting should you use?
The slider runs from 0 to 100, and Apple’s guide only says that moving it right increases the amount of tuning adjustment. It doesn’t say what a value of 50 does to a note. So the useful numbers below are recommendations from published guides. Five GarageBand guides give a range for natural correction and a setting for the obvious effect:
| Guide | Natural correction | Obvious autotune effect |
|---|---|---|
| Whipped Cream Sounds | around 50 to 60 | 100 |
| CrumplePop | 50 to 70 | 100 |
| The GarageBand Guide | 15 to 30 on a main vocal | 60 to 80 |
| The Ghost Production | 25 to 35 on verses | 70 to 100 |
| Vocal Presets | 50 to 70 | 100 |
Put together, the natural settings span 15 to 70 across the five guides, and the median midpoint is 55. That median hides a split. Two guides keep natural correction between 15 and 35, while three put it at 50 to 70. The Ghost Production calls 45 to 60 “more obvious pop or dance correction”, which is the same zone the other camp calls natural. For the hard-tuned sound, three of the five go all the way to 100 and the other two start at 60 and 70. The GarageBand Guide also suggests 40 to 80 for backing vocals, since they support the main vocal rather than carry the song.
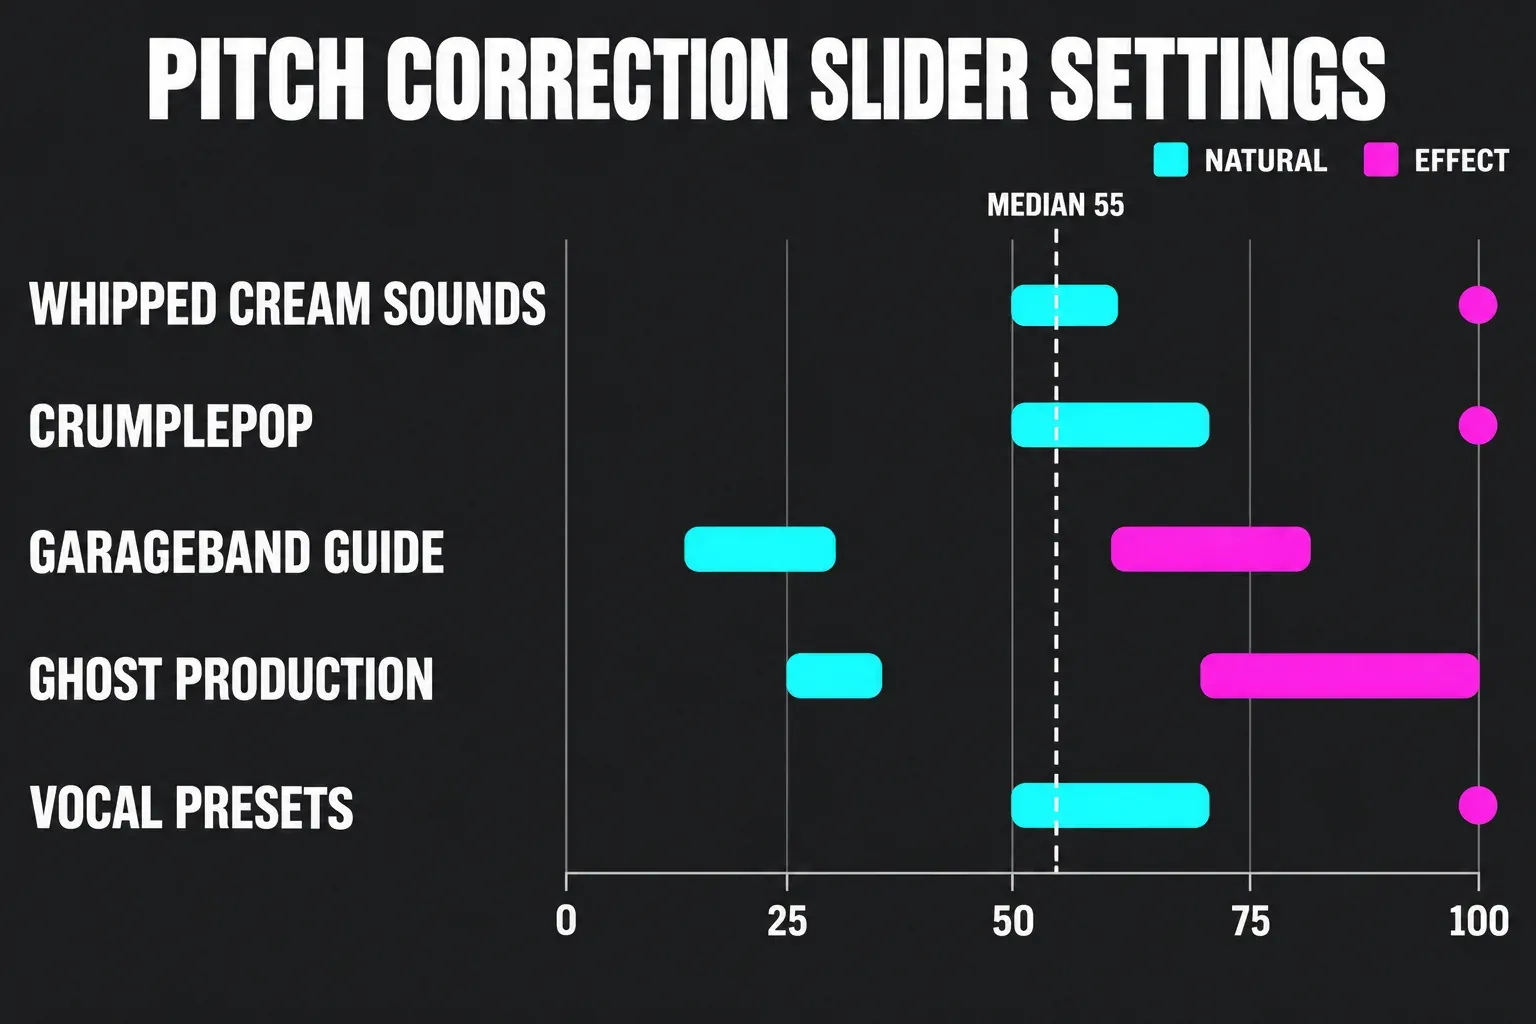
My default is to start at about 30 with the right key and Limit to Key on, then raise the slider only until the held notes stop wavering. The reason is the split above and the fact that the setting covers the whole track. A value that fixes the chorus also flattens the bends in the verse, and the lower camp’s numbers leave room for that. If you want the effect, go to 100 and keep Limit to Key on, since a hard jump to the wrong scale note is the most audible mistake you can make there.
How do you autotune vocals in GarageBand on iPhone and iPad?
GarageBand for iPhone and iPad has no Pitch Correction slider. Its tuning effect is Extreme Tuning, a preset in the Audio Recorder that Apple’s GarageBand for iPad guide describes as a vocal effect that changes the pitch of your recording based on the song’s key and scale settings. That makes the order the same as on a Mac:
- Set the key. Tap the Settings button, tap Key Signature, then tap the song’s key and its scale, major or minor. On iPhone SE, open Song Settings before Key Signature.
- Record your vocal in the Audio Recorder. For a vocal you’ve already recorded, tap its region in Tracks view, then tap Microphone in the toolbar.
- In Fun view, tap or turn the dial until Extreme Tuning is selected.
- Adjust Pitch Control and Distortion to fine-tune the sound.
- Add echo or reverb with the Echo and Reverb sliders under Master Effects in Track Controls.
Apple’s Extreme Tuning support article warns that if the song’s real key or scale differs from the setting, the effect might be less pronounced or might change the pitch of individual notes in undesirable ways. GarageBand songs default to the key of C, the same trap as on the Mac. Apple also says Extreme Tuning is optimized for male and female voices, but you can use it as a creative effect on any mono audio track, such as a bass guitar.
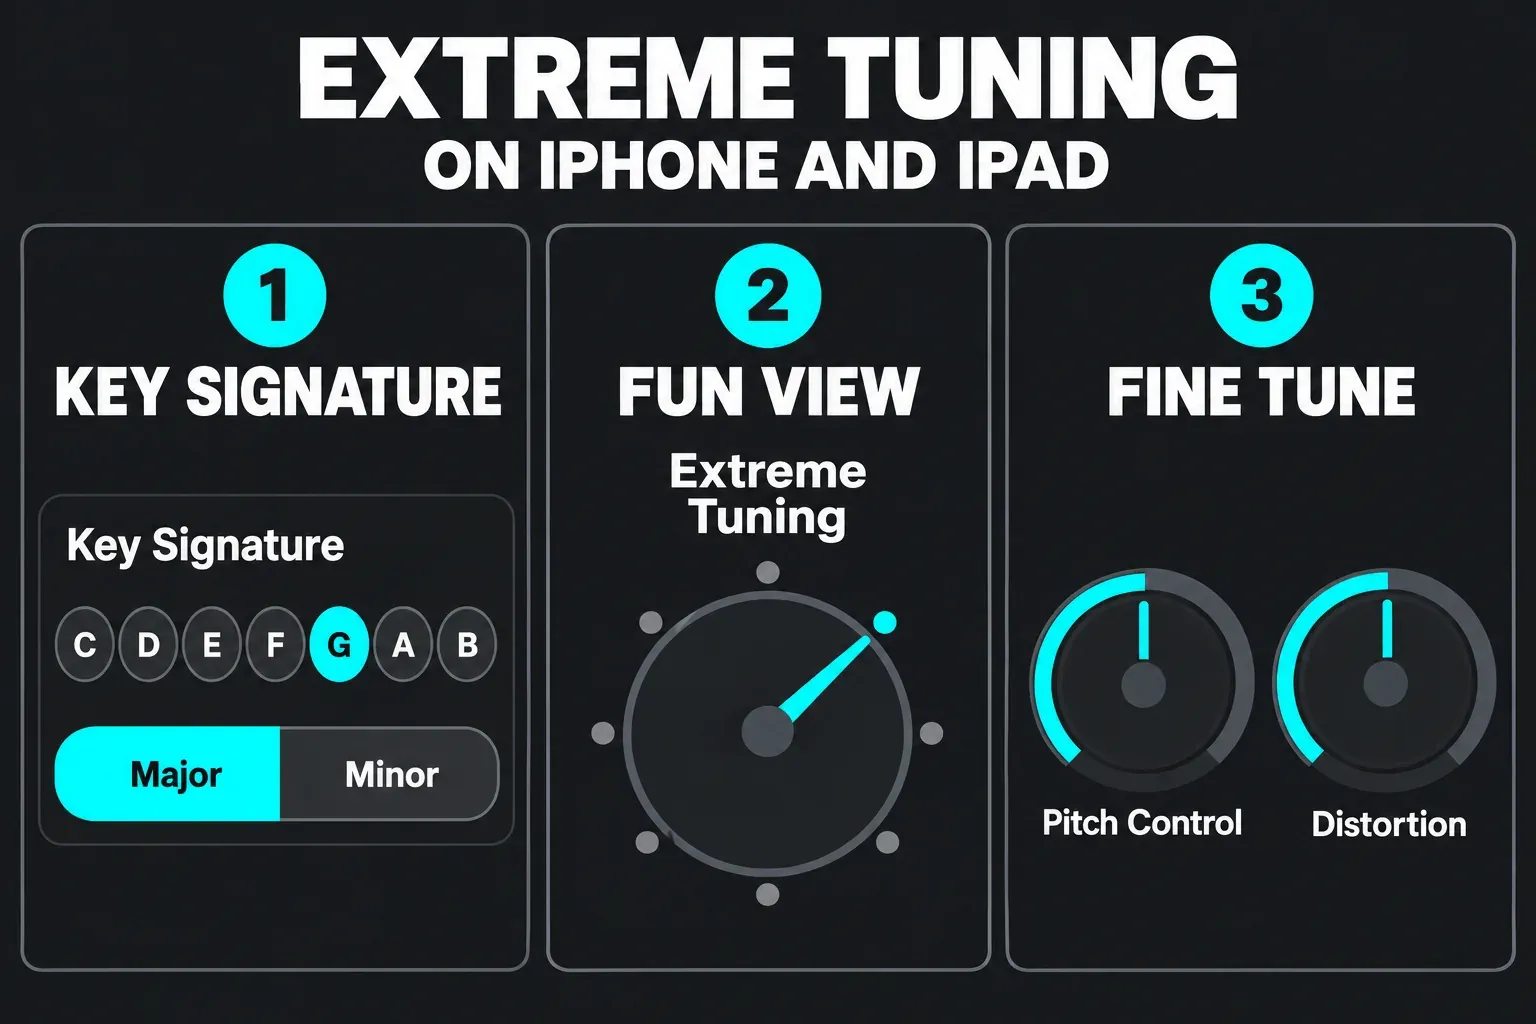
Extreme Tuning is one preset with two knobs. For finer control over a vocal, the Mac version’s Pitch Correction slider and the Audio Units tuners below go further.
Which autotune plugins work in GarageBand?
GarageBand on a Mac loads Audio Units, so choose a tuner whose AU version supports your GarageBand and macOS versions. Apple’s Audio Units guide for GarageBand lists two steps. First, make sure Enable Audio Units is selected in GarageBand > Settings > Audio/MIDI. Then, in the Plug-ins area of the Smart Controls pane, click an empty slot and choose the tuner from the Audio Units submenu.
| Plugin | Cost | What it does in GarageBand |
|---|---|---|
| Graillon 3 by Auburn Sounds | Free Edition, paid Full Edition | Pitch correction for hard-tune and natural sounds, AU on macOS; check host-reported delay |
| MAutoPitch by MeldaProduction | Free | Automatic tuning for vocals and other monophonic instruments, plus formant shift and stereo expansion |
| Waves Tune Real-Time | Paid | Speed and Note Transition controls, 43 scales, Waves quotes zero or near-zero plug-in latency depending on pitch; its supported-host list includes GarageBand 10.4 (Audio Units) |
| Antares AutoTune | Paid, free trial | Retune Speed, Humanize and Flex Tune, Classic Mode for the AutoTune 5 hard-tuned sound, needs macOS 14 or later |
| Melodyne 5 essential by Celemony | Paid, 30-day trial | Basic pitch and timing edits on detected notes as an AU plugin, with audio transferred by playback |
I’d start with Graillon 3’s Free Edition. It covers both the natural and the hard-tuned sound and costs nothing, so you can compare a dedicated tuner with the stock slider before paying. Check its reported delay in GarageBand and compare the monitoring cue before recording. MeldaProduction’s system requirements page lists GarageBand with AU support, which makes MAutoPitch the other safe free choice.
Melodyne works differently from the others. GarageBand isn’t on Celemony’s list of ARA-compatible hosts, so the plugin can’t see the whole recording at once. Celemony’s transfer walkthrough describes the workaround: click the Transfer button at the top left of the Melodyne window, then press Play in GarageBand so Melodyne records its own copy of the part. It’s slower than the slider, and of the options here it’s the one that edits single notes instead of the whole track.
Antares now sells the plugin as plain AutoTune, formerly AutoTune 2026, and its page states compatibility with DAWs that support VST3, AU or AAX. For the plugin’s own setup inside a Mac DAW, see how to install plugins in Logic Pro. Apple’s GarageBand guide gives the install folders: Audio Unit Extensions go in Applications and AUv2 plugins in Library/Audio/Plug-ins/Components.
Why is GarageBand autotune not working?
Start by checking the key, the track contents and whether GarageBand loads the plugin. Match the symptom:
| Symptom | Likely cause | Fix |
|---|---|---|
| You hear no difference | Slider set low, or the Track button isn’t selected in the inspector | Click Track in the Audio Editor inspector and raise the slider while a held note loops |
| Notes jump to the wrong pitch | Limit to Key is on and the project key is still C major or wrong | Set the key in the LCD, or turn Limit to Key off |
| Harmonies or guitar chords warble | The track holds chords or unpitched sounds | Move them to their own track and tune only the single-note vocal |
| A loop changed pitch | Pitch Correction applies to every region on the track | Keep loops off the vocal track |
| Extreme Tuning sounds off on iPhone or iPad | Key Signature doesn’t match the song | Change the key and scale in Settings > Key Signature; on iPhone SE, open Song Settings first |
| The tuner isn’t in the Audio Units submenu | Enable Audio Units is off, or the plugin is in the wrong folder | Check GarageBand > Settings > Audio/MIDI and the install location |
| GarageBand misbehaves after adding a tuner | A damaged or incompatible Audio Units plugin | Turn Audio Units off in Audio/MIDI to isolate the cause, then check the suspect plugin’s compatibility |
Apple’s GarageBand troubleshooting article names damaged or incompatible Audio Units plugins as a cause of unexpected behavior and suggests disabling them to check. If the project behaves with Audio Units off, isolate the individual plugin and check its compatibility and available updates before enabling it again.
When is Logic Pro better for autotune?
GarageBand gives you one slider per track. Logic Pro’s Pitch Correction plugin adds the controls that the GarageBand slider hides. Its parameter reference describes Response, which sets how quickly the voice reaches the corrected pitch, and Tolerance, a zone around the core frequency where no correction happens, so vibrato can survive. Bypass Notes leaves chosen notes uncorrected, which helps with blue notes that slide between major and minor.
For single-note fixes, Logic Pro’s Flex Pitch shows the vocal as notes that you drag up or down, much like in the Piano Roll. Our Logic Pro autotune guide covers the plugin settings and the Flex Pitch guide covers note editing. Logic Pro opens GarageBand projects, costs $199.99 as a one-time purchase on the Mac App Store and has a free trial. If tuning is the only thing GarageBand can’t do for you, try the free plugins above first. For the full decision, read Logic Pro vs GarageBand.
GarageBand autotune FAQ
Does GarageBand have autotune?
Yes. On a Mac it’s the Pitch Correction slider in the Track inspector of the Audio Editor. On iPhone and iPad it’s the Extreme Tuning preset in the Audio Recorder. Extreme Tuning follows the song’s key; on a Mac, select Limit to Key to use the project key.
Is autotune in GarageBand free?
Yes. Pitch Correction and Extreme Tuning come with GarageBand, which is free on the App Store. Free tuning plugins such as Graillon 3’s Free Edition and MAutoPitch also load on a Mac.
Does GarageBand come with Antares AutoTune?
No. Antares AutoTune is a separate paid plugin with a free trial. On a Mac, install its compatible Audio Units version and make sure Enable Audio Units is selected in GarageBand > Settings > Audio/MIDI.
Can GarageBand tune one note at a time?
Not with its own tools. Pitch Correction applies to the whole track, and GarageBand’s Flex editing changes timing. For single notes, use Melodyne essential with its Transfer button or move the project to Logic Pro and use Flex Pitch.
How do you get the hard-tuned rap vocal sound in GarageBand?
Set the correct key, select Limit to Key and push Pitch Correction to 100. Three of the five guides above use 100 for the effect. On iPhone and iPad, use Extreme Tuning with the right Key Signature.
Does Pitch Correction work on guitar or bass?
It works on any single-note part, so a bass line or a guitar solo can be corrected. Chords can’t, because Apple says the correction is accurate only for monophonic audio. Extreme Tuning can also be used as a creative effect on a mono bass or other live instrument track.


