How to Autotune Vocals in Logic Pro With Pitch Correction
Set up Logic’s stock Pitch Correction for natural or hard-tuned vocals, keep it from fighting your melody, and commit the sound when you’re done.

To autotune vocals in Logic Pro, insert the stock Pitch Correction plug-in on the vocal track (Audio Effect slot > Pitch > Pitch Correction), set Root Note and Scale/Chord to the song’s key, then use Response to set how fast notes move to pitch and Tolerance to set how much natural movement gets through. Low Response and low Tolerance give you the hard, stepped effect. Higher settings give quieter, more natural correction. Logic doesn’t include Antares AutoTune, and you don’t need it for either sound.
Two questions sit outside the plug-in itself: how to hear the effect while you record, and how to commit it to the vocal once you like it. Both get their own sections below, after the settings.
Does Logic Pro Have Autotune?
Not under that name. AutoTune is a product made by Antares, and Logic doesn’t ship it. What Logic includes is Pitch Correction, a channel-strip effect that Apple’s Pitch Correction overview describes as fixing the pitch of incoming audio by speeding up and slowing down playback until the sung note matches the target. Apple adds that correcting larger intervals creates special effects. That’s the hard-tuned sound most people mean when they say “autotune.”
Antares sells AutoTune separately, in several editions (AutoTune, AutoTune Advanced and AutoTune Pro 11), and its AutoTune product page offers a free trial. The Antares DAW compatibility list gives AU as the plug-in format for Logic, so if you buy it, it installs like any other Audio Units plug-in. Our guide to installing plugins in Logic Pro covers that part.
| Tool | What it does | Use it when |
|---|---|---|
| Pitch Correction (included) | Corrects pitch automatically as the track plays, toward a key or scale you choose | You want the autotune effect, or quick hands-off correction of a whole part |
| Flex Pitch (included) | Detects the notes in recorded audio so you can move and reshape each one | Only a few notes are off and the rest of the take should stay as sung |
| Antares AutoTune (separate purchase) | Third-party automatic tuning that loads in Logic as an Audio Unit | You want its specific controls or sound, for example to match a session built around it |
Add Pitch Correction to the Vocal Track
- Select the vocal track and show its channel strip in the inspector or the Mixer.
- Click an empty Audio Effect slot and choose Pitch > Pitch Correction.
- Drag it to the top slot if other plug-ins are already there.
- Play the vocal and watch the correction display while you set the key in the next step.
I put Pitch Correction first in the chain. Apple’s page on insert effects in Logic Pro explains that inserts run in series, each one feeding the next, so anything above Pitch Correction changes what its pitch detector hears. A reverb, delay or doubler ahead of it hands the detector overlapping pitches, and Apple says polyphonic material can’t be corrected to a specific pitch. Compression and EQ can come after it.
Set the Key Before You Touch the Knobs
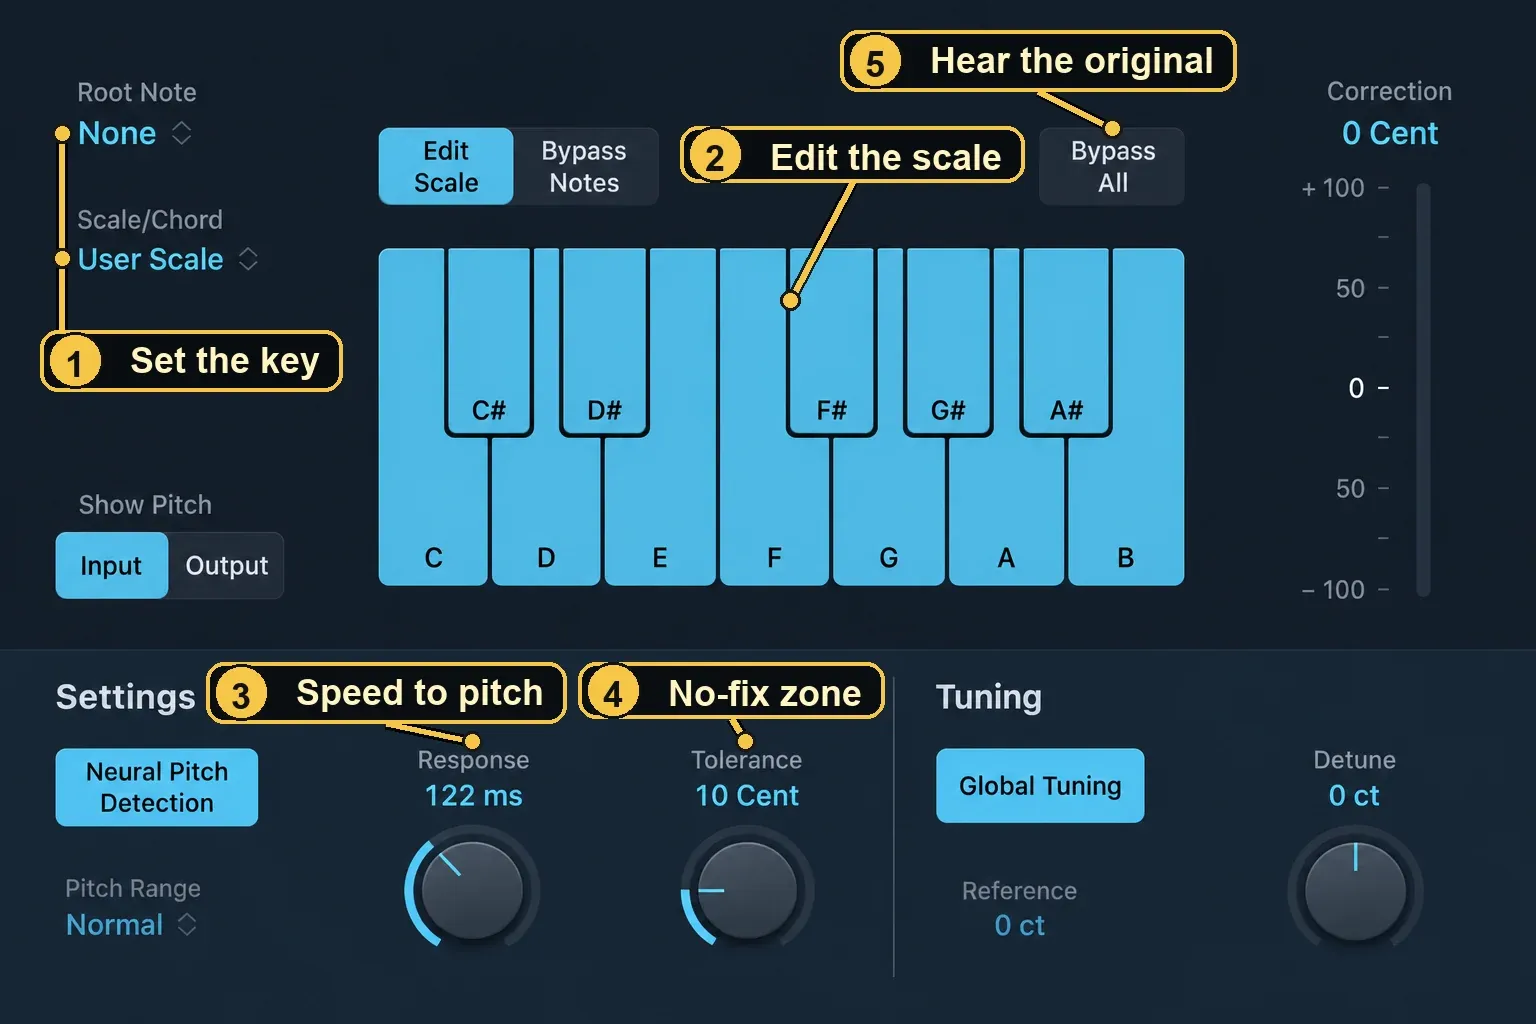
Pitch Correction opens with every note of the chromatic scale active, so each sung note goes to the nearest semitone. Apple’s page on excluding notes from Pitch Correction gives the problem in one example: the singer means to sing an E, lands closer to D#, and the chromatic grid pulls the note to D#. If the song has no D#, the correction makes the wrong note sound confident.
Choose the song’s root from the Root Note menu and its scale from Scale/Chord. The quantization grid page confirms you can transpose the major and minor scales and the chord-named scales to any root. If you’re not sure of the key, work it out from the song’s chords first. A wrong key pulls good notes to wrong ones no matter how you set the knobs below.
Response and Tolerance: Hard Effect or Natural Correction
Apple’s Pitch Correction parameter reference defines both controls clearly:
- Response sets how quickly the voice reaches the corrected pitch. Too low, and smooth slides between notes turn into semitone-stepped glissandi with perfect intonation. Too high, and the pitch doesn’t change quickly enough to fix anything.
- Tolerance sets a zone around the target where no correction happens. A low value gives more extreme, faster correction. A higher value lets more pitch variation, such as vibrato, through before the plug-in steps in.
Put together, Tolerance decides whether a note gets corrected at all, and Response decides how fast it moves once it does. That’s why the two sounds people want sit at opposite corners:
| Goal | Response | Tolerance | What to listen for |
|---|---|---|---|
| Hard, stepped autotune effect | At or near the lowest setting | Low | Clean steps between notes. Glides turning into stairs is the point. |
| Natural, invisible correction | Start high, then lower it until sour notes settle | Higher, so vibrato passes untouched | Slides and vibrato that still sound sung, not processed |
Apple gives no recommended values. It says the right Response depends on singing style, tempo, vibrato and how accurate the performance was, so any number you read elsewhere is only a place to start. Set both controls with the vocal playing in the mix, not soloed, and click Bypass All, which Apple describes as a way to quickly compare the corrected and original signals.
The correction display helps here. Apple says it shows the amount of pitch change, with a marker for the average correction over a longer stretch. If that marker sits off center for a whole song, the singer may be consistently sharp or flat, which the Reference setting further down handles better than harder correction.
Stop It From Correcting Notes You Meant to Sing
A scale grid treats every out-of-scale note as a mistake. Blue notes, passing tones and deliberate bends aren’t mistakes, and the onscreen keyboard gives you two ways to protect them:
- Edit Scale removes a note from the grid. Anything sung near it is corrected to the nearest note that’s still in the scale.
- Bypass Notes leaves a note alone. Sung pitches that match a bypassed key, shown in orange, aren’t corrected at all. Apple suggests this for blue notes that slide between major and minor.
Both settings apply to every octave; Apple’s guide says there are no per-octave settings. For a soulful or bluesy lead, Apple’s own tip is the one I’d try first: choose sus4 from Scale/Chord, set Root Note to the song’s key, and turn on Bypass Notes for every other key. Only the root, fourth and fifth get corrected, and the rest of the phrasing stays as sung.
Follow Key Changes With Automation
Apple notes that Root Note and Scale/Chord can be fully automated to follow the song’s harmony. If the bridge moves to a new key, or a chorus borrows a chord the verse doesn’t use, write Root Note and Scale/Chord automation on the vocal track so the grid changes with the song. I place each change in the gap before the first sung note of the new section, so no note gets caught between two grids. Our guide to automation in Logic Pro covers drawing and editing plug-in automation.
Automation also solves the opposite problem. Apple says Bypass All is useful for spot correction through automation and is optimized for near-instant switching. Automate Bypass All to stay on through the song and switch off only for the phrases that need tuning.
Match the Tuning Reference
Apple’s page on Pitch Correction reference tuning explains the settings below the knobs:
- Global Tuning on uses the project tuning from File > Project Settings > Tuning, so the tuned vocal matches your software instruments. Leave it on unless you have a reason not to.
- Reference, available when Global Tuning is off, sets the reference tuning in cents. Apple’s example is a singer who is slightly sharp or flat through a whole song: setting Reference to that constant offset makes detection more accurate.
- Detune shifts the output by the amount you set. It isn’t a correction-strength control.
For stacked backing vocals on separate tracks, Apple points out that correcting every voice to exactly the same pitch partly loses the choir effect. Detuning each track’s correction slightly keeps the group sounding like several people.
Leave Neural Pitch Detection On
Apple says Neural Pitch Detection should generally stay on, because it finds the pitch range automatically. With it off, you choose Pitch Range yourself: Normal is the default and suits most material, and Low is only for audio with extremely low frequencies, below 100 Hz, which could otherwise be detected inaccurately. Apple adds that these settings don’t change the sound. They only help the plug-in track pitch, so they’re not the place to fix a vocal that sounds too processed.
Apple also lists what the plug-in can’t handle: polyphonic recordings such as choirs, and highly percussive signals with a lot of noise. Use Pitch Correction on one vocal part per track, not on a bus that carries the lead and harmonies together.
Hear Pitch Correction While You Record
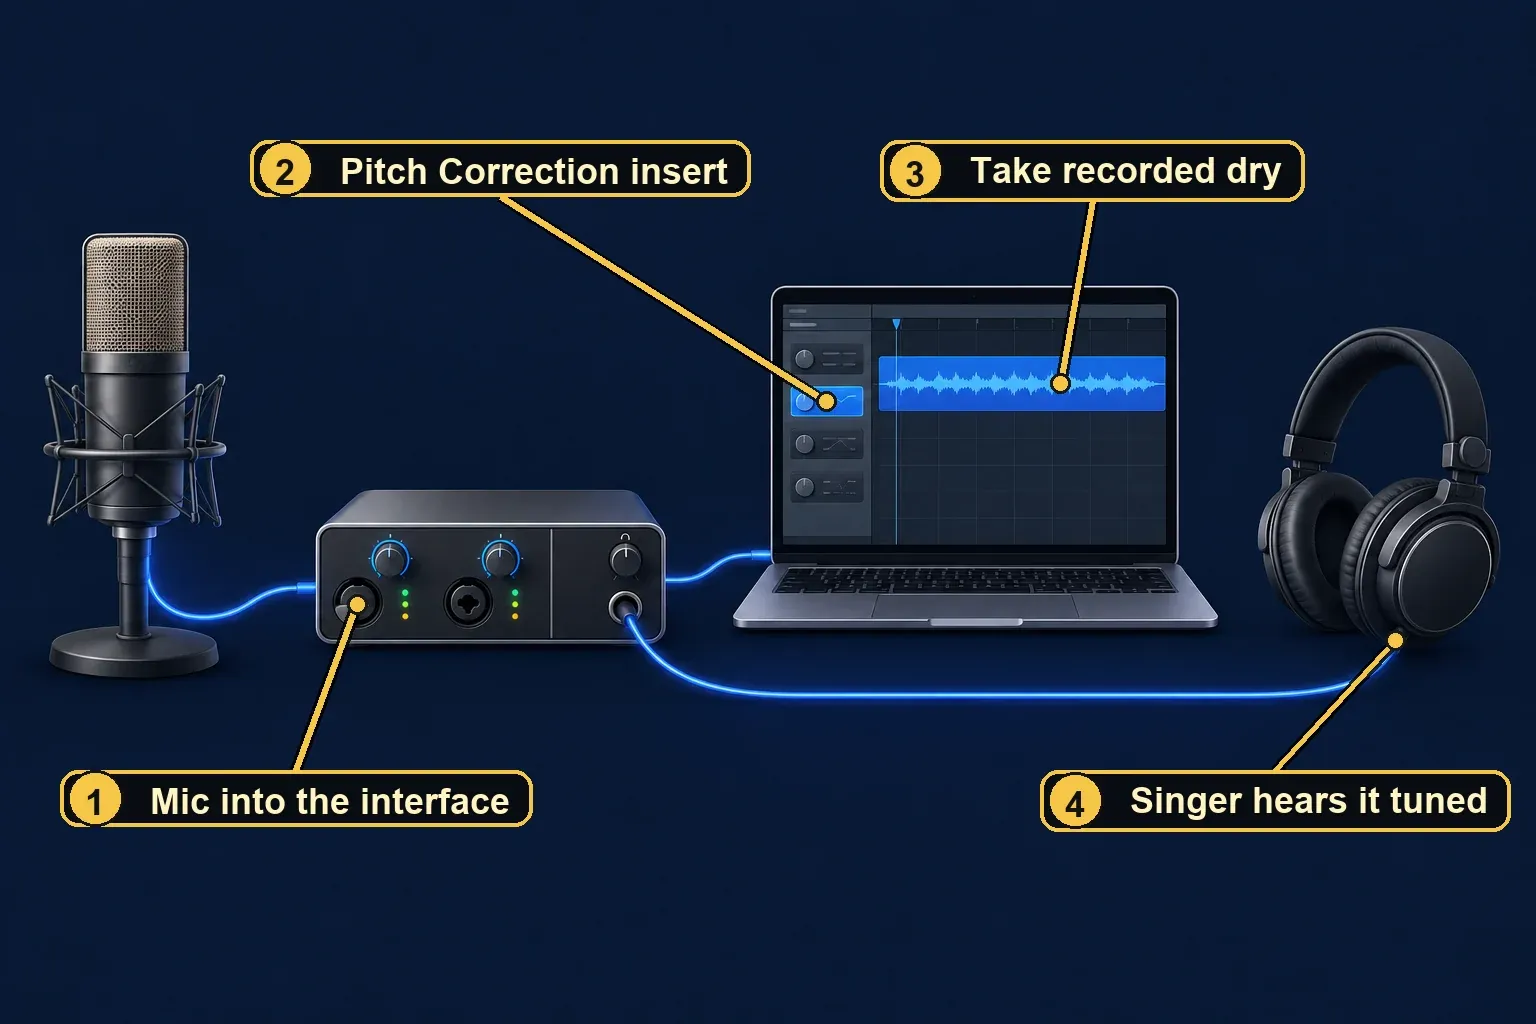
Pitch Correction fixes incoming audio as it plays, so a singer can track through it. Apple’s General Audio settings explain that software monitoring lets you hear incoming audio including the processing of all plug-ins, with some latency that a lower I/O buffer size reduces. Turn on Software monitoring in Logic Pro > Settings > Audio > General, then record-enable the track or turn on its input monitoring.
Every plug-in adds some delay. Apple’s page on plug-in latencies says you can hold the pointer over a plug-in slot to see its latency in samples and seconds. It also explains Low Latency Monitoring mode: on record-enabled and input-monitored tracks, Logic bypasses a plug-in only when its latency pushes the track over the Limit you set (up to 30 ms), and a bypassed plug-in turns gray with orange text. If the effect disappears the moment you arm the track, check that mode first. For the rest of the delay picture, see how to fix latency in Logic Pro.
Apple’s checklist before recording audio recommends your interface’s direct monitoring when it has one, and software monitoring only when you’re using effects on a record-enabled channel strip. A singer who needs to hear Pitch Correction is exactly that case. Turn the interface’s direct monitoring down while you do, so the singer doesn’t hear a dry and a delayed vocal at the same time. Our guide to recording vocals in Logic Pro covers the full headphone setup.
The take you record doesn’t include the correction. As one member of a Logic Pro Help thread on vocal tracking with autotune put it, a tuner inserted for monitoring “doesn’t change what’s recorded into file.” That matches how Apple describes the pieces: an insert processes the signal running through the channel strip, and printing that processing into a new audio file is the job of Bounce in Place, covered next. Until you bounce, you can still change the key, Response or Tolerance. Another member in the thread records with the plug-in bypassed and switches it on when playing takes back, and notes that when a song depends on the tuned sound, it changes the singer’s phrasing, so it’s worth tracking with it in the headphones.
Commit the Tuned Vocal With Bounce in Place
Once the tuning sounds right, print it so it becomes part of the audio. Choose File > Bounce > Track in Place. Apple’s page on bouncing a track in place says the bounce renders the track, including its active plug-ins and automation, to a new audio file whose name ends in _bip. The dialog offers two destinations: New Track creates an audio track below the original and places the bounce there, and Replace Track replaces the existing track with it.
The same page warns that after a bounce in place, the original track content (its regions and all automation except volume, pan and sends) is lost and the channel strip is reset, with Undo as the way back. Before printing a lead vocal, I’d save a copy of the project. If the key or the Response setting needs to change a week later, the untuned take and the plug-in settings are still there.
Every active plug-in on the track gets rendered, not just Pitch Correction. If you only want the tuning printed, bypass the other inserts before you bounce and set them up again on the bounced track afterward. Leave the Bypass Effect Plug-ins checkbox off, because it bypasses all plug-ins on the source track during the bounce, Pitch Correction included. For when to bounce in place and when to export instead, see Bounce in Place vs Export in Logic Pro.
When Flex Pitch Is the Better Tool
Pitch Correction applies one set of rules to the whole performance. Flex Pitch works the other way round: Logic detects each note in a recorded region, and Apple’s Flex Pitch editing guide shows how to drag a single note to a new pitch or adjust its drift, vibrato, gain, fine pitch and formant. Use it when most of the take is fine and only a few notes are off, or when the singer’s slides and bends should stay exactly as sung.
There’s also a middle path. With Flex Pitch on in the Audio Track Editor, select notes and drag the Pitch Correction slider, then choose a key and scale from the Scale Quantize menus. Apple’s page on quantizing pitch in the Audio Track Editor says this works only on monophonic regions and defaults to the chromatic scale. Despite the shared name, that slider edits the selected notes, not the plug-in. Our Flex Pitch guide covers note-by-note tuning in detail.
Why Pitch Correction Does Nothing or Picks the Wrong Notes
- Bypass All is on. The signal passes through unprocessed.
- The plug-in button is gray with orange text. Low Latency Monitoring mode bypassed it on an armed or input-monitored track.
- Tolerance is too high. Small deviations sit inside the no-correction zone, so a slightly sour note passes untouched.
- Response is too high. The pitch doesn’t move quickly enough to hear the correction.
- The key is wrong, or still chromatic. Notes go to the nearest semitone, which may not be in the song. Set the key, then use Edit Scale or Bypass Notes.
- The source isn’t a single voice. A doubled lead, a harmony stack or a choir on one track is polyphonic, and Apple says that can’t be corrected to a specific pitch.
- Something sits above it in the chain. Move Pitch Correction to the top slot, ahead of reverb, delay or doubling effects.
Pitch Correction in Logic Pro for iPad
Logic Pro for iPad has the same effect. Apple’s iPad Pitch Correction overview describes the same controls, and you add it from Pitch > Pitch Correction in a channel strip’s Audio Effect menu or the Plug-ins area. The key, Response and Tolerance advice above applies there too. For the rest of the iPad app, see our Logic Pro for iPad guide.
Logic Pro Autotune FAQ
Is Pitch Correction free in Logic Pro?
Yes. It’s one of the effect plug-ins included with Logic Pro, so there’s nothing extra to buy or install.
Is there a free autotune plugin for Logic Pro?
Pitch Correction already covers it. If you want a second option, MeldaProduction lists MAutoPitch as a free automatic tuning plug-in for vocals and other monophonic instruments, part of its free effects bundle. Before installing any third-party tuner, check that the developer offers an Audio Units version that supports your macOS and Logic versions. Apple’s page on Audio Units in Logic Pro tells you to check the plug-in’s documentation for compatibility.
Does Antares AutoTune work in Logic Pro?
Yes. Antares lists AU as its plug-in format for Logic, and once installed, Audio Units plug-ins appear in the Audio Units submenu of Logic’s plug-in menu. If it doesn’t show up, work through Logic Pro plugins not showing up.
Is Pitch Correction the same as AutoTune?
They do the same basic job, automatic correction toward a key, but they’re different products with different controls. Antares’ AutoTune page describes Retune Speed, Humanize and Flex Tune; Logic’s plug-in uses Response and Tolerance. Settings from an AutoTune tutorial won’t carry over one to one, so set Logic’s controls by ear.
Once the tuning sits right, continue with the stock-plugin vocal mixing workflow for EQ, compression, de-essing and space. More mixing guides are collected in the Mix & Master hub.


