Bounce in Place vs Export in Logic Pro
Print audio inside the session, send aligned files to another mixer, or make the final stereo master without choosing the wrong render command.

Bounce in Place puts rendered audio back into your Logic Pro project at the source timeline position. Export saves tracks or regions as separate audio files. Project or Section bounce creates a file from the output-channel mix, including its processing. Choose according to where you need the audio and which effects should be included.
To turn a software instrument into editable audio or commit a sound-design chain, bounce it in place. When another mixer needs aligned WAV files, export tracks. When the label, client, or mastering engineer is waiting on the stereo mix, bounce the project. Those three outputs can carry different processing, automation, tails, and routing even though they all start from the same session.
The menu paths below were checked against Apple’s Logic Pro for Mac documentation on September 12, 2026. The Bounce in Place overview specifies 24-bit audio at the project sample rate. Export and project bounce have their own file-format settings.
Choose the command by destination
| What you need | Use | Where the result goes |
|---|---|---|
| Print one clip or sound-design passage | Bounce Regions in Place | New or selected track inside the project. |
| Commit a full instrument or processed track | Bounce Track in Place | New or replacement audio track inside the project. |
| Temporarily save CPU with easy recall | Freeze | Logic-managed frozen state, not a normal deliverable file. |
| Send one file per source track | Track / All Tracks as Audio Files | External multitrack files. |
| Send grouped drums, music, vocals, or effects | Print and export stems | External grouped submix files. |
| Create the final mono, stereo, or surround mix | Project or Section bounce | External output-channel file or files. |
A file can be technically correct and still be the wrong deliverable. A folder of individual source files is not a set of stems, and a Bounce in Place region is not automatically the approved stereo master. When the request says “stems,” reach for the dedicated Logic Pro stem export workflow and settle groups, shared effects, naming, and the sum check.
A safe render workflow
- Save the project and make a separate project copy before using a command that can replace tracks or regions. Check that the copy includes the required assets.
- Choose one route: Bounce in Place for audio inside the project, track or region export for separate files, or Project or Section bounce for the output mix. Do not run all three in sequence.
- Select the source tracks or regions for that route. For a project bounce, check which unmuted tracks reach the output you intend to render.
- Review the destination and any source Leave, Mute, Delete or Replace setting before confirming.
- Choose whether source effects and volume/pan automation should be printed. Account separately for shared aux returns and multi-output instruments.
- Set the available range, tail, normalization and file options for the chosen command. For files sent to another mixer, agree on the start point, format and naming first.
- Complete the chosen dialog: OK for Bounce in Place; Save for track or region export; Bounce, then a filename and folder and Bounce again for a project bounce.
- Listen to the result from its first transient through the final decay. Reimport a delivery set into a blank project to check alignment and included processing before sending it.
Use File > Save a Copy As, enter a separate project name and click Save. Apple’s project-saving instructions say this copies recordings and assets already saved with the original project; check any externally referenced assets too. A project alternative is not an independent backup. The Logic Pro backup checklist explains the difference and how to keep an off-machine copy.
Bounce Track in Place: print the whole track
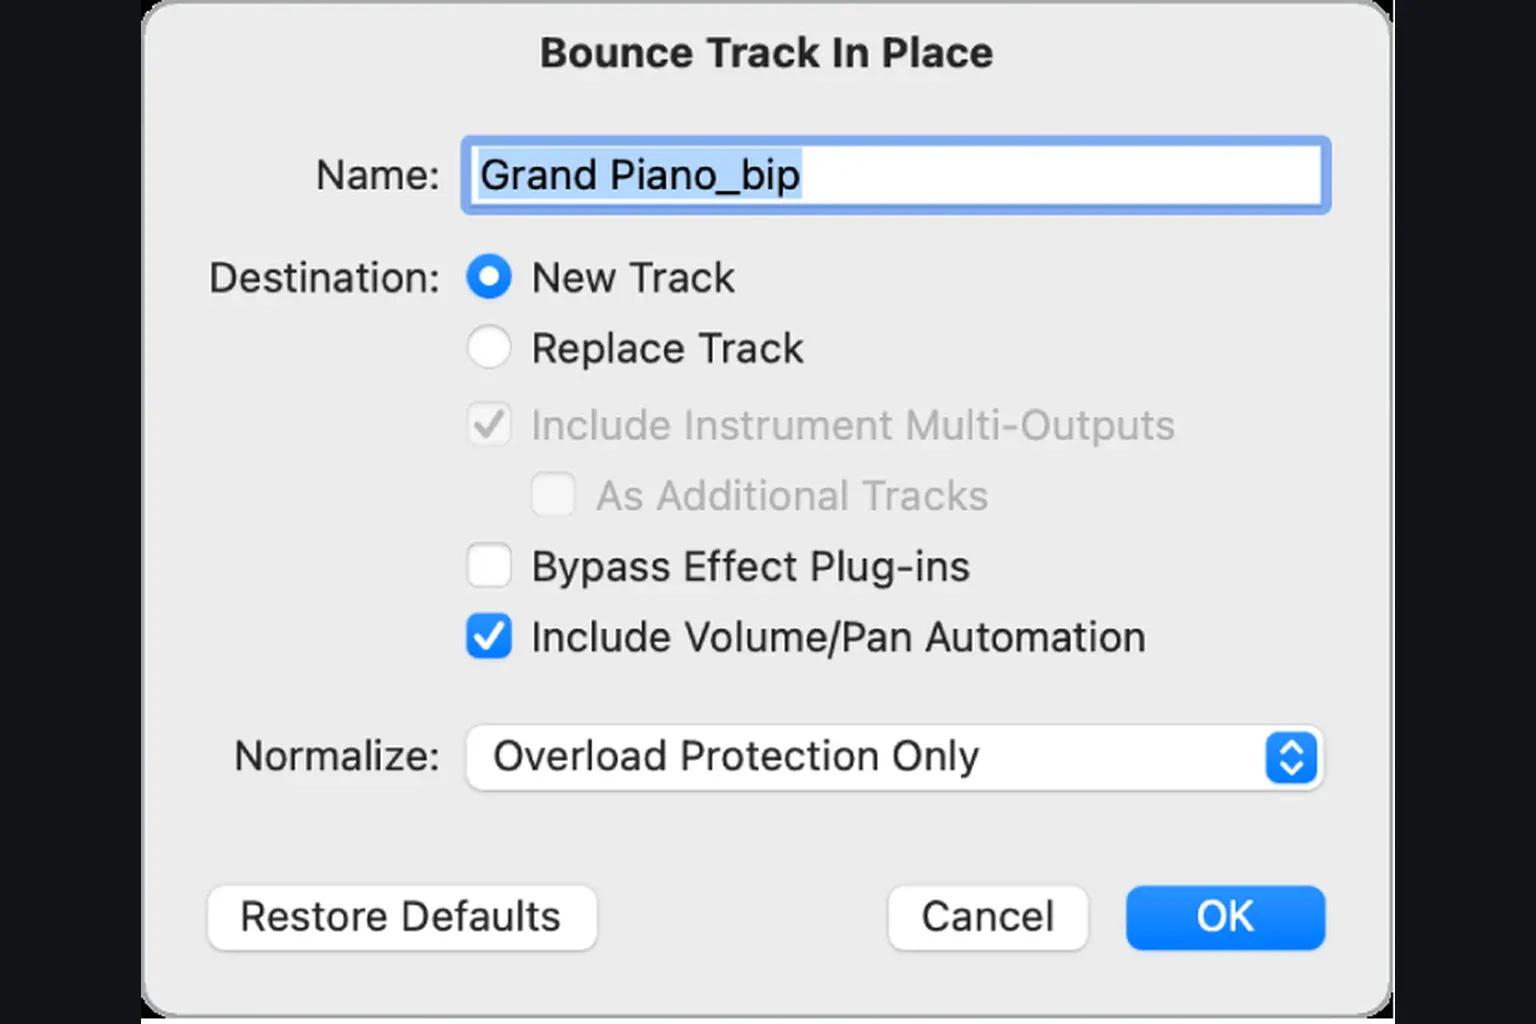
Select an audio, software instrument, or Drummer track, then choose File > Bounce > Track in Place. Apple’s current Track in Place guide says the render can include active plug-ins and automation. What becomes permanent is set in the dialog:
- New Track creates an audio track below the selected track for the result. It is a destination choice, not a substitute for a project backup.
- Replace Track replaces the existing track with the result. Use it only when that replacement is intentional and you have a recoverable copy.
- Bypass Effect Plug-ins excludes source-track effects when enabled. Leave it unchecked when the effect chain is part of the sound you want to print.
- Include Volume/Pan Automation performs those changes into the audio. When it is off, Logic copies the volume and pan automation instead of performing it.
- Include Instrument Multi-Outputs includes the instrument’s aux outputs. As Additional Tracks creates separate bounce files for those aux channels.
Before clicking OK, check the destination and your saved copy. Apple’s Track in Place instructions warn that original track content can be lost and the instrument or channel strip reset; Undo returns to the pre-bounce state. Do not treat Undo as your only recovery plan. For temporary CPU relief, Freeze is easier to return to the original state than Bounce in Place.
Bounce in Place creates 24-bit audio at the project sample rate. Internally routed sources render offline; supported tracks with external routing render in real time. External MIDI tracks themselves cannot be bounced in place. Use a properly routed audio return and project bounce when capturing external instruments.
Bounce Regions in Place: print selected material
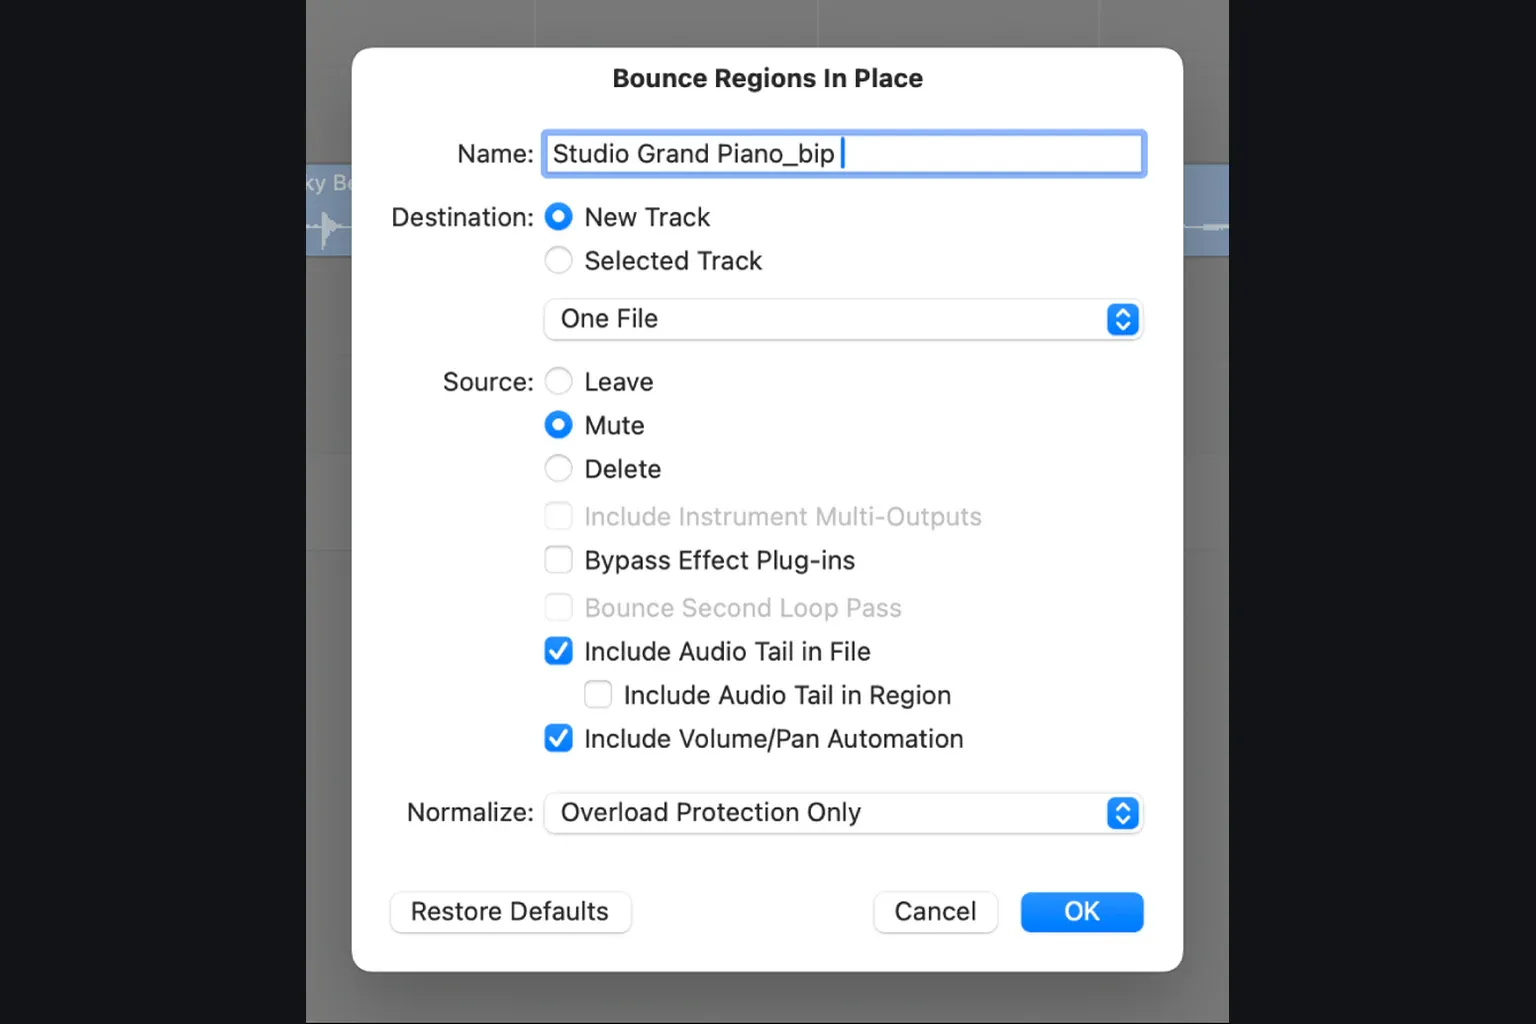
Select one or more audio or software-instrument regions, then choose File > Bounce > Regions in Place. Use it to print selected passages with their active processing rather than the whole track. Check the selection before opening the dialog.
The current Region in Place dialog adds decisions that Track in Place doesn’t present the same way:
- Destination: New Track puts the result below the selected track. Selected Track can replace the selected source regions if they are on that track.
- Source: Leave, Mute or Delete applies when Destination is New Track. It does not protect selected regions from replacement when Destination is Selected Track.
- One File combines the selection; One File per Track creates a file per selected track across its selected range; One File per Region creates a file for each selected region.
- Add Effects Tail to File continues rendering until the instrument or effect produces no signal. A plug-in that continually generates noise can prevent a useful automatic end.
- Add Effects Tail to Region extends the resulting region to include the full file. Without it, the file can contain a tail beyond the region’s visible boundary.
Review effect bypass, volume/pan automation and normalization as well, then click OK. Play across both edges of the result. If the file contains a tail but the region ends earlier, extend the region when you want that decay to play. Check that it does not overlap the next event unintentionally.
Finish the edits you want to commit before rendering. Use the Take Folder and Quick Swipe workflow for comping and the Flex Time guide for timing corrections, then listen again after the bounce.
Treat Bounce Replace All Tracks as destructive
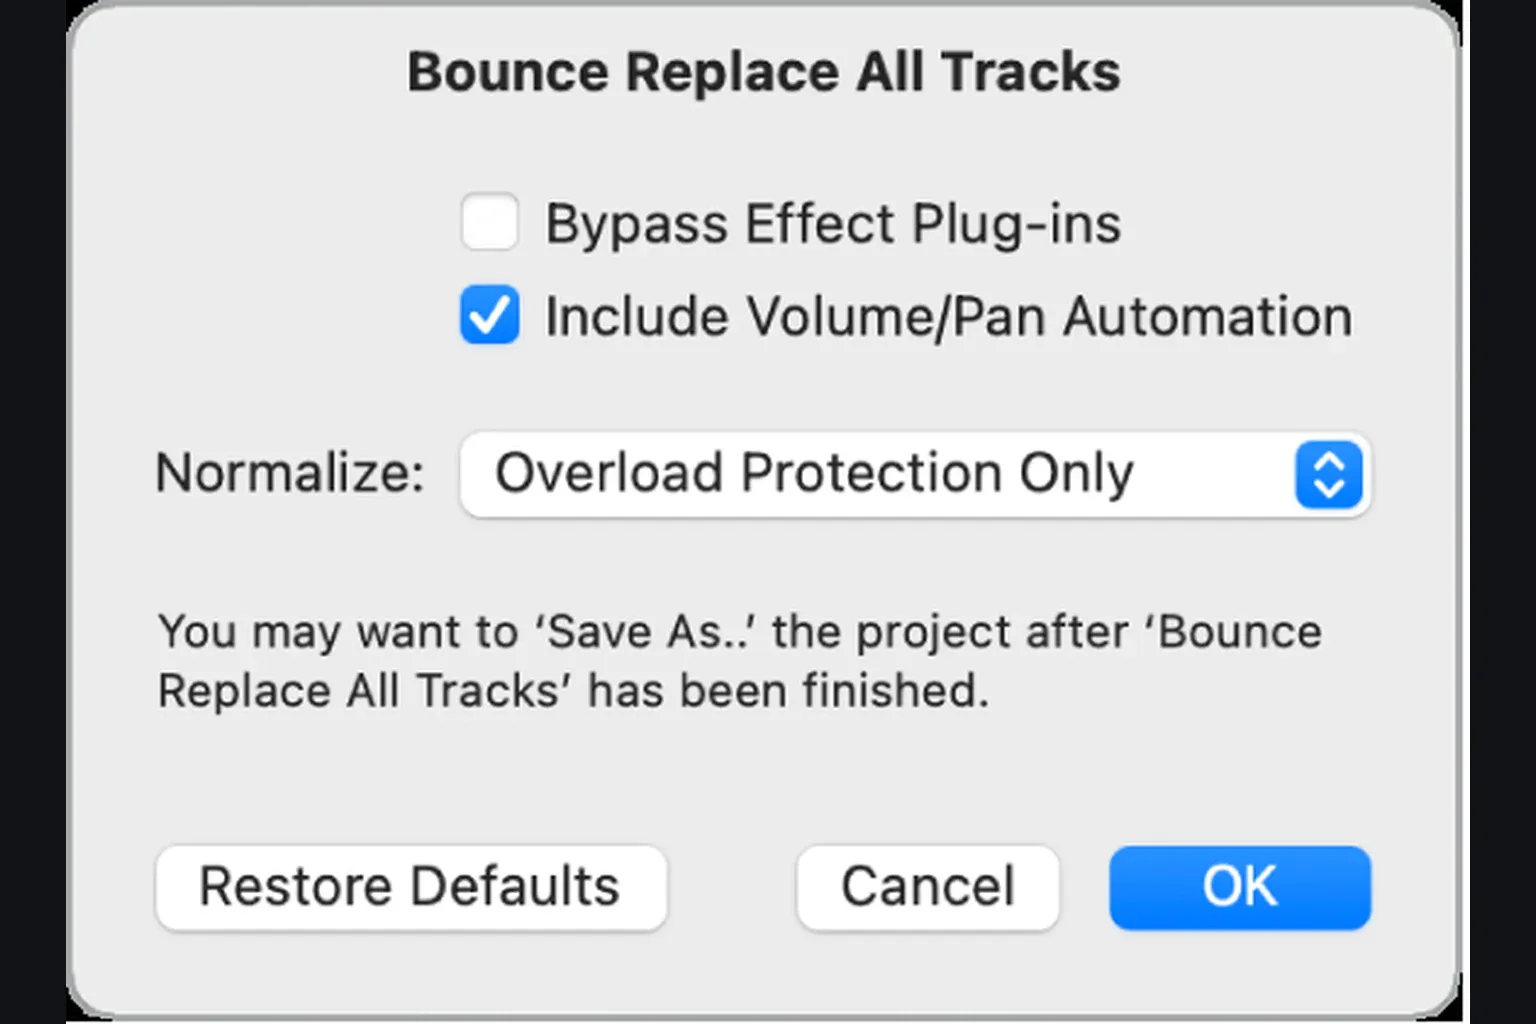
File > Bounce > And Replace All Tracks replaces project tracks with rendered audio inside the session. Apple’s all-tracks bounce instructions describe a save prompt before the dialog opens. Make your separate copy first; the prompt is not a complete backup procedure. Review bypass, volume/pan and normalization, then click OK only when you intend to replace the tracks.
Save it for a deliberate archive or a simplified working copy, and only after you’ve verified every external source, sidechain, multi-output instrument, automation lane, and shared return. For routine delivery, All Tracks as Audio Files is the external-file workflow that leaves the working session structurally intact.
Export tracks for a mixer, another DAW, or an archive
Select the required tracks and choose File > Export > 1 Track as Audio File; the command reflects the selection count. File > Export > All Tracks as Audio Files exports the full track set. Apple’s track export guide documents the options below. For selected-track export, Range can trim end silence, export only the cycle range or extend to the project end. Use the same cycle range for an aligned handoff; do not assume every export dialog has identical range controls.
| Control | For external mixing | For a committed archive |
|---|---|---|
| Save Format | Use the requested uncompressed format, commonly WAV or AIFF. | Use a documented uncompressed format. |
| Bit Depth | Match the recipient’s specification; do not guess. | Preserve a suitable production depth. |
| Range | Use a common intended start/end so files align on import. | Include the section needed to reconstruct the project. |
| Bypass Effect Plug-ins | Decide whether inserts are creative commitments or mixer choices. | Consider wet and dry versions only when both are genuinely useful. |
| Include Audio Tail | Keep releases and delays that belong to the source file. | Prevent the archive from truncating the sound. |
| Include Volume/Pan Automation | Usually off when the mixer needs independent level and pan control. | On when the performed mix movement is part of the intended sound. |
| Normalize | Off unless the delivery spec explicitly requests otherwise. | Off preserves the rendered relative level. |
Apple generally recommends omitting volume/pan automation when the files will be mixed or edited in another app. Agree with the mixer first: a performed fade may be intentional. Creative plug-in automation, such as a filter sweep, is a separate decision from volume and pan. Print it when it is part of the sound, or explain how to reproduce it.
Use clear filenames: track number, instrument or role, version and wet/dry status where needed. Choose the folder and click Save. The Logic Pro handoff checklist covers assets and delivery notes. Reimport the files to confirm their actual starts rather than relying only on the export settings.
Export regions when you need external clips
Select one or more audio or MIDI regions, then choose File > Export > 1 Region as Audio File. With multiple regions selected, the command becomes Regions as Audio Files. Apple’s current region export guide confirms that fades are included, while plug-in bypass, audio tail, volume/pan automation, tempo information, normalization, and multi-output handling remain choices in the export dialog.
Use region export for separate reusable clips; use Bounce Regions in Place to put processed audio back on the timeline. A single region uses the name you enter in the save dialog. Multiple regions use their region names, so check those names first. Choose the destination folder and click Save.
Do not lose aux returns or confuse stems with multitracks
A reverb aux is a separate signal path from the inserts on a vocal track. Including the vocal’s inserts does not automatically include that shared reverb return. Decide what the recipient needs:
- Export the dry source tracks and a separate effects-return file.
- Print wet source versions when the effect must travel with each sound and routing allows a controlled render.
- Create grouped stems through buses so drums, music, vocals, and effects sum predictably to the approved mix.
Raw one-file-per-track exports are multitracks. Stems are submix groups. A drum stem may pull in kick, snare, overheads, parallel compression, and drum-room returns. Renaming a kick track “Drums” does not create a drum stem. Test the actual contents against the requested deliverable.
For a multi-output instrument, One File per Track combines its multi-output signals with the main track signal. One File per Channel Strip creates additional files for the associated aux channel strips. These are the instrument’s multi-output auxes, not a promise to collect every shared send effect in the project.
Use Project or Section for the final mix
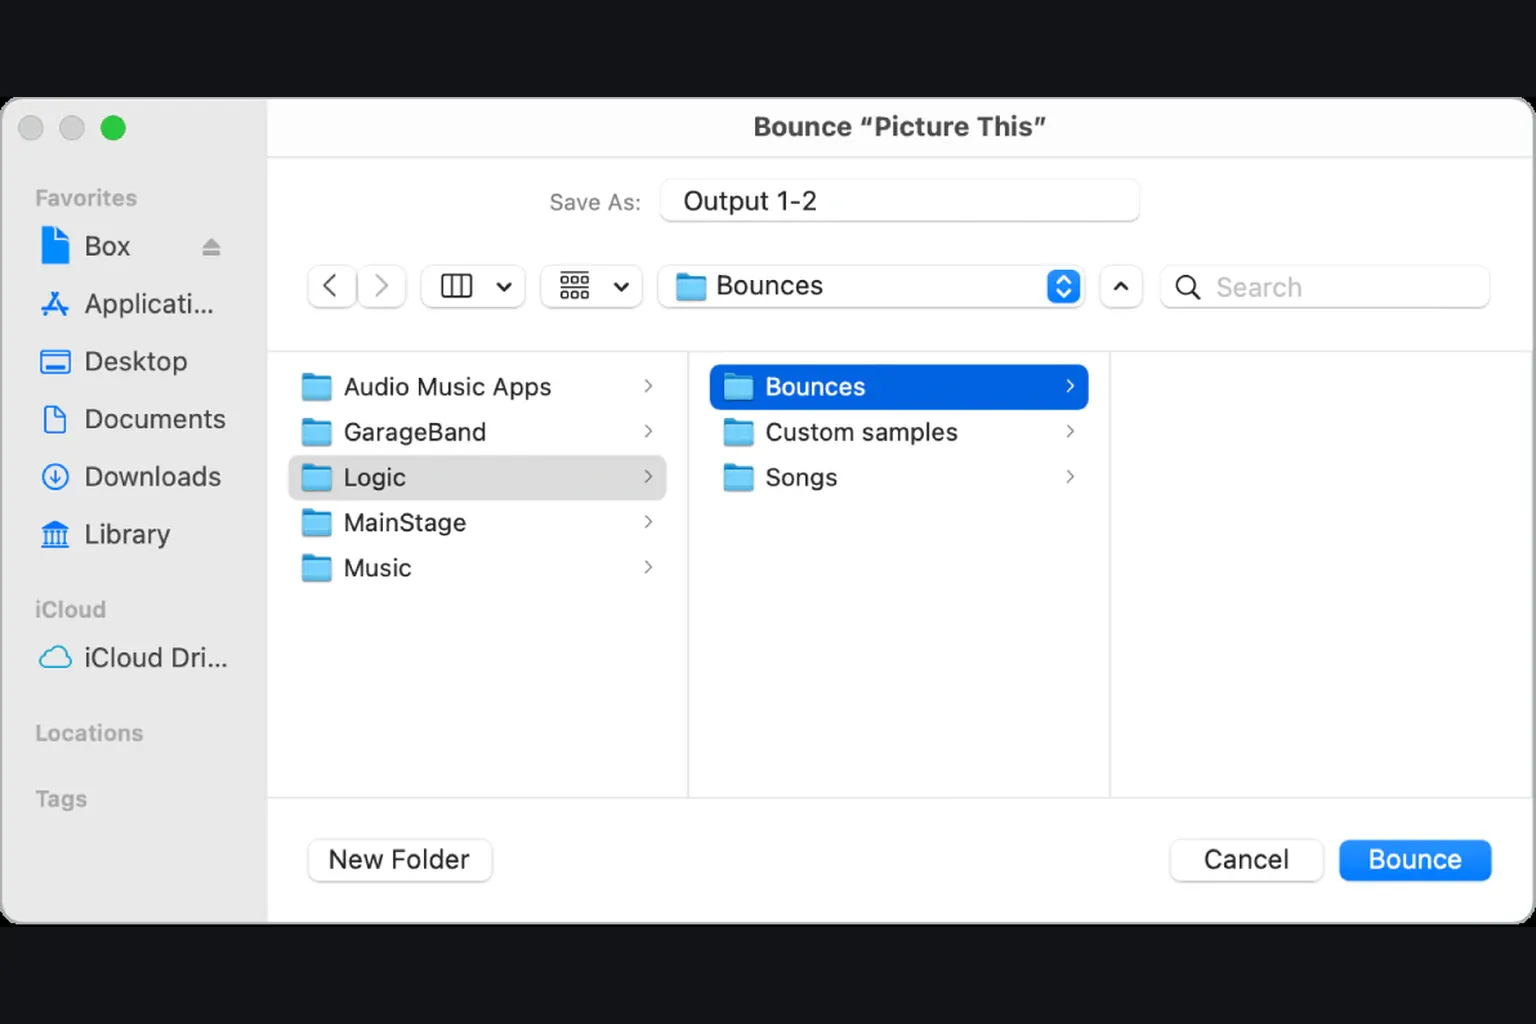
Choose File > Bounce > Project or Section when the deliverable is the actual output-channel mix. Apple’s current project bounce guide says every unmuted track routed to the chosen output contributes its parameters, effects, and automation. File > Bounce uses Output 1-2 by default and produces stereo when that channel strip is stereo. To render material routed to a different output, click the Bnce button on that output channel strip instead.
Check Start and End. If Cycle is active when you open the dialog, Logic uses that range. Leave room for the final decay or use the tail option where appropriate. Choose the file settings, click Bounce, enter a filename and folder, then click Bounce again. Open the saved file to confirm that it contains the full song rather than an earlier practice loop.
Project bounce differs from track export because the signal runs through the complete output routing, master-bus processing included. That’s the right route for the approved stereo mix and for a listening copy. Settle the processing decision first with the manual chain versus Mastering Assistant workflow, then create the required uncompressed master and any MP3 listening version. The Logic Pro MP3 export guide covers that compressed copy without ever treating MP3 as the production master.
Choose Offline, Realtime, or Automatic from routing
- Automatic lets Logic decide whether the project can render offline or requires real time.
- Offline is normally faster and handles internal audio and software instruments without waiting for playback.
- Realtime is required when the sound depends on an external instrument, the I/O plug-in, an external insert, or other signal that must run in real time.
Offline bounce is suitable when all sources and plug-ins can render internally. Use Realtime for external audio, routed back into Logic through an audio or aux path; a MIDI connection alone is not an audio recording. Automatic selects real-time processing when required by a plug-in. Listen to the saved file to check that each external part was actually captured.
Set tails, normalization, and format intentionally
Audio tail: push the range beyond the last musical event, or, where the selected dialog offers it, use Include Audio Tail when the release and effects should decay naturally. For a seamless cycle, Bounce 2nd Cycle Pass renders two repetitions and starts the file from the second, allowing the first pass tail to feed the beginning. Apple warns that noise-generating plug-ins, including some mastering processors or a test oscillator, can make automatic tail detection run too long. When that happens, define the end manually.
Tempo information: the Project bounce checkbox can include project tempo, tempo points, and curves only in an uncompressed audio file. Leave it on when that map will help the next Logic workflow; turn it off when the recipient needs plain audio without embedded project-tempo data.
Normalize: Off leaves the rendered level unchanged. Overload Protection Only turns the whole file down if the render exceeds 0 dBFS. On scans the file and moves it up or down toward the maximum peak. Normalization doesn’t add detail, resolution, or mastering quality. All it changes is gain. For controlled multitracks, stems, and mastered outputs, Off is the dependable default unless the specification says otherwise.
For a production handoff, use the recipient’s requested uncompressed format, bit depth, sample rate and channel layout. Apple’s Uncompressed bounce options distinguish Split files from Interleaved files and recommend dithering when reducing 24-bit recordings to 16-bit files. Make a delivery copy at the required settings and keep the original project; avoid repeated bit-depth reduction during editing.
Verify every rendered delivery
- Open or reimport every file; do not trust a completed progress bar.
- Check the first intended transient and the full final decay.
- Confirm mono/stereo/surround channel count and no accidental empty side.
- Place multitracks at the agreed start in a blank project and verify alignment.
- Confirm creative inserts and automation are printed where intended and absent where control was promised.
- Listen to shared reverbs, delays, parallel buses, sidechains, and multi-output instruments.
- Sum stems and compare them with the approved reference mix at matched level.
- Check for clipped peaks, cut tails, double monitoring, missing external hardware, and wrong versions.
- Keep the source project, project alternative, and delivery folder together with a plain-language manifest.
For the editing stages before rendering, browse the Recording & Editing guides. If you are working through a first project, the beginner tutorial covers setup through the final bounce. Other workflows are in Logic Pro Tutorials.
Frequently asked questions
What is the difference between Bounce in Place and Export in Logic Pro?
Bounce in Place renders a track or region and places the resulting audio at the same timeline position inside the current project. Export writes selected tracks or regions as external audio files for handoff, reuse, archiving, or another DAW.
Does Bounce in Place include plug-ins and automation?
It can. Leave Bypass Effect Plug-ins unchecked to print active source inserts, and enable Include Volume/Pan Automation when that movement should become part of the file. Region and track dialogs differ, so read the visible options before committing.
Should I choose New Track or Replace Track?
New Track puts the printed result on a separate track; Replace Track replaces the existing one. Save a separate project copy first rather than treating either destination as a backup. In Regions in Place, Source: Leave or Mute applies to New Track, while Selected Track can replace selected regions already on that track.
Should I bounce a region or a track in place?
Bounce Regions in Place when you need selected clips, edits, or a sound-design passage printed at their current positions. Bounce Track in Place when the complete track, instrument, plug-ins, and relevant automation should become one rendered audio track.
Should I export a region or bounce it in place?
Export a region when you need an external clip file for reuse, delivery, or another app. Bounce Regions in Place when the processed audio should appear at the same timeline position inside the current Logic project for further editing.
How do I export tracks for another mixer or DAW?
Select the tracks and use File > Export > 1 Track as Audio File; the label changes with the selection count. Choose the agreed range and uncompressed format, review effects and volume/pan automation, then choose a folder and click Save. Reimport the files into a blank project to verify their alignment before delivery.
Are exported tracks the same as stems?
Not necessarily. One file per source track is a multitrack export. Stems are grouped submixes such as drums, instruments, lead vocals, backing vocals, and effects, and those stems should sum predictably to the approved mix.
Does track export include send effects and aux returns?
Source-track inserts can be included when plug-in bypass is off, but a shared aux return is a separate channel-strip signal. Export or print that return separately, or create intentional stems, instead of assuming each source file contains its share of the common reverb or delay.
Which command makes the final stereo file?
Use File > Bounce > Project or Section. It renders the unmuted material routed to the selected output channel strip, including output processing and automation, into mono, stereo, or surround files according to that output format.


