How to Export Logic Pro as MP3
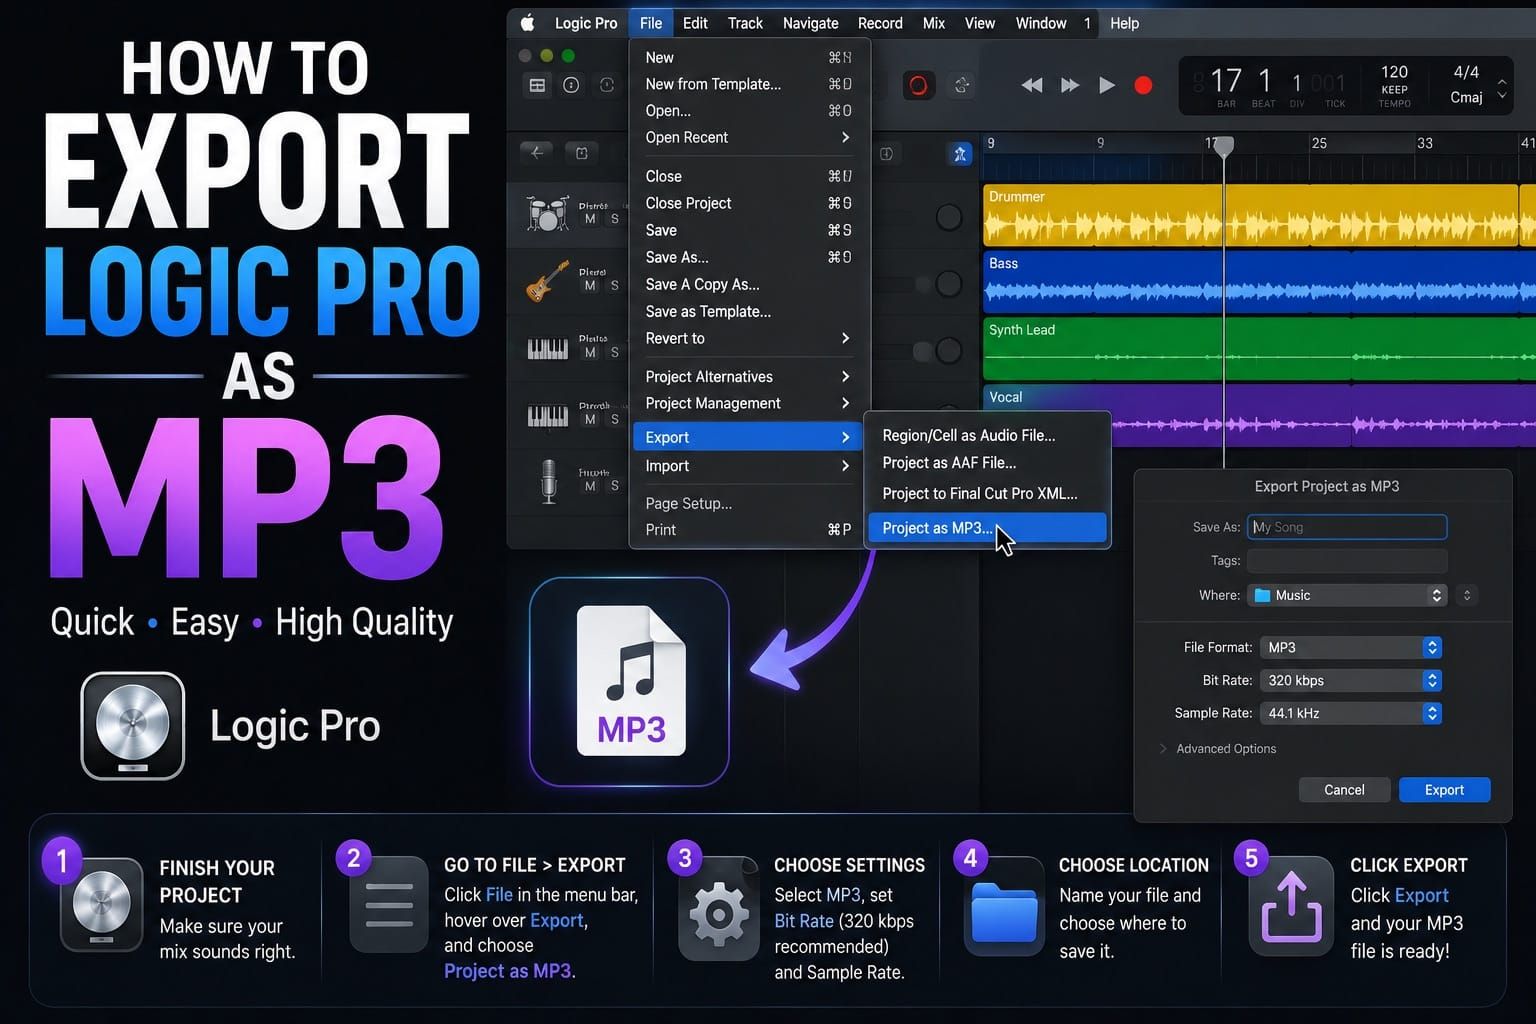
Logic Pro calls it bouncing, not exporting. Same result, different name. Go to File > Bounce > Project or Section (or press Command + B), tick the MP3 box, set your bit rate to 320 kbps, and click OK. That's the short version.
The longer version matters because the default settings Logic ships with are not the ones you want. The default stereo bit rate is 160 kbps. That's fine for a rough demo you're texting to a collaborator. For anything you're sending to a label, uploading publicly, or handing off as a reference deliverable, 320 kbps is the safest MP3 setting.
Here's the full walkthrough, including the settings most guides gloss over.
Set the Correct Bounce Range Before Exporting
Before you touch the bounce settings, make sure Logic knows what you want to export. The bounce range pulls from your project's start and end locators. If you've been working with cycle mode on, your bounce will only cover the yellow cycle region, not the full project.
I've bounced 4-minute songs that came out as 23-second loops because I forgot cycle was still on. Check the Cycle button in the toolbar before you open the bounce window.
To export the full project, make sure cycle mode is off, then set your end locator past the last audio event. Leave a bar or two of silence at the end so reverb tails don't get cut.
Once that's set: File > Bounce > Project or Section.
Best MP3 Bounce Settings in Logic Pro
The bounce window has two destination columns. Uncheck PCM unless you also want a WAV or AIFF file alongside the MP3. Check MP3, then click on the MP3 label to expand its options on the right side.
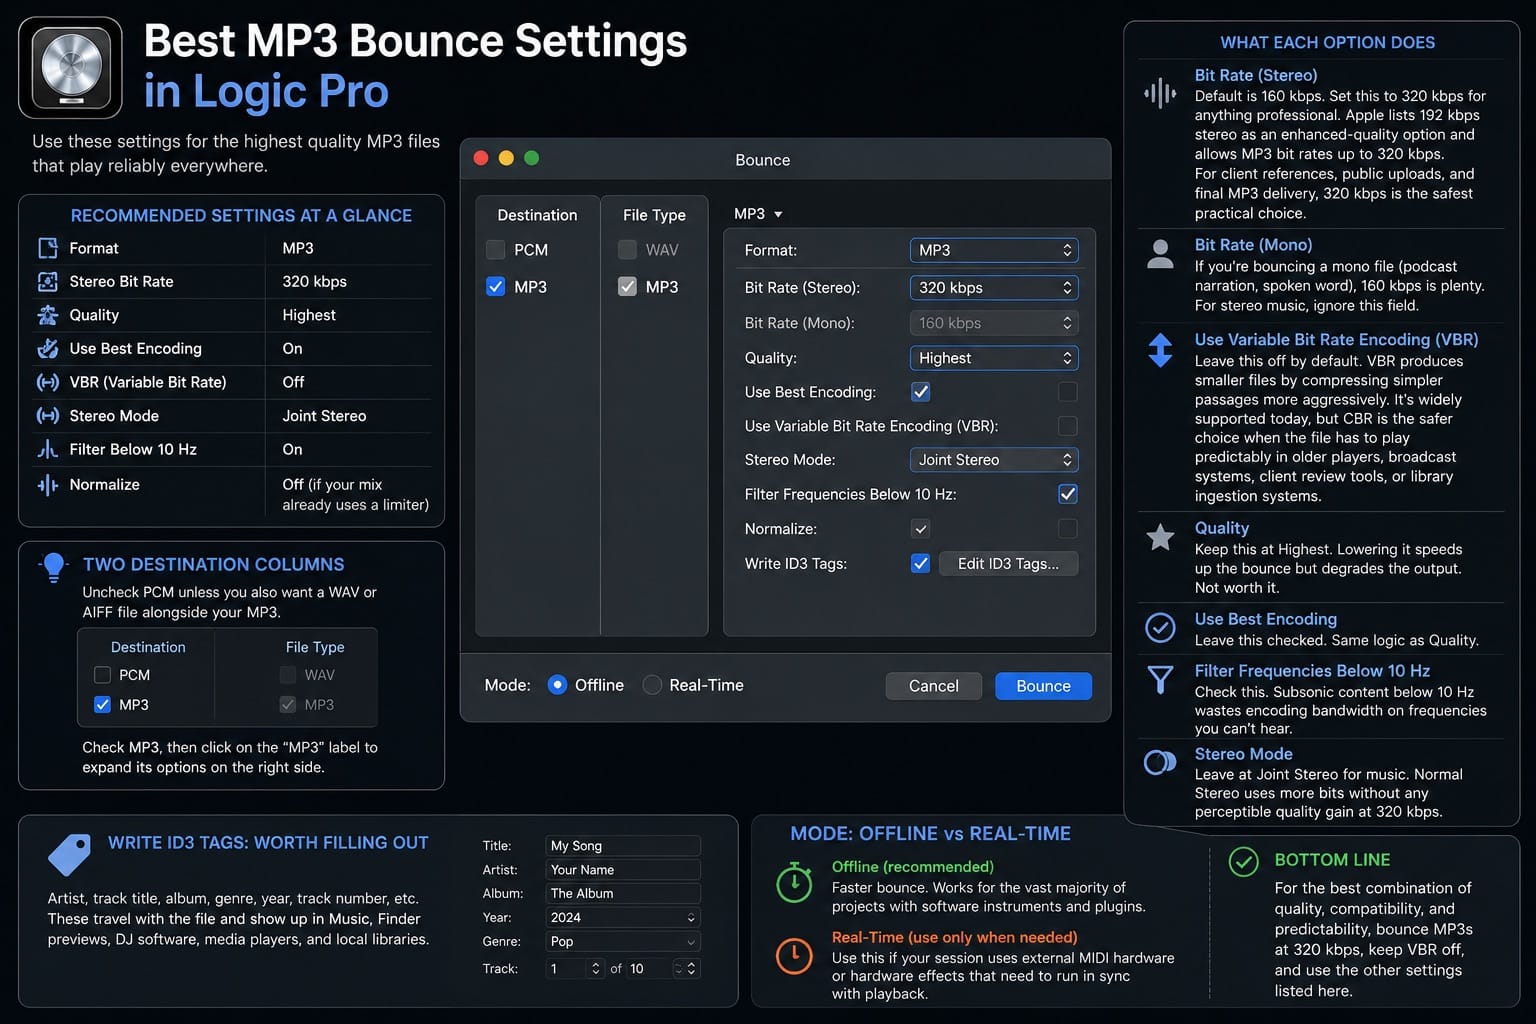
Recommended settings at a glance:
- Format: MP3
- Stereo Bit Rate: 320 kbps
- Quality: Highest
- Use Best Encoding: On
- VBR: Off
- Stereo Mode: Joint Stereo
- Filter Below 10 Hz: On
- Normalize: Off if your mix already uses a limiter
Here's what each option actually does:
- Bit Rate (Stereo): Default is 160 kbps. Set this to 320 kbps for anything professional. Apple lists 192 kbps stereo as an enhanced-quality option and allows MP3 bit rates up to 320 kbps. For client references, public uploads, and final MP3 delivery, 320 kbps is the safest practical choice.
- Bit Rate (Mono): If you're bouncing a mono file (podcast narration, spoken word), 160 kbps is plenty. For stereo music, ignore this field.
- Use Variable Bit Rate Encoding (VBR): Leave this off by default. VBR produces smaller files by compressing simpler passages more aggressively. It's widely supported today, but CBR is the safer choice when the file has to play predictably in older players, broadcast systems, client review tools, or library ingestion systems.
- Quality: Keep this at Highest. Lowering it speeds up the bounce but degrades the output. Not worth it.
- Use Best Encoding: Leave this checked. Same logic as Quality.
- Filter Frequencies Below 10 Hz: Check this. Subsonic content below 10 Hz wastes encoding bandwidth on frequencies you can't hear.
- Stereo Mode: Leave at Joint Stereo for music. Normal stereo uses more bits without any perceptible quality gain at 320 kbps.
- Write ID3 Tags: Worth filling out. Artist, track title, album. These travel with the file and show up in Music, Finder previews, DJ software, media players, and local music libraries.
Mode options at the bottom of the window let you choose between Offline and Real-Time bounce. Offline is faster and works for the vast majority of projects. Use Real-Time only if your session uses external MIDI hardware or hardware effects that need to run in sync with playback.
MP3 vs WAV: Which Format Should You Use?
MP3 is a lossy format. Every time you bounce to MP3, you permanently discard audio information. That's fine for a final share, but it matters a lot for your workflow.
A few situations where you should not bounce to MP3:
- Sending to a mastering engineer. Send WAV or AIFF at 24-bit, 44.1 kHz or 48 kHz. Mastering from an MP3 compresses audio that's already been compressed.
- Exporting stems for a collaborator. Same reason.
- Uploading to a streaming distributor like DistroKid or TuneCore. Distributors may accept MP3, but WAV or FLAC is the safer upload master because the platform will create its own delivery versions from your source file.
- Archiving your final mix. Keep a WAV master. MP3 is for delivery, not storage.
For demos, SoundCloud uploads, client references, sync pitches, and anything where someone just needs to press play, 320 kbps MP3 is completely appropriate. A 4-minute song at 320 kbps is roughly 9 MB. A 24-bit WAV of the same song is closer to 50 MB.
One thing worth knowing: Logic Pro's MP3 encoder does not support sample rates above 48 kHz. If your project is running at 88.2 kHz or 96 kHz, Logic automatically creates a temporary 48 kHz downsampled file and encodes from that. You don't need to change your project settings.
Best Export Format for Streaming, SoundCloud, Email, and Sync
Most streaming distribution workflows are better served by a WAV or FLAC master. DistroKid accepts WAV, MP3, M4A, FLAC, AIFF, and WMA, but recommends WAV or FLAC when sound quality matters. TuneCore recommends WAV files for upload. Either way, a lossless source gives the distributor a cleaner file to encode from.
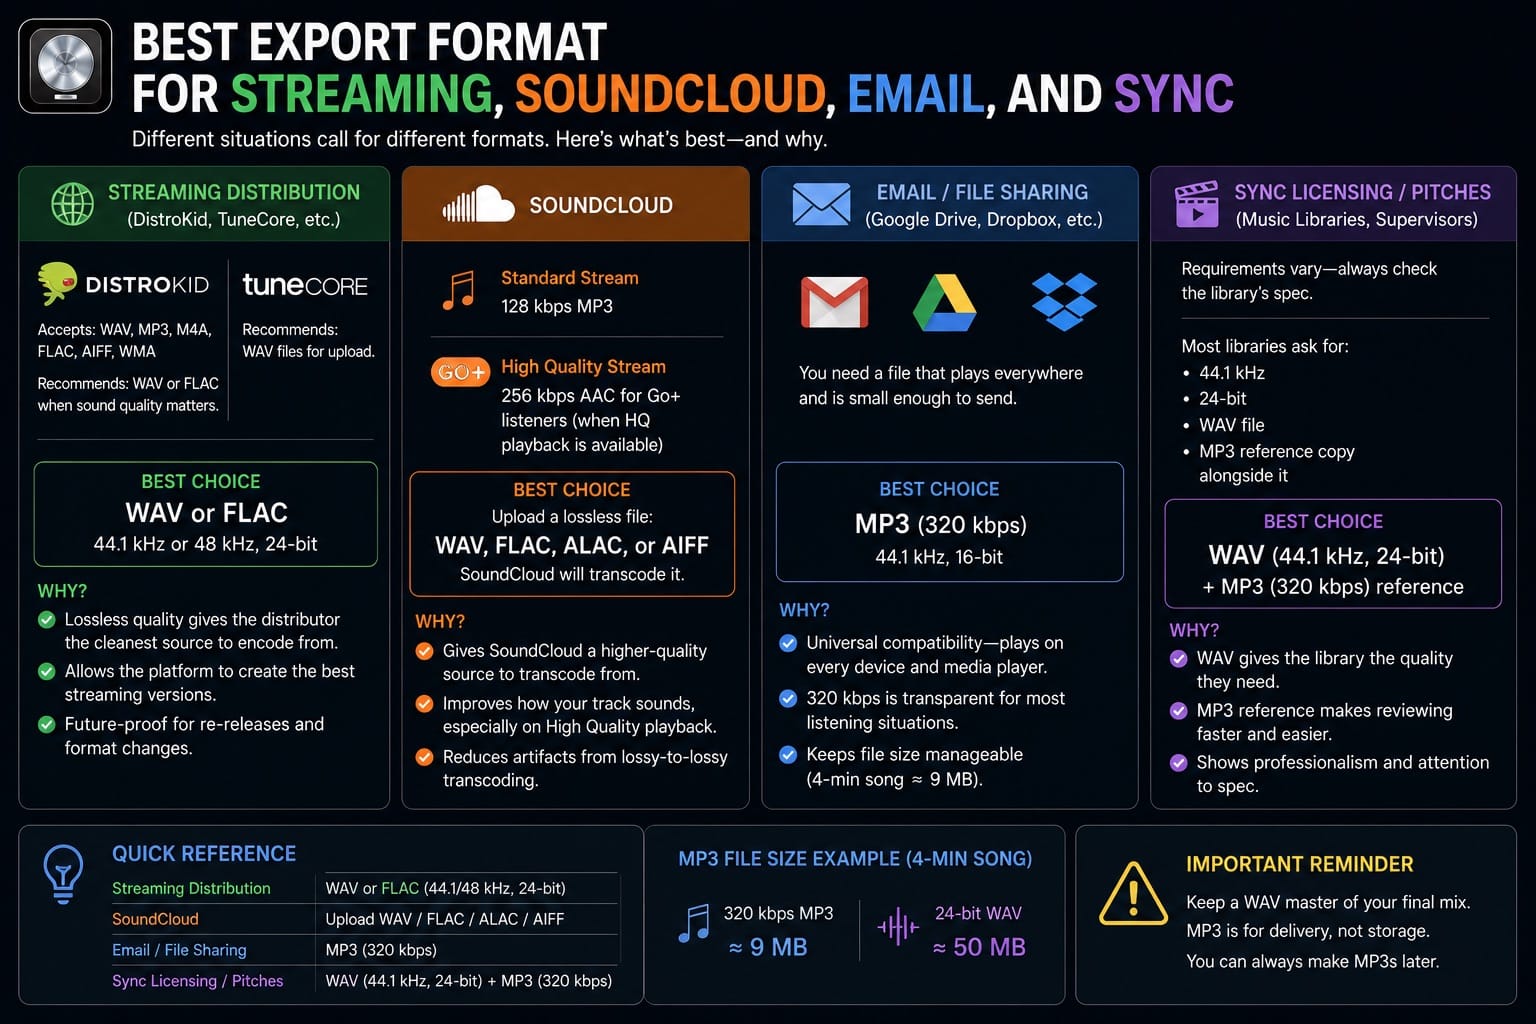
SoundCloud's standard stream is 128 kbps MP3, while High Quality streaming uses 256 kbps AAC for Go+ listeners when HQ playback is available. If audio quality matters, upload a lossless WAV, FLAC, ALAC, or AIFF source so SoundCloud has a cleaner file to transcode.
For emailing a demo or sharing via Google Drive or Dropbox, 320 kbps MP3 is the right call. It plays on everything and keeps the file size manageable.
For sync licensing pitches, check what the library wants. Most ask for 44.1 kHz 24-bit WAV with the MP3 as a reference copy alongside it.
Exporting a Section Instead of the Full Project
If you want to export just a part of your project, there are two ways to do it.
The first is cycle mode. Set the cycle region over the section you want, make sure the Cycle button is on, then bounce. Logic will use those locator positions as the start and end of the export.
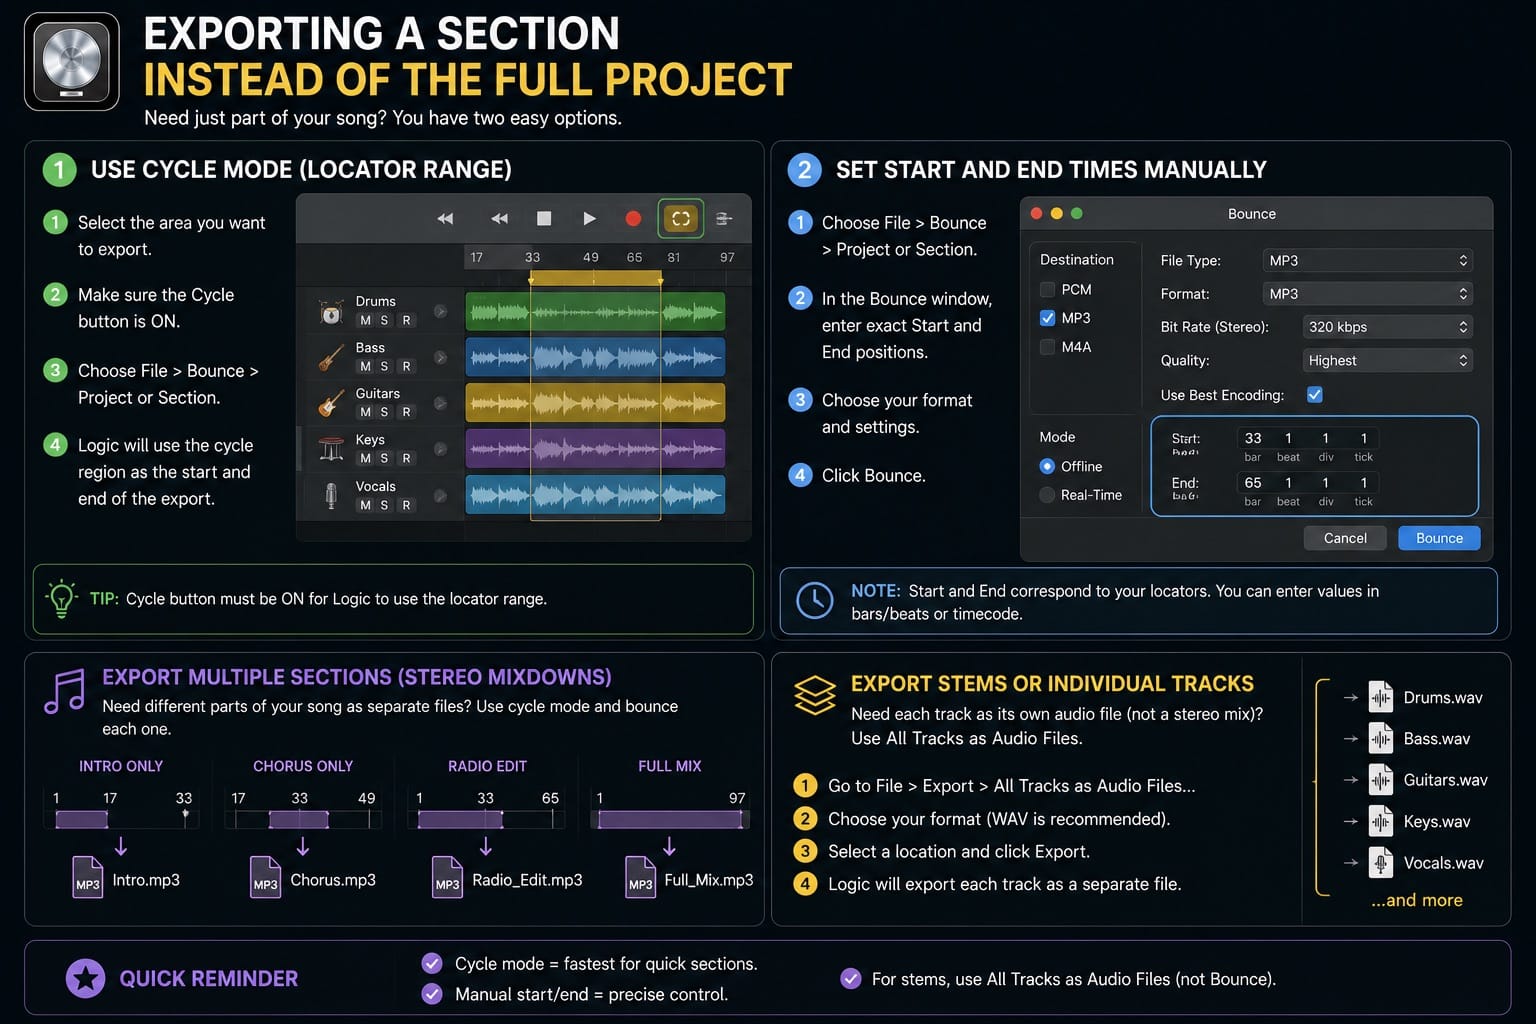
The second is manually setting start and end times directly in the Bounce window. The Start and End fields in the bounce window correspond to your locators. You can type in exact bar/beat positions or timecode values.
If you need several stereo MP3 versions (intro only, chorus only, radio edit, full mix), bounce each section separately using different cycle ranges. If you need separate track files or stems, use File > Export > All Tracks as Audio Files instead. That exports each track individually as its own audio file, not as a stereo mixdown.
Final Checklist Before You Bounce
Run through this before hitting OK on any final bounce:
- Cycle mode is off (unless you're intentionally exporting a section).
- End locator has a bar or two of silence after the last audio event.
- No tracks are accidentally muted in the mixer.
- Output meter is not clipping. Leave at least -0.3 dBFS of headroom.
- MP3 bit rate is set to 320 kbps, not the default 160 kbps.
- Quality is set to Highest.
- Use Best Encoding is checked.
- ID3 tags are filled in if this file is going to someone else.
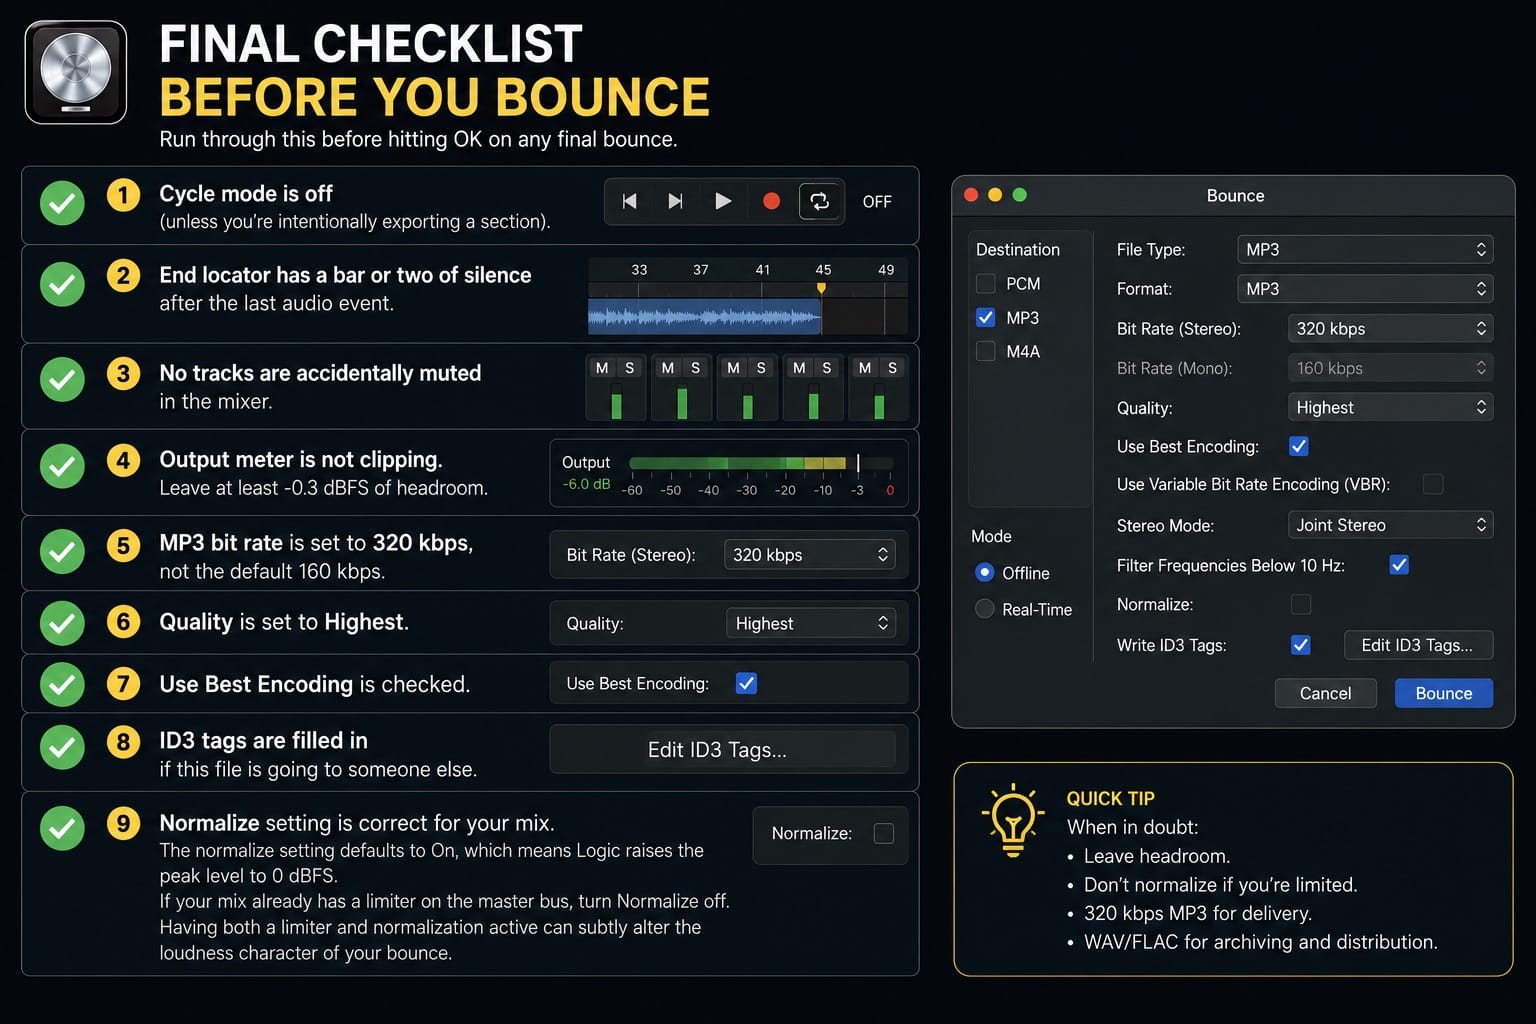
The normalize setting defaults to On, which means Logic raises the peak level to 0 dBFS. If your mix already has a limiter on the master bus, turn Normalize off. Having both a limiter and normalization active can subtly alter the loudness character of your bounce.
Logic Pro for iPad: MP3 Export Limitations
Logic Pro for iPad handles export differently. Tap the project name in the top-left corner, then tap Export. You'll see options for Uncompressed (AIFF or WAV) and Compressed (M4A/AAC). As of the current version, Logic Pro for iPad does not offer a direct MP3 export option from this menu.
If you need an MP3 from an iPad session, export the project as M4A, WAV, or AIFF, then convert it on Mac using Logic Pro, GarageBand, Music, or a dedicated audio converter. Alternatively, open the project in Logic Pro for Mac and bounce from there.
Common Logic Pro MP3 Export Mistakes
- Exporting only the cycle region by accident. Cycle mode stays on from your last editing session. Always check the Cycle button before bouncing.
- Leaving Normalize on with a limited master. If your Stereo Out has a limiter, turn Normalize off. Both processes fighting the same signal produces a bounce that doesn't match your mix.
- Sending MP3 to mastering or distribution. Mastering engineers and streaming distributors need a lossless source. A 320 kbps MP3 that gets re-encoded is audio quality you're not getting back.
- Forgetting reverb tails. If your end locator sits on the last note, reverb and delay from Space Designer or any other plug-in will be cut off. Add at least a bar of silence past the last event.
- Leaving the default 160 kbps bit rate. Logic can easily leave you on a previous or default bit rate. Check it every time.
FAQ
Why does Logic Pro call it "bounce" instead of "export"?
The terminology comes from the analogue tape era, where you'd bounce tracks from one tape machine to another to free up tracks. In Logic, bouncing renders your full mix, including all effects, automation, and plug-in processing, into a single audio file. Exporting (File > Export) has a different function: it exports individual regions or stems, not a stereo mixdown.
What is the best MP3 bit rate for Logic Pro bounces?
320 kbps for any final deliverable or public release. Logic defaults to 160 kbps stereo, which is adequate for quick reference listens but not for professional use. The difference in file size between 160 kbps and 320 kbps on a 4-minute song is around 4 MB.
Should I check the "Normalize" option when bouncing to MP3?
Only if your mix has no limiter on the master output. If you're running a limiter plug-in (Adaptive Limiter, Limiter, or a third-party limiter) on the Stereo Out channel strip, turn Normalize off. The two processes can interact and produce a bounce that doesn't match what you heard during mixing.
Can I export just part of my Logic Pro project as an MP3?
Yes. Either enable Cycle mode and set the yellow cycle region to the section you want before bouncing, or manually set the Start and End locator positions in the Bounce window. Logic will only export audio within those boundaries.
Does Logic Pro for iPad export MP3?
Not directly. Logic Pro for iPad exports as M4A (AAC compressed) or uncompressed AIFF/WAV. For MP3, you need either Logic Pro for Mac or a separate file conversion tool.
Should I bounce to MP3 or WAV for streaming platforms?
WAV. Streaming distributors like DistroKid and TuneCore re-encode your upload into their delivery formats. Giving them a WAV master means they're encoding from lossless source material. Uploading an MP3 means they're compressing a file that's already been compressed.
What does "Use Best Encoding" mean in Logic's MP3 bounce options?
It tells Logic to use a slower, higher-quality encoding algorithm. Unchecking it speeds up the bounce at the cost of audio quality. Leave it checked unless you're bouncing dozens of files and need to save time.
Related guides: Logic Pro Stem Splitter, Fix latency in Logic Pro, Best DAW for Mac in 2026
Sources: Logic Pro User Guide — Apple Support · Logic Pro — Apple