Flex Time in Logic Pro: Fix Audio Timing Cleanly
Move a late note or loose phrase without dragging the rest of the performance or leaving stretched, hollow audio behind.

To use Flex Time in Logic Pro, show the Flex controls, enable Track Flex and choose an algorithm for your audio. Add markers around the note or phrase you want to move, then drag its timing marker. Start with one audible mistake and compare the edit with the original recording.
The surrounding markers limit which audio changes, but they are not fixed locks: dragging past a neighbouring marker can extend the edit into the next interval. Stretching modes compress or expand the sound between boundaries; Slicing instead moves slices at their original playback speed.
The Mac controls and menu paths below were checked against Apple’s documentation on September 12, 2026. The region settings use the separate Flex checkbox and Smart Tempo menu documented in the Logic Pro 12.3 release notes. Older versions may label these controls differently.
Use Flex Time for the right problem
| Problem | Best starting tool | Why |
|---|---|---|
| One late vocal word or bass note | Manual flex markers | You can isolate and move one attack. |
| Whole audio performance is uneven against a grid | Flex-enabled audio quantization | Automatic quantize can process many detected events consistently. |
| Imported loop should follow project tempo | Region Flex and Smart Tempo controls | The relationship is tempo-wide, not one-note repair. |
| Note is sharp or flat | Flex Pitch | The defect is pitch, not timing. |
| Entire take is globally early or late | Move the region or adjust region delay | No internal time stretching is needed. |
| Multimic drums need tightening | Grouped, Quantize-Locked Flex tracks | Every microphone must keep the same timing relationship. |
The companion guide to quantizing audio and MIDI in Logic Pro handles grids, Q-Strength, Q-Range, and phase-locked drum quantization. What follows here stays with manual Flex Time repair: one audible mistake, one controlled edit.
If the waveform itself is clipped, noisy, or captured through the wrong monitoring path, stretching it only puts the damage on display. Go through the Logic Pro audio recording workflow first, before you treat Flex Time as a rescue tool.
A safe Flex Time workflow
- Save a separate project copy with its audio assets before file-level transient edits. A duplicated region is useful for comparison but is not an independent audio-file backup.
- Listen in the arrangement and identify one timing event that needs to move.
- Show Flex, enable Track Flex and choose an algorithm that matches the source.
- Enable the region’s Flex checkbox and choose whether Smart Tempo should use the file tempo; Off still allows manual Flex edits.
- Check that the transient marker sits on the attack you intend to move.
- Add a target flex marker and neighbouring guard markers around the affected interval. Check their positions rather than accepting every detected transient.
- Drag the target marker without crossing its neighbouring markers if the surrounding audio must stay fixed.
- Listen for softened attacks, doubling, gaps, metallic tone, pitch changes and changes in the relationship between microphones.
- Reduce the move, adjust the algorithm or markers, or reset the edit if it sounds worse.
- Compare with the untouched recording through the full section before keeping the change.
Use File > Save a Copy As and check that the required audio assets are included. A project can reference external files, so a second project name alone does not prove that its audio is backed up. For timing decisions, listen with the arrangement; use solo to investigate a click or damaged attack.
Turn on Flex Time and confirm the region
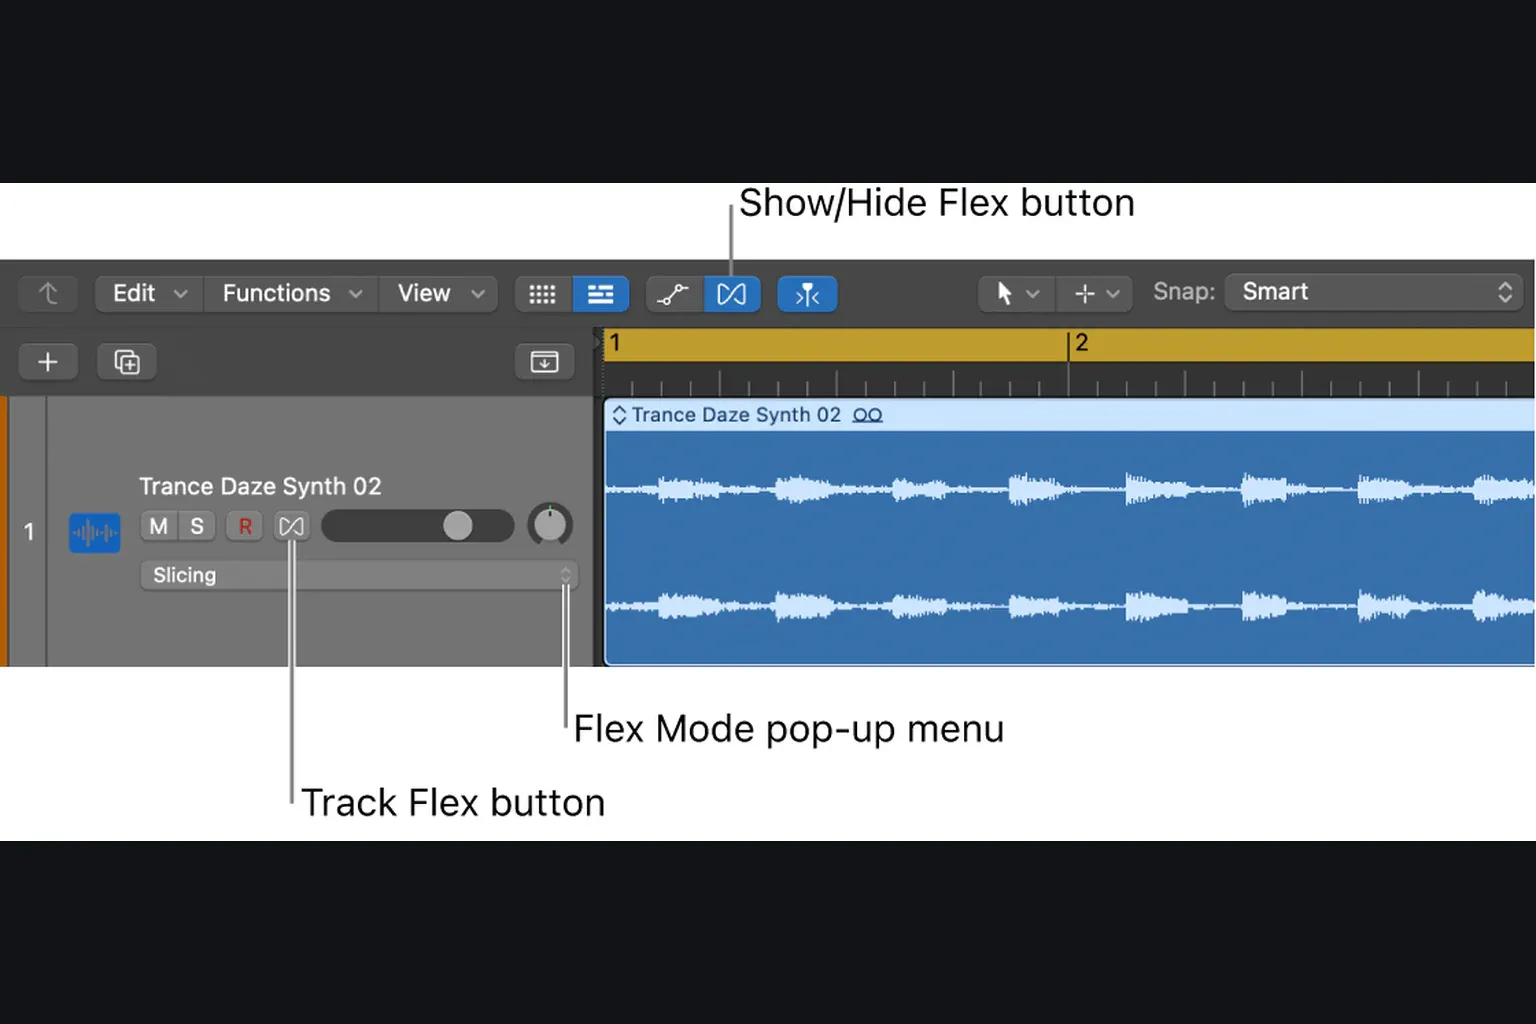
- Choose Edit > Show Flex Pitch/Time in the Tracks area, or press Command-F.
- Click the Track Flex button on the audio track.
- Choose a Flex Time algorithm from the Flex Mode pop-up menu.
- Select the audio region and make sure its Flex checkbox is enabled in the Region inspector.
Apple’s Flex Time overview distinguishes showing the controls from activating processing. Show/Hide Flex reveals the controls; Track Flex enables the track. Then check the selected algorithm and the region’s Flex checkbox. Detected transient lines are analysis points, not timing edits by themselves.
Why do older videos say Flex & Follow? That was the combined region control in earlier versions. Apple’s Logic Pro 12.3 release notes document the new Smart Tempo pop-up, and the current audio region parameters show it beside a separate Flex checkbox. Follow the labels in your current inspector instead of copying an older menu path.
Choose the Flex Time algorithm by source
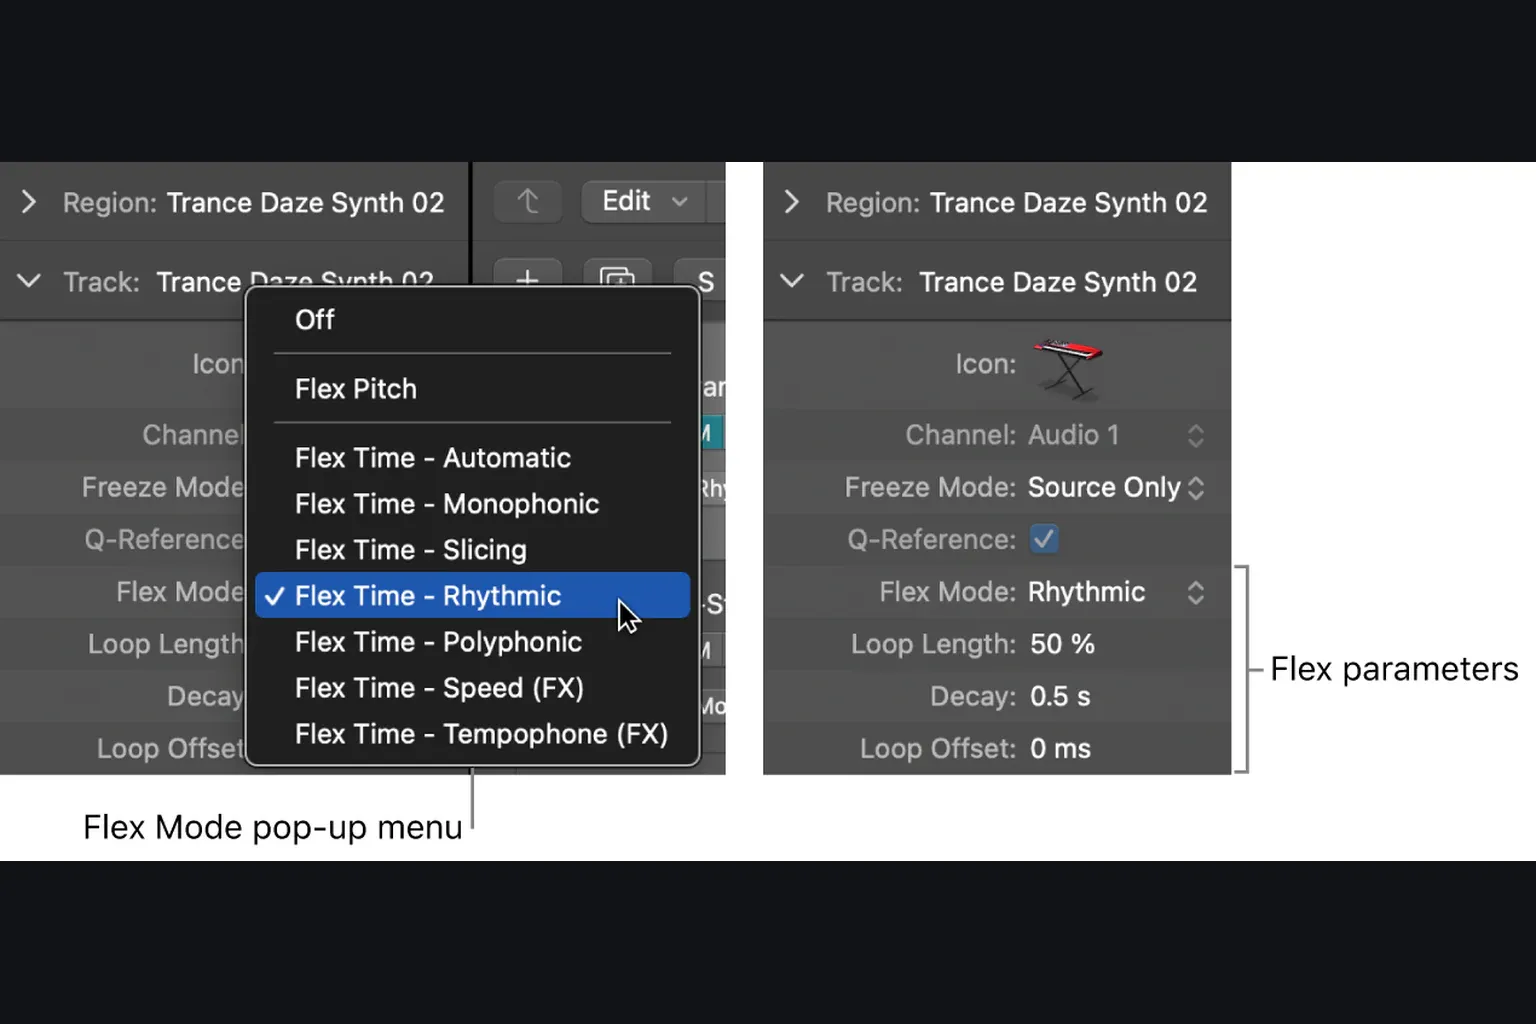
| Algorithm | Best first use | What to watch |
|---|---|---|
| Automatic | Quick initial classification | Logic selects Monophonic, Slicing, or Polyphonic; still audition the choice. |
| Slicing | Drums and non-tonal percussion | Slices play at original speed, so moved hits can expose gaps or tails from neighbouring slices. |
| Rhythmic | Rhythm guitar, rhythmic keys, loops | Looped material fills expansion; bad loop length or offset can repeat pre-attacks. |
| Monophonic | Dry vocal, bass, one-note melody | Reverb, doubles, or overlapping notes confuse the single-line assumption. |
| Polyphonic | Chords, piano, choir, complex mix | Phase-vocoder stretching can sound watery on attacks and costs more processing. |
| Speed (FX) | Creative slow-down or speed-up | Pitch changes with playback speed; it is not a transparent timing repair. |
| Tempophone (FX) | Granular, mechanical effects | The audible artifacts are the point, controlled by Grain Size and Crossfade. |
Treat these as starting points rather than genre rules. A plucked bass can work in Monophonic with Percussive enabled to protect its attacks. A wet lead vocal often behaves better in Polyphonic, since its reverb breaks the dry, one-note assumption. Apple’s current algorithm reference describes Automatic’s choices and every mode’s processing parameters, but what passes or fails is still the recorded sound.
Understand the markers before dragging
- Transient marker: an analysis point marking a significant peak. It suggests where an event starts but does not change timing by itself.
- Flex marker: an edit anchor controlling timing within neighbouring boundaries. The selected algorithm determines how the audio moves or stretches.
- Quantize flex marker: a marker created automatically when audio quantization adjusts timing.
- Tempo marker: a boundary associated with the region’s tempo behavior. Crossing one can extend the range of a manual Flex edit.
If a detected transient misses the attack, open the Audio File Editor and choose View > Transient Editing Mode. Apple’s transient editing instructions describe adding a candidate with the Pencil tool, dragging a marker to reposition it, or double-clicking it to invalidate it. Audio File > Detect Transients rebuilds the file’s map and overwrites manually added or edited transients after confirmation. Preserve a separate copy of the source audio before doing this; duplicating its region does not create that copy.
Check the sound at the marker, not just the peak’s size: a breath or pick noise can precede the attack you want to align.
Add one marker or three guard markers
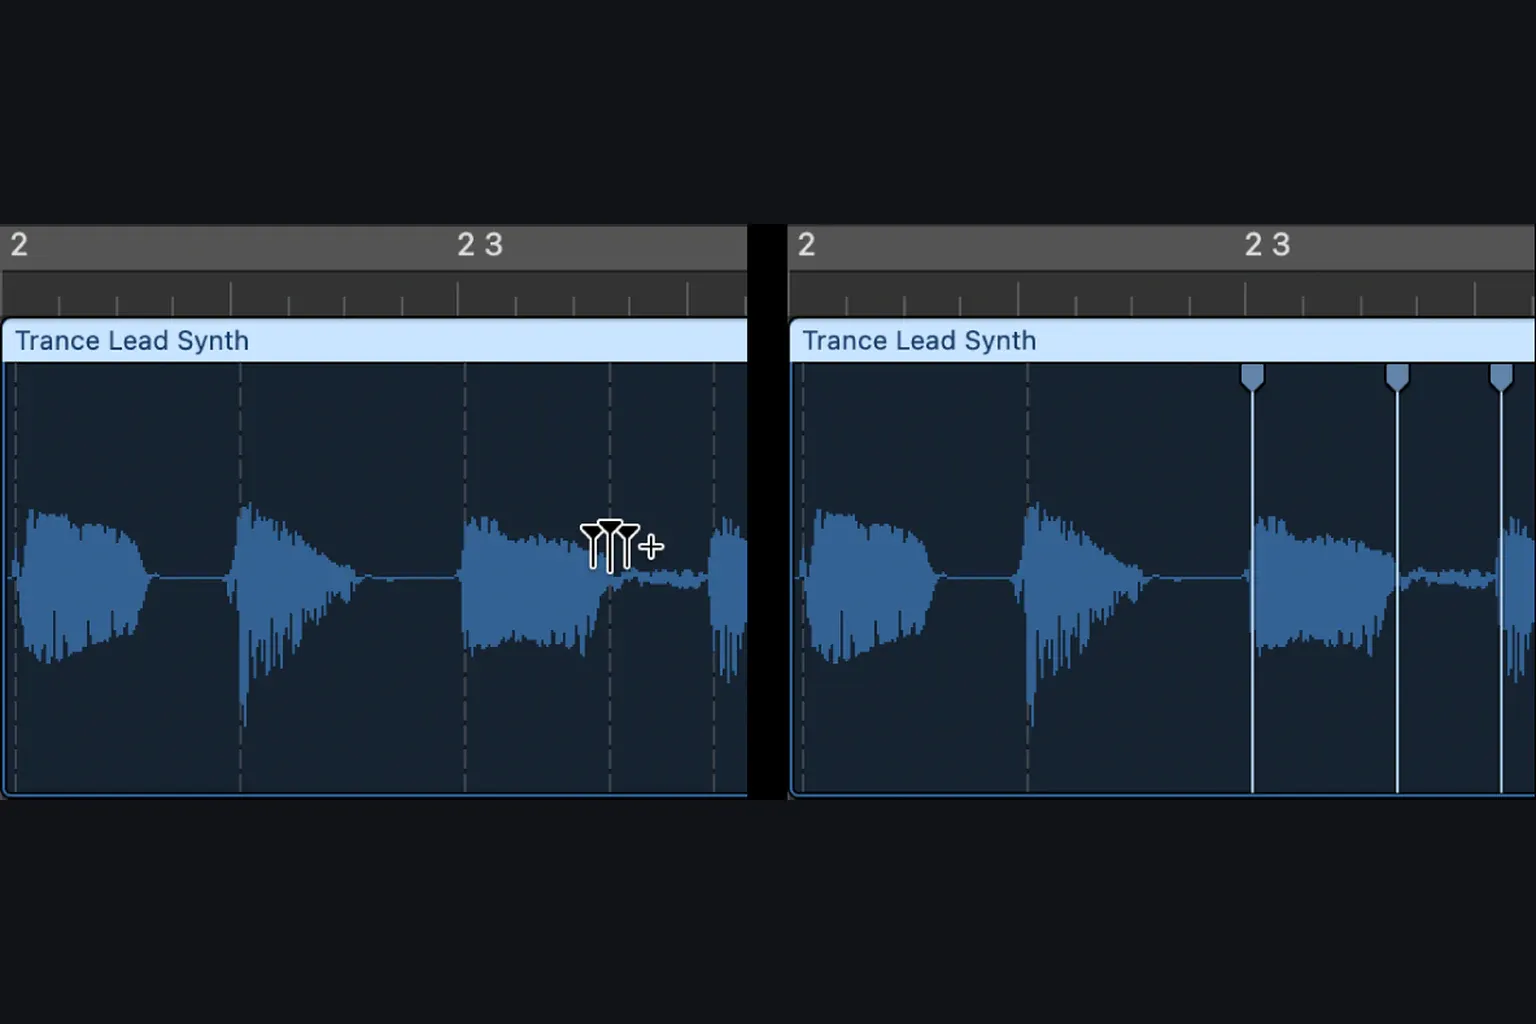
Logic’s waveform has two useful marker gestures:
- Click the upper half over or beside a transient to add one flex marker.
- Click the lower half to add three markers: the target and anchors at the previous and following transient positions.
Apple’s flex marker instructions describe both gestures. Three markers give a local edit two boundaries, but inspect where they landed. If you drag the target across a neighbouring flex or tempo marker, that boundary can jump to the next transient and extend the affected area. Keep the target between its guards when the surrounding timing must stay fixed.
Think in syllables and attacks. For a late vocal word, put guards around the previous stable vowel or breath boundary and the consonant that follows. On bass, protect the note attacks either side. On rhythm guitar, protect strums instead of arbitrary grid lines.
Move an intact phrase with the Flex Tool and Marquee
A single target marker is right for one attack. A short word, chord, or phrase can need to move as a unit instead. With Flex active, make a Marquee selection around the material you want to protect, then drag that selection with the Flex Tool. Apple’s current Flex Tool workflow adds four markers: two at the Marquee boundaries and one at the previous and next transient. The audio between the two inner markers stays unchanged while Logic stretches the transitions outside it.
Use this when the phrase itself sounds right but starts too early or late. Keep the move inside the outer boundaries and listen to both joins. If the transitions sound damaged, compare a region edit with crossfades or another take.
Move the event and understand the stretch
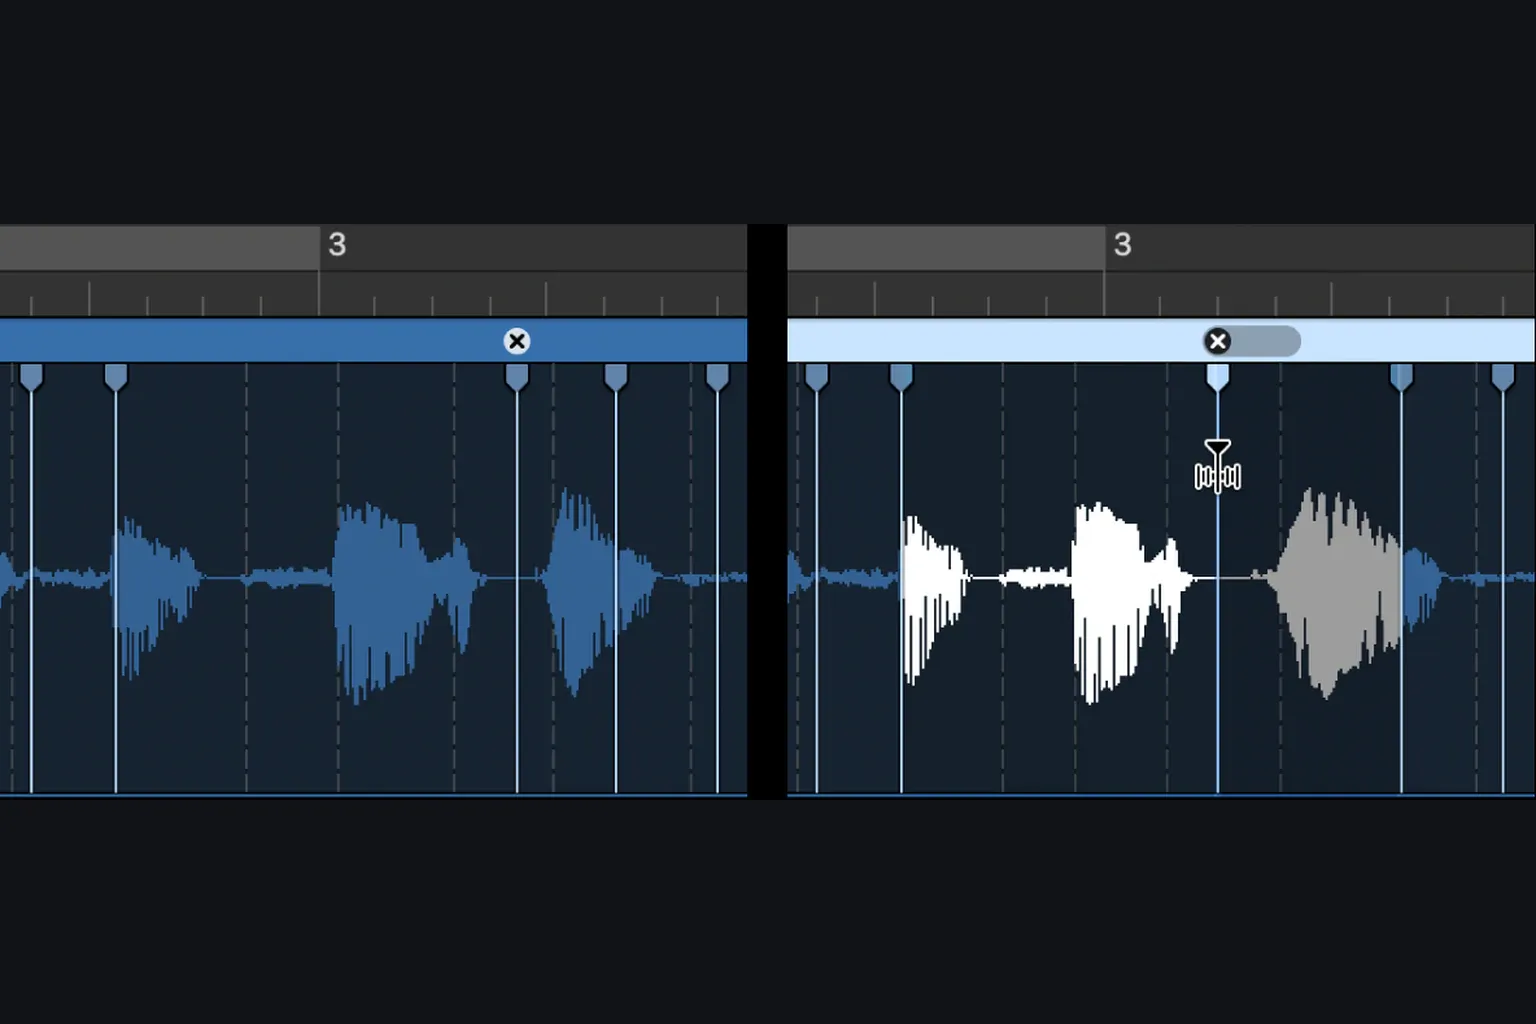
In a stretching mode, dragging a flex marker left compresses the preceding interval and expands the following one; dragging right reverses that relationship. The intervals end at neighbouring flex or tempo markers, or the region edges. Slicing handles the change by shifting original-speed slices instead. Do not drag through a boundary that is supposed to protect another note.
Move the attack to the musical reference rather than automatically to the nearest vertical line. Dragging over an adjacent track lets you use the yellow guideline to snap the flex marker onto one of that track’s transients. Handy for pinning a bass note to a kick or a backing-vocal consonant to the lead, though only when those events genuinely belong together.
Hold Option while dragging a flex marker and you move the marker itself, with no time stretching. That shifts the anchor position rather than the audio timing, which is what you want when the marker landed on the wrong part of the waveform.
Flex Time, the Flex checkbox, and Smart Tempo
Manual markers and tempo following solve problems at different scales. The region’s Flex checkbox lets manual Flex edits and quantization affect playback. Its Smart Tempo setting decides whether Logic uses the file tempo and aligns the region to the project. Apple’s current Smart Tempo setting guide is explicit: with Smart Tempo set to Off, you can still stretch, edit, and quantize with Flex Time. Use that current 12.3 combination when the file tempo is wrong or irrelevant and you only need a local repair.
The four Smart Tempo choices are:
- Off ignores file tempo.
- On uses the file tempo as a reference.
- On + Align Bars also aligns bar positions.
- On + Align Bars and Beats adds beat alignment.
Do not turn on the most aggressive alignment setting as a repair for one late note. You’re asking Logic to solve a region-wide tempo relationship instead. Manual flex markers handle a local event, audio quantization handles many grid-related events, and Smart Tempo alignment is for imported or freely played audio that needs to track the project’s tempo map.
Practical source workflows
Vocals
Choose the performance before you repair it; the Take Folder and Quick Swipe comping workflow keeps that decision recoverable. Then start with Monophonic on a dry, single lead. Put the target on the consonant or vowel onset you actually hear as the word’s arrival, guard the adjacent breath and the next syllable, and try Polyphonic if ambience or doubles smear. Never let a word land neatly on screen while its consonant sounds doubled.
Bass
On a clean single-note line, try Monophonic with Percussive enabled whenever attacks need protection. Align only the notes whose relationship with the kick distracts you. Sliding notes, hammer-ons, and expressive pickups want a larger protected phrase, or no edit at all.
Rhythm guitar and keys
Try Rhythmic for rhythmic guitar or keys, then listen for repeated pick noise in expanded intervals. Its controls are in the Track inspector: Loop Length sets the repeated section’s length, and Loop Offset moves it earlier to avoid the following attack. Compare Polyphonic for sustained chords.
Drums and percussion
Slicing plays each slice at its original speed but can expose gaps. In the Track inspector, Fill Gaps enables the decay used to fill them, and Decay controls its duration. Slice Length shortens slices; use it to remove unwanted pre-attacks, not as a way to fill a gap. For multimic drums, group the microphones before editing and enable Editing and Quantize-Locked. Prepare the Q-Reference tracks as described in the grouped drum quantization workflow; do not move one microphone independently of the others.
Diagnose Flex Time artifacts
| What you hear | Possible cause | First correction |
|---|---|---|
| Soft or doubled attack | Marker is off the true transient or the stretch crosses an attack. | Reposition the marker, add guards, and shorten the move. |
| Watery or metallic chord | Large Polyphonic phase-vocoder stretch. | Reduce the distance, add boundaries, or use an alternate take. |
| Click or gap between drum hits | Slicing created uncovered space. | Check Fill Gaps and Decay in the Track inspector; reduce the move. |
| Repeated pick or pre-attack | Rhythmic loop includes the next transient. | Adjust Loop Offset and Loop Length in the Track inspector. |
| Vocal glitch at every marker | Percussive protection or Monophonic mode does not suit the source. | Disable Percussive or compare Polyphonic. |
| Pitch changes with timing | Speed (FX) is selected. | Choose a repair-oriented algorithm unless pitch change is intentional. |
| Hollow multimic drums | Microphone tracks moved differently. | Revert and edit the phase-locked group together. |
| Whole region shifts unexpectedly with tempo | Smart Tempo alignment scope is broader than intended. | Review the region’s Smart Tempo setting and use manual markers for local repair. |
Do not use a fixed stretch percentage as a quality guarantee. Check attacks and decays after the move. If you cannot remove the artifact, compare another take or a region edit with crossfades instead of adding more markers.
Delete, neutralize, or reset the edit
Flex work is recoverable, though the scope of the reset matters. Apple’s current marker reset guide separates these actions:
- Double-click a flex marker, click its x, or Control-click it and choose Delete Flex Marker. Surrounding boundaries determine whether its timing change disappears or is redistributed.
- Control-click the marker and choose Set to Neutral Position. It moves to the position the audio sample would occupy if that marker were deleted.
- Control-click the region background and choose Reset Manual Flex Edits to remove manually added markers while retaining automatic quantize work.
- Control-click the region background and choose Reset All Flex Edits to remove manual and automatically created flex markers.
Use the Eraser tool only in the waveform body to remove flex markers. Apple warns that using it in the region header deletes the entire region. Resetting Flex markers is not a way to restore an overwritten source-file transient map; keep the separate audio copy described in the Logic Pro backup guide.
Final Flex Time checklist
- The original audio remains available in a separate saved copy.
- The edit corrects an audible timing problem in the arrangement.
- The chosen algorithm suits the recording.
- The target marker sits on the intended attack.
- Neighbouring markers remain where intended; the move has not crossed a protected boundary.
- Attacks, tails, ambience and pitch sound acceptable.
- Multimic tracks retain their timing relationship.
- The region’s Flex and Smart Tempo settings match the intended edit.
- The edited section sounds better than the original.
The Recording & Editing guides cover capture, comping and the steps around this repair. Browse Logic Pro Tutorials for other topics. If monitoring delay caused the timing problem, follow the latency troubleshooting guide before recording another take.
Frequently asked questions
What does Flex Time do in Logic Pro?
Flex Time changes audio timing using markers within a region. Depending on the algorithm, it stretches intervals, shifts slices at their original speed, or changes playback speed and pitch. You can use it for a local note repair, phrase alignment, tempo following or audio quantization.
How do I turn on Flex Time in Logic Pro?
Choose Edit > Show Flex Pitch/Time or press Command-F, click the Track Flex button on the audio track, then choose a Flex Time algorithm from the Flex Mode menu. In Logic Pro 12.3, confirm the selected region's Flex checkbox is enabled.
Why is Flex Time on but not changing the audio?
The blue Show Flex control only reveals the editing view. Confirm the track’s Track Flex button, choose a Flex Time algorithm, enable the selected region’s Flex checkbox, then add or move a marker or apply quantization. In Logic Pro 12.3, Smart Tempo may stay Off for local Flex edits; Off ignores file tempo rather than disabling Flex processing.
Which Flex Time algorithm should I use?
Start with Slicing for drums and non-tonal percussion, Monophonic for a relatively dry vocal or single-note instrument, Rhythmic for rhythm guitar or keyboard, and Polyphonic for chords or a complex mix. Use Speed and Tempophone as creative effects, not transparent repair modes.
What is the difference between a transient marker and a flex marker?
A transient marker is an analysis point marking a likely attack or significant peak. A flex marker is an edit anchor you create or move to change timing. Automatic audio quantization can also create quantize flex markers.
Why does moving one flex marker change audio on both sides?
In stretching modes, moving a marker compresses one side and expands the other up to neighbouring boundaries. Slicing instead shifts original-speed slices. Add guard markers around a local edit and do not drag through them: crossing a neighbouring flex or tempo marker can extend the affected area.
Why does Flex Time sound metallic, doubled, or watery?
Possible causes include an unsuitable algorithm, misplaced transients, too much stretching, reverberant audio in Monophonic mode, separately edited microphones or gaps between slices. Test a smaller move, check the markers and compare algorithms; the sound alone does not identify one definite cause.
How do I remove Flex Time edits?
Delete an individual flex marker to remove or redistribute its local timing change. Control-click the region background and choose Reset Manual Flex Edits for manual markers, or Reset All Flex Edits for manual and automatically created markers. These commands do not restore a separately overwritten source-file transient map.
Is Flex Time the same as Flex Pitch or Smart Tempo?
No. Audio timing belongs to Flex Time. Flex Pitch analyzes and corrects note pitch, while Smart Tempo manages tempo relationships. A region's Flex checkbox and Smart Tempo setting can connect Flex processing to project tempo, so the systems can interact without being the same tool.


