Logic Pro Take Folders and Quick Swipe Comping
Turn several audio performances into one clean, recoverable comp without losing the takes you may need later.

Logic Pro take folders keep repeated audio performances on one track, and Quick Swipe Comping lets you build a master take by pulling the best phrase, word, note, or breath from each lane. The safe workflow is simple: collect the takes, listen before cutting, comp in musical phrases, duplicate the comp, refine the transitions, and hold off on Flatten until you no longer need instant access to the unused performances.
Start by choosing the strongest complete performance. Then replace only the phrases that need help. Listen across each join for changes in tone, a doubled breath or a clipped guitar decay; a neat-looking boundary can still sound wrong.
The Mac commands below were checked against Apple’s documentation on September 12, 2026. This workflow is for audio takes: Quick Swipe Comping is not available for MIDI take folders.
The complete take-folder workflow
- Set overlapping audio recordings to Create Take Folder.
- Record repeated cycle passes or pack existing audio regions into a take folder.
- Open the take folder and audition each complete take during playback: click it with Quick Swipe on, or Option-click its header with the mode off.
- Turn on Quick Swipe Comping for the audio take folder.
- Drag across the strongest complete phrase in the take lane you want to hear.
- Continue phrase by phrase while watching the comp overview in the top lane.
- Move each boundary to a quiet, stable transition and listen across it in context.
- Choose Duplicate Comp, select the saved comp, then use Rename Comp to enter a useful name and click OK.
- Listen to the whole performance for tone, timing, breaths, clicks, and continuity.
- Keep the folder recoverable. To use an exported working copy, turn off source-track playback; do not flatten your only folder.
If the takes don’t exist yet, start with the clean signal path in How to Record Audio in Logic Pro. Tracking vocals? The broader vocal recording workflow adds room, microphone, headphone, and performance decisions around the comp.
Take folder, take, and comp are not the same thing
| Term | What it means in the session |
|---|---|
| Take | One recorded or packed performance available inside the folder. |
| Take lane | The row that displays one take when the folder is open. |
| Take folder | The container on one track that holds the takes and any saved comps. |
| Comp | A playback map that chooses different time ranges from one or more takes. |
| Comp overview | The top lane showing which sections are active and where transitions occur. |
A comp isn’t a new performance. It’s a set of selections pointing at material inside the folder. That distinction matters, because a finished-sounding comp can stay editable and recoverable. You don’t need to create one merged audio file just to hear the chosen phrases as a continuous performance.
Create a take folder while recording
For cycle recording, open Logic Pro > Settings > Recording. In Overlapping Track Recordings, set Audio Cycle On to Create Take Folder. You can also go Record > Overlapping Audio Recordings > Cycle > Create Take Folder. Draw a yellow cycle area in the ruler, set the count-in or metronome if the performer needs it, and press R.
Apple’s multiple-take recording steps say the folder appears after the second cycle pass, with later passes added to it. Press Space to stop. Click the disclosure arrow in the folder’s upper-left corner or double-click the folder to open it. These mouse actions avoid a shortcut discrepancy between Apple’s recording and preview pages.
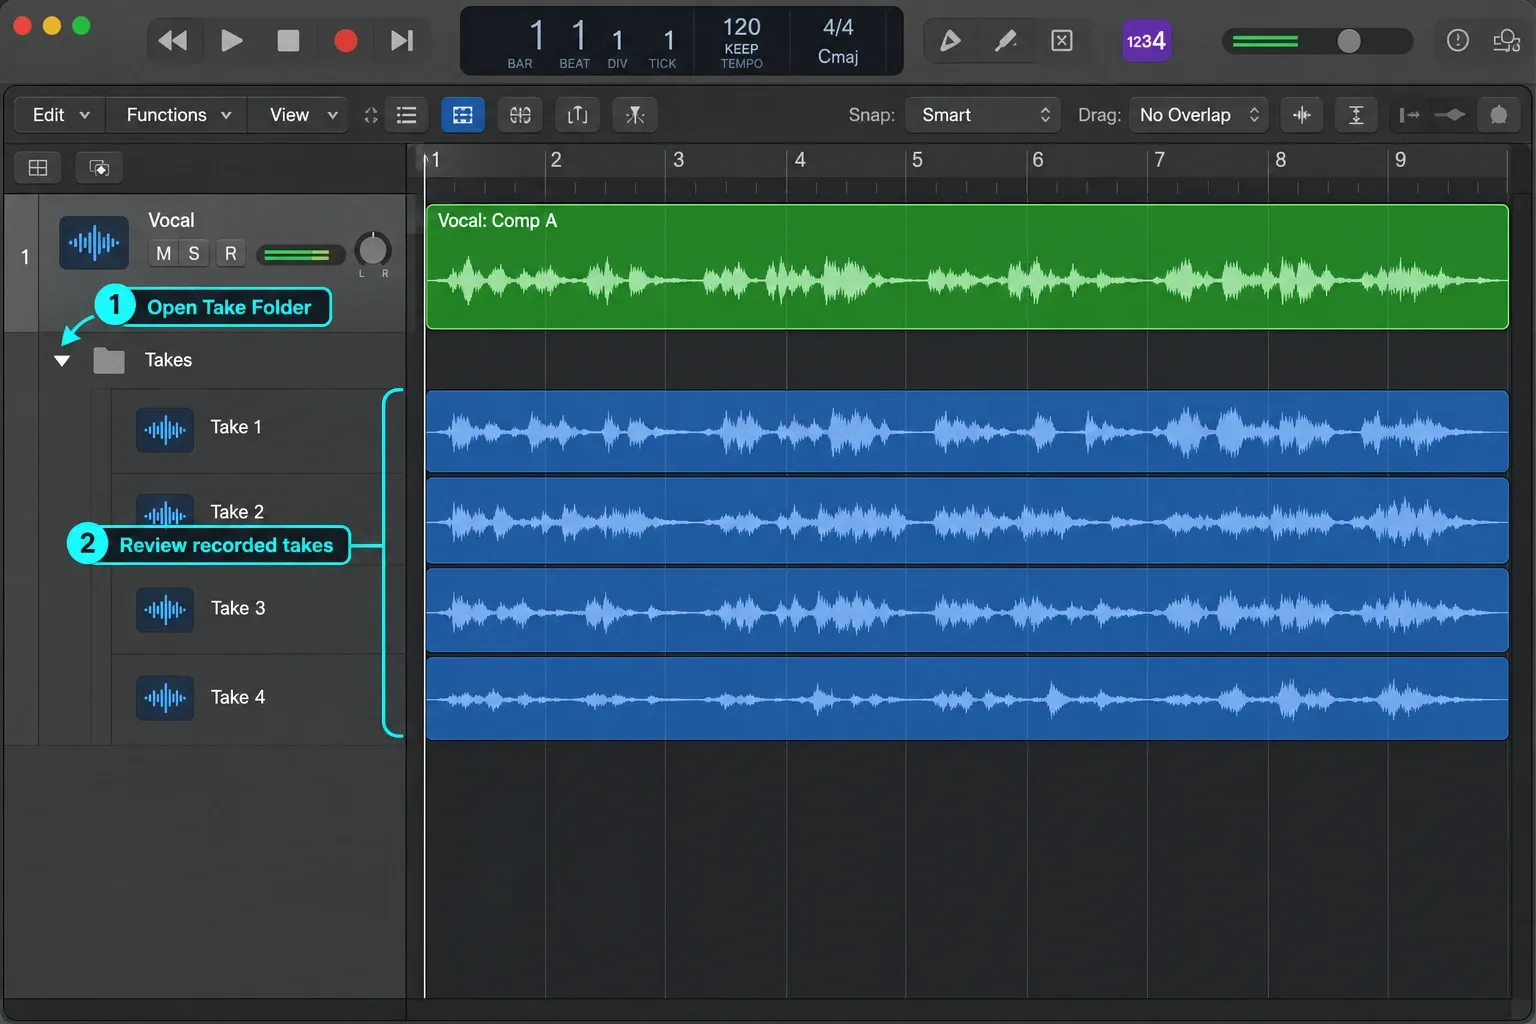
Choose the cycle range for the performer, not for the screen. Give a singer room to breathe before the line and let ringing instruments finish after it. A cycle that clips too tightly at both ends produces takes with awkward pickups and truncated decays, leaving no clean material for the comp boundary.
Latency, a doubled monitor path, or an unstable buffer should be sorted out before you record ten more passes. The Logic Pro latency guide separates interface delay, plug-in latency, Bluetooth delay, and direct monitoring, so a performance problem doesn’t get mistaken for a comping problem.
Pack existing recordings into one take folder
If the performances already sit as regions on one or more tracks, select the regions, Control-click, and choose Folder > Pack Take Folder. Apple’s Pack Take Folder reference says each selected region becomes an individual take.
Check the signal path before you pack regions from different tracks. Logic drops the new take folder on the topmost selected track, and the folder then plays through one channel strip. If the original tracks used different plug-ins, sends, pan positions, automation, or channel-strip settings, the sound can shift even though the underlying audio hasn’t.
Line the performances up first. A take folder is at its best choosing between alternate performances of the same musical time range. If the regions start at unrelated positions, have different pickup lengths, or were edited against different bar locations, packing them won’t make them comparable. Preserve a recoverable project alternative or backup before reorganizing a complicated recording session.
Turn on Quick Swipe Comping
Open the audio take folder. Click the Quick Swipe Comping button in its upper-left corner, or open the Take Folder pop-up menu and check Quick Swipe Comping. With the mode on, dragging across a take with the Pointer or Pencil tool adds that time range to the comp and deselects the same range from the previously active take.
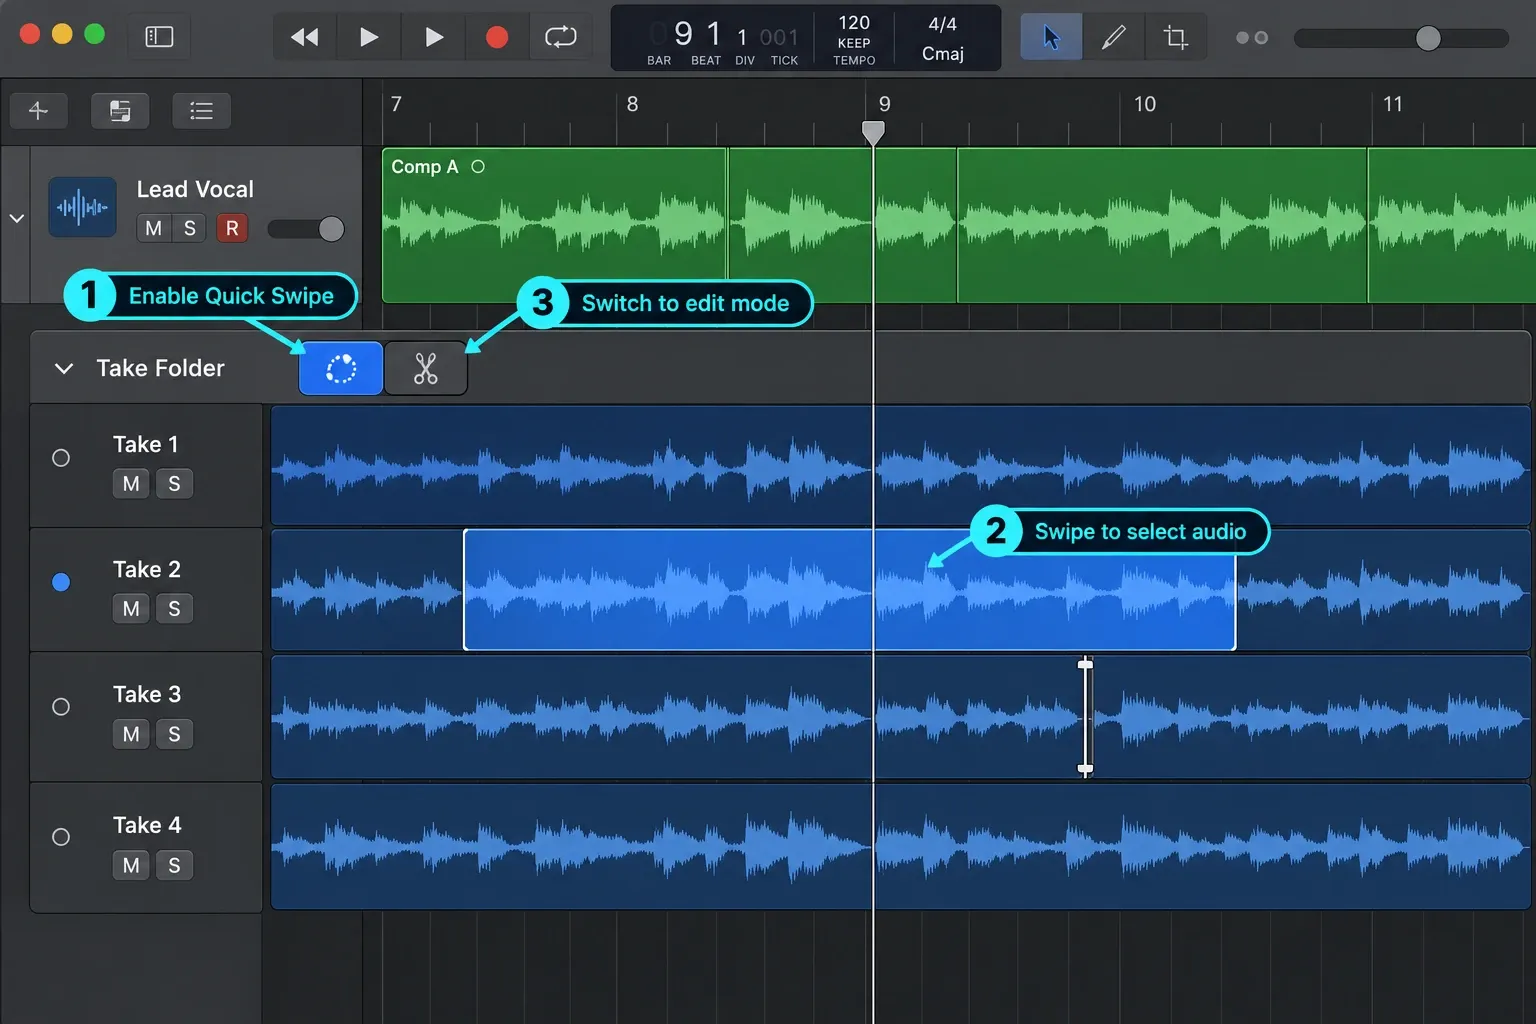
Quick Swipe on and off are two different editing modes. Apple’s comping overview draws the line clearly: turn it on to create and edit a comp; turn it off when you need to cut, drag, or move take regions and folders.
Understand Quick Swipe and Take Editing click zones
Open Logic Pro > Settings > General > Editing and check Quick Swipe and Take Editing click zones. When enabled, the upper half of a take region is for ordinary take editing and the lower half is for comping. If Marquee tool click zones is also enabled, the upper third is for take editing, the middle third is for Marquee, and the bottom third remains for Quick Swipe. Apple’s General Editing settings describe how these options interact.
If dragging trims or moves audio instead of selecting a phrase, check the editing mode and pointer position before changing anything else. Increase the track height if the take lanes are too short to target accurately.
Build the first comp in musical phrases
To audition whole takes during playback, Apple’s preview instructions say to click the take when Quick Swipe Comping is on, or Option-click its header when the mode is off. In a closed folder, choose the take from the Take Folder pop-up menu. Listen to every take, choose the strongest complete performance, and use that as the starting point for repairs.
Start with whole phrases: a lyric line, a guitar answer, one bass figure, or a complete held note and release. Drag across the range in the lane you want. The active section becomes part of the comp, and the overview at the top updates immediately. Carry on only where another take clearly improves the performance.
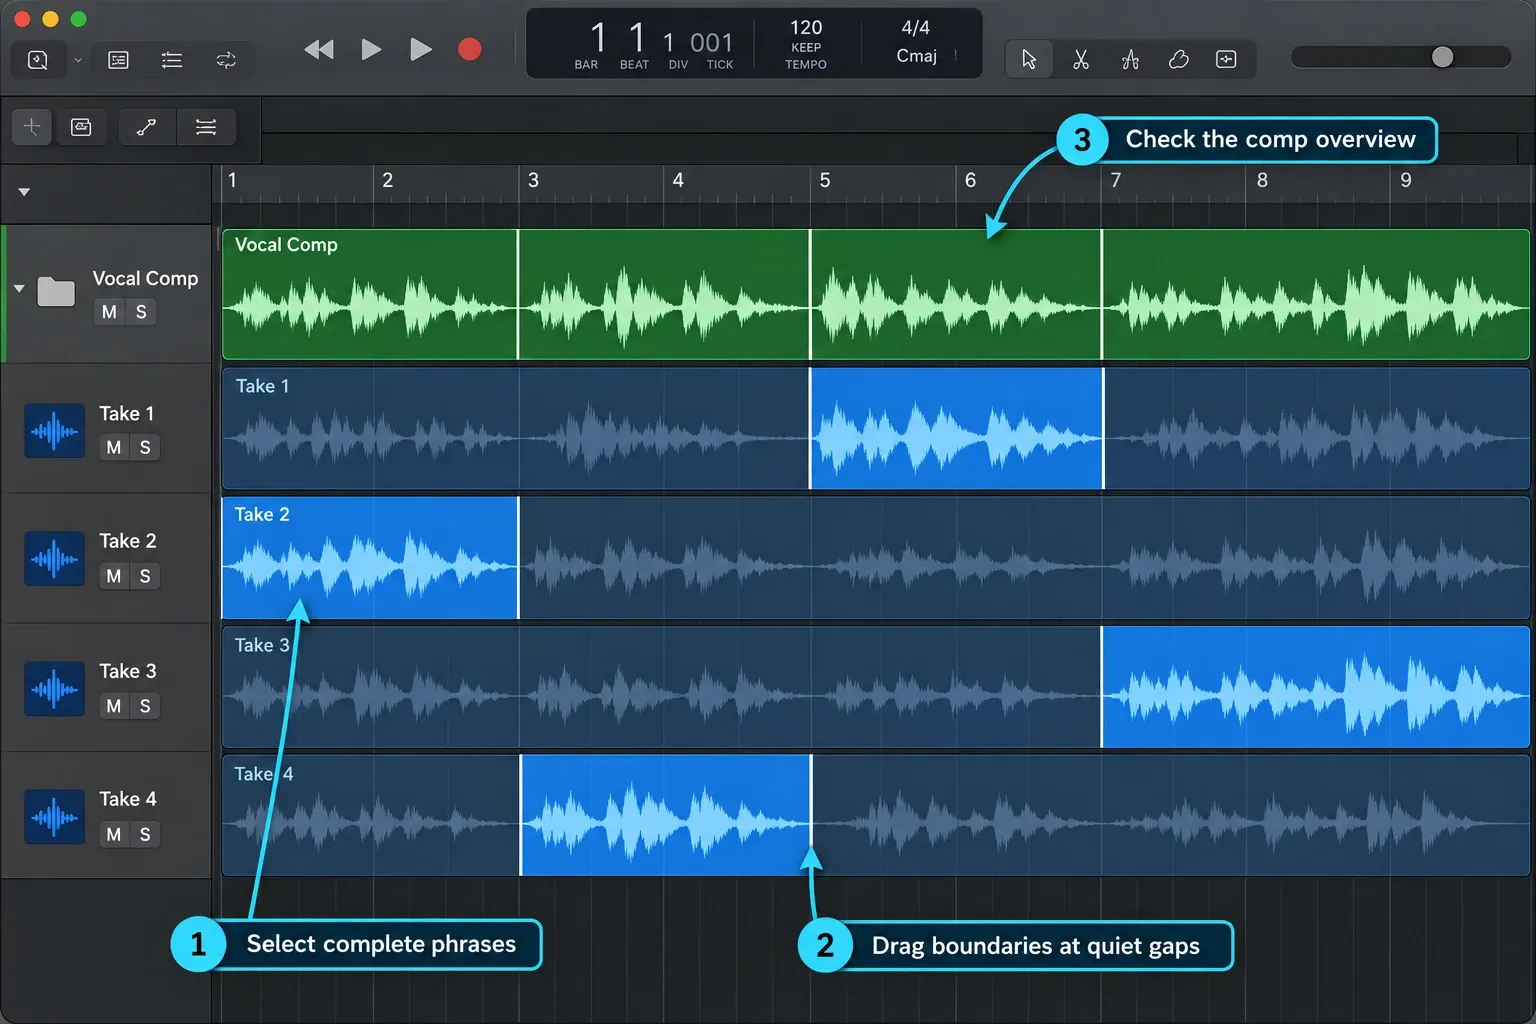
Judge the edit from before the transition rather than by soloing a tiny fragment. Listen for the previous consonant or pick attack, the breath into the new line, room tone, vibrato speed, guitar sustain, cymbal spill, and the way one note hands energy to the next. A boundary can look visually tidy and still be musically obvious.
Place boundaries where the performance can change naturally
- Vocals: prefer stable room tone, the middle of a sustained vowel only when tone and pitch match, or the quiet space around a breath. Avoid cutting a consonant in half.
- Guitar and bass: protect pick attacks, slides, vibrato, and ringing decays. Do not switch takes halfway through a noise or fret movement unless both performances match.
- Drums or multimic sources: preserve the same edit across every microphone. Independent comp boundaries can damage phase and ambience.
- Any source: choose the musical transition first, then zoom in only as far as needed to remove a click or timing bump.
Refine the comp without creating a gap
Put the pointer over the start or end of a selected take section and drag to move the boundary. Apple’s current Edit Comps guide explains the linked behavior: extending one selection shortens the adjacent selection, and shortening it normally extends the neighbor. That keeps the timeline covered.
Shift-drag behaves differently. It can shorten a selection without extending the adjacent take, which leaves silence between selections. That’s useful only when a deliberate gap is the goal. If playback suddenly drops out, check the comp overview for an uncovered range and close the accidental gap.
You can also drag the center of a selection left or right once the pointer becomes a two-headed arrow. Clicking an unselected area in another lane assigns that time range to the clicked take. Both are faster for comparison than redrawing the entire phrase.
Treat clicks as a boundary problem first
When an edit clicks, move the transition away from a hard waveform discontinuity, transient, lip noise, or pick attack and audition it again. Don’t immediately hide every bad edit under a long fade. A fade can’t make mismatched room tone, pitch, or phrasing feel continuous.
Once the comp becomes ordinary regions, look at the region fades or crossfade if a transition still needs smoothing. Keep the fade short enough to preserve timing, long enough to kill the discontinuity. The edit should vanish when you hear it in the track. Looking symmetrical when you zoom in isn’t the same thing.
Duplicate and name the comp before risky edits
Choose Duplicate Comp from the Take Folder pop-up menu. Apple’s comp-saving instructions explain that the current comp is saved in the menu and subsequent edits create another comp. To name a version, select it in the menu, choose Rename Comp, enter the name and click OK, as shown in the rename instructions. Names such as Lead vocal: natural or Solo: alternate ending make the choices easier to identify.
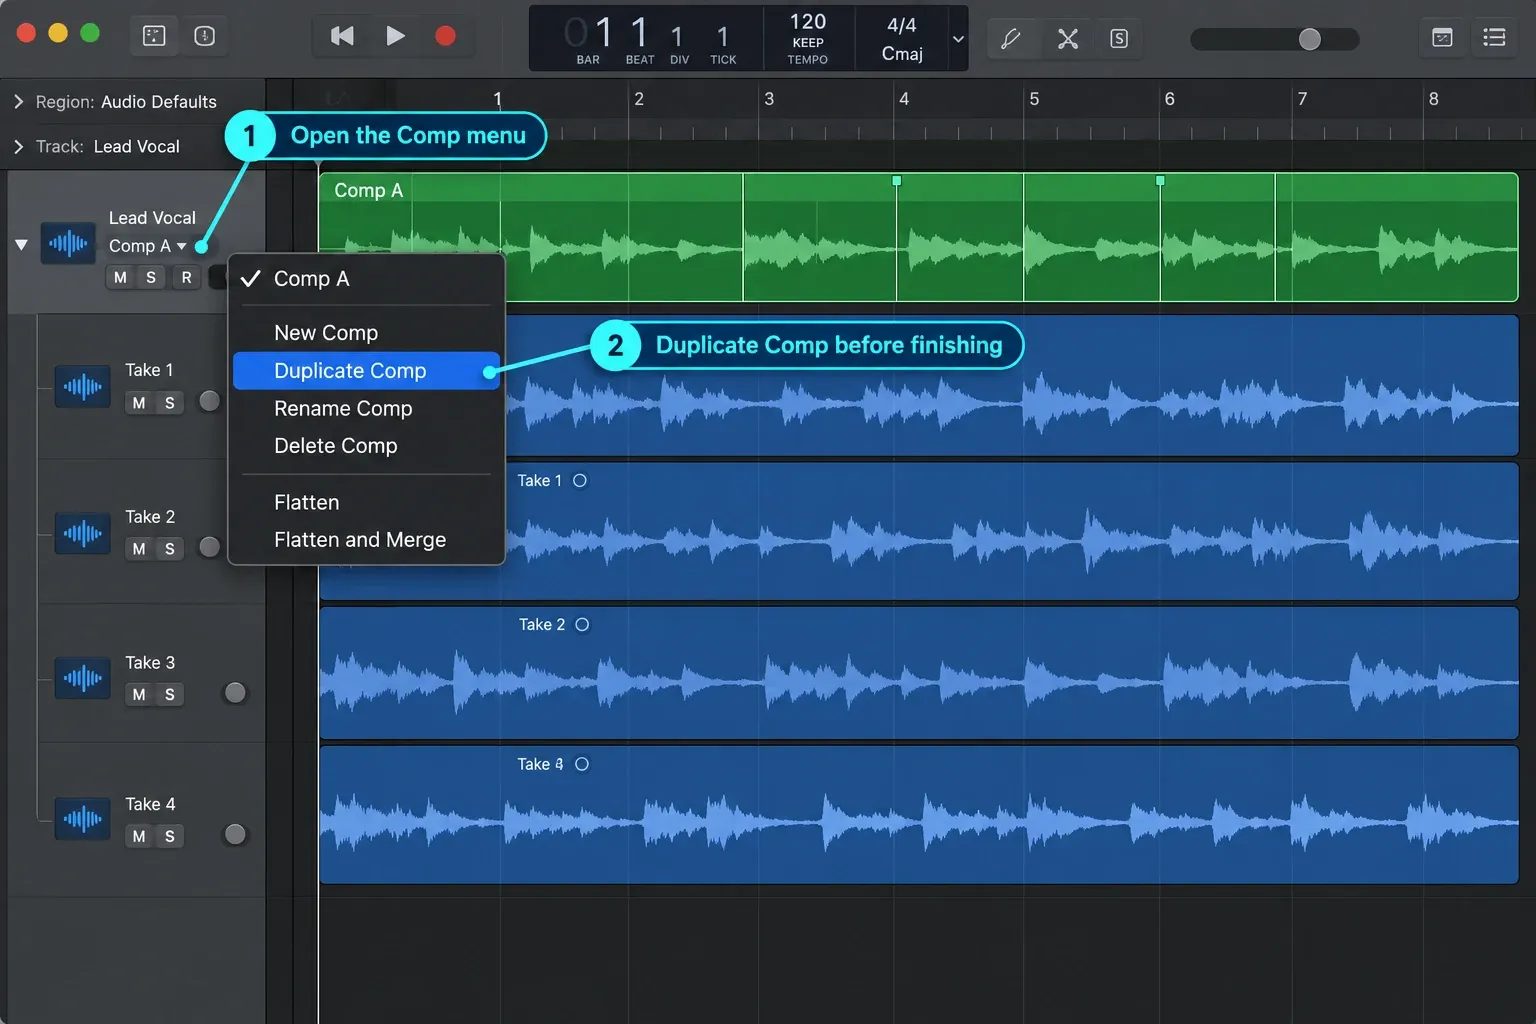
A saved comp preserves selections inside its take folder; it does not protect the whole folder from Flatten. Before replacing that folder, preserve it in a recoverable project copy or export the active comp to a working track and retain the original folder. Keep a less-edited version if you want to compare the performance later.
Choose the finish command by what you need next
| Command | Result | Use it when |
|---|---|---|
| Keep the take folder | The takes and saved comps remain immediately available. | You are still editing, tuning, arranging, or waiting for approval. |
| Export active Comp to New Track | Copies the active comp to a new track while leaving the original folder intact. | You want an editable working track and a preserved source folder. |
| Flatten | Replaces the folder with multiple regions representing the chosen comp. | You need ordinary region edits but do not need unused take sections in the arrangement. |
| Flatten and Merge | Creates one new audio file from the chosen comp. | The comp is approved and one continuous audio file is worth the reduced reversibility. |
Apple’s Flatten and Merge reference distinguishes the results: Flatten replaces the folder with regions; Flatten and Merge then creates a new audio file. Both remove unused take sections from that arrangement. Neither command is required to play the comp, and Duplicate Comp inside the same folder is not a backup of the folder you are replacing.
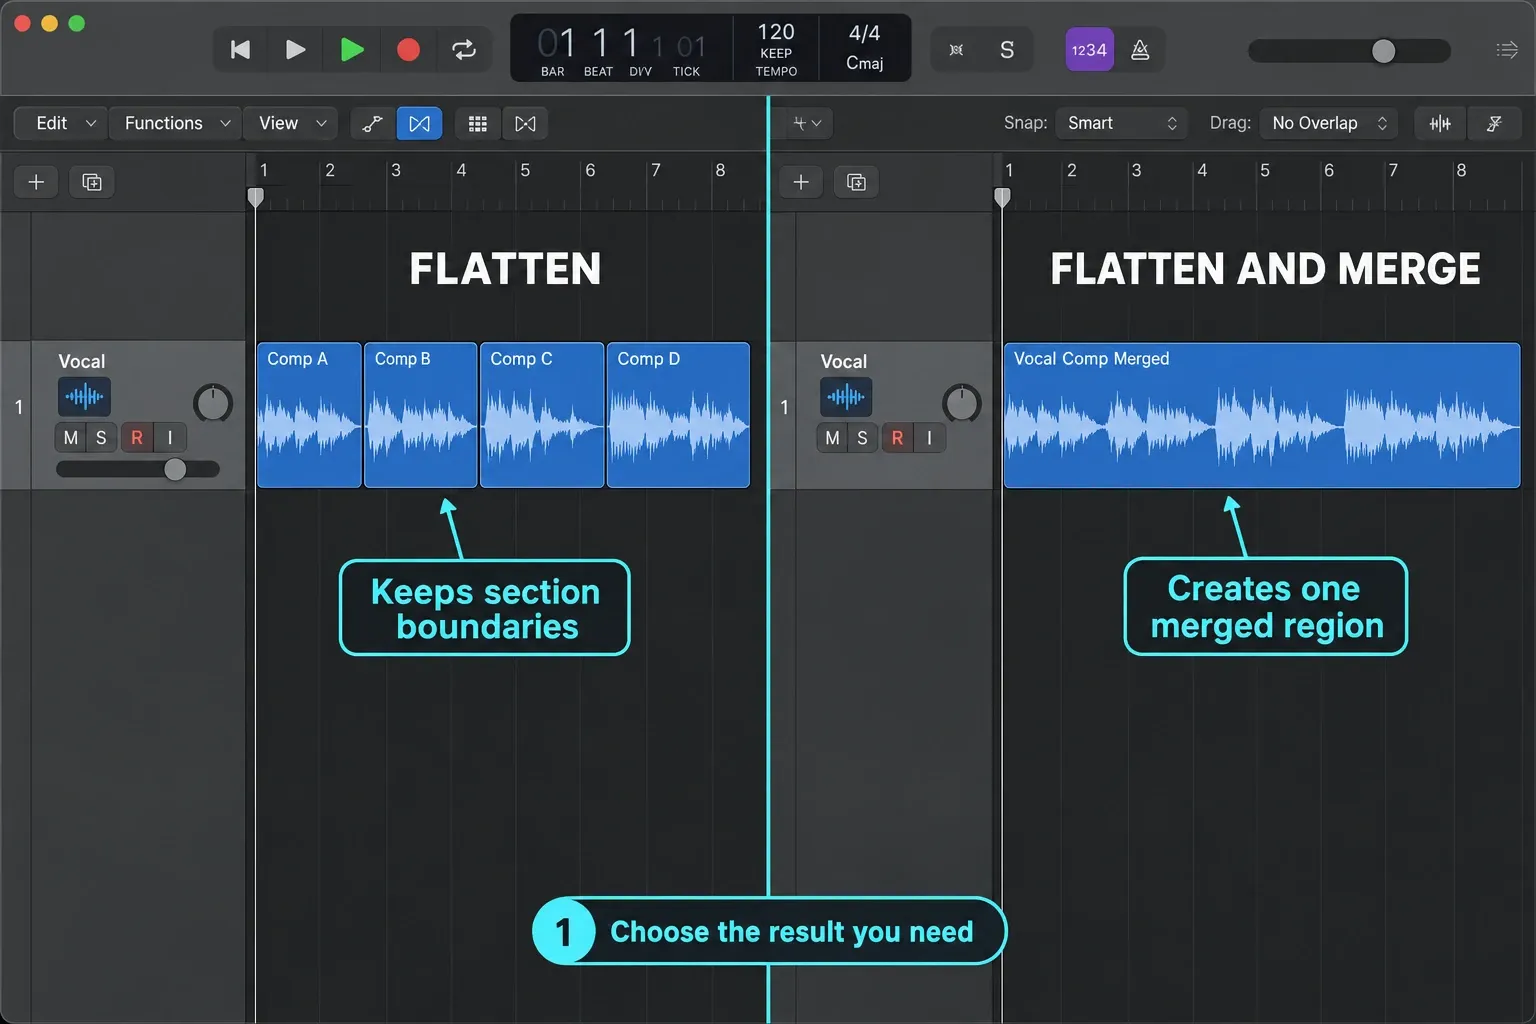
For a working copy, select the intended comp in the Take Folder menu and choose Export active Comp to New Track. Apple’s export instructions confirm that the new track appears below the source and the original folder stays intact. Turn the source track off with its track-header On/Off control, then check that only the working copy plays. You may hide the source afterward, but Hide does not stop playback. Do not delete your only recoverable folder.
Comp before you get into detailed pitch and timing correction. Applying heavy edits to every take burns time and can make boundaries harder to judge. Once the performance choice is stable, the Flex Pitch workflow can handle only the notes that genuinely need correction.
When Quick Swipe Comping does not behave as expected
| Symptom | Useful check |
|---|---|
| Quick Swipe button is missing | Confirm this is an audio take folder. Apple does not provide Quick Swipe Comping for MIDI take folders. |
| Repeated passes do not create a folder | Set the applicable Audio Cycle On or Cycle Off behavior to Create Take Folder before recording more overlaps. |
| Dragging moves or trims a take | Turn Quick Swipe on and use the lower zone: the bottom half, or bottom third when Marquee click zones is also enabled. |
| Dragging selects audio when you want to move it | Turn Quick Swipe off, or use the upper take-editing zone: half the region, or its top third when Marquee click zones is also enabled. |
| The comp has a silent hole | Look for an uncovered range created by Shift-dragging a selection shorter. |
| A transition clicks | Move the boundary away from a transient or discontinuity, then audition in context before adding a fade. |
| Packed takes sound different | Compare the original tracks’ plug-ins, sends, pan, automation, and channel strips; the folder now plays through one track. |
| Grouped drum edits do not match | Stop and verify the group’s editing settings and take-folder structure before changing more boundaries. |
Treat multimic and grouped comping as a phase-sensitive workflow
A vocal through one microphone and a guitar DI on one track are forgiving next to a drum kit, piano pair, or guitar captured by several synchronized microphones. For a multimic source, the same performance change has to land at the same sample position across the related tracks. Comping microphones independently changes their phase and room relationship.
Group the related tracks. In Apple’s current group-editing workflow, enable both Editing (Selection) and Quantize-Locked (Audio). Apple says this lets comping use the same takes across the group. Test one boundary before comping an entire song. If grouped edits stop matching, undo back to the last coherent state instead of repairing every microphone by eye. The goal is one performance decision applied to the whole microphone set.
Final comp checklist
- The take folder contains comparable performances aligned to the same musical range.
- The overall best take was chosen before phrase-level editing began.
- Every switch improves the performance rather than merely changing it.
- Consonants, breaths, attacks, sustains, decays, and room tone remain natural.
- No Shift-drag edit left an unintended gap.
- Every transition was auditioned from before the boundary in the full track.
- Multimic edits remain sample-aligned across all related tracks.
- A clearly named duplicate comp or project alternative preserves the earlier version.
- The full song was played once without stopping to check continuity.
- Flatten or Flatten and Merge is postponed unless its loss of immediate take access is acceptable.
The Logic Pro recording and editing hub places comping between capture and corrective editing. It sits inside the broader Logic Pro Tutorials path. If you’re still building the whole project rather than editing one performance, the first-project guide gives the larger order from track creation to export.
Frequently asked questions
What is a take folder in Logic Pro?
A take folder is one region container that holds multiple performances recorded or packed into take lanes. You can audition a complete take or build a comp that plays selected sections from several takes.
How do I make a take folder in Logic Pro?
Set Audio Cycle On to Create Take Folder in Logic Pro > Settings > Recording, define a cycle area, and record repeated passes. Apple says the folder appears after the second cycle pass, with later passes added as more takes.
Why is Quick Swipe Comping missing or not working?
Confirm this is an audio take folder, not MIDI. Set overlapping audio recordings to Create Take Folder, open the folder and turn Quick Swipe Comping on. With click zones enabled, swipe in the lower half; if Marquee tool click zones is also enabled, use the bottom third.
Can I use Quick Swipe Comping on MIDI takes?
No. Apple states that Quick Swipe Comping is available for audio take folders, not MIDI take folders. MIDI takes can still be chosen or edited, but they do not use the same swipe-to-build-a-comp workflow.
What does Duplicate Comp do?
Duplicate Comp saves the current selection map as another comp inside the take folder. Use it before changing boundaries or trying different takes. It does not preserve the whole folder if you later flatten that folder; keep a recoverable copy before that step.
What is the difference between Flatten and Flatten and Merge?
Flatten replaces the take folder with multiple regions representing the chosen comp. Flatten and Merge goes further and creates one new audio file from those regions. Both remove unused take sections from the arrangement, so preserve a recoverable version first.
Should I flatten a take folder when the comp is finished?
No. The comp can play from its take folder. For a separate working track, export the active comp and retain the original folder, turning off its playback so you do not hear both copies. Flatten only when you need ordinary regions and have preserved a recoverable version.
How do I stop clicks between comp sections?
Move the boundary away from a hard transient or noisy breath, audition across the edit in context, and avoid creating an unintended gap. If a click remains after the comp is committed to ordinary regions, inspect and adjust the region fades or crossfade.


