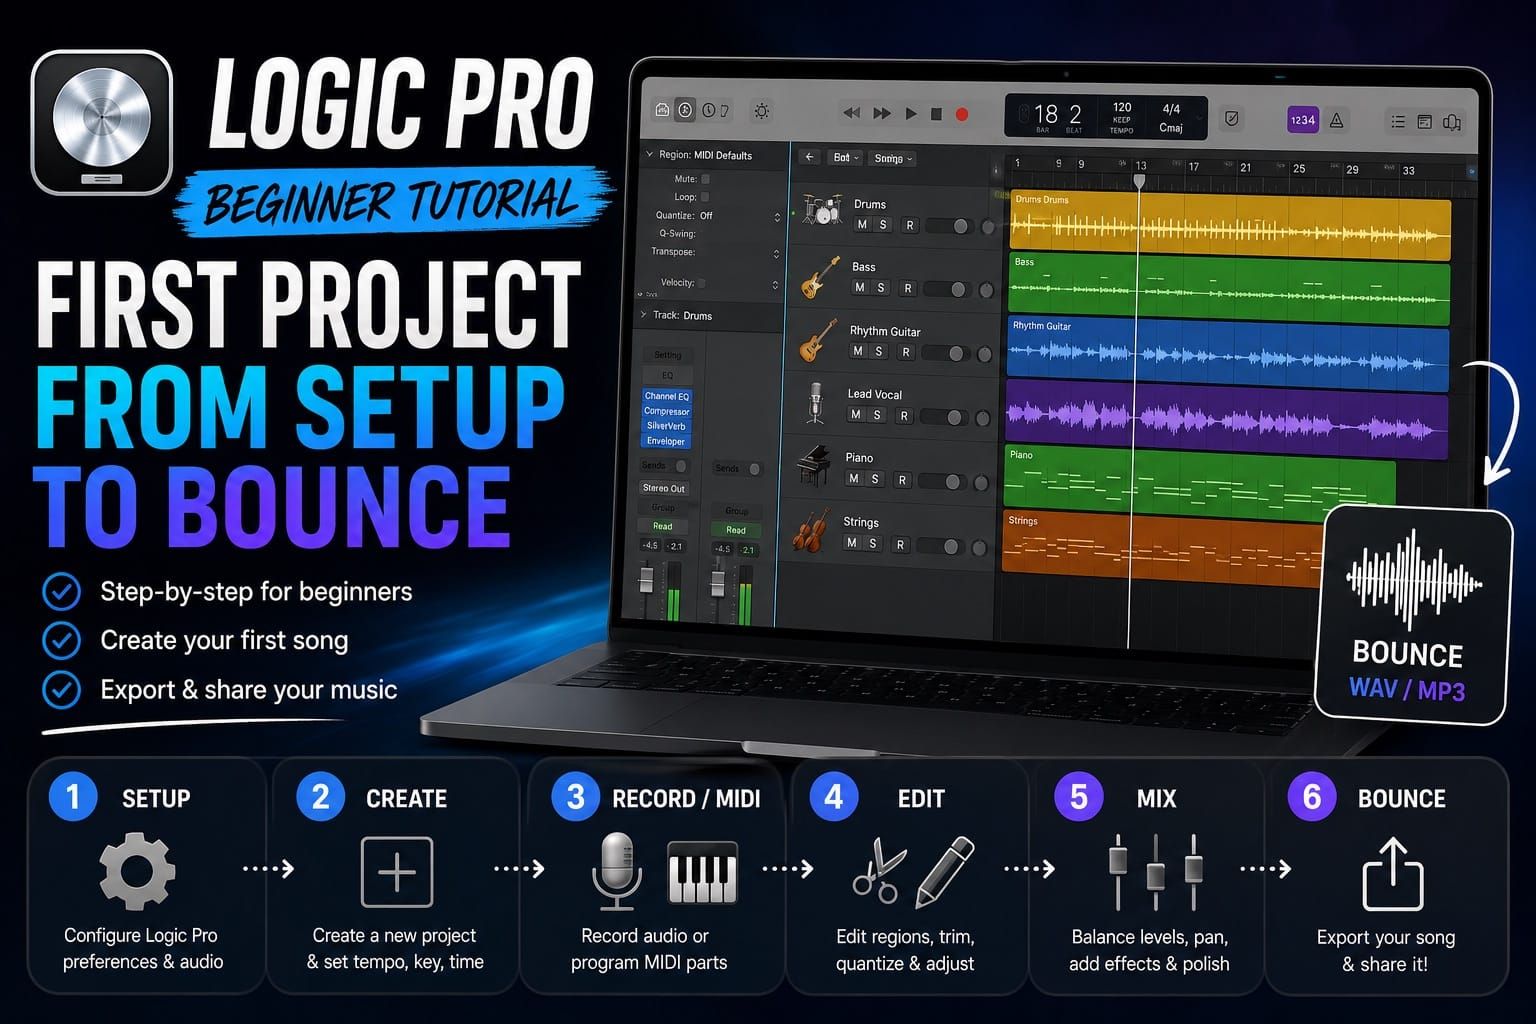
Logic Pro Beginner Tutorial: First Project from Setup to Bounce
The first time I opened Logic Pro, I spent 47 minutes trying to figure out why no sound was coming out. The answer was the output device in Preferences had defaulted to something I wasn't using. Nothing glamorous. Just a dropdown I missed. If you're starting your first project and something isn't working, that kind of small setting is usually the culprit.
This Logic Pro beginner tutorial walks you through a complete first project from setup to bounce. You'll create a new session, add Drummer, use Apple Loops, write MIDI in the Piano Roll, record audio if you have a microphone or interface, make a basic mix with stock plugins, and export a finished track.
Is Logic Pro Free or Paid?
Logic Pro is not free, but there are two ways to get it. You can buy Logic Pro for Mac as a standalone one-time purchase for $199.99 through the Mac App Store. Or you can access it through Apple Creator Studio, a subscription that bundles Logic Pro with Final Cut Pro, Pixelmator Pro, and other Apple creative apps. Apple Creator Studio costs $12.99 per month or $129 per year. Education pricing brings that down to $2.99 per month or $29.99 per year.
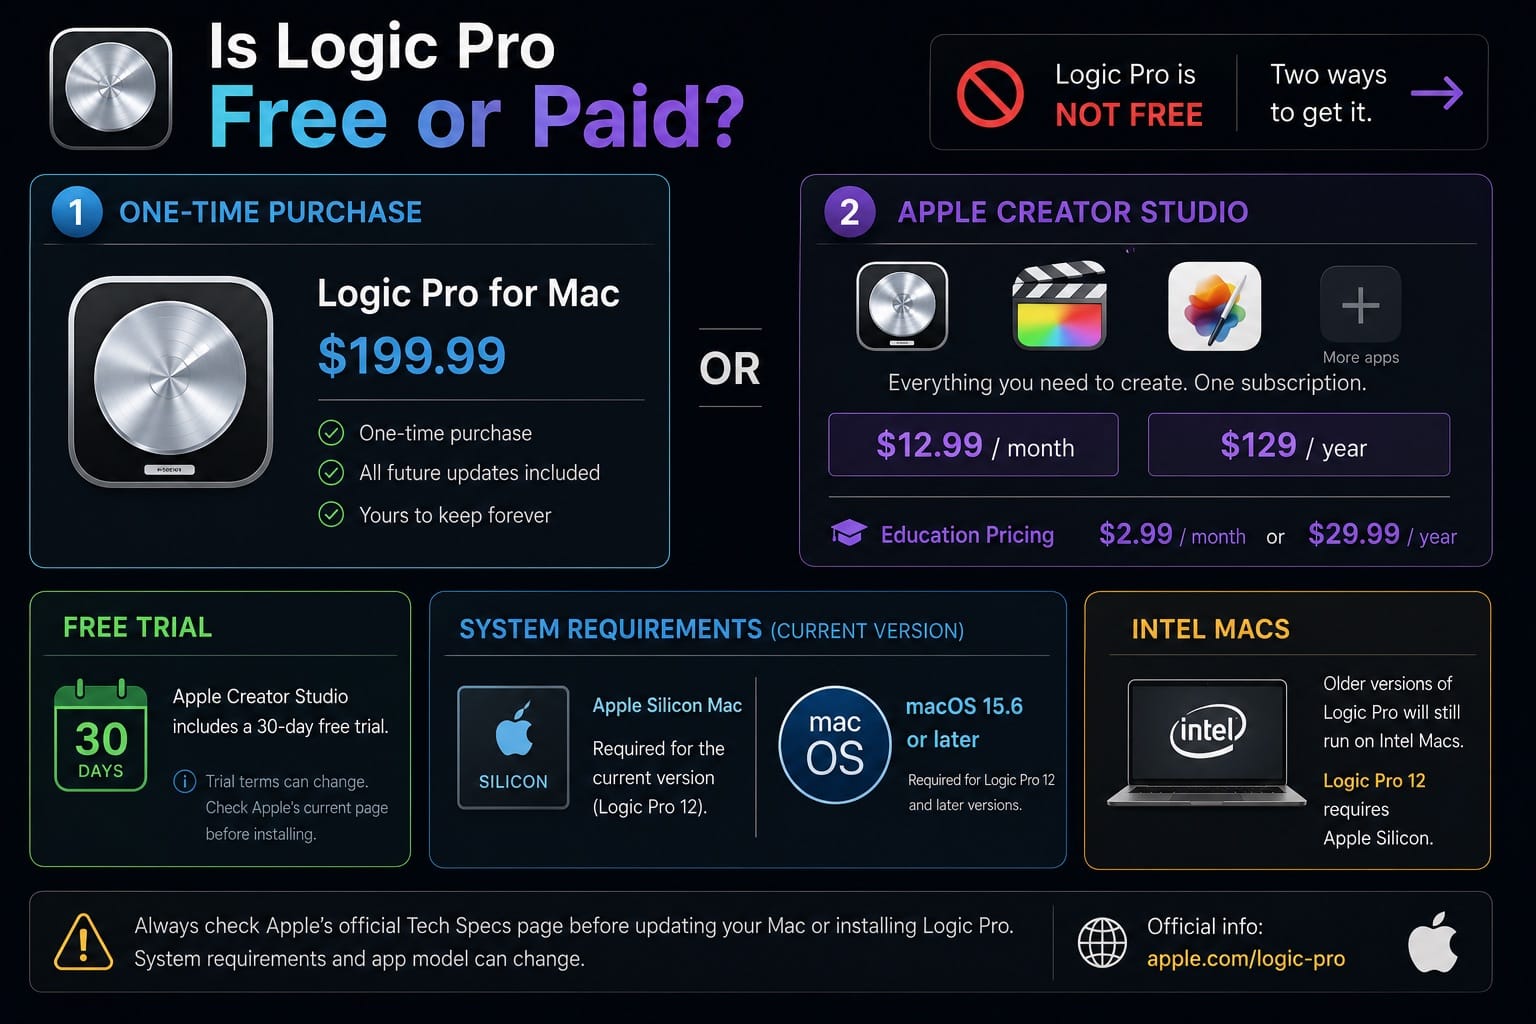
Apple Creator Studio includes a 30-day free trial. Trial terms can change, so check Apple's current page before installing, because Apple's app model changed in 2026.
Logic Pro requires macOS 15.6 or later and an Apple Silicon Mac for the current version. If you're still on an Intel Mac, older versions of Logic Pro will still run, but Logic Pro 12 requires Apple Silicon. Check Apple's tech specs page before updating.
How to Set Up Your First Logic Pro Project
Open Logic and you'll see a project chooser. Select Empty Project and click Choose. A dialog appears immediately asking what kind of track to create. Pick Software Instrument for now and click Create. You can add any other track type later.
Before you record a single note, check two things. First, go to Logic Pro > Settings > Audio and confirm your output device is set to whatever you're actually listening through, whether that's your audio interface, headphones, or built-in speakers. Second, look at the control bar at the top and set your project tempo. Click the BPM number and type a new one. 90 BPM is a decent starting point for most genres if you're not sure yet.
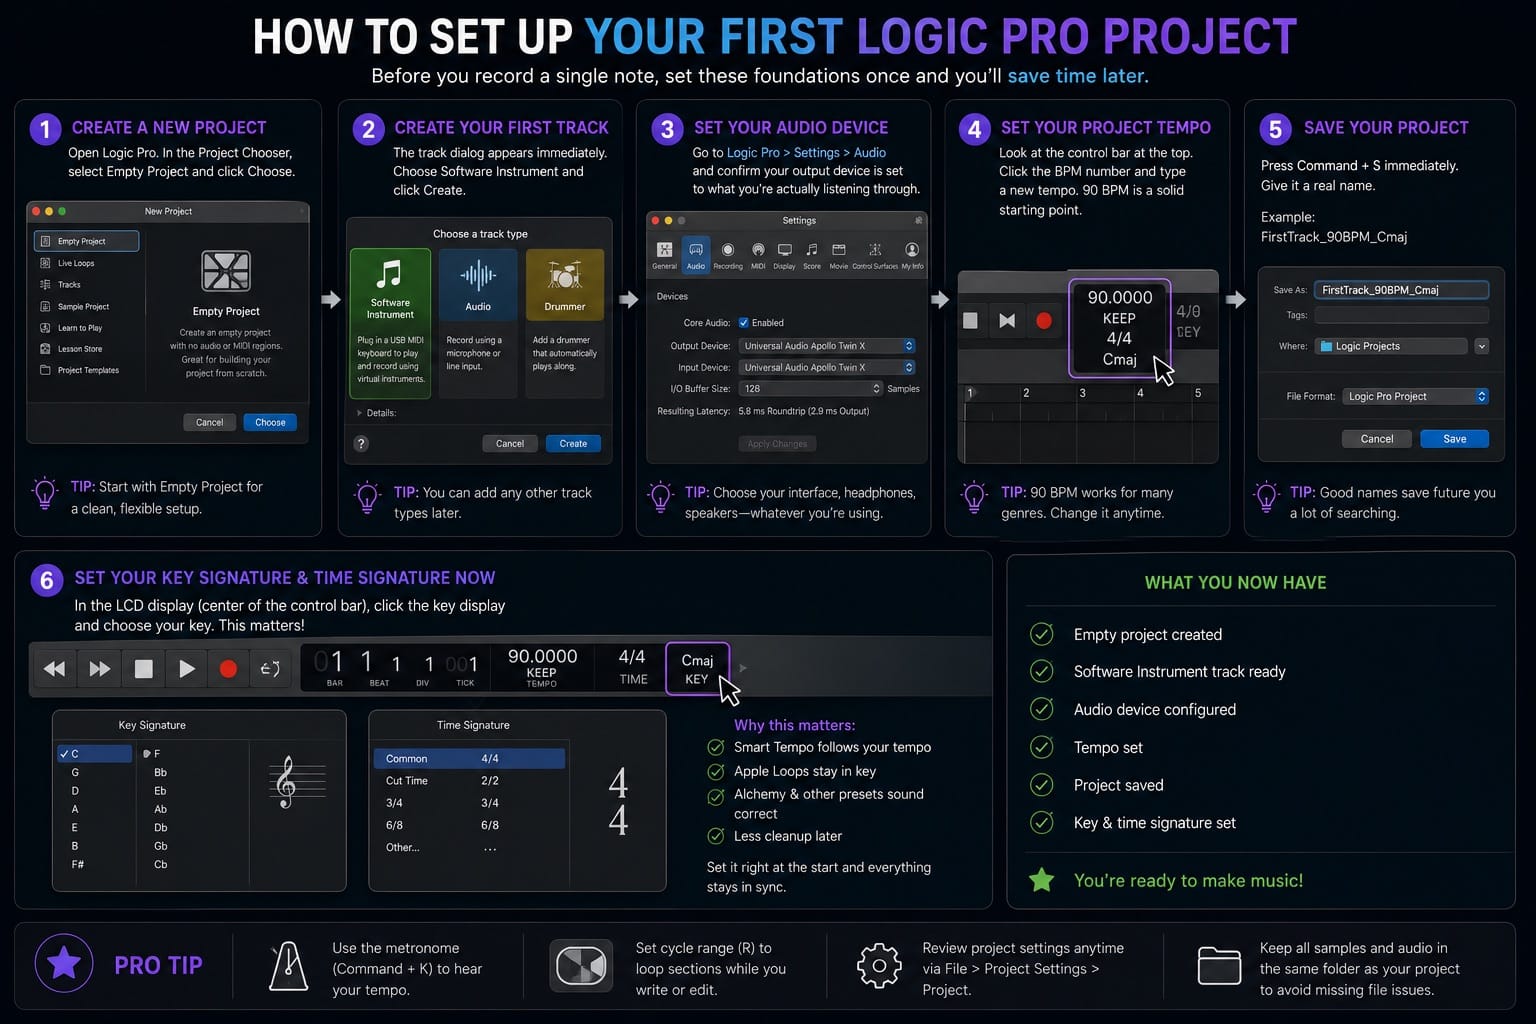
Save the project immediately: Command + S. Give it a real name. Something like FirstTrack_90BPM_Cmaj is more useful six months from now than Untitled.
One thing most tutorials skip: set your key signature and time signature now in the LCD display (the area in the middle of the control bar). Click on the key display and pick your key. This matters once you start using Smart Tempo, Apple Loops, or Alchemy presets, because all of them respond to key and tempo data. Getting it right at the start saves a lot of cleanup.
Logic Pro Interface Basics: Tracks, Library, Inspector, and Mixer
Logic's interface has four main areas you'll use on every project. The Tracks area in the centre is your timeline, where regions appear and your arrangement takes shape. The Library panel on the left is where you browse and load sounds. The Inspector, also on the left, shows settings for the selected track and region. The Mixer (Command + 2) opens at the bottom or in a separate window and is where you set levels, pan, and add effects.
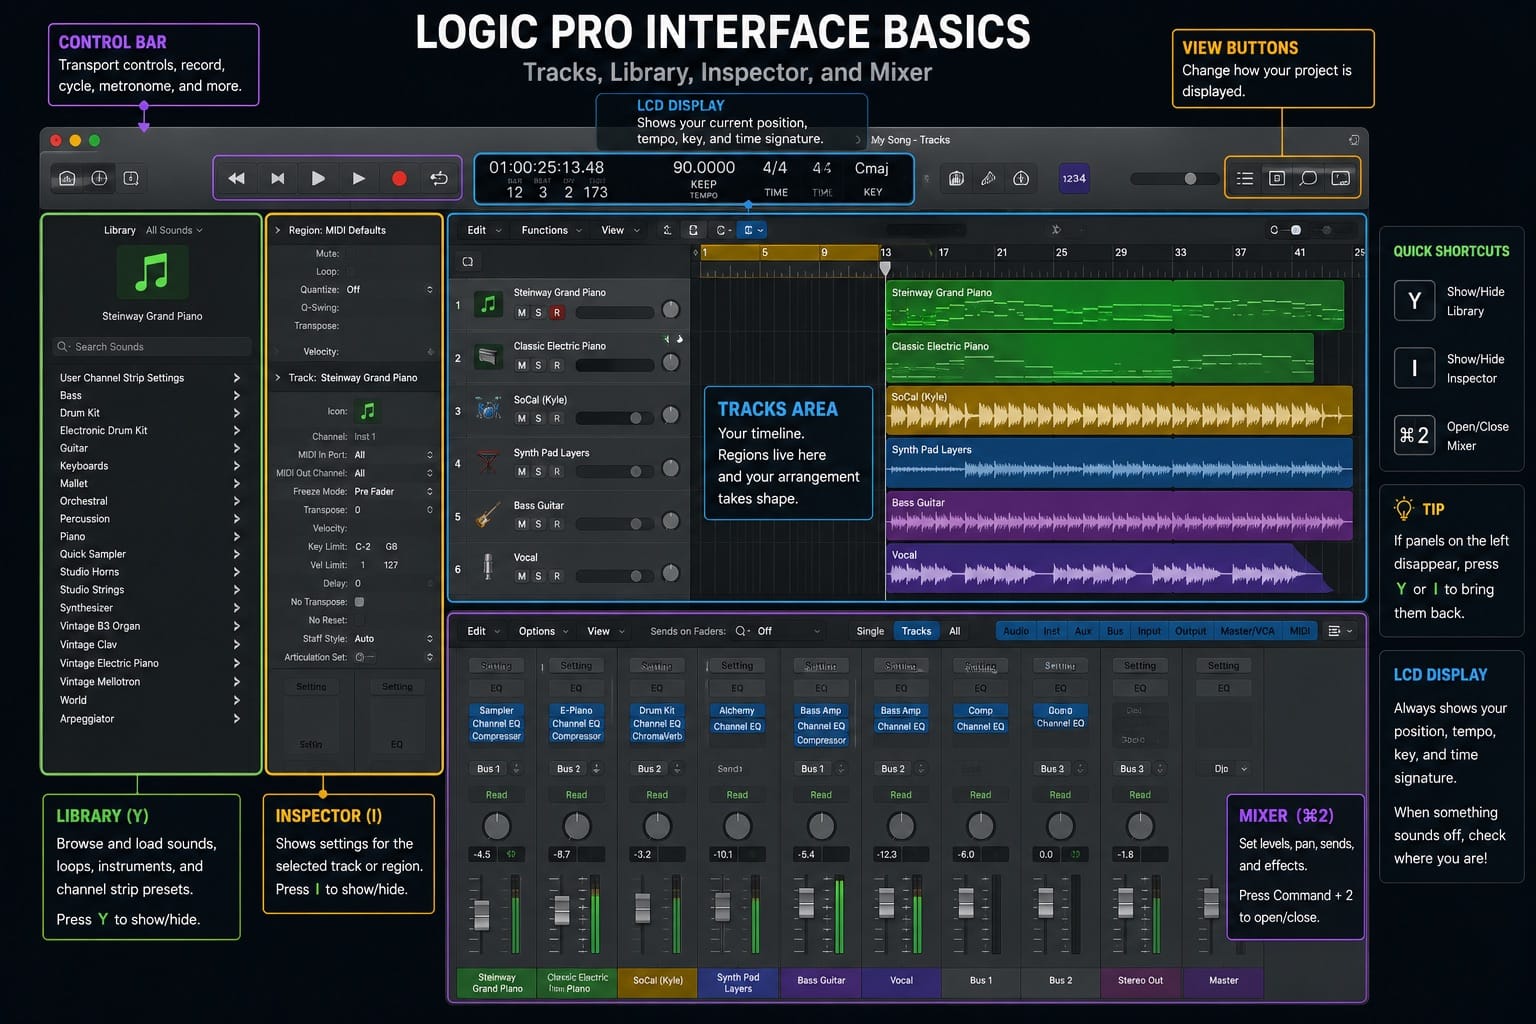
The Control Bar at the top contains your transport controls, tempo, key, and time signature settings. The LCD display in the centre shows your current position in the timeline. When something sounds off and you're not sure where you are, the LCD tells you.
Two panels that beginners often close by accident and then can't find: press Y to show or hide the Library, and press I to show or hide the Inspector. If something you expect to see has disappeared from the left side of the screen, one of those two shortcuts brings it back.
Logic Pro Drummer Track: Your First Beat in Under 3 Minutes
Add a Drummer track by clicking the + button at the top of the track list and choosing Drummer. Logic creates a region automatically in the timeline. Press the spacebar to play it back. You'll hear a full drum performance immediately.
The Drummer editor appears at the bottom of the screen. The XY pad on the left controls loudness and complexity. Push it toward the top right for more energy. The buttons on the right let you swap individual drum pieces. If the hi-hat pattern isn't working, try the "Ride" button instead.
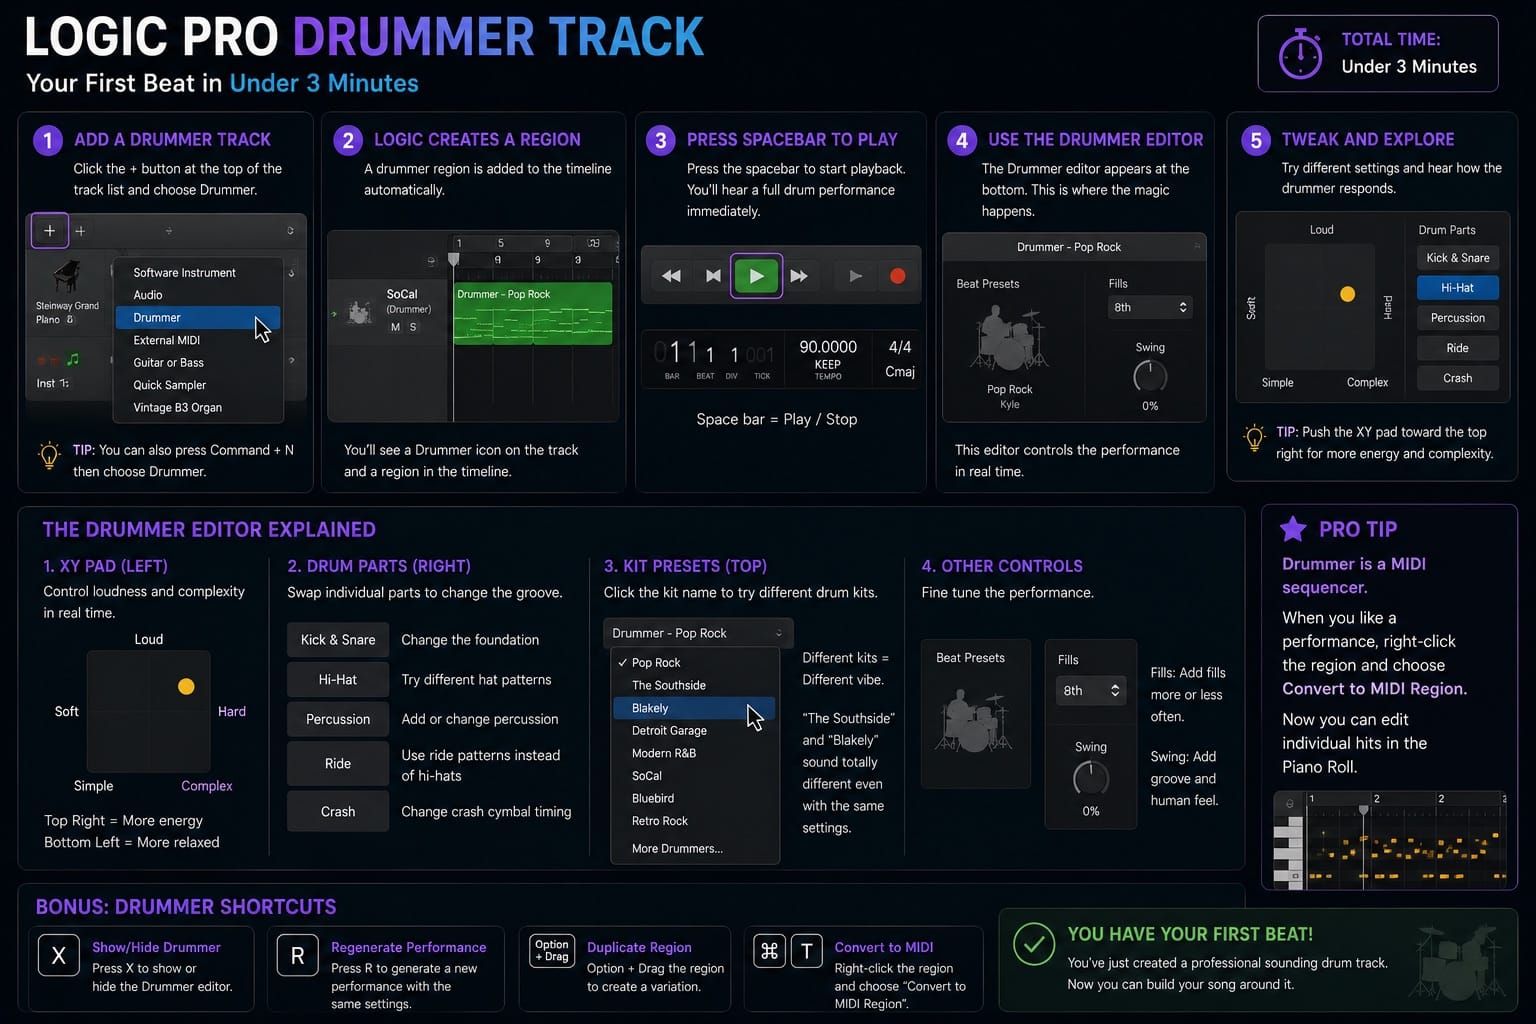
Most beginners leave Drummer on the default kit and never touch it again. That's fine. But before you move on, try clicking the kit name at the top of the Drummer editor and swapping to a different preset. The difference between "The Southside" and "Blakely" is dramatic even on the same XY pad setting.
Drummer works as a MIDI sequencer under the hood. Once you like a performance, you can right-click the region and convert it to MIDI if you want to edit individual hits in the Piano Roll. I've done that on 11 or 12 projects where I needed a fill in a specific place the Drummer editor couldn't quite hit.
Logic Pro Apple Loops: Adding Loops Without Breaking Your Project Tempo
Open the Loop Browser by pressing O or clicking the loop icon in the top-right of the control bar. You'll see thousands of royalty-free loops sorted by instrument type, genre, and feel. Click any loop to preview it. Drag it into the Tracks area to add it to your project.
Apple Loops automatically conform to your project's tempo and key. If your project is at 90 BPM in C major, a loop recorded at 120 BPM in G will stretch and transpose to match. Most of the time this works cleanly. Occasionally a loop will drift or sound pitched if the stretch is extreme, so stay within roughly 20 BPM of the loop's native tempo if possible.
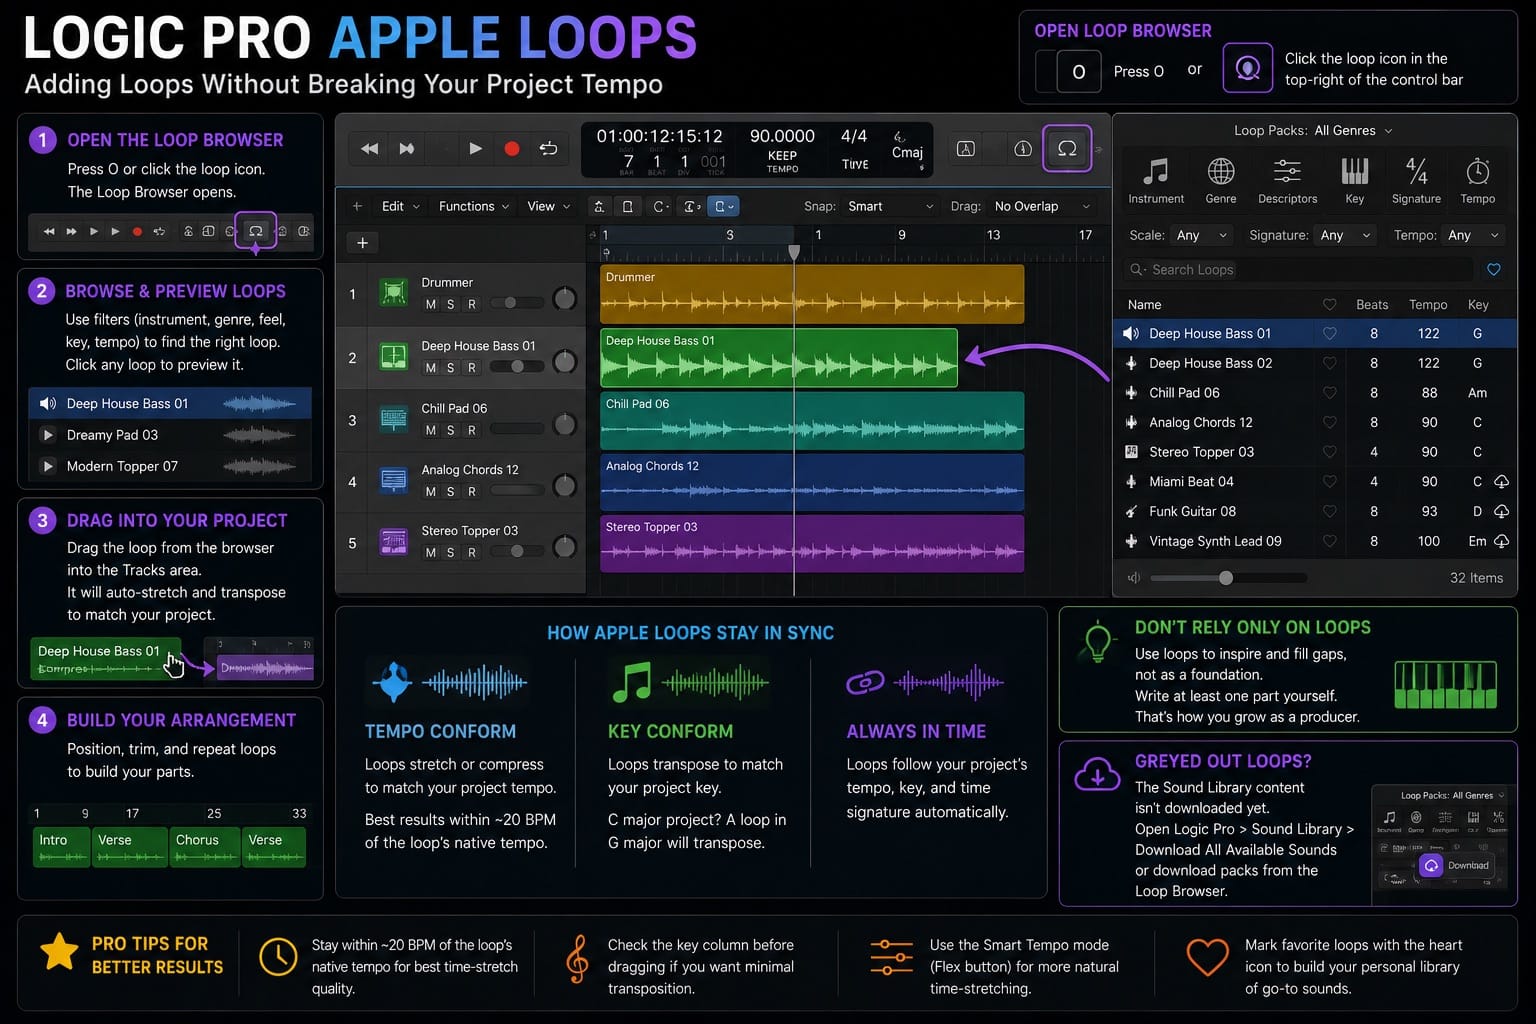
One habit worth building early: don't build your whole first project out of loops. Use one or two to fill gaps while you're learning to write MIDI, but write at least one part yourself. The projects I've seen beginners finish fastest are the ones where a loop gives them a starting point to react to, not a foundation to hide behind.
If a loop in the browser is greyed out or shows a download button, the Sound Library content for that category hasn't been installed yet. Open Logic Pro > Sound Library > Download All Available Sounds or download individual packs from the Loop Browser directly. Most Sound Library issues on a fresh install come down to incomplete downloads rather than bugs.
Logic Pro Piano Roll: Writing Your First MIDI Part
The software instrument track you created at the start is where your first MIDI part goes. Click on the track to select it, then look in the Library panel on the left and pick a sound. Alchemy is worth exploring early: search "Keys" or "Pad" in the Library and you'll find sounds that work in almost any context.
To write MIDI without a keyboard, double-click in an empty area of the track to create a region. Then double-click the region to open the Piano Roll. In the Piano Roll, select the Pencil tool (press T to open the tool selector) and click anywhere on the grid to place notes. Hold the mouse button down and drag right to extend a note's length.
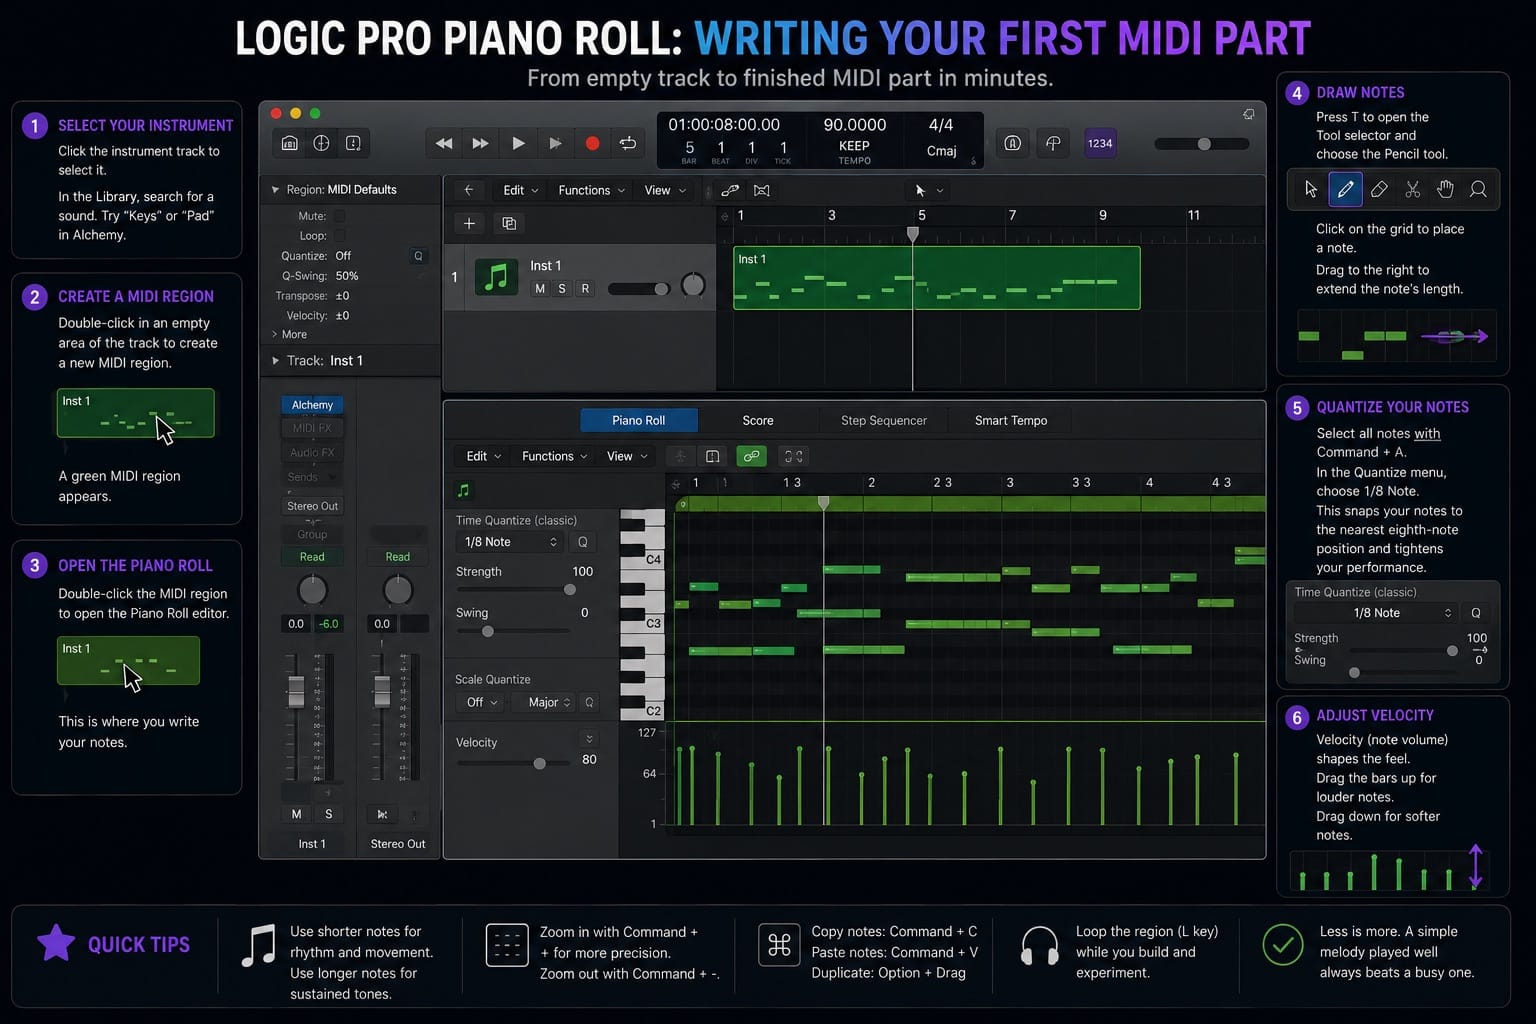
Quantize is your friend here. Select all notes with Command + A, then use the Quantize dropdown in the top-left of the Piano Roll. 1/8 note is a good starting point for most melodic or chord parts. It snaps your notes to the nearest eighth-note position and cleans up anything sloppy.
One thing that trips up a lot of beginners: the Piano Roll shows notes in MIDI, but the volume of each note (velocity) matters as much as pitch. Look at the thin vertical bars at the bottom of the Piano Roll. Those are velocity values. Low velocity sounds quiet and soft. High velocity sounds loud and aggressive. Select a few notes and drag those bars up or down to shape the dynamics of your part.
How to Use Logic Pro Without a MIDI Keyboard
No MIDI keyboard? Use Musical Typing instead. Go to Window > Show Musical Typing or press Command + K. A floating keyboard appears that maps your Mac's keyboard to piano keys. The middle row of letter keys (A, S, D, F...) plays notes, and you can shift octaves up or down with the Z and X keys.
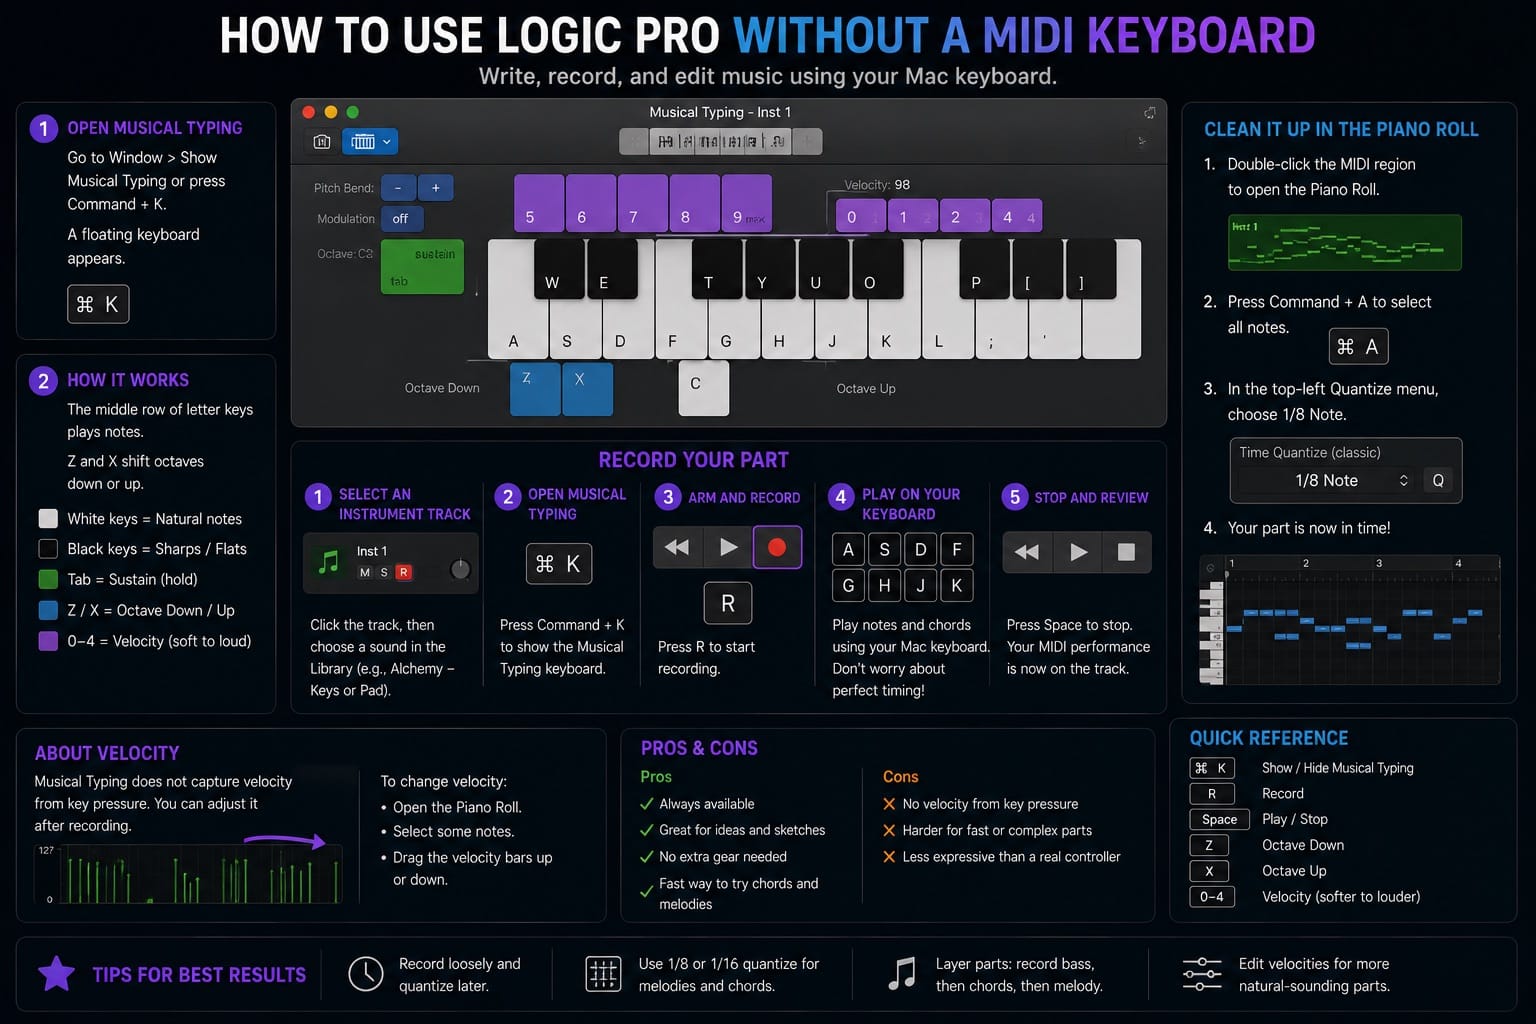
To use it, select a software instrument track, press Command + K to open Musical Typing, then press R to start recording. Play the keys on your Mac keyboard and Logic captures the MIDI in real time. The timing will be messy, which is fine. Open the Piano Roll afterwards and quantize to 1/8 note (Command + A, then the Quantize dropdown) to clean it up.
Musical Typing works for sketching chord progressions and melodies fast. It's not as expressive as a real controller because you can't vary velocity with key pressure, but you can fix that in the Piano Roll after recording. For a first project, it's more than enough to get parts down without waiting until you own hardware.
Logic Pro Audio Recording: Capturing a Real Performance
If you have an audio interface and a microphone or a guitar, you can record a real audio track into the project. Add an Audio track from the + button in the track list. In the Inspector on the left, set the input to whatever channel your mic or instrument is plugged into.
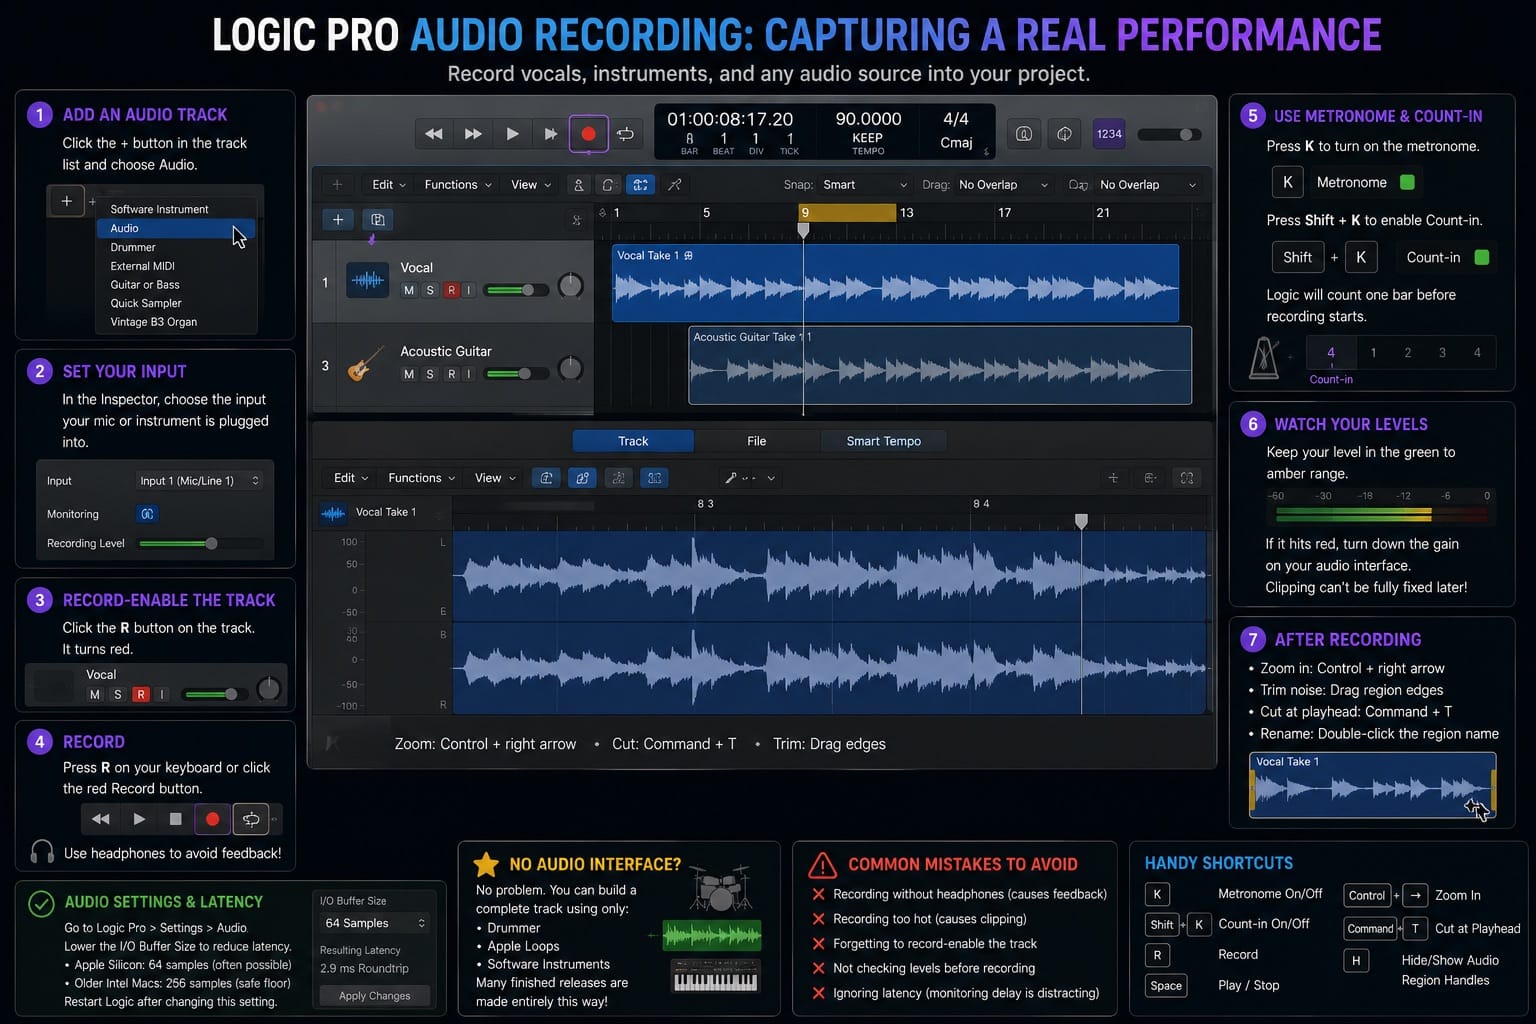
Click the R button on the audio track to record-enable it (it turns red). Put on headphones so you don't get feedback, then press R on your keyboard or the red record button in the transport bar to start recording. If you're getting latency while monitoring, lower your I/O buffer size in Logic Pro > Settings > Audio. On Apple Silicon, you can often go as low as 64 samples without audio glitches. On older hardware, 256 is usually the safe floor. Check how to fix latency in Logic Pro if monitoring delay is a problem.
Before recording MIDI or audio, turn on the metronome by pressing K. If you need a bar to get ready before Logic starts capturing, press Shift + K to enable Count-in. Logic will count one bar before recording begins. Both work for MIDI recording too, not just audio.
Keep the level meter on the track somewhere in the green to amber range. If it's hitting red, turn down the gain knob on your interface. Clipping a recording is one of those problems you can't fix later, at least not fully.
After recording, zoom in on the waveform by pressing Control + right arrow to see the audio in detail. If there's noise at the start or end of the clip, grab the left or right edge of the region and drag inward to trim it. To cut a region at a specific point, position the playhead there and press Command + T.
No audio interface? Skip this section entirely. You can build a complete track using only Drummer, Apple Loops, and software instruments. A lot of finished releases work exactly that way.
Logic Pro Mixing Basics: Channel EQ, Compression, and Chromaverb
Open the Mixer by pressing Command + 2. You'll see a channel strip for every track. This is where mixing happens.
Start with levels. Nothing should be hitting the master output in the red. Pull down faders on anything too loud. Set the kick drum as your reference: aim for around -18 dBFS on the channel meter when the kick hits. Then build everything else around that. Most beginners mix too loud and then wonder why everything sounds crushed.

Add the Channel EQ to a track by clicking the first empty slot in the Audio FX section of a channel strip and navigating to EQ > Channel EQ. A high-pass filter is the first move on almost every track that isn't a kick or bass: drag the low-cut handle up to around 80-100 Hz to remove low-end rumble that adds mud without adding value.
Compression is next. Add Vintage VCA or the stock Compressor to drums or vocals. Set the ratio to 4:1, attack to around 10ms, release to auto. Adjust the threshold until the gain reduction meter is moving between 3 and 6 dB on the loudest hits. That's a starting point, not a rule.
Reverb brings a mix together. Add a Chromaverb to an Aux bus rather than directly to individual tracks. In the Mixer, hold Option and click the Send knob on a channel to route it to Bus 1. Logic creates an Aux channel automatically. Put Chromaverb on that Aux channel. Now you can send different amounts from each track to one shared reverb, which tends to sound more natural than adding reverb to each instrument separately.
Most beginner mixes have too much reverb on too many things. If your reverb sounds obvious when you're listening, it's probably too loud by at least 4 or 5 dB. Reverb works best when you can barely hear it on its own but miss it when it's gone.
Logic Pro Arrangement: Turning 8 Bars Into a Track
Before you bounce, take 10 minutes to turn your loop into a simple arrangement. Even 60 seconds of structure makes a first project feel finished rather than a test. The simplest version: intro (Drummer only, no chords or melody), main section (everything in), break (drop out the Drummer), ending (fade out or hard stop).
Duplicate regions by holding Option and dragging. To mute a region for a break, select it and press M. Change the Drummer's XY pad setting between sections to vary the energy. A chorus that's slightly louder and more complex than the verse is more interesting than 16 identical bars repeated 4 times.
You don't need a technically perfect arrangement. You need one decision per section: what's in, what's out, and does the energy feel intentional. That's all a first project requires.
Logic Pro Bounce: Exporting Your First Finished Track
Every Logic Pro tutorial online at some point says "use the Export button." There is no Export button for a full mix. The function you want is Bounce, found at File > Bounce > Project or Section. Bounce renders your entire project, including all tracks, effects, and automation, into a single audio file. For more detail on specific export formats, see the Logic Pro MP3 and WAV export guide.
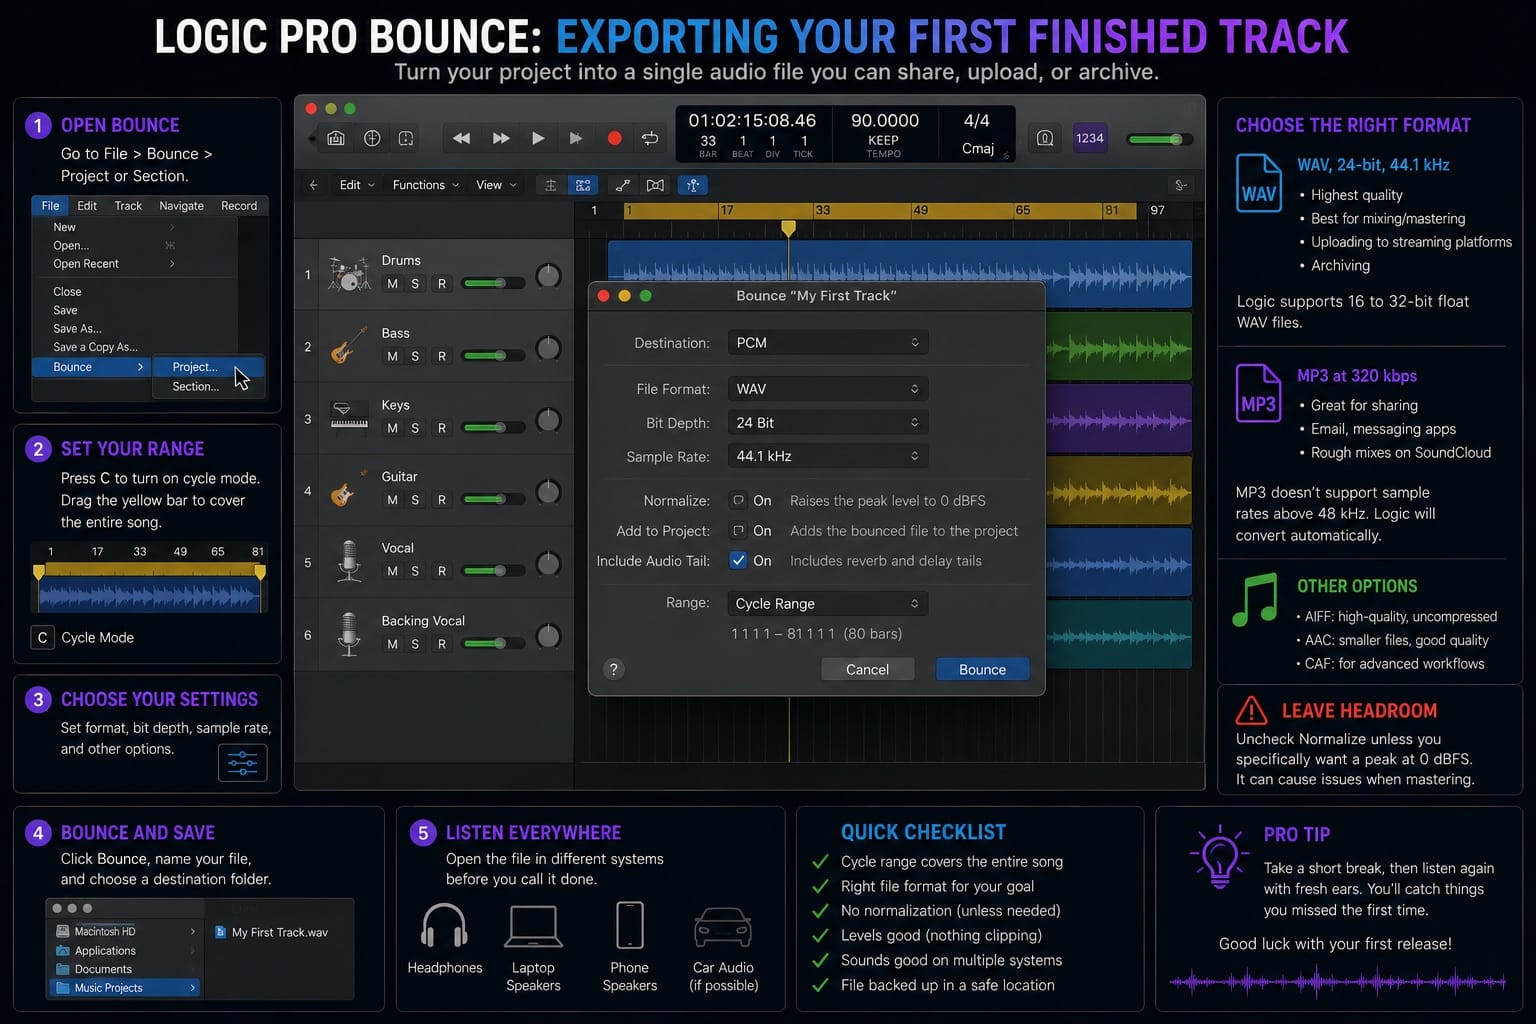
In the Bounce dialog, set your cycle range to cover the full length of the track. The easiest way is to press C to turn on cycle mode and drag the yellow bar in the ruler to span the whole song before opening the bounce dialog.
For format, the choices depend on what you're doing with the file:
- WAV, 24-bit, 44.1 kHz: use this if you're sending to a mixing or mastering engineer, uploading to a streaming platform, or want the highest-quality file for archiving. Per Apple's Logic Pro tech specs, Logic plays and bounces WAV at any bit depth from 16 to 32-bit float.
- MP3 at 320 kbps: use this for sharing via email, messaging apps, or putting a rough mix on SoundCloud. Per Apple's Logic Pro documentation, MP3 doesn't support sample rates above 48 kHz, so Logic handles the conversion automatically if your project is set higher.
Uncheck Normalize in the bounce dialog unless you specifically want Logic to raise the peak to 0 dBFS. If your mix is still in progress or you're sending to a mastering engineer, normalized files can cause issues. Leave headroom.
Click Bounce, name your file, and choose a destination folder. Logic processes the project offline (faster than real time) and saves the file. Open the file in any audio player and listen on headphones, laptop speakers, and phone speakers before you declare it done. Issues that hide in studio monitors tend to reveal themselves on smaller playback systems.
Common Logic Pro Beginner Mistakes to Avoid
Most of these took me a while to figure out. Seeing them listed up front saves a lot of frustration.
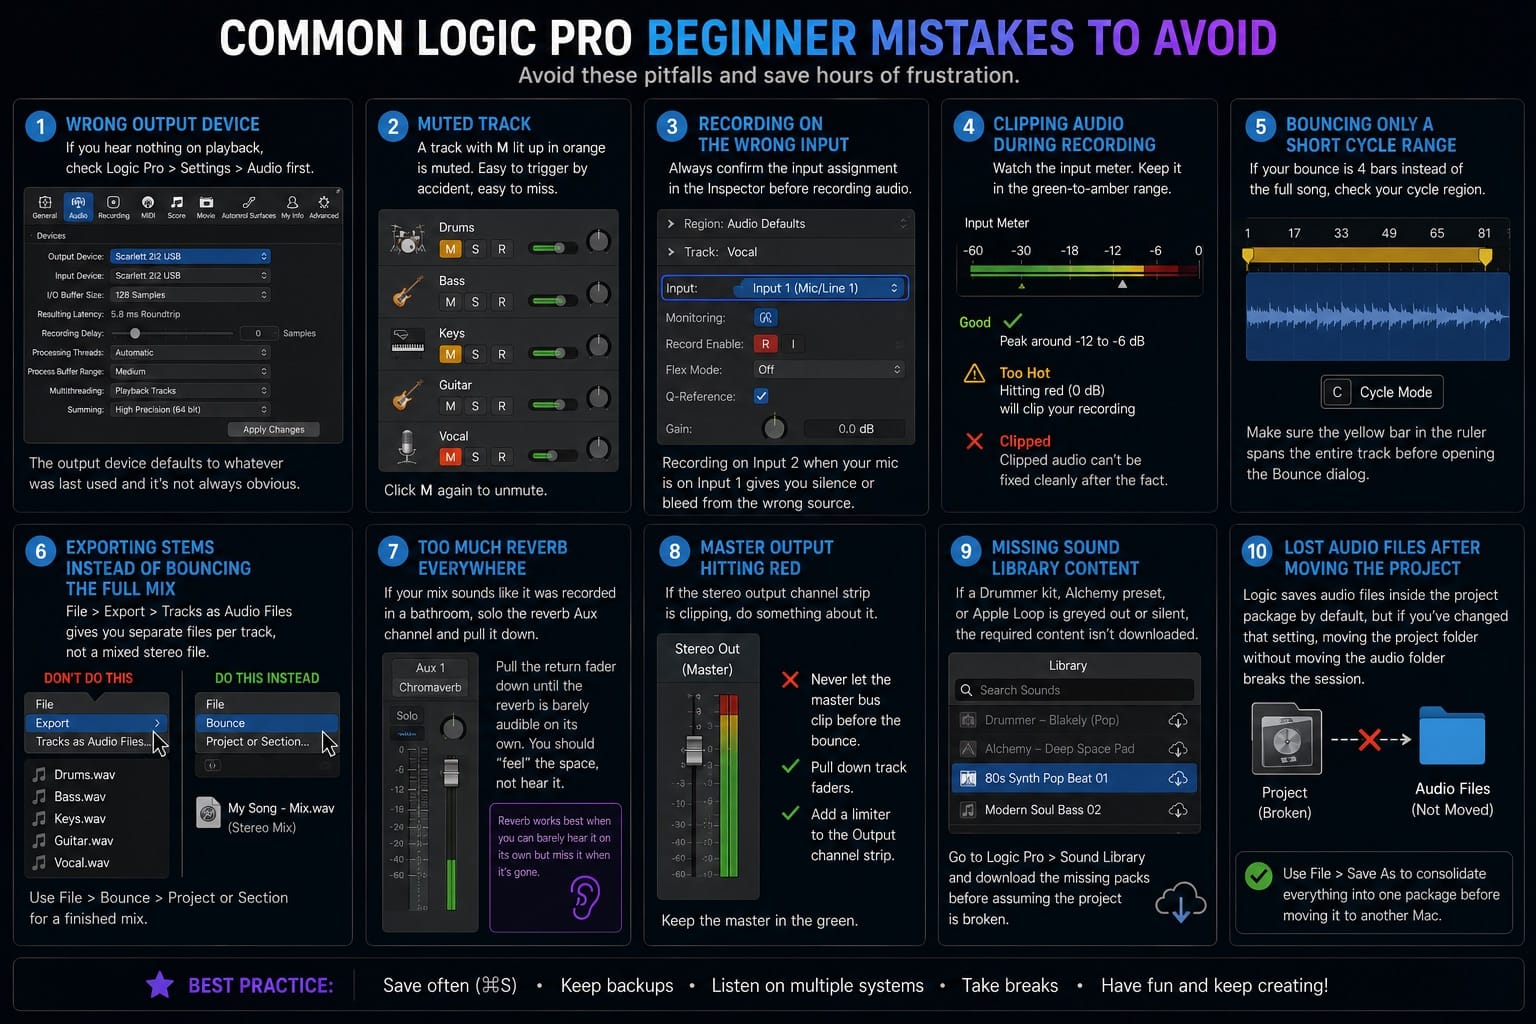
- Wrong output device: If you hear nothing on playback, check Logic Pro > Settings > Audio first. The output device defaults to whatever was last used and it's not always obvious.
- Muted track: A track with M lit up in orange is muted. Easy to trigger by accident, easy to miss during a session.
- Recording on the wrong input: Always confirm the input assignment in the Inspector before recording audio. Recording on Input 2 when your mic is on Input 1 gives you silence or bleed from the wrong source.
- Clipping audio during recording: Watch the input meter. Keep it in the green-to-amber range. A clipped recording can't be fixed cleanly after the fact.
- Bouncing only a short cycle range: If your bounce is 4 bars instead of the full song, check that your cycle region (the yellow bar in the ruler) spans the entire track before opening the Bounce dialog.
- Exporting stems instead of bouncing the full mix: File > Export > Tracks as Audio Files gives you separate files per track, not a mixed stereo file. Use File > Bounce > Project or Section for a finished mix.
- Too much reverb everywhere: If your mix sounds like it was recorded in a bathroom, solo the reverb Aux channel and pull the return fader down until the reverb is barely audible on its own.
- Master output hitting red: If the stereo output channel strip in the Mixer is clipping, pull down individual track faders or add a limiter to the Output channel strip. Never let the master bus clip before the bounce.
- Missing Sound Library content: If a Drummer kit, Alchemy preset, or Apple Loop is greyed out or silent, the required content hasn't been downloaded yet. Go to Logic Pro > Sound Library and download the missing packs before assuming the project is broken.
- Lost audio files after moving the project: Logic saves audio files inside the project package by default, but if you've changed that setting, moving the project folder without moving the audio folder breaks the session. Use File > Save As to consolidate everything into one package before moving it to another Mac.
Logic Pro Beginner Tutorial: Key Shortcuts Worth Learning in Week One
Keyboard shortcuts in Logic are the difference between a session that flows and one that constantly interrupts itself. You don't need to memorize all of them. These 7 are the ones that matter in your first few weeks:
- Spacebar: play/stop
- R: record
- Command + S: save
- Command + Z: undo
- Command + T: split region at playhead
- Command + 2: open/close Mixer
- E: open/close the Piano Roll or Audio Editor for the selected region
- Command + K: open/close Musical Typing
The one shortcut most people don't discover for months: hold Option and drag a region to duplicate it in place. Much faster than copy/paste when building an arrangement.
Logic also has a Quick Help feature (the ? button in the top-left of the control bar). Turn it on and hover over any button you don't recognize. The tooltip explains it without you having to leave the session. It's actually useful and almost everyone ignores it.
Logic Pro Beginner FAQs
Do I need an audio interface to use Logic Pro?
No. You can produce a complete track using only software instruments, Drummer, and Apple Loops with no external hardware at all. An audio interface is necessary if you want to record a real microphone, guitar, or other external instrument, but it's not required to get started.
Is Logic Pro free for beginners?
Logic Pro is paid software. Apple Creator Studio includes a 30-day free trial. After that, Creator Studio costs $12.99 per month or $129 per year. Logic Pro for Mac is also available as a standalone one-time purchase for $199.99. Trial terms can change, so check Apple's current page before installing.
What's the difference between Bounce and Export in Logic Pro?
Bounce (File > Bounce > Project or Section) renders your full mix to a single stereo file. Export (File > Export > Tracks as Audio Files) saves individual tracks as separate audio files, useful for sending stems to a collaborator or mixing engineer. For your first finished track, Bounce is what you want.
Why can't I hear anything when I press play in Logic Pro?
Check Logic Pro > Settings > Audio and confirm your output device is set correctly. Also check that the Mute button (M) isn't active on any tracks you expect to hear. If you're on a MacBook without an interface, the output device is typically "Built-in Output."
Can I use Logic Pro on Windows, iPad, or Mac?
No official Windows version exists. Logic Pro runs on Mac and iPad, but not on Windows. If you use a Windows PC, the closest alternatives are FL Studio, Ableton Live, Studio One, or Reaper. The Logic Pro for iPad version is a full-featured app for iPad with Apple A12 Bionic chip or later, though some features differ from the Mac version.
How many tracks can I have in a Logic Pro project?
Logic Pro supports up to 1,000 stereo audio tracks, 1,000 software instrument tracks, and 1,000 auxiliary channel strips per project, per Apple's tech specs. In practice, your Mac's processor and RAM determine the real limit. On an Apple Silicon Mac with 16 GB of memory, you can typically run 60 to 100 tracks with plugins before performance becomes an issue at typical buffer settings. Intel Macs tend to hit limits earlier.
What format should I export from Logic Pro for Spotify or Apple Music?
Upload a WAV file at 44.1 kHz, 24-bit. Both Spotify and Apple Music transcode your upload to their own formats, so starting with the highest-quality uncompressed file gives them the best material to work with. Do not upload an MP3 to a streaming platform if you can avoid it.
Is Logic Pro good for beginners with no music theory?
Yes. Drummer generates realistic performances without you writing a single note. Apple Loops are pre-made in various keys and tempos and snap to your project settings automatically. Alchemy patches sound polished straight out of the Library. You can build a finished track entirely from these tools while you develop your theory knowledge separately. GarageBand is more limited but free if you want an even simpler starting point. If you are still comparing options, see our Best DAW for Beginners guide before committing.
Can I use Logic Pro without a MIDI keyboard?
Yes. Open Musical Typing with Command + K, select a software instrument track, and use your Mac keyboard to record MIDI notes in real time. It is less expressive than a real MIDI controller, but it is enough for a first project. You can fix timing and velocity in the Piano Roll after recording.
How do I fix a Logic Pro project that isn't saving?
Logic autosaves in the background, but you should still save manually with Command + S regularly. If Logic can't save, it's typically a permissions issue with your project folder. Right-click the project folder in Finder, choose Get Info, and check that your user account has Read and Write access under Sharing and Permissions.
Related guides: Best DAW for beginners, Logic Pro free trial, How much Logic Pro costs
Sources: Logic Pro — Apple · Logic Pro User Guide — Apple Support