How to Record Audio in Logic Pro: Complete Setup
Set up an audio device and track, choose the right input and monitoring path, capture a clean region, and diagnose the first recording when it fails.

To record audio in Logic Pro, choose your input device, create an Audio track, select the matching mono input or stereo pair, and enable recording on that track. Set the input gain, choose one monitoring path, then press R. Press Space to stop, play back the new region, and save the project with its audio files.
Three controls have different jobs: Record Enable arms a track, Input Monitoring lets you hear its input when software monitoring is enabled, and the transport Record command starts capture. Hearing a microphone does not, by itself, mean it is being recorded.
This guide covers Logic Pro for Mac: a microphone, electric guitar or bass, hardware synth, mixer, USB microphone, or the Mac’s built-in microphone. Logic records the input and channel selected on an Audio track. MIDI and audio playing inside another Mac app need different routing.
Record, check and save your first take
- With monitor volume down and phantom power off, connect the source and headphones. Enable phantom power only if the connected equipment requires and supports it.
- Choose the correct Input Device and Output Device in Logic Pro > Settings > Audio > Devices.
- Set the project sample rate and choose the recording file type and bit depth before tracking.
- Create an Audio track and choose Mic or Line, or Guitar or Bass.
- Select the mono input or stereo input pair that matches the physical connection.
- Turn on Record Enable for the track that should capture audio.
- In Audio > General, disable Software Monitoring for direct hardware monitoring, or enable it and the track’s I button for Logic monitoring. Do not hear both paths together.
- Set the interface or preamp gain so the strongest performance stays below clipping.
- Place the playhead, set a count-in if needed, press R to record, and press Space to stop.
- Play the new region and listen for clipping, noise, missing channels or timing problems.
- Choose File > Save and keep the project with its audio assets; verify the saved audio before continuing.
If the input meter never moves, stop here and use the Logic Pro recording diagnostic. Pressing Record again and again won’t repair a disconnected device, the wrong input, denied microphone permission, or a silent preamp.
Connect the source before configuring Logic
A microphone normally lands on a microphone preamp in an audio interface. An electric guitar or bass wants an instrument or Hi-Z input. A hardware synth, mixer, or external preamp usually sends line level. Do not feed a speaker output into an interface input, and do not assume every combination jack detects the source type automatically. If you haven’t chosen the hardware yet, compare audio interfaces for Logic Pro by the inputs, monitoring route, driver support and outputs your sessions actually need.
Turn the monitor volume down and switch phantom power off before connecting or disconnecting equipment at microphone inputs. Once connected, enable 48 V only if the microphone requires it and every device on that powered input or bank can accept it. Focusrite’s phantom-power guidance explains these precautions. For microphone placement, headphone balance and vocal takes, continue with recording vocals in Logic Pro.
Wear wired headphones while overdubbing. Speakers can spill the backing track into an open microphone, and they can tip into feedback when the microphone signal is monitored through those same speakers. Bluetooth headphones add another delay that Logic’s I/O buffer can’t remove. Apple counts wireless output among the sources of input-monitoring latency.
Choose the input and output devices
Open Logic Pro > Settings > Audio > Devices. Core Audio has to be enabled. Pick the interface, USB microphone, or built-in microphone under Input Device, then pick whatever feeds your headphones or monitors under Output Device. For a first-time setup, the audio-interface connection guide covers cabling, macOS recognition, sample rate and the first test recording before you troubleshoot a missing device.
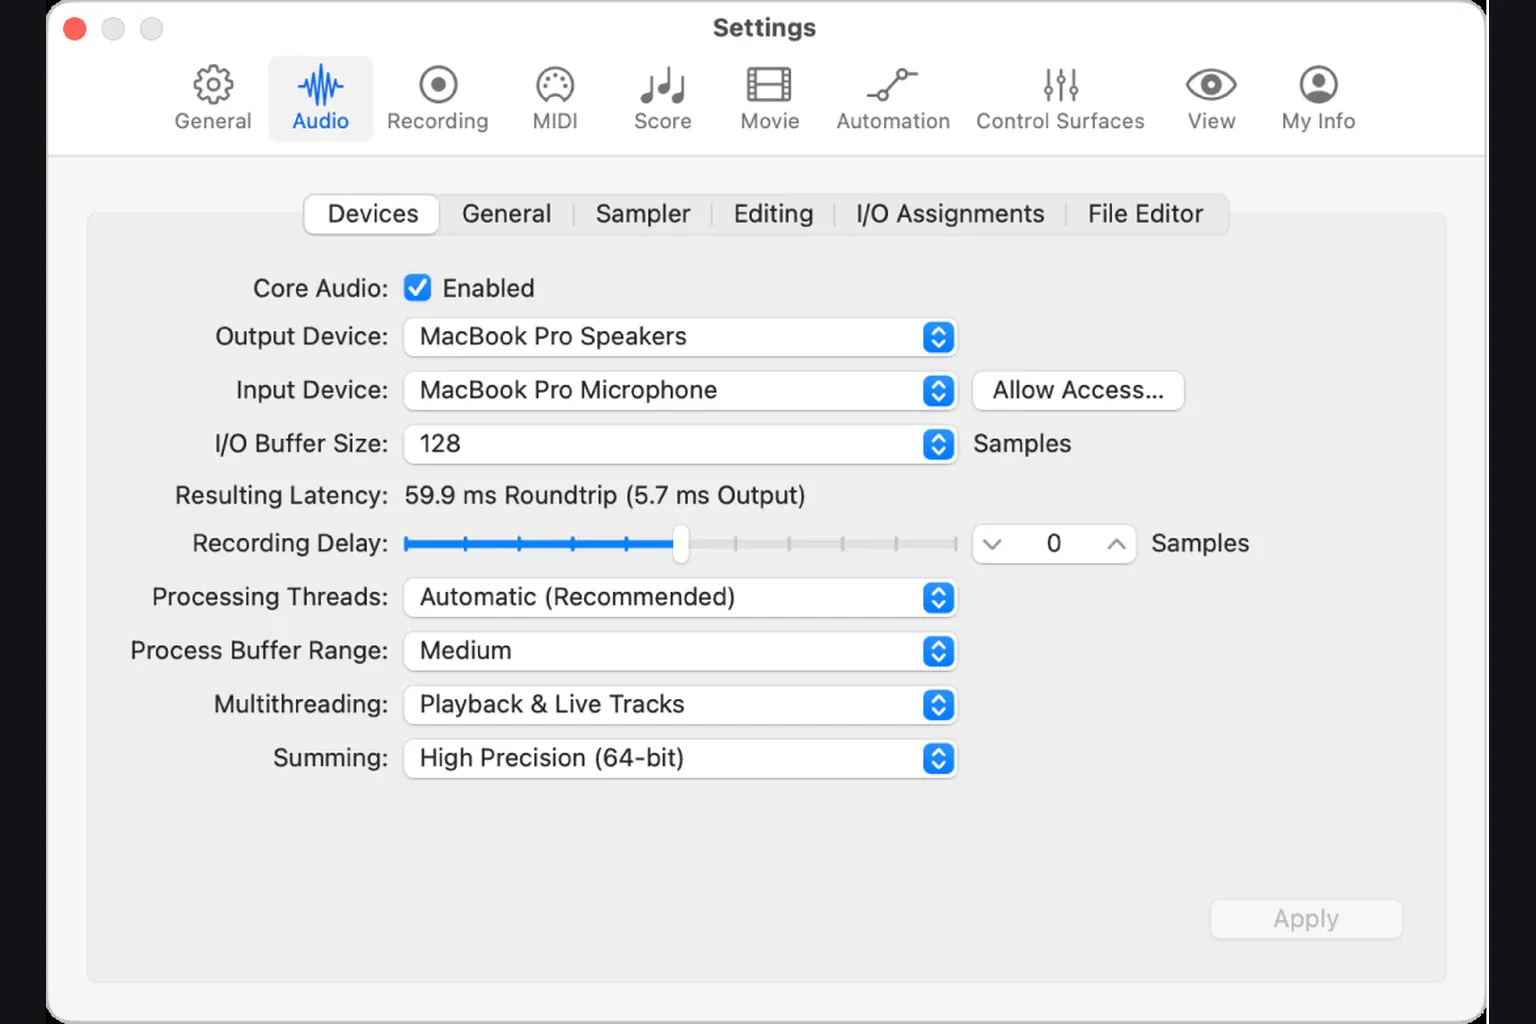
Apple’s Audio Devices reference notes that choosing an output device with inputs can also change the Input Device selection. Recheck both menus, then click Apply if it is available. These device choices are stored with the project, so opening it on another Mac may prompt you to choose replacement hardware.
If the device is missing from the menu, check its cable and power, plug it in directly rather than through an unreliable hub, install only the current manufacturer driver when one is required, and confirm that macOS can see it in Audio MIDI Setup. The full audio-interface detection guide covers driver, permission, Core Audio, and aggregate-device failures without mixing them into the basic recording steps.
Check microphone permission and Mic Mode
If Logic can’t reach the selected input, its Devices pane can show an Allow Access button that opens macOS Privacy & Security > Microphone. Change the permission there, then restart Logic Pro as the pane instructs.
Check the orange microphone indicator in the macOS menu bar too. Apple warns that Voice Isolation can degrade recording input and puts up an alert when it’s active. Stay on Standard Mic Mode unless filtering the live input is a deliberate choice you’ve auditioned.
Set the recording format before the session
Decide the project sample rate before you record. Apple recommends against changing it after audio has been recorded or imported, because files that no longer match can play at the wrong speed or pitch. In File > Project Settings > Audio, 44.1 kHz is a common music delivery rate, while 48 kHz is the usual starting point for work tied to video. A client, broadcast specification, or existing session may call for something else.
Then open Logic Pro > Settings > Recording. The current Recording pane offers AIFF, WAVE (BWF), or CAF and 16-bit, 24-bit, or 32-bit-float recording. Apple describes WAVE (BWF) as the most compatible file type, AIFF as Mac-oriented, and CAF as the one for exceptionally long continuous recordings.
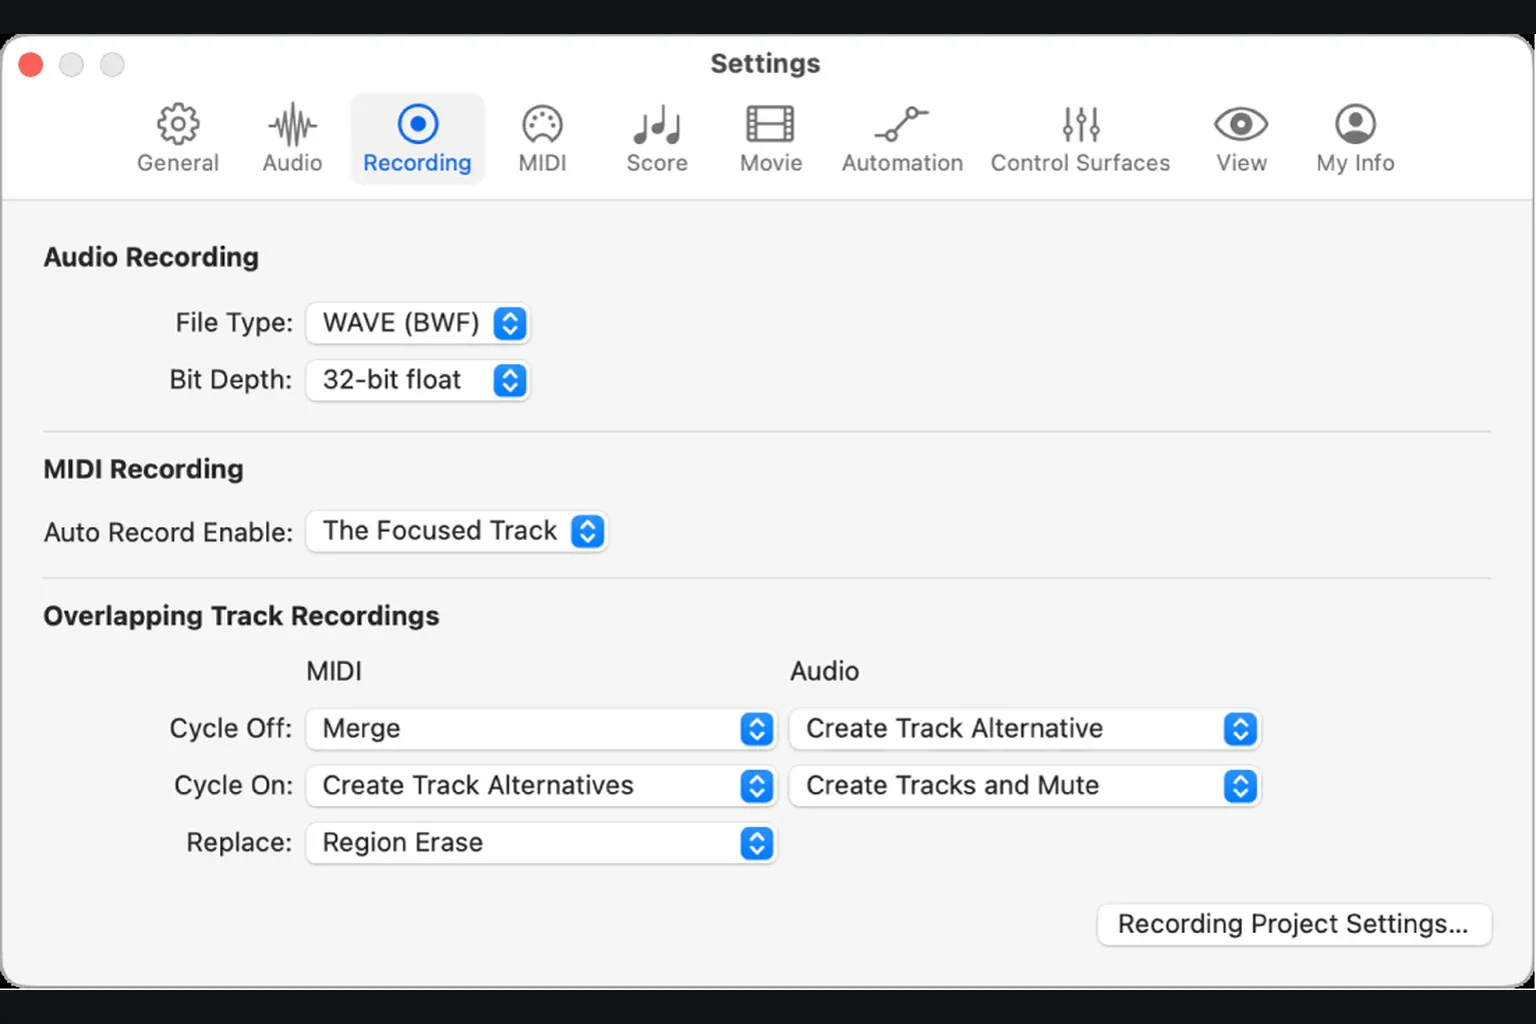
For bit depth, match what the audio device actually supplies. Apple calls 24-bit the most commonly used option and says it’s enough for acoustic recording with proper external gain staging. The current Recording settings documentation also supports 32-bit float, but do not read that as permission to overload the interface. Floating-point headroom inside the file can’t reconstruct distortion that already happened in the microphone, preamp, analog stage, or converter before Logic ever received the signal.
Create the right kind of audio track
Press Option-Command-N or click the Add Tracks button. Choose Audio, then Mic or Line for a microphone, preamp, mixer, or line source, or Guitar or Bass when you want Logic’s guitar/bass patch path. Open Details, choose the input and output, and click Create. Apple’s current Create Tracks guide also lets you turn on Input Monitoring and Record Enable before the track exists. If the source is an electric guitar, the Logic Pro guitar-recording guide continues with Hi-Z input choice, direct versus software monitoring, amp patches, noise and take management.
Choose mono for one source, stereo for a real pair
A single microphone, one guitar cable, one bass DI, or one mono line output should normally feed a mono track from the matching input number. If the microphone is plugged into interface Input 1, choose Input 1 instead of Input 1–2. Pick a stereo pair for one mono cable and the signal can land on only one side of the recording.
Choose stereo when the source genuinely sends a left/right pair: a stereo keyboard output, a stereo mixer bus, a two-microphone stereo technique, or a stereo hardware processor. Work out which physical jack is left and which is right before you record. Nudging a channel strip’s pan or balance doesn’t convert a one-sided stereo recording into a correctly captured stereo source.
Record Enable, Input Monitoring, and Record are different
| Control | What it actually does |
|---|---|
| Record Enable (R on the track) | Makes that audio track ready to capture its selected input. |
| Input Monitoring (I on the track) | Lets you hear the incoming signal through Logic when software monitoring is active. |
| Transport Record / keyboard R | Starts recording on every eligible record-enabled track. |
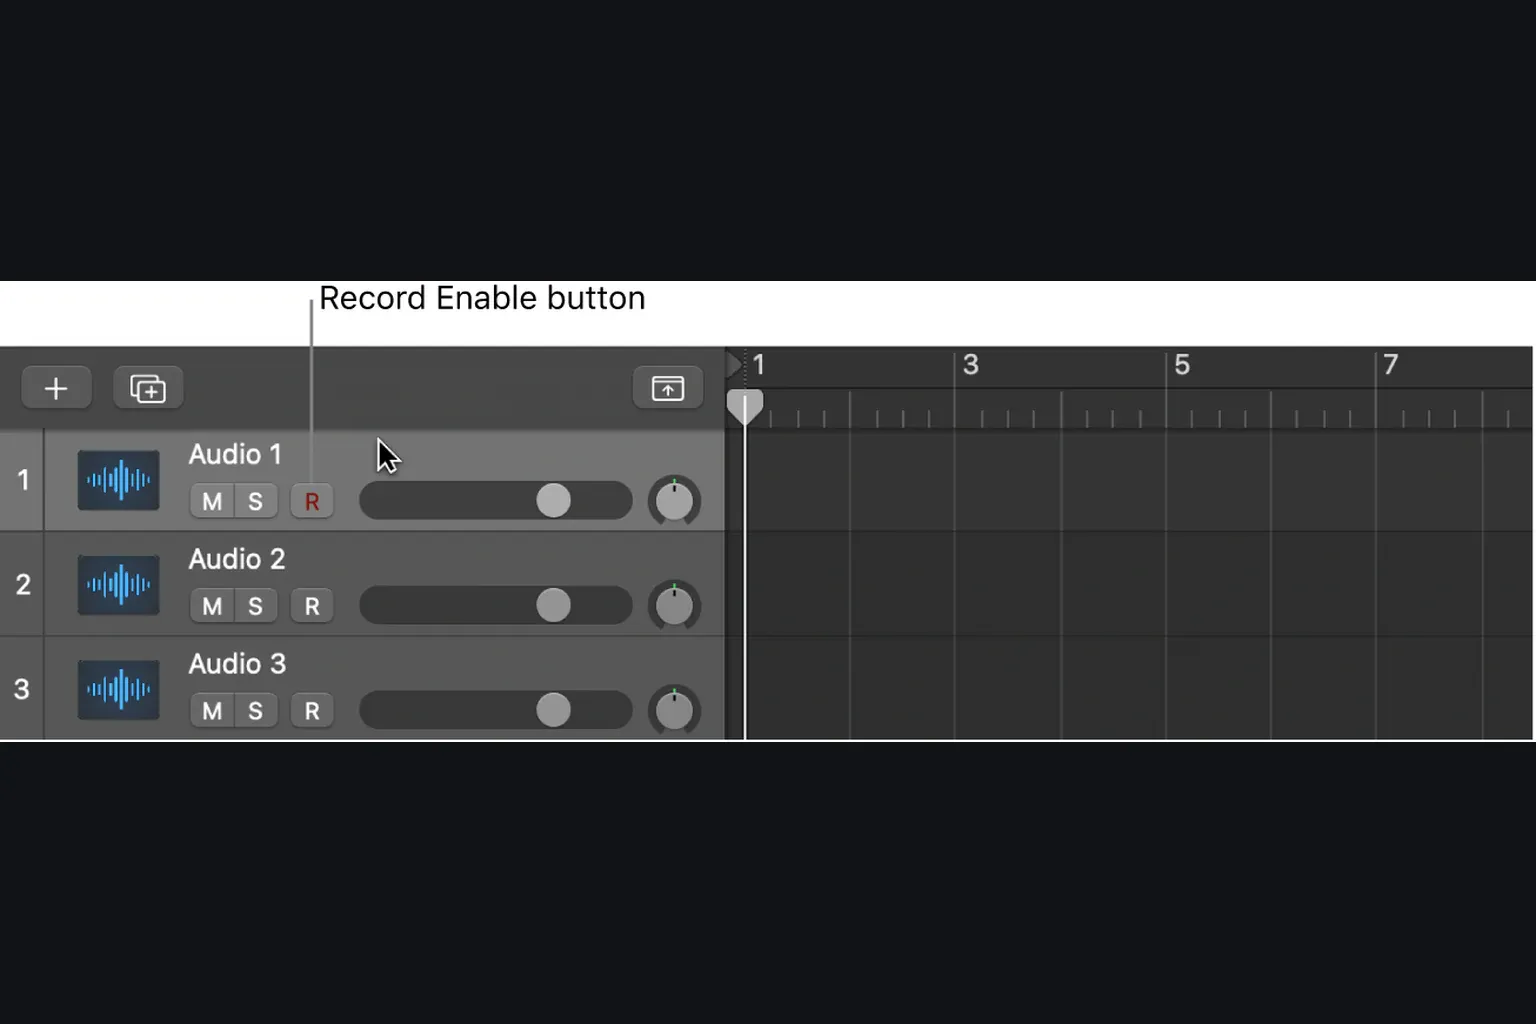
Apple says the Input Monitoring button can stay on before, during, and after ordinary recording. Its input-monitoring reference also makes an important exception: when punch recording, use Auto Input Monitoring rather than building the workflow around the track’s I button. The dedicated punch-in guide in this series handles that behavior in full.
Set recording gain at the interface, not with the track fader
Play or sing the loudest part you expect to perform and watch both the interface and Logic input meter. Ride the interface’s input gain or external preamp until the signal sits comfortably above the noise floor and the strongest peaks stay below clipping. Leave margin for the take to come in louder than the rehearsal.
No single peak value fits a quiet ribbon microphone, an active bass, a hot hardware synth, and a drum close mic all at once. A useful recording level is clean, stable, and leaves headroom. Chasing a magic number can do more harm than listening to the source and watching for overloads.
The track fader changes the level going to your monitoring mix; it does not turn down the signal being written from the selected hardware input. If the input clips, lower the interface/preamp gain. If the performer’s headphones are too loud but the recorded level is healthy, lower the monitor path instead. The broader Logic Pro gain-staging guide follows the signal after capture into editing, plug-ins, buses, and Stereo Out.
Choose one monitoring path
You can hear the source through the audio interface before it reaches Logic, or route it through Logic and back out to the headphones. Both are valid. Using both by accident is what creates a doubled, hollow, or flanged sound.
| Monitoring route | Use it when |
|---|---|
| Direct / hardware monitoring | You need the lowest practical delay and do not need to hear Logic plug-ins on the live source. Clear Software Monitoring in Audio > General to avoid doubling. |
| Logic software monitoring | You need to hear Amp Designer, reverb, pitch processing, or a Logic headphone mix while performing. Enable Software Monitoring in Audio > General and the track’s I button; disable direct monitoring for that input. |
For software monitoring, open Logic Pro > Settings > Audio > General and select Software Monitoring, then turn on the track’s I button. Disable the interface’s direct-monitor path for that input so you hear it only once. For hardware monitoring, clear Software Monitoring instead; switching off I alone is not a substitute. Apple describes the global switch in General Audio settings.
For the software path, adjust I/O Buffer Size in Audio > Devices. Use the lowest setting that gives workable delay without clicks, pops or overloads. A larger buffer reduces processor load during mixing.
If plug-ins on tracks, auxes or Stereo Out add delay, choose Record > Low Latency Mode while tracking. In General Audio settings, the current guide labels its checkbox Low Latency Monitoring Mode. It can bypass plug-ins and disable sends, so check the headphone mix after enabling it. The Logic Pro latency guide covers the remaining causes.
Record and verify the first pass
- Move the playhead to the intended start position.
- Turn the metronome and count-in on only if they help the performance.
- Confirm the correct track is record-enabled and its input meter responds.
- Press R or click the transport Record button.
- Perform while watching for clipping, not while trying to mix the track.
- Press the Space bar to stop.
- For playback, turn off the track’s Input Monitoring and Record Enable buttons, and stop playing the live source.
- Play the region from before its start and listen through the same output path.
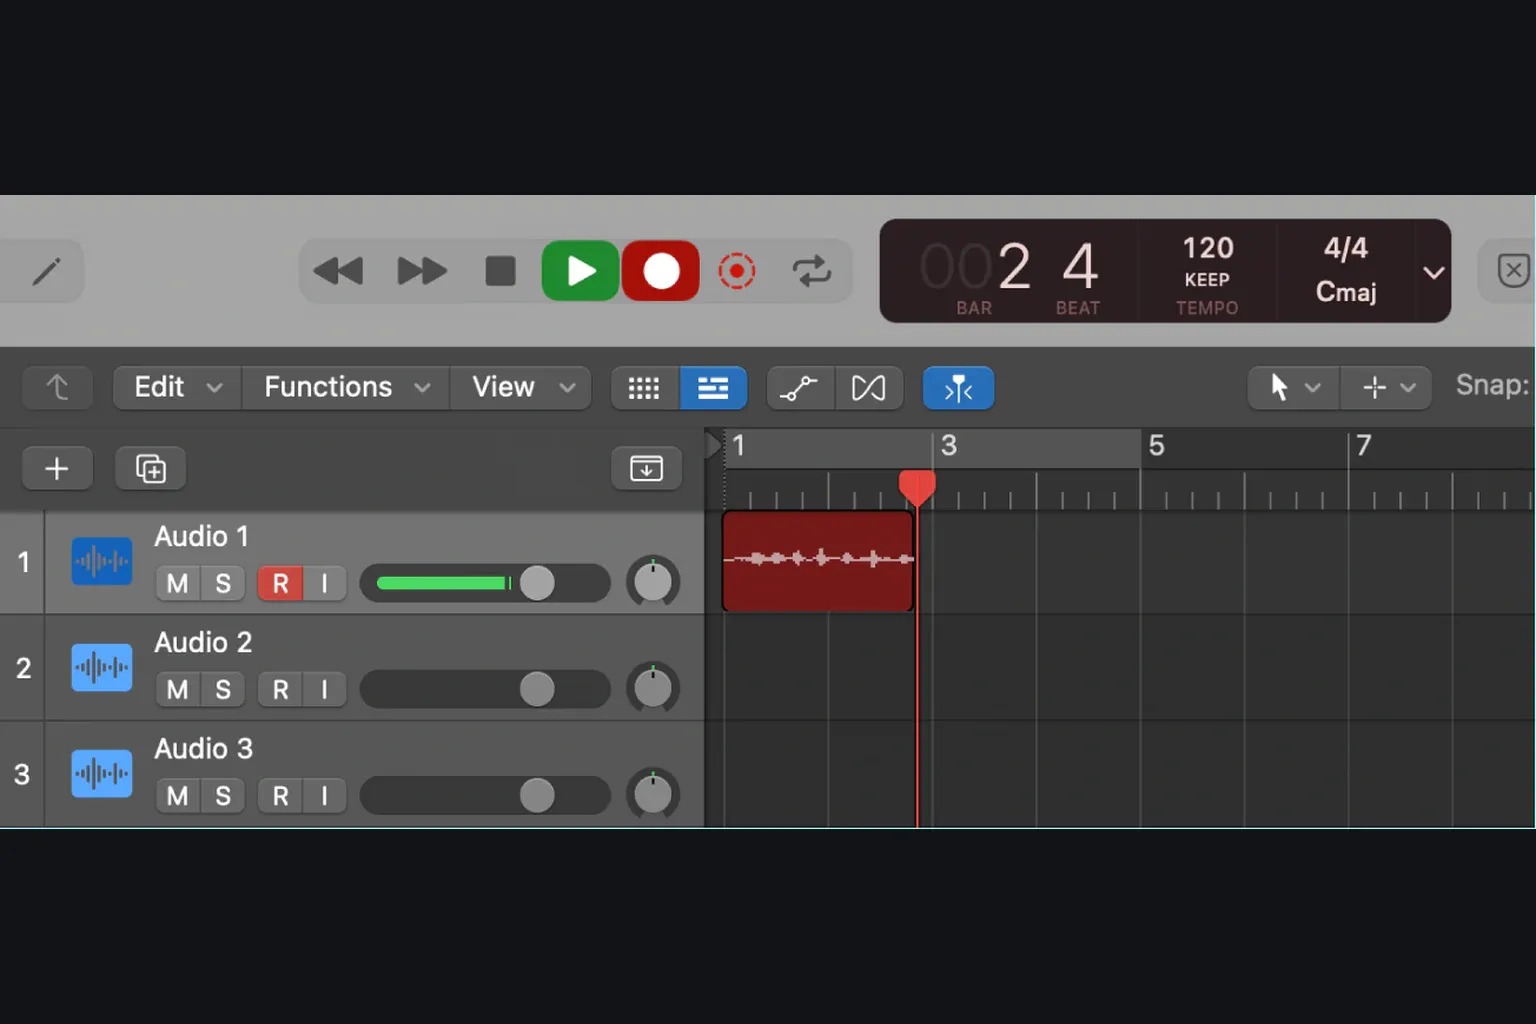
Do not judge only by the size of the waveform. Listen for clipping, room noise, electrical hum, the wrong input channel, one-sided stereo, latency between the performance and backing track, and stray processing in the monitor path. Zooming the waveform display makes a region look larger without changing the audio at all.
Rename the track and region, then choose File > Save (Command-S). For a new project, choose a name and location and include its audio assets. If you need to collect audio referenced elsewhere, use File > Save As, choose Package or Folder, and select the audio assets to copy. Apple’s project-saving instructions explain both layouts. Confirm the audio files are in the saved project before a long session.
Before destructive file editing, make a separate project copy with File > Save a Copy As after collecting the audio assets, and keep that copy untouched. Reopen it to check that the recordings are present and playable, then return to the working project. Project Alternatives share the same assets; they preserve arrangement or mix states, not independent copies of audio you may overwrite. The Logic Pro backup workflow covers longer-term protection.
If the first recording fails
| Symptom | Fastest useful check |
|---|---|
| No input meter movement | Confirm microphone permission, Input Device, physical cable/input, source type, interface gain, and the track’s selected input. |
| Input Monitoring button is missing | Check the channel strip Input slot. Apple hides the I button when the track is set to No Input. |
| Meter moves but no sound is heard | Check Output Device, headphones, software monitoring, Input Monitoring, and whether direct monitoring is the intended route. |
| You hear the source but no region appears | Monitoring is working, but the track may not be record-enabled or the transport may not be recording. |
| Signal is doubled, hollow, or echoing | Choose direct monitoring or software monitoring instead of hearing both paths together. |
| Performance feels late | Use wired headphones, lower the I/O buffer, remove latency-heavy plug-ins, or switch to direct monitoring. |
| Recording is too quiet | First check the recorded signal, not just the headphones. If capture is genuinely low, adjust hardware gain without clipping. If capture is healthy, adjust playback or headphone level instead. |
| Recording is distorted | Lower gain at the earliest overloaded stage. Turning down the Logic fader after capture does not repair analog or converter clipping. |
| Audio plays at the wrong speed or pitch | Check whether the file, project, and device sample rates match before changing anything else. |
Go deeper only where the symptom points. Reach for the dedicated guides on no recorded audio, a quiet microphone, an interface missing from Logic, or no playback sound. That beats changing every Audio setting at once and losing the original cause.
Decide what the next pass should create
Before recording over an existing passage, open Logic Pro > Settings > Recording and check Overlapping Track Recordings: Audio. With Cycle off, the choices include Create Take Folder, Create Track and Create Track Alternative. With Cycle on, Create Tracks and Mute creates new tracks and mutes their new regions; the other choices create takes or track alternatives. Select the behavior you want before another pass.
Use a take folder to compare performances of the same passage and build a comp. Use punch recording to replace a defined section while keeping the surrounding performance. The punch and cycle recording guide explains how monitoring and overlapping takes change for those jobs.
The Logic Pro recording and editing hub connects this setup to takes, comping, MIDI, timing repair, and delivery. It sits inside the broader Logic Pro Tutorials path. If you’re starting a whole session rather than adding one audio track, the first-project tutorial gives the larger order.
Frequently asked questions
Can I record directly into Logic Pro without an audio interface?
Yes. Choose a compatible USB microphone or the Mac’s built-in microphone as Logic’s Input Device, then select its channel on an Audio track. An audio interface is still the practical route for XLR microphones, guitar or bass inputs, line sources, better headphone routing, and multiple inputs.
Can Logic Pro record Mac system audio?
Not through the ordinary microphone setup alone. An Audio track records channels exposed by the selected Core Audio input device; apps do not appear as track inputs by name. Use a separately configured loopback route, such as the one in our Mac system-audio recording guide. Check permissions, channel assignment and monitoring before capture, and record only audio you have permission to use.
Why can I hear my microphone but Logic Pro records no waveform?
Input monitoring can work even when the track is not record-enabled. Confirm the correct audio track and input, turn on its Record Enable button, then press the transport Record command. If the meter never moves, diagnose the device and input first.
Should I record at 24-bit or 32-bit float in Logic Pro?
Match the audio device’s supported bit depth. Apple describes 24-bit as the common recording choice. Logic also supports 32-bit float, but extra file headroom does not restore distortion created in the microphone, preamp, analog input, or converter before the signal reached Logic.
Where does Logic Pro save recorded audio?
The recording appears as a region and is listed in the Project Audio Browser. Choose File > Save and include audio assets when saving a new project. To collect referenced audio into an existing project copy, use File > Save As and select the audio assets to copy. Check the saved package or project folder before moving or backing it up.


