How to Connect an Audio Interface to Logic Pro
Connect the hardware, choose the right Logic Pro devices and track input, then prove the complete signal path before you record a take.

Checked September 30, 2026 against the Logic Pro 12.4 release notes and the current Apple and manufacturer documentation linked below.
To connect an audio interface to Logic Pro, connect it to the Mac, plug your microphone or instrument into a hardware input, then select the interface under Logic Pro > Settings > Audio > Devices. Create an audio track with the matching input—mono for one microphone or instrument cable—and choose direct monitoring or Logic software monitoring. Finish by recording a short take and playing it back. Hearing the live input alone doesn’t prove that recording and playback work.
Connect the hardware before opening a session
Use the cable and power supply specified by the interface maker. A bus-powered USB interface may need only one USB-C cable. A larger interface may also need its own power adapter and a driver or control app. Apple's current audio-device guidance says to confirm macOS compatibility and follow the manufacturer's driver instructions. Some interfaces are class-compliant and need no extra driver. Others require manufacturer software. An old installer isn't automatically the right installer for a current Mac.
- Turn the interface's monitor or headphone level down.
- Connect the interface to the Mac. Prefer a direct USB or Thunderbolt connection for the first setup.
- Connect wired headphones to the interface, or connect powered monitors to its main outputs using the cable type specified by the manufacturer.
- Connect the source to one numbered input: XLR for a microphone, or the input and cable type required by your guitar, keyboard, preamp, or mixer.
- Power the interface on and wait for macOS to finish detecting it.
Apple's Logic interface-connection guide explicitly recommends a direct computer connection rather than a hub or daisy chain when possible. That doesn't make every good powered dock unusable. It gives you the cleanest baseline. Once the interface works directly, you can test a dock without wondering whether the dock, cable, power budget, driver, or Logic is responsible.
Use phantom power only when the microphone needs it
A condenser microphone often needs +48 V phantom power. A dynamic microphone usually doesn't. Ribbon designs vary, so check the exact microphone manual before pressing 48 V. Shure's phantom-power guidance recommends turning phantom power off while connecting or disconnecting microphones and checking compatibility, especially with ribbon microphones. Lower the monitor level first so a connector pop doesn't reach headphones or speakers at full volume.
Choose the interface in Logic Pro Audio settings
- Open Logic Pro.
- Choose Logic Pro > Settings > Audio.
- Open the Devices tab and confirm that Core Audio is enabled.
- Set Input Device to the audio interface.
- Set Output Device to the same interface for the simplest recording setup.
- Click Apply if the button is available, then close Settings.
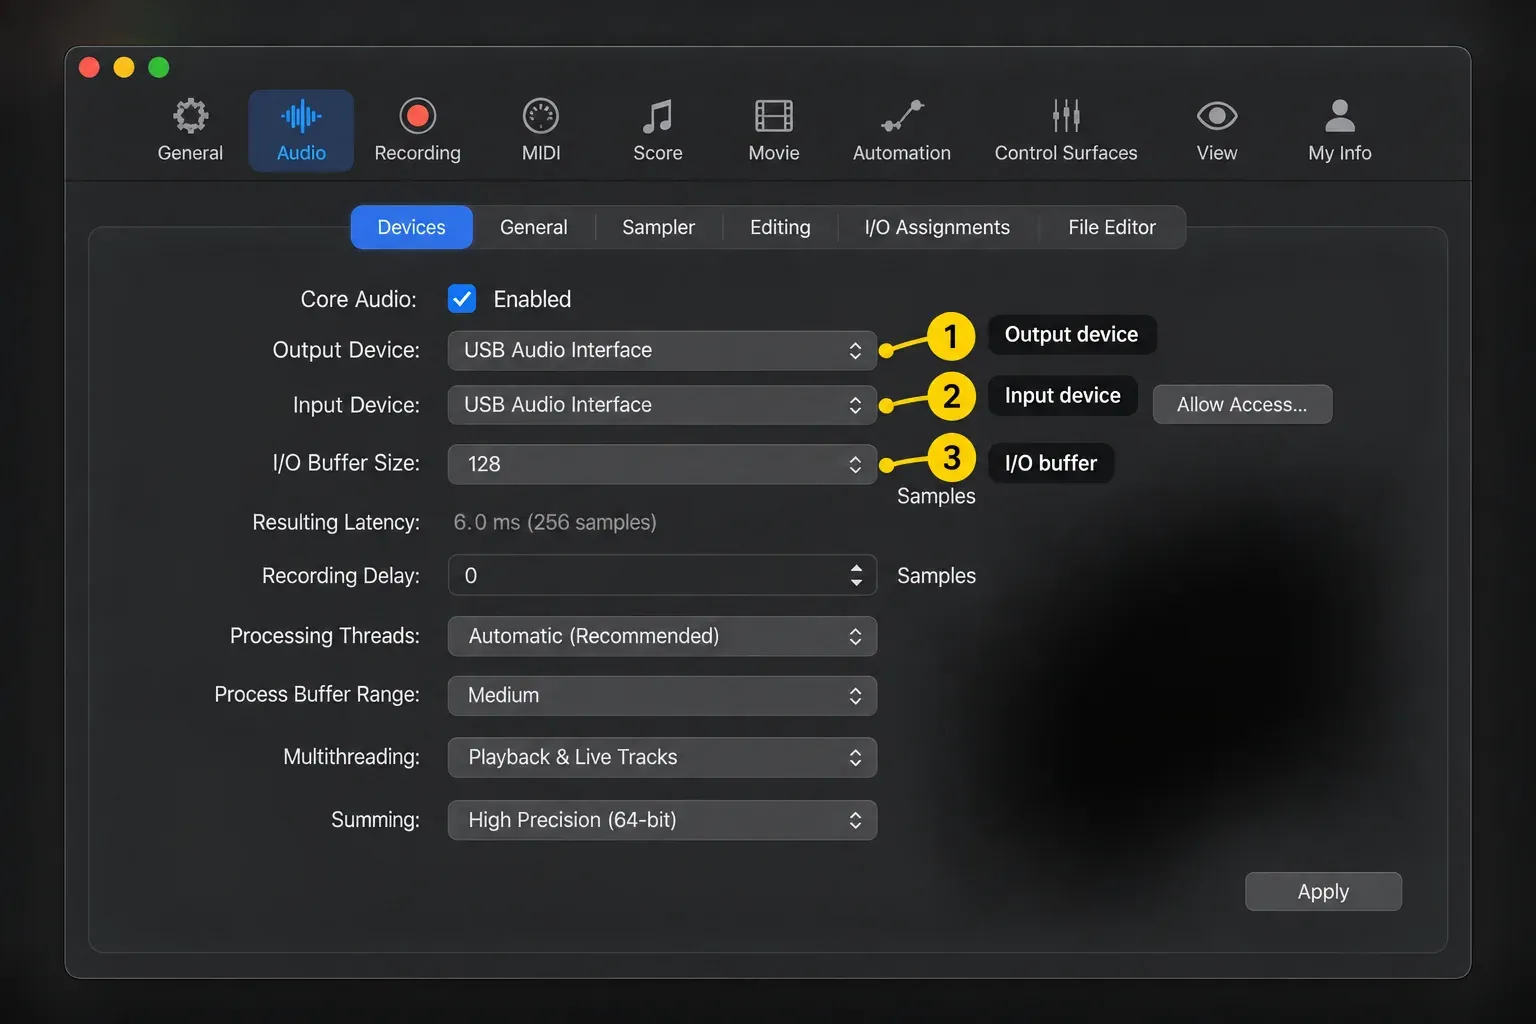
Selecting one interface for both input and output keeps setup simple. Logic also allows separate input and output devices, and you don’t need an Aggregate Device for that arrangement. Use an aggregate when you need to combine devices into one set of inputs and outputs. Apple’s Aggregate Device instructions explain channel order, clock source and drift correction. The Audio MIDI Setup guide covers that more involved setup.
The image shows the device menus with the Mac’s built-in speakers and microphone selected. Replace those selections with your interface. Don't copy the 128-sample buffer shown in the image as a universal rule. Start with a modest recording buffer your Mac can run cleanly, then use the dedicated sample rate and buffer size guide when you need to balance latency against stability.
Create an audio track and match the physical input
Selecting an Input Device tells Logic which interface to use. The audio track still needs the input that’s receiving your microphone or instrument. A wrong track input is one reason the hardware meter can move while Logic receives no signal.
- Click the Add Tracks button or press Option-Command-N.
- Choose Audio, then Mic or Line for a plain recording track. Open Details if the input controls are hidden. Guitar or Bass is the alternative when you want amp and stompbox processing.
- Choose Input 1 if the cable is plugged into hardware input 1, Input 2 for hardware input 2, and so on.
- Use a mono track for one microphone or one mono instrument cable. Use a stereo input pair only when the source really sends left and right channels.
- Create the track, then confirm its channel strip still shows the intended input.
- Click Record Enable on the track and make normal performance-level sound.
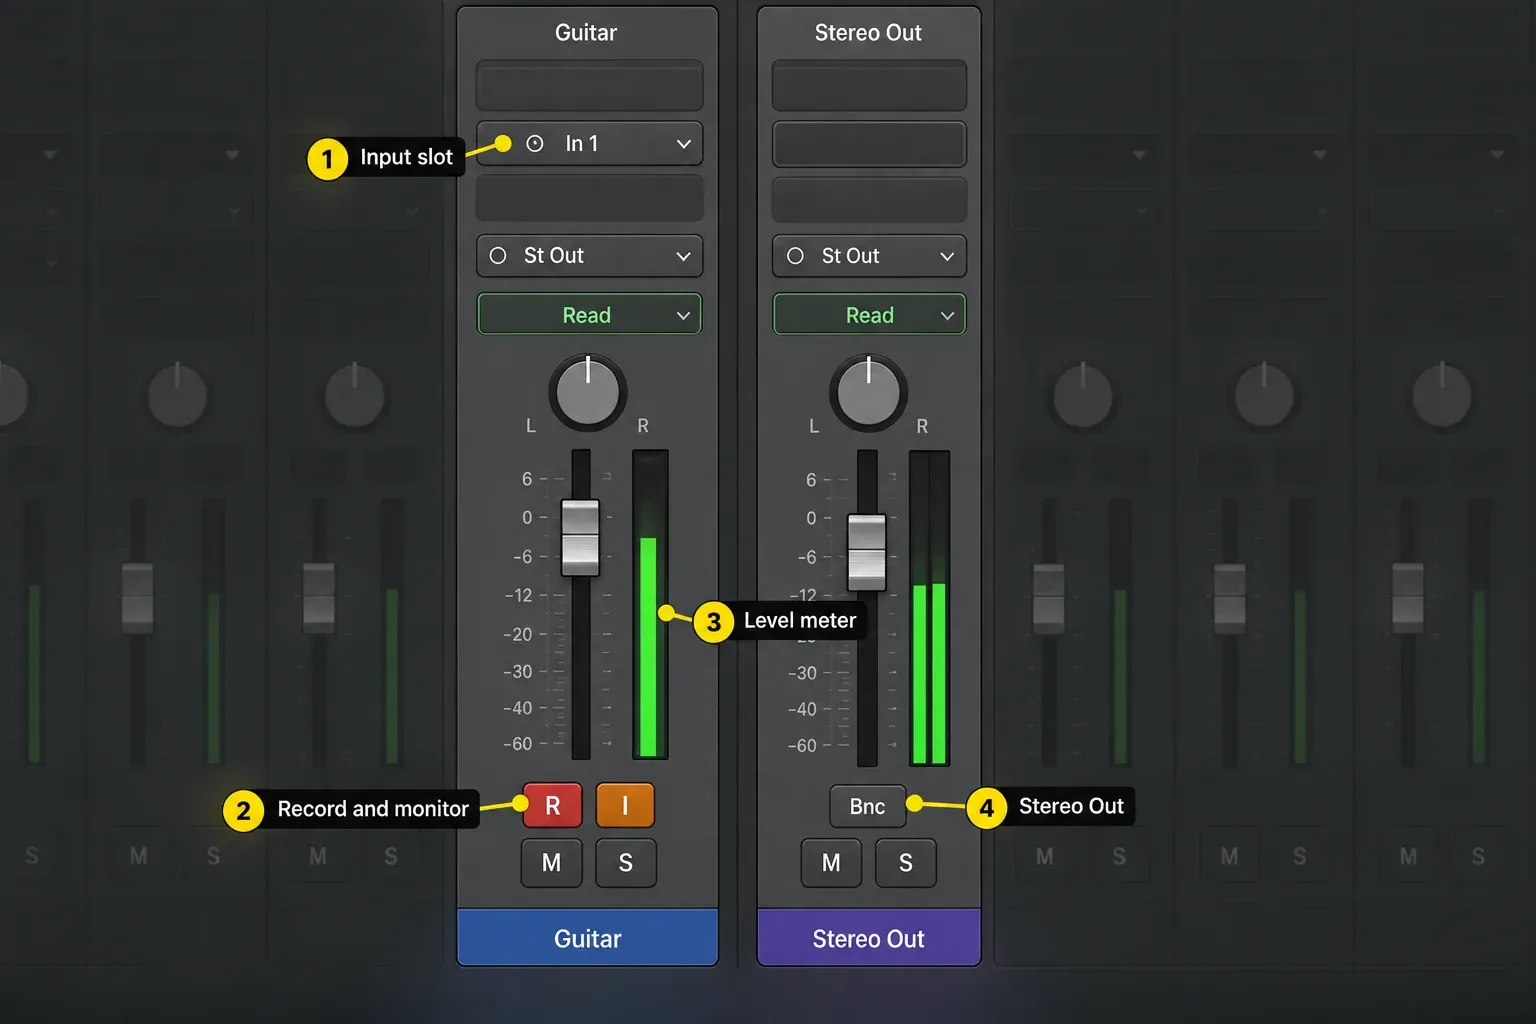
With a straightforward interface setup, a microphone in input 2 needs Input 2 on its track. A stereo keyboard connected from L and R to inputs 1 and 2 needs the Input 1–2 pair on a stereo track. If you use only its L/Mono output, choose one mono input. With an Aggregate Device or custom interface-mixer routing, check the channel mapping. Don’t assume Logic’s numbers match the labels on the box.
Choose one monitoring path
You can hear the live input through the interface or through Logic. Monitoring both copies can cause an echo or a hollow, phasey sound. Choose one path for this first test.
Direct or hardware monitoring
Use this when you want minimal monitoring delay and don’t need Logic plug-ins on the live input. Enable Direct Monitor on the interface or in its control app. For this test, turn off Software Monitoring in Logic Pro > Settings > Audio > General.
Logic software monitoring
Use this to hear an amp simulation, reverb or other Logic effects while performing. Enable Software Monitoring in Logic Pro > Settings > Audio > General, then turn on the track’s I button. Turn off the interface’s direct-monitor path for that input.
In Audio > General settings, “Input monitoring only for the focused track” can restrict what you hear: click the audio track’s number to focus it if that option is enabled. The Input Monitoring button doesn’t replace the Software Monitoring setting. For direct monitoring, your interface’s monitor mix must also include computer playback if you want to hear backing tracks. Use wired headphones, since Apple’s latency guidance notes that Bluetooth adds delay. If software monitoring feels late, work through the latency checks.
Set input gain with the interface, not the track fader
Sing or play at the loudest level you expect in the take, and set the interface’s input gain while watching its input meter or clipping indicator. Leave headroom for louder moments. Check the Logic track meter too, but don’t rely on a low level after plug-ins or fader changes as proof that the interface input isn’t clipping. There’s no single peak target that suits every source and interface.
The Logic track fader controls what you hear from that channel. It doesn't repair an overloaded analogue input. The interface's headphone knob changes listening level too, not microphone gain. If the recording is too quiet, check microphone distance, input type, pad, phantom power, and preamp gain before pushing the track fader.
Record and play back a short test
- Make sound and confirm the interface's input indicator responds.
- Confirm the selected Logic track meter moves.
- Confirm you hear the signal through exactly one monitoring path.
- Click Record in the control bar and capture a short phrase. Stop, turn off the track’s Record Enable and Input Monitoring buttons, move the playhead before the recorded region, and click Play. Listen to the recording, not the live input.
- Listen for clipping, hum, one-sided stereo, doubled monitoring, and obvious delay.
- Save the project before quitting. Reopen it and check that the intended interface and track input are still selected.
If the live input works but the recorded region is silent, check the track’s Record Enable and Input Monitoring buttons first, then its playback routing. Once the test recording plays correctly, the audio recording workflow covers session preparation, takes and delivery.
If the interface or meter does not appear
Keep setup and diagnosis separate. If the interface is missing from Logic's device menu, check whether it appears in Audio MIDI Setup, reconnect it directly, verify power and the data cable, and check the maker's current macOS driver. Use the complete audio interface detection checklist for that branch.
If the interface is listed but the track meter doesn’t move, check the track input, interface-mixer routing, preamp gain and microphone permission. Apple’s audio-input permission guide applies to external interfaces too: quit Logic, open System Settings > Privacy & Security > Microphone, enable Logic Pro, then reopen it. If the meter moves but you hear nothing, check the chosen monitoring path, Output Device, Stereo Out routing, interface monitor mix and headphone level.
Frequently asked questions
Why is my audio interface not showing up in Logic Pro?
The setup has failed before track routing. Check power, use a known data-capable cable, connect directly to the Mac, confirm the device in Audio MIDI Setup, install only the manufacturer's current macOS driver when required, then reopen Logic and check Settings > Audio > Devices.
Should Input Device and Output Device be the same in Logic Pro?
Usually, selecting the interface for both is the simplest option. Logic also supports separate input and output devices without an Aggregate Device. An aggregate is useful when you need to combine multiple devices into one set of inputs and outputs; it needs correct channel mapping and clock settings.
Which input should I choose in Logic Pro?
Use the input receiving your source. In a basic setup, a microphone in hardware input 2 needs Input 2 on a mono track; a stereo source in inputs 1 and 2 needs Input 1–2 on a stereo track. Check the mapping if you use an Aggregate Device or custom interface routing.
Should I use direct monitoring or Input Monitoring in Logic?
Use direct monitoring when you want minimal delay and do not need Logic effects on the live input. To hear those effects, enable Software Monitoring in Audio > General, turn on the track’s I button, and select the track if monitoring is restricted to the focused track. Avoid monitoring a second dry copy through the interface.
Do I need 48 V phantom power?
Use phantom power only when the connected microphone or active device requires it. Many condenser microphones need it; most dynamic microphones do not. Ribbon microphones vary. Check the exact microphone manual, turn monitor volume down, and turn phantom power off before connecting or disconnecting the cable.
Why does Logic hear my interface but not my microphone?
The device can be selected while the track is routed to the wrong socket. Match the hardware input and track input, record-enable the track, raise the interface preamp gain, supply phantom power only if required, and allow Logic microphone access in macOS Privacy & Security settings.
Save the working setup
Once the recorded test plays back correctly, save the project. If you regularly use the same hardware, a project template can keep your track layout and routing. Check the connected device and inputs before each session anyway. The Recording & Editing hub has the next steps for vocals, punch-ins, takes, editing and export.


