Audio MIDI Setup for Logic Pro: Devices and Aggregate I/O
Choose the correct Mac audio or MIDI device, build Aggregate I/O without clock mistakes, map channels, and test ports before opening a session.

Use Audio MIDI Setup when Logic Pro needs a device configuration that macOS must understand first: checking an interface's channels and sample rate, combining hardware in an Aggregate Device, sending playback to several outputs, or defining external MIDI port connections. Then select the finished audio device in Logic Pro > Settings > Audio > Devices.
One interface is usually the cleanest setup. Build an aggregate only when you genuinely need inputs or outputs from more than one audio device.
What Audio MIDI Setup does for Logic Pro
Audio MIDI Setup is a macOS utility in Applications > Utilities. Its Audio Devices window lists the Core Audio devices the Mac can use, and its MIDI Studio window lists MIDI interfaces, ports and external devices. Logic reads those system-level devices, then adds its own recording, monitoring and project settings.
This division saves time when something is wrong:
- If an interface is absent from Audio Devices, changing an input on a Logic channel strip cannot make the Mac detect it.
- If the interface exists in macOS but Logic is using Built-in Output, change Logic's Audio Devices settings.
- If MIDI Studio receives a note but Logic does not, the physical USB or DIN connection is alive and the next check belongs inside Logic.
- If you see no MIDI activity, select the correct configuration and enable Test MIDI Setup before checking the connection. An inactive test is not evidence of a bad cable.
Audio MIDI Setup doesn't install a missing manufacturer driver, repair a damaged cable or decide which Logic track should record Input 5. It also controls device formats and speaker assignments, with volume controls where the hardware supports them. Those settings do not replace the input selection on a Logic track.
One device, Aggregate Device or Multi-Output Device?
| Need | Choose | What Logic receives |
|---|---|---|
| Record and monitor through one interface | The interface itself | Its inputs and outputs with the least routing complexity |
| Use inputs or outputs from two or more devices | Aggregate Device | One virtual Core Audio device with combined channels |
| Play the same Mac output through several output devices | Multi-Output Device | A playback destination, not extra recording inputs |
| Name or connect DIN MIDI instruments and ports | MIDI Studio | MIDI destinations and sources, not audio channels |
Apple's current Logic device guide advises avoiding different input and output devices when possible. That's a preference for a simpler, clock-consistent path, not a claim that separate devices can never work. If one interface covers the session, select it for both input and output.
Check the audio device in macOS first
- Connect and power the interface. Install current manufacturer software only when the model requires it.
- Open Applications > Utilities > Audio MIDI Setup.
- Choose Window > Show Audio Devices if the Audio Devices window is hidden.
- Select the interface in the sidebar.
- Confirm that the displayed input and output channel counts match the hardware you expect.
- Check Format and Clock Source. Do not change sample rate during an active recording merely to make two panels look alike.
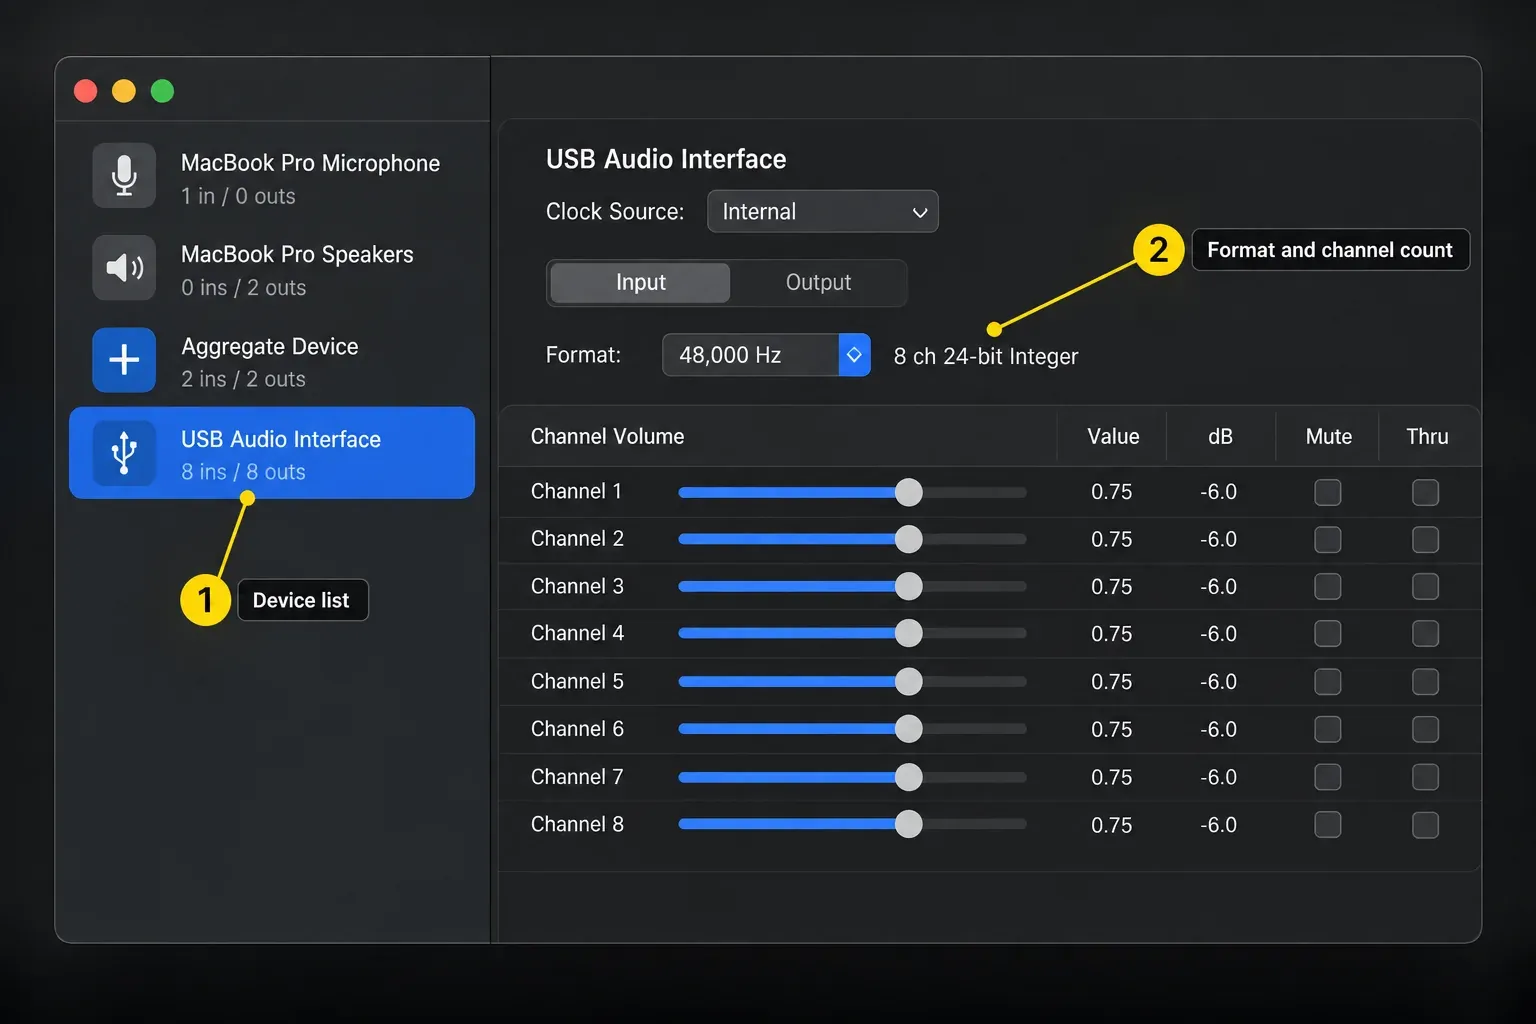
The system-use commands at the bottom of this window can set a device for macOS input, output or alert sounds. Logic still has its own device selectors. If the interface is missing here, use the focused audio-interface detection checklist before creating an aggregate.
Select the device in Logic Pro
- Open Logic Pro > Settings > Audio.
- Open the Devices pane.
- Enable Core Audio if it is disabled.
- Choose the interface or aggregate from Output Device.
- Choose the same device from Input Device when it provides the required inputs.
- Click Apply if Logic presents the button, then check the track input list.
Changing the device can change the meaning of Input 1, Input 2 and every output number in the project. Before a session, verify one microphone or line input end to end: hardware socket, device channel, Logic channel-strip input and monitor path. The audio-interface connection guide covers gain, monitoring and the first recording after detection.
I/O buffer size belongs in Logic's Audio Devices pane, not Audio MIDI Setup. Lower values can reduce monitoring latency but increase CPU pressure. Higher values give the system more processing room. Choose it by testing the current project and interface, not by copying a value from someone else's setup.
Create an Aggregate Device for combined I/O
An Aggregate Device makes several Core Audio devices appear to Logic as one device. Apple's current aggregate guide uses the example of combining an eight-channel and a two-channel device into one ten-channel device.
- Confirm that every member works by itself in Audio MIDI Setup.
- In the Audio Devices window, click the Add button at the bottom of the sidebar.
- Choose Create Aggregate Device.
- Rename it for the actual job, such as Interface + USB Mic.
- Select the Use checkbox for each device that belongs in the aggregate.
- Use matching sample rates where the devices support them. The current macOS guide also allows different or fixed rates when synchronization converts them to the primary source’s rate.
- Choose one primary timing device: Clock Source in older macOS interfaces, or Sync Source in the current guide.
- Set synchronization according to each member’s sample rate and hardware-sync state. In older interfaces, leave Drift Correction off for the selected Clock Source.
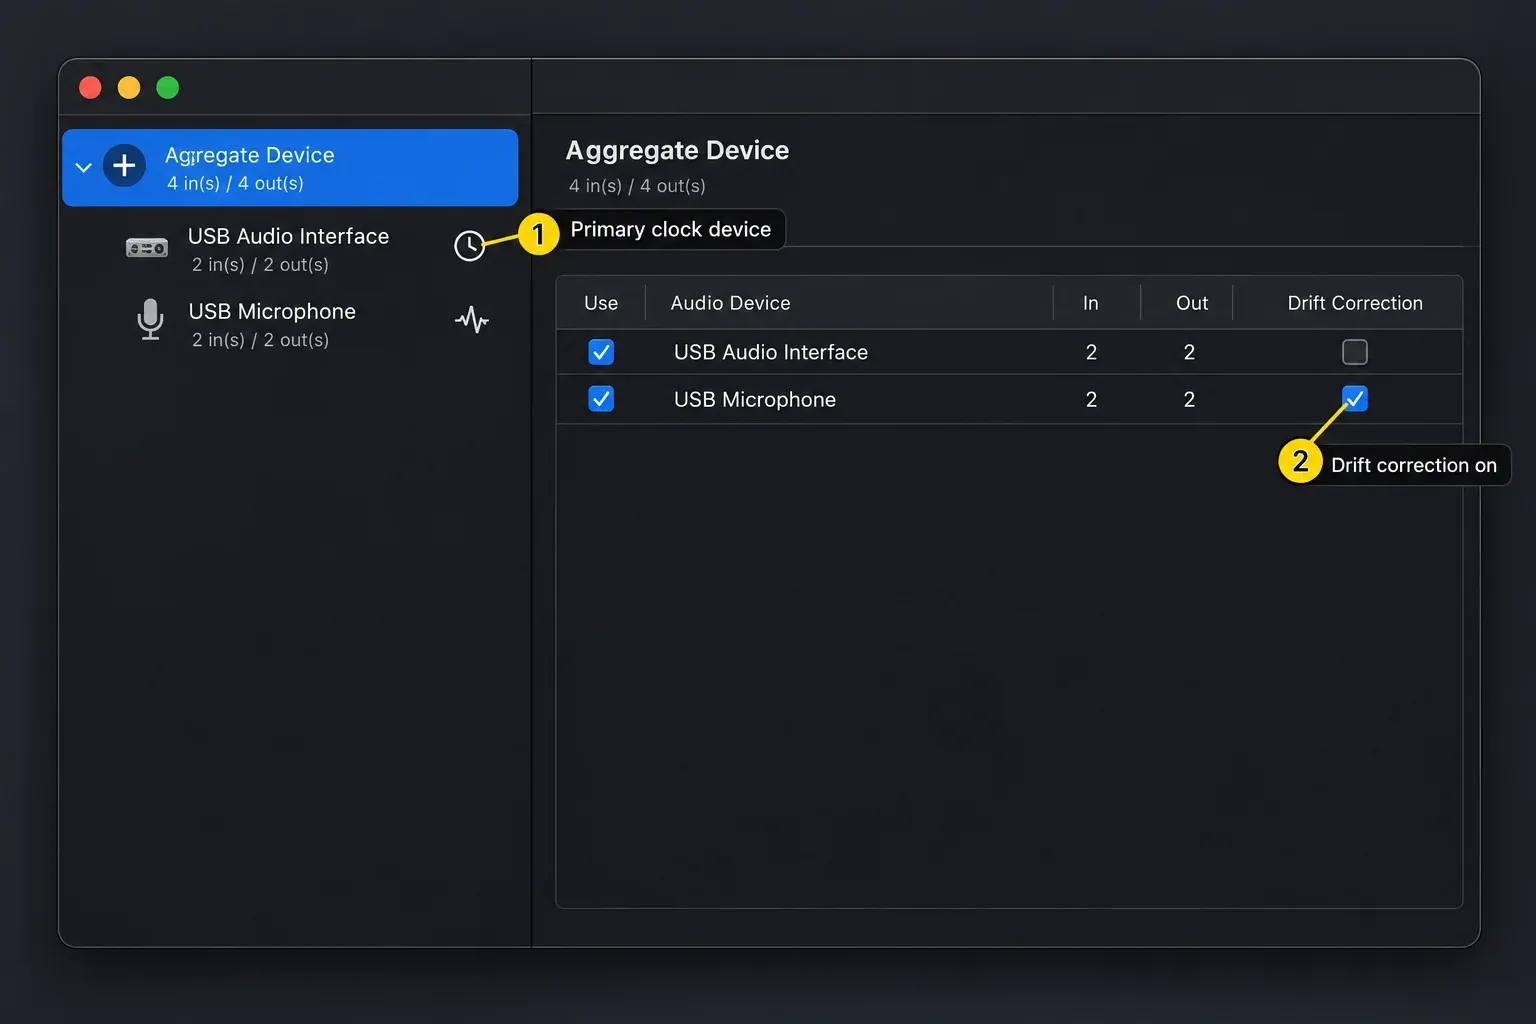
Do not add Built-in Microphone, display audio, Bluetooth devices and every interface simply because they're listed. Each member adds channels and another dependency. Include only hardware the session will use.
Set clock source and drift correction correctly
The current macOS guide calls the controls Sync Source and Sync; older interfaces use Clock Source and Drift Correction. Digital devices don't run at perfectly identical rates unless they share synchronization. Over time, unsynchronized streams can drift, click or lose alignment. Apple's aggregate settings guide gives three distinct cases:
- No devices share hardware sync: choose the device with the most reliable clock and enable the available Sync controls. In older interfaces, enable Drift Correction for the other members.
- Some devices share hardware sync: choose the hardware synchronization's primary clock and synchronize members outside that group. Different sample rates also need synchronization for rate conversion.
- All devices share hardware sync: choose that primary clock; with matching sample rates, leave drift correction off. Different rates still need synchronization for rate conversion.
Those conditions are more accurate than the common shortcut “turn drift correction on for everything.” The clock-source member is the timing reference. If the interfaces support word clock and the studio uses it, follow each manufacturer's termination and cabling instructions before changing macOS settings.
Apple’s older aggregate setup instructions explicitly exclude the selected clock source from Drift Correction. Its current macOS guide uses Sync for drift correction and sample-rate conversion. Follow the labels on your Mac: choose one primary timing source and synchronize the other members as their hardware-sync state requires.
Map aggregate channel numbers before recording
The order of devices inside the aggregate determines how their channels are numbered in Logic. If a four-input interface comes first, its inputs may occupy Inputs 1-4. A two-input device that follows may appear as Inputs 5-6. Reordering or removing members can change the map.
In the aggregate’s horizontal layout, drag a device left or right under Subdevices to change its order. If you are using the vertical layout, click Set horizontal layout first. Moving a device left gives it lower channel numbers. Note the resulting ranges before changing track inputs.
- Open the aggregate and note each member's input and output channel range.
- Create a short channel map in the session notes.
- Select the aggregate in Logic.
- Name recording tracks by source and physical socket, such as Vocal - Interface B Input 1.
- Send signal through one socket at a time and confirm the intended Logic meter moves.
- Record a brief test, play it back and confirm monitoring reaches the correct outputs.
Do this before musicians arrive. A working aggregate with an undocumented channel order is still an easy way to record silence or the wrong microphone.
Use a Multi-Output Device only for shared playback
A Multi-Output Device sends the same output stream to more than one destination. Apple's current setup guide describes choosing a primary device and adding output devices to the stack. It doesn't combine their recording inputs.
- In Audio MIDI Setup, choose Window > Show Audio Devices.
- Click Add (+) below the sidebar, then choose Create Multi-Output Device.
- Select the new device and tick Use for each playback destination you need.
- Choose the main output from the Primary Device menu and give the device a recognizable name.
- In Logic Pro > Settings > Audio > Devices, choose the Multi-Output Device as Output Device. Keep a real recording interface selected as Input Device if you need to record, then click Apply when shown.
- Start playback at a low level and confirm each intended destination receives the signal.
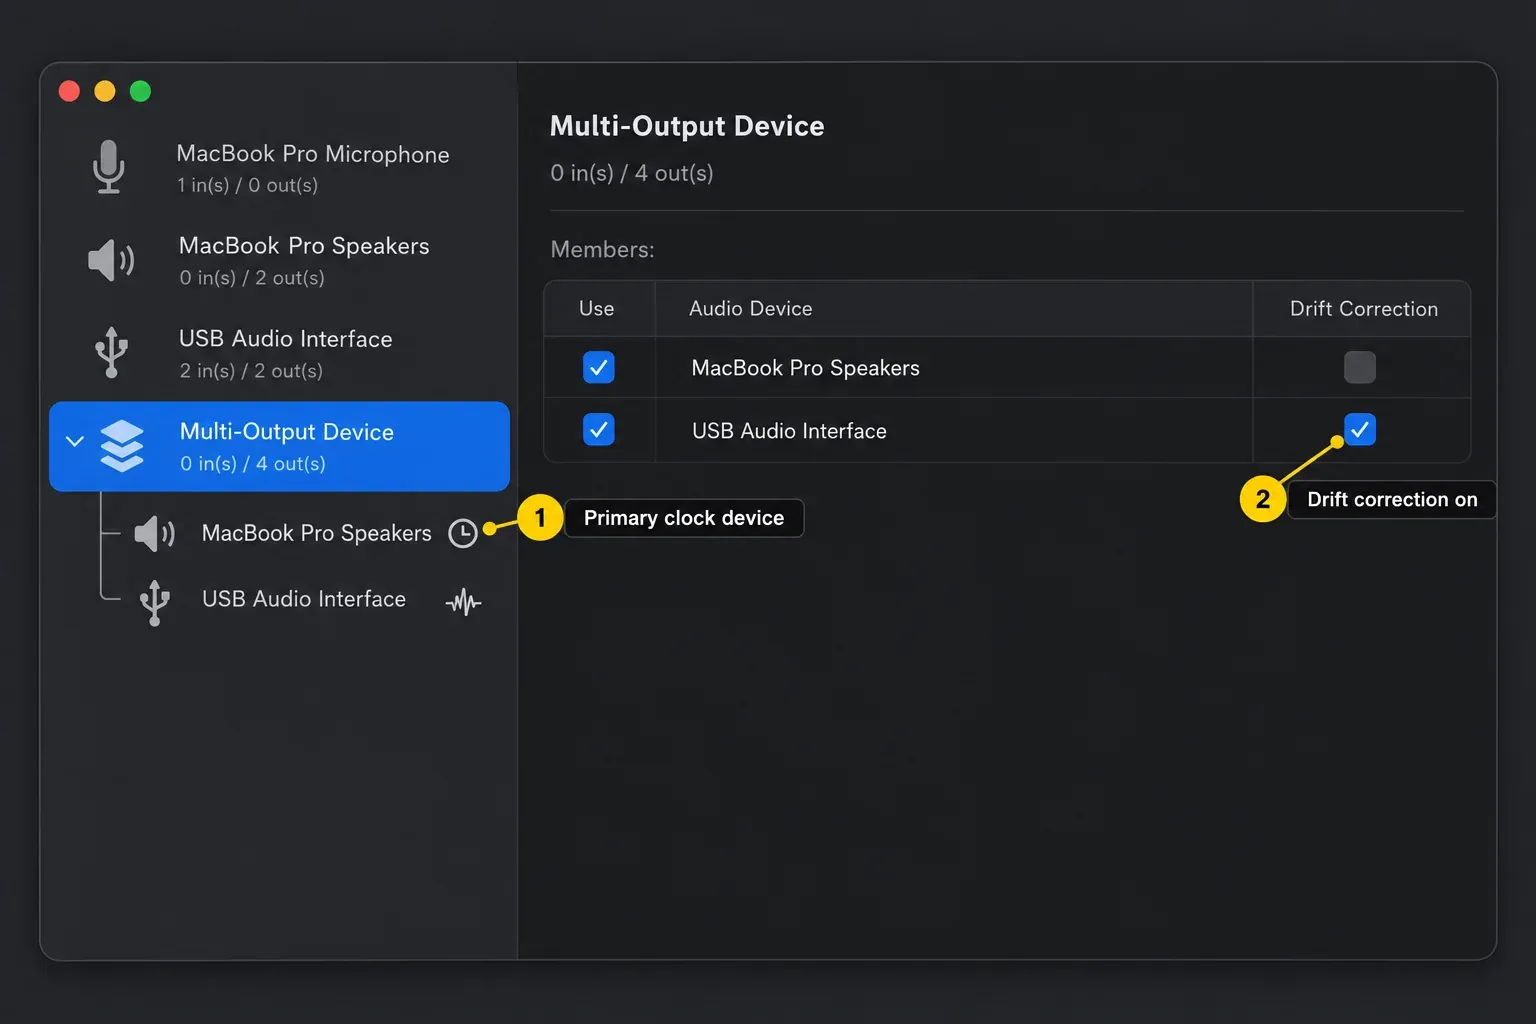
Use it when the same Mac playback must reach two speaker systems or another output destination. Do not assume their acoustic arrival will align. Different devices and wireless paths can add different latency, so two speaker pairs may comb-filter when heard together in one room. Measure or audition the actual monitoring arrangement.
Use MIDI Studio for ports and external instruments
Choose Window > Show MIDI Studio. A USB MIDI interface is normally detected automatically. Its visible In and Out ports represent physical or virtual MIDI connections. An external synthesizer connected through five-pin DIN is different: the Mac detects the interface, and you can add an external device icon and connect its ports to document the real cable path.
- In MIDI Studio, choose the configuration you want to edit and switch to Icon View.
- For a DIN-connected instrument, click Add to create an external device. Do not add a duplicate of an automatically detected USB interface.
- Double-click the external device, or select it and click Device Info. Name it so you can identify the instrument later.
- Open Ports and add the MIDI In and MIDI Out connectors that match the actual hardware. Click Apply.
- Drag a connector between the interface and external device icons to match each real cable: interface Out to instrument In, and instrument Out to interface In when that return cable is connected.
- Run the MIDI test below. A line between icons describes the connection; it cannot repair a missing physical cable or an undetected USB interface.
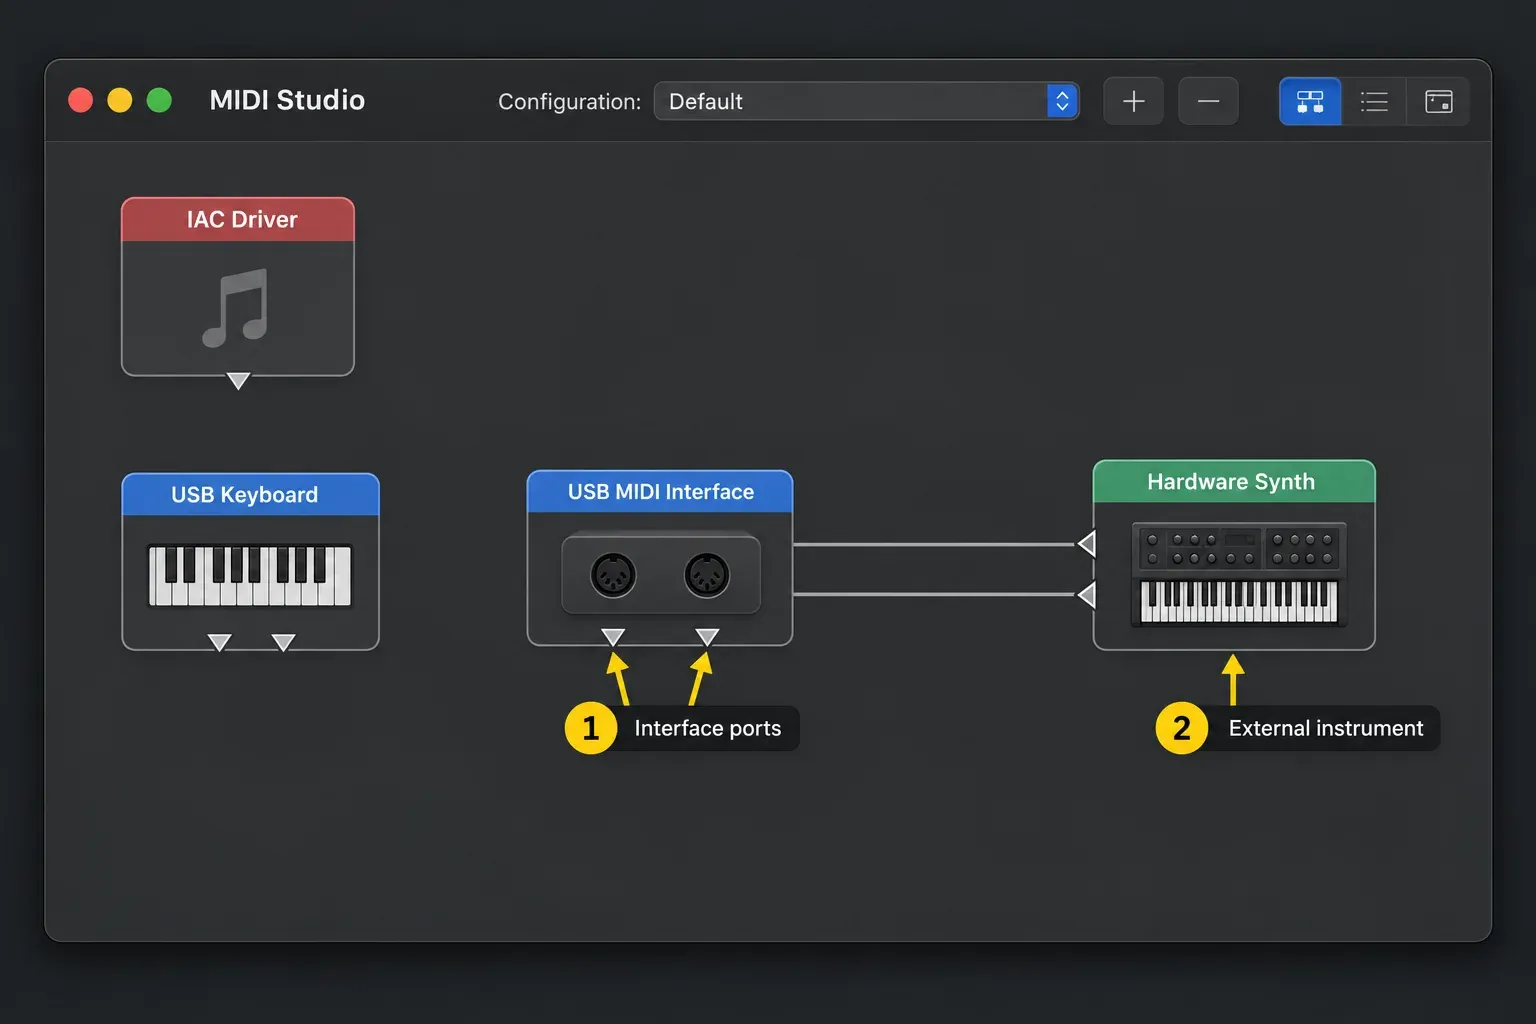
A MIDI cable carries notes, controllers, clock and related messages. It doesn't carry the synthesizer's audio. To hear and record an external synth, connect its audio outputs to an audio interface as well. The MIDI controller guide continues from a working port into recording and assignments.
Test MIDI In and Out before editing Logic
- Open MIDI Studio and select the correct configuration.
- Click Test MIDI Setup in the toolbar.
- Play the connected controller. Apple's MIDI connection test says the device's up arrow, its In port, highlights when data arrives.
- To test an Out port, click the down arrow on the device icon. The connected hardware should show MIDI activity and may sound if its audio path and receive channel are ready.
- Turn Test MIDI Setup off when finished.
If a connected USB MIDI interface is missing, Apple's current recovery steps start with Window > Show MIDI Studio and Rescan MIDI, followed by power, connection and required manufacturer software. Do not create a decorative external-device icon and treat it as a replacement for a missing USB driver.
If the port passes this test but Logic doesn't react, use the Logic MIDI keyboard troubleshooting guide for Logic inputs, control-surface conflicts and track state.
Keep Logic projects portable when device names change
A project can open when its original interface is absent, but its physical input and output choices may no longer describe the connected hardware. Check the recording inputs and headphone outputs too; hearing playback does not prove they are still assigned correctly.
- Keep track names based on the source rather than an interface channel number alone.
- Save the aggregate member order and channel map with the session notes.
- When moving to another Mac, install required drivers and recreate the device configuration before opening the important project.
- Check every hardware insert, external MIDI destination, headphone output and multichannel output after a device change.
- Record a short labeled test file through each required input before the real take.
Renaming an aggregate to something clear helps people choose it, but the name doesn't preserve missing member devices. If a laptop setup and studio setup use different hardware, create distinct, documented configurations rather than repeatedly changing one aggregate before each session.
Troubleshoot in the layer that failed
- Hardware: power, cable, adapter, USB or Thunderbolt port and manufacturer compatibility.
- macOS audio: device presence, channel count, format and clock in Audio Devices.
- macOS MIDI: interface presence, port connection, Rescan and Test mode in MIDI Studio.
- Aggregate: member availability, common sample rate, clock source, drift correction and channel order.
- Logic audio: Input Device, Output Device, Core Audio, track input and monitoring.
- Logic MIDI: incoming activity, selected software instrument track, MIDI input filters and control-surface assignments.
Change one layer at a time and test again. Deleting MIDI configurations or aggregates as a first step destroys useful evidence and may change port names used by existing projects.
Frequently asked questions
Do I need Audio MIDI Setup to use Logic Pro?
Not for every session. A compatible interface or USB MIDI controller often appears automatically. Use Audio MIDI Setup to verify devices, inspect formats and ports, create aggregate or multi-output devices, and document external MIDI connections.
What is the difference between an Aggregate Device and a Multi-Output Device?
An Aggregate Device combines discrete inputs and outputs from several Core Audio devices into one device for an app such as Logic. A Multi-Output Device sends the same playback stream to several output devices and does not combine their recording inputs.
Can Logic Pro use two audio interfaces at once?
Yes, when macOS can combine them in an Aggregate Device. Test each interface alone first and use matching sample rates where possible. Choose one Clock Source or Sync Source, configure synchronization for clock drift or different sample rates, and map the resulting channel numbers before recording.
Should drift correction be enabled on every aggregate member?
Follow the labels and available controls on your Mac. Older Clock Source/Drift Correction instructions exclude the selected source and correct unsynchronized followers. The current Sync controls also convert different sample rates; choose a primary Sync Source and enable synchronization where needed. If every member shares hardware synchronization and the same sample rate, drift correction is unnecessary.
Why does MIDI Studio show activity but I hear no sound?
MIDI activity proves that messages are moving, not that audio is connected. A hardware synth also needs its audio outputs connected to an interface or speakers, the correct receive channel, a playable patch and a working monitor path.
Why does Logic not show my Aggregate Device?
Confirm that it still exists in Audio MIDI Setup and that every included member is available. Then reopen Logic's Audio Devices pane. If a member was disconnected or its driver failed, repair that device first rather than repeatedly rebuilding the aggregate.
Pre-session setup checklist
- Every required audio and MIDI device appears in Audio MIDI Setup.
- Manufacturer drivers and firmware match the current macOS installation where required.
- One interface is used unless the session has a real multi-device requirement.
- Use matching aggregate sample rates where possible; if a device has a different fixed rate, enable synchronization as described in the current macOS guide.
- One clock source is selected and drift correction matches the hardware-sync state.
- Aggregate input and output channel numbers are documented.
- Logic uses the intended Input Device and Output Device.
- A short audio recording and playback test reaches the correct sockets.
- MIDI In and Out ports pass MIDI Studio Test mode where needed.
- External MIDI instruments have a separate working audio path.
Continue through the Logic Pro Recording & Editing hub for tracking and delivery workflows, or use the Troubleshooting hub when a verified macOS device still fails inside Logic.


