Connect a Hardware Synth to Logic Pro: MIDI, Audio Return and Clock
A hardware synth becomes predictable in Logic Pro when MIDI, audio return and clock are configured as separate paths. This guide shows the complete route and the fixes that matter when it is silent, doubled or out of time.

Connecting a hardware synthesizer to Logic Pro is straightforward once you separate the job into three paths: MIDI goes to the synth, audio comes back through an interface, and MIDI Clock is added only when the hardware needs Logic's tempo. Treat those as separate decisions and the setup stops feeling mysterious.
The shortest complete route is:
- Connect MIDI or USB MIDI so Logic can send notes, program changes and automation to the synth.
- Connect the synth's audio outputs to the inputs of your audio interface.
- Create an External Instrument or MIDI track for the performance, then create an audio return track for monitoring and recording.
- Turn on MIDI Clock only if the synth's arpeggiator, sequencer or delay should follow the Logic project tempo.
If the synth is silent, start by asking which path is missing. MIDI can be working while audio is unplugged. Audio can be present while monitoring is off. The synth can sound correct while its tempo stays independent because clock was never sent.
Connect the hardware before opening Logic Pro
First identify what the synth actually sends and receives. A five-pin MIDI cable carries control data, not sound. A USB connection may carry MIDI, and some instruments also expose USB audio, but those are still separate choices inside Logic. If you use the synth's analog outputs, the audio interface is the bridge back into the project.
For a conventional hardware-synth setup, prepare these connections:
- Connect the computer to the MIDI input of the synth with USB MIDI or a MIDI interface.
- Connect the synth's left and right audio outputs to two line inputs on the audio interface when you want stereo.
- Connect headphones or monitor speakers to the interface that receives the synth return.
- Set the synth to the intended MIDI channel and confirm whether Local Control should remain on or be disabled for your chosen monitoring route.
That last decision belongs to the instrument. Logic cannot compensate for a synth that is listening on another MIDI channel, and a keyboard with Local Control still enabled can play its internal sound while Logic also sends the same notes back. For a broader device check, the Audio MIDI Setup guide for Logic Pro explains how macOS exposes MIDI devices before you troubleshoot a project. If you are playing the hardware from a separate keyboard, the MIDI controller setup guide covers the same destination and input logic from the controller side.
Open Logic only after the cables and the interface input assignment are clear. This makes the first test smaller: send one note, watch for MIDI activity, then listen for one audio return.
Send MIDI from Logic Pro to the hardware synth
There are two useful ways to build the MIDI side. An External Instrument channel strip keeps the MIDI destination and audio return conceptually together. A separate MIDI or software instrument track plus a separate audio track makes the signal flow more visible while you are diagnosing it. Both approaches can work; the important part is selecting the correct MIDI destination and channel.
On the MIDI side, create a software instrument or external MIDI track, then choose the port and channel that lead to the synthesizer. Record or draw a short MIDI region and play it back. You should see MIDI activity in Logic and activity on the synth. No audio is expected yet unless the return path is connected. When you want to capture the keyboard performance before routing the hardware audio, the guide to recording MIDI in Logic Pro explains that editable step.
Apple describes MIDI devices in Logic Pro as control and communication paths for external gear. The practical implication is simple: a selected MIDI destination proves that notes are leaving Logic, but it says nothing about whether the synth's audio has reached an interface input.
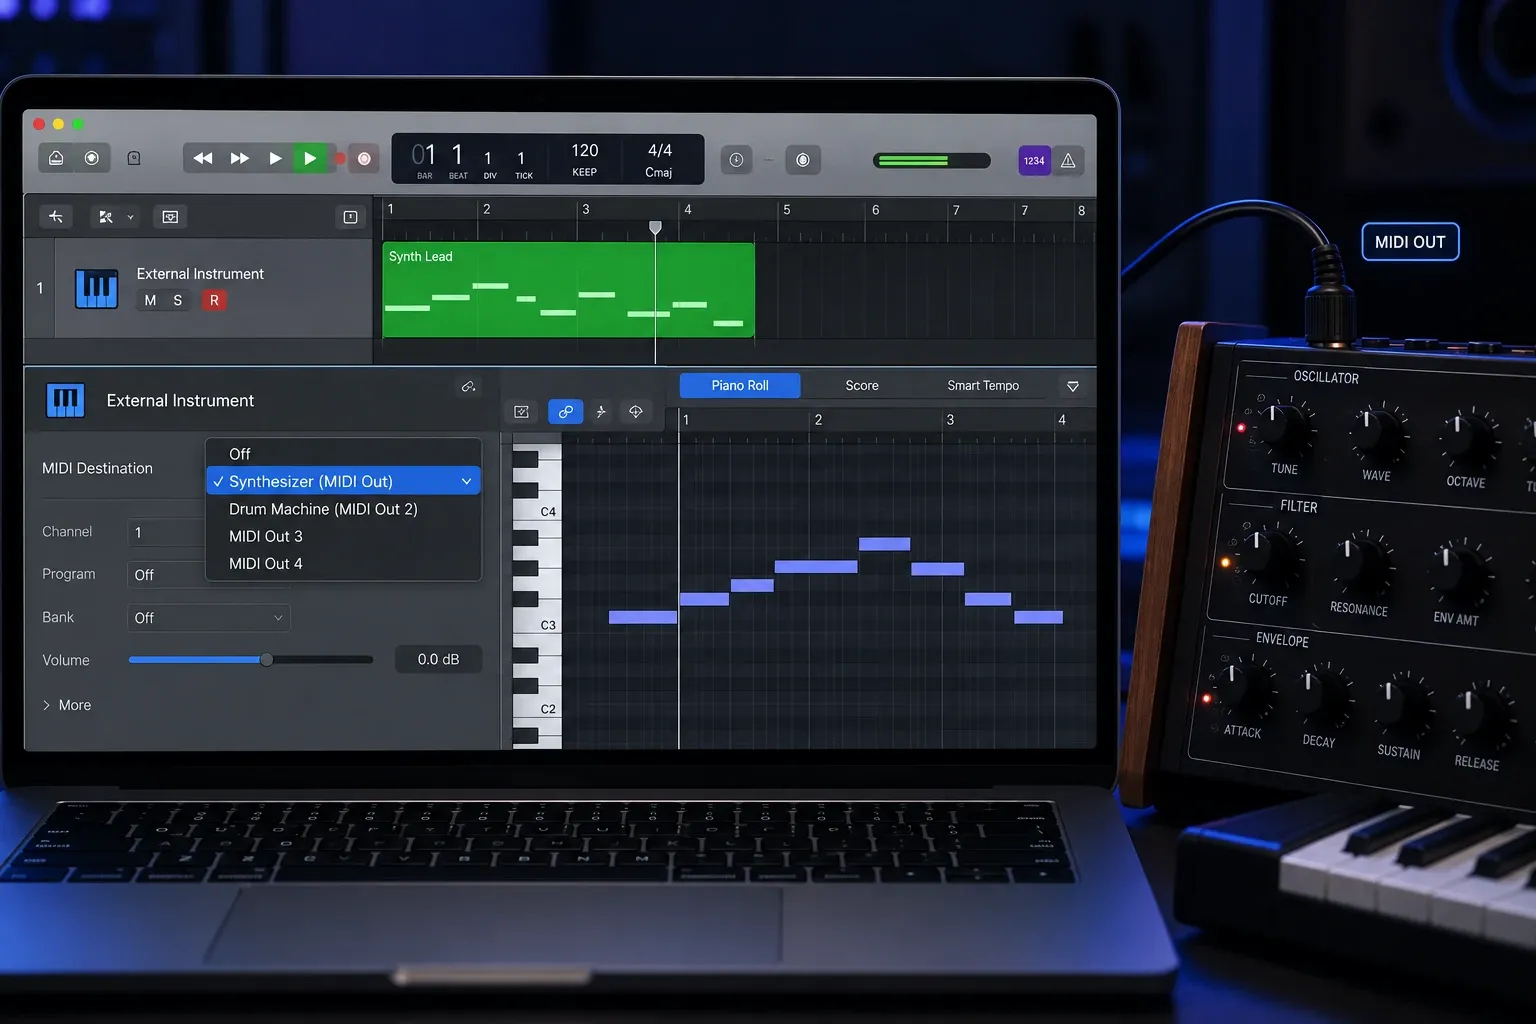
If you use External Instrument, open the channel strip and set its MIDI destination to the synth. Then choose the audio input that receives the synth return. Apple’s External Instrument documentation explains the combined channel-strip approach. It is convenient for playing the part, while separate tracks are often easier when you need to record, compare or troubleshoot the return.
Keep the first MIDI test short. A one-bar pattern with a single note gives you a clean answer about routing. A full arrangement can hide a wrong channel, a stuck note or a doubled local performance behind too much activity.
Return the synth audio through your interface
Now create the audio path. Plug the synth's output into the interface input you intend to use, then choose that input on an audio track in Logic. For a stereo patch, use a stereo audio track and the paired inputs. For a mono synth output or a mono part, use one input and a mono track.
Set the interface gain conservatively while the loudest part of the patch is playing. Leave enough headroom for filter resonance, velocity changes and effects tails. The goal is a clean return with no clipping, not the loudest possible meter.
- Create an audio track in Logic.
- Choose the interface input receiving the synth output.
- Enable input monitoring when you need to hear the live return through Logic.
- Play the MIDI region and watch the audio meter on the return track.
When the meter moves but you hear nothing, the fault is now narrowed to monitoring or output routing. When the meter stays still, check the cable, the interface input, the synth output level and the selected input number. The LogicPros audio-interface setup guide covers the macOS and Logic device-selection layer that sits underneath this track setup.
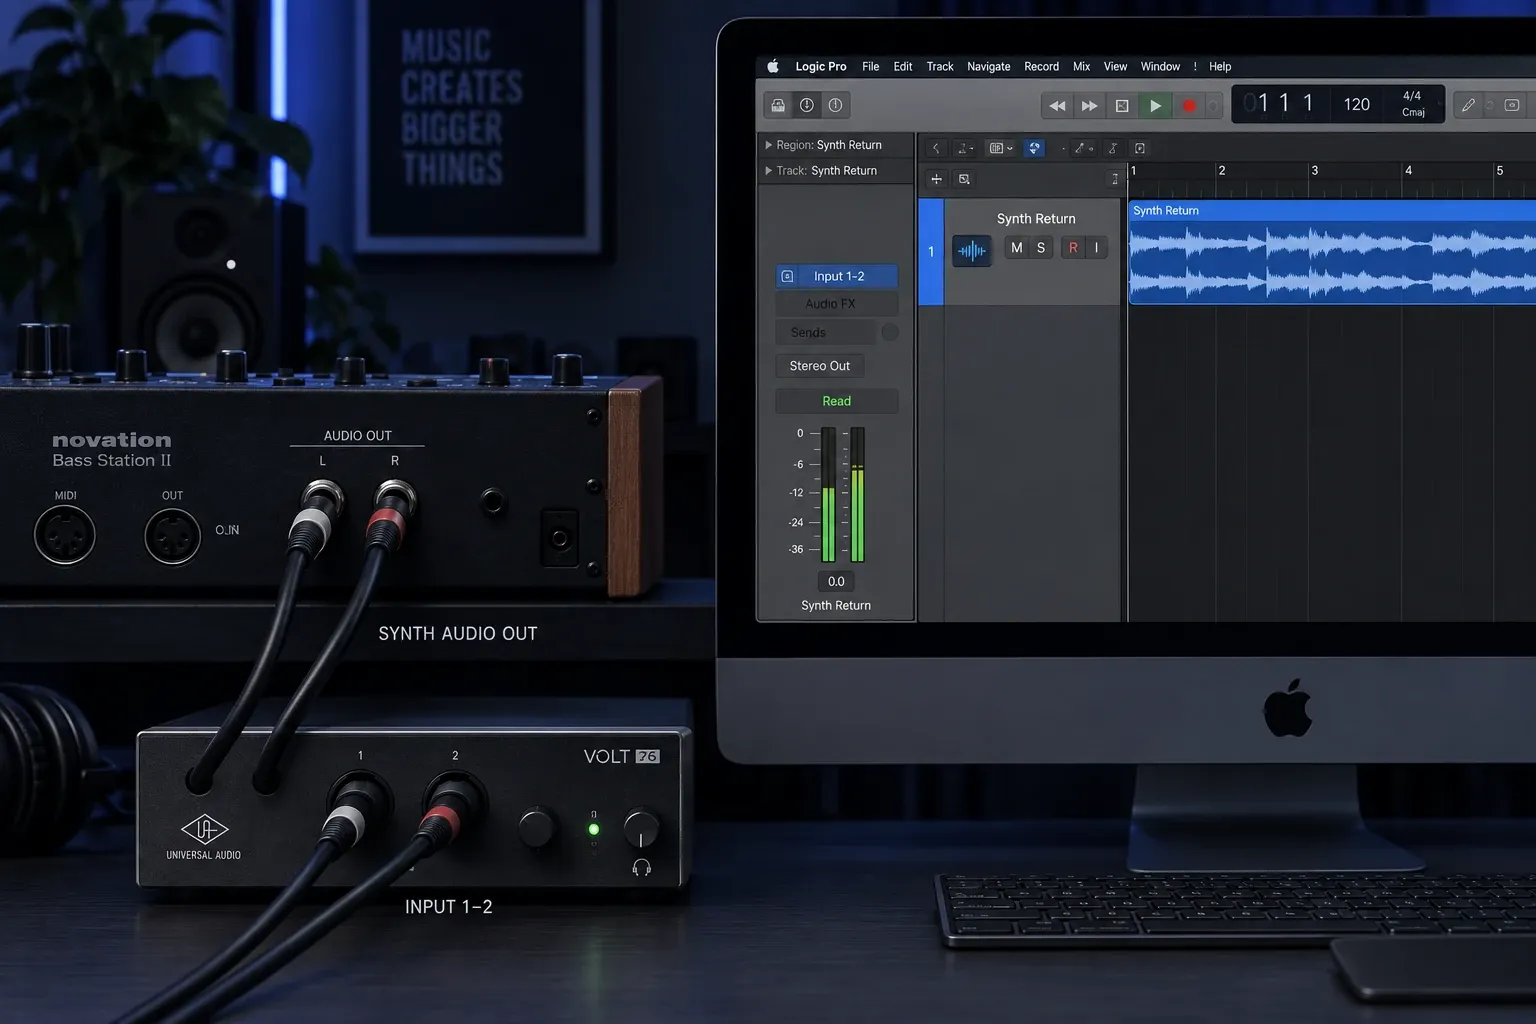
External Instrument can make this return feel like one instrument, but the underlying signal still follows the same route: MIDI leaves Logic, the synth creates sound, and audio returns through an input. Keeping that model in mind makes later recording and latency decisions much easier.
Choose one monitoring path
Monitoring is where many otherwise correct setups become confusing. You can monitor the synth through Logic, or you can monitor it directly from the audio interface. If both paths are active, you may hear a doubled sound, a short slapback or a comb-filtered tone. If neither is active, the meters can move while the speakers stay silent.
Use Logic monitoring when you need software effects, sends or the same mix balance that will be recorded. Turn on input monitoring for the audio return track and make sure the track output reaches the interface master output. Apple’s input-monitoring guide separates input monitoring from record enable: monitoring lets you hear the input, while record enable prepares the track to capture it.
Use direct monitoring when the interface provides a hardware mix and you want the shortest path while playing. In that case, avoid also monitoring the same return through Logic. The names vary by interface, but the rule is stable: one audible path for the live return is easier to judge than two.
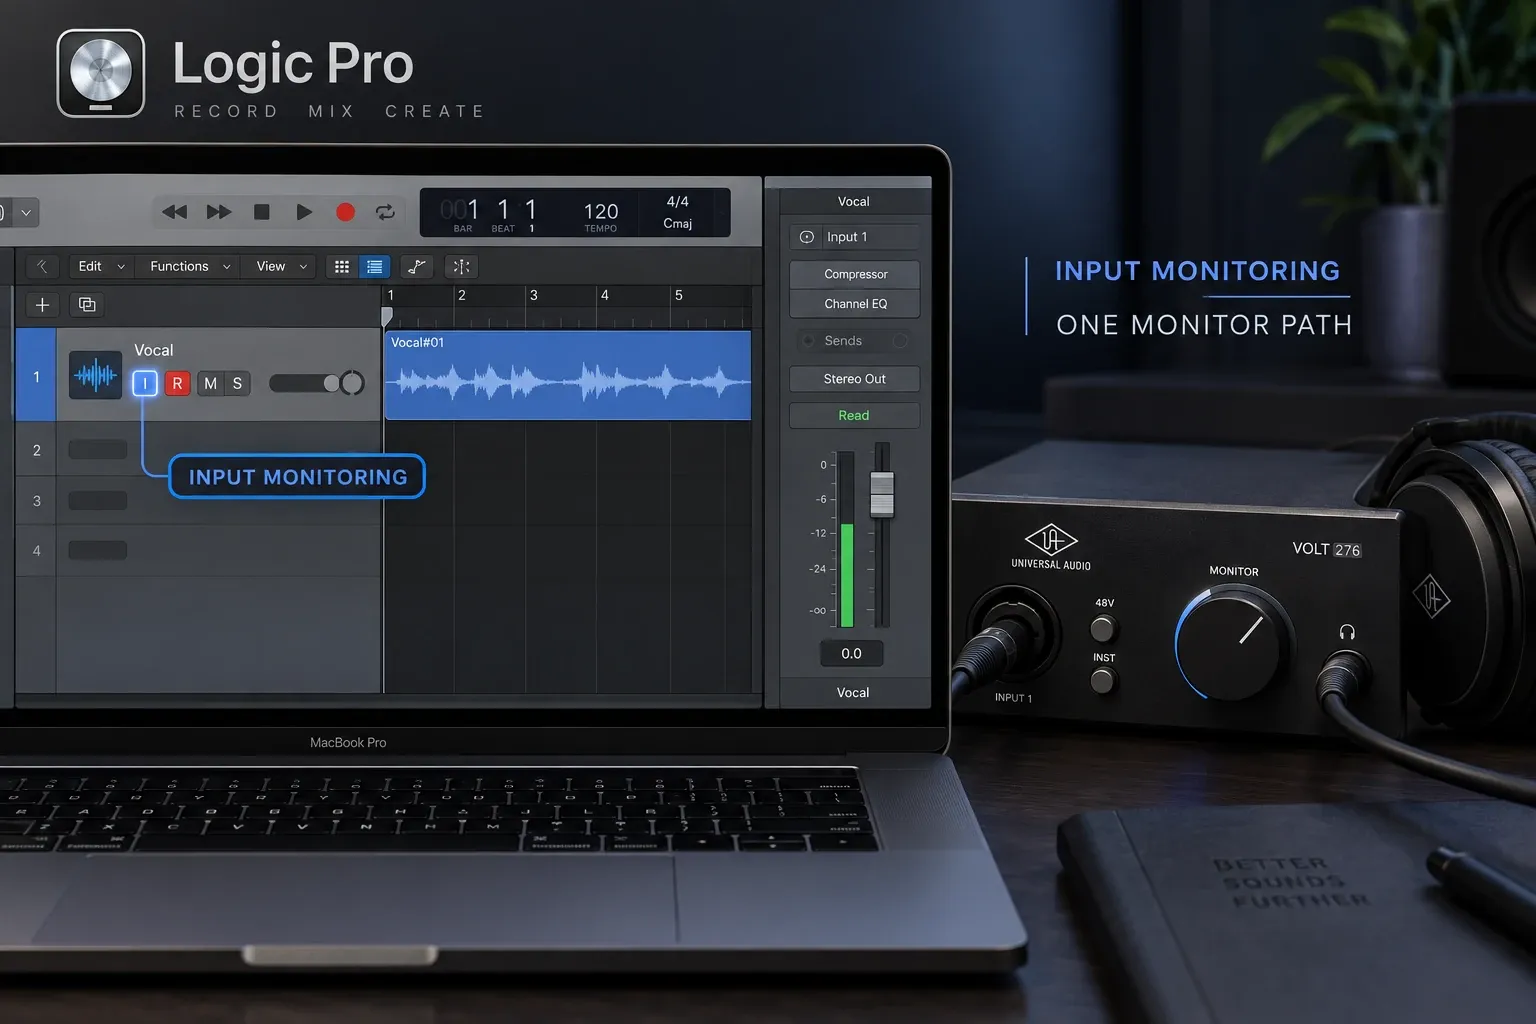
A feedback loop is different from ordinary doubling. It happens when the return is sent back toward the synth input or when an interface mix routes its own return into the output that feeds the instrument. Lower the monitor level immediately, mute the return, and trace the input and output assignments one step at a time. A safe default is to send the synth return to the main mix while keeping the synth's physical input path one-way.
Match latency to the way you monitor
The MIDI event and the audio return do not arrive at exactly the same point in the project. Logic schedules the MIDI message, the synth generates the sound, the interface converts it, and the audio buffer delivers it to the monitoring path. A larger buffer can make live playing feel less immediate; a smaller buffer can reduce the delay while increasing the load on the computer.
For a practical setup, choose the smallest stable buffer that gives you the software effects you need while playing. If you use direct monitoring, the live feel is determined mainly by the interface path, while Logic still records against the project timeline. If the recorded return consistently lands late, inspect the interface and track delay settings instead of moving every region by guesswork.
The Logic Pro sample-rate and buffer-size guide explains the tradeoff between responsiveness, plug-in load and stable playback. You do not need to change the sample rate just because the synth is external; it should match the project and the interface unless a specific device workflow requires something else.
Send MIDI Clock only when the synth needs it
MIDI Clock is a tempo reference, not a replacement for MIDI notes and not an audio connection. Use it when the synth's arpeggiator, sequencer, synced delay or modulation should follow the Logic project. Leave it off when the hardware should run freely or when another device is meant to be the tempo master.
When Logic is the master, set the project tempo first. The Logic Pro project-tempo settings determine the tempo that the project plays and records against. If you need to change the BPM while building the arrangement, the Logic Pro tempo and BPM guide shows where that project control lives. Then open the project synchronization settings and enable MIDI Clock for the destination port that leads to the synth.
Apple’s current guide to synchronizing external MIDI devices with Logic Pro covers MIDI Clock, MTC and MMC destinations. It also allows a separate delay value for a clock destination. Treat that value as a timing correction for the device, not as a general latency control for the audio return. Start with the default and change it only when the rhythmic behavior gives you a reason.
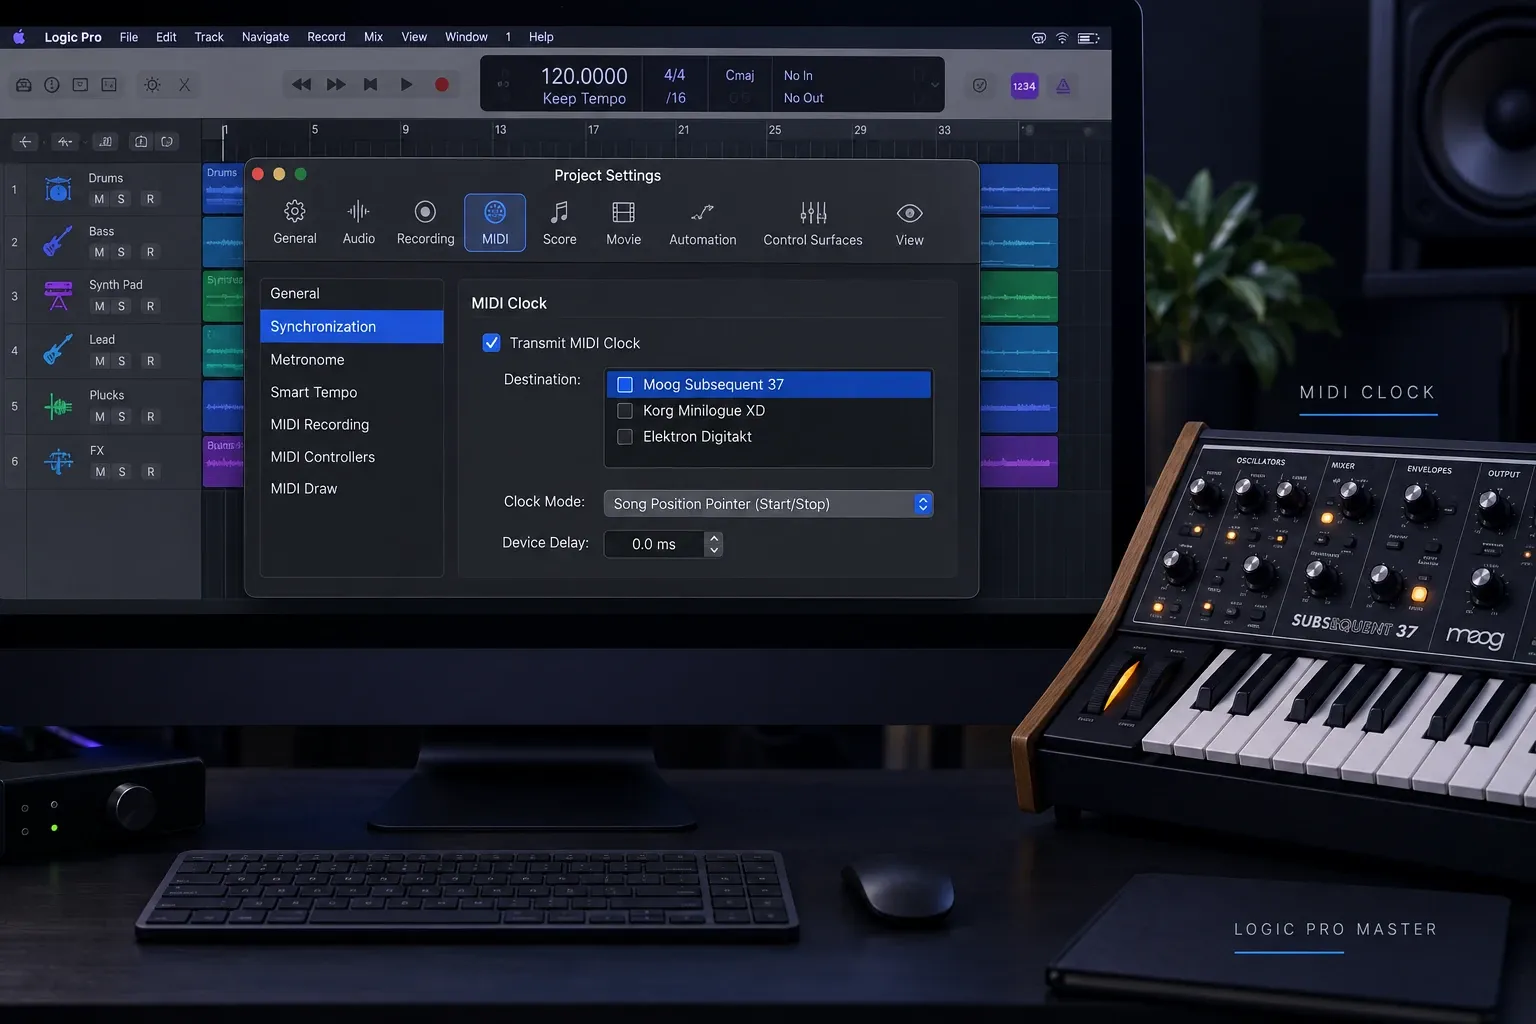
Choose one clock master. If the synth is sending clock while Logic is also sending clock, the two tempo sources can fight. If the synth's own sequencer starts at the wrong point, check transport and clock settings together: tempo answers how fast it runs, while transport messages determine when it starts and stops when those messages are enabled.
Record the hardware synth return
Keep the MIDI performance on its own track and record the synth's audio on a separate audio track. That gives you two useful forms of control: you can correct notes, articulation or the MIDI channel later, and you can edit the captured sound as audio without losing the original performance.
- Keep the MIDI or External Instrument track available for playback.
- Create or select the audio return track with the correct interface input.
- Choose one monitoring path and check that the return is not routed back to the synth.
- Record enable the audio return track.
- Start recording and let the complete phrase play through the synth.
- Stop, then name the audio region with the patch and take information you will need later.
Do not record the return onto a track that sends its output into the synth's input path. The audio track should normally go to the main mix, a bus or another safe destination. If you need several passes, keep the MIDI region unchanged and make new audio takes so the sound, effects and performance choices remain comparable.
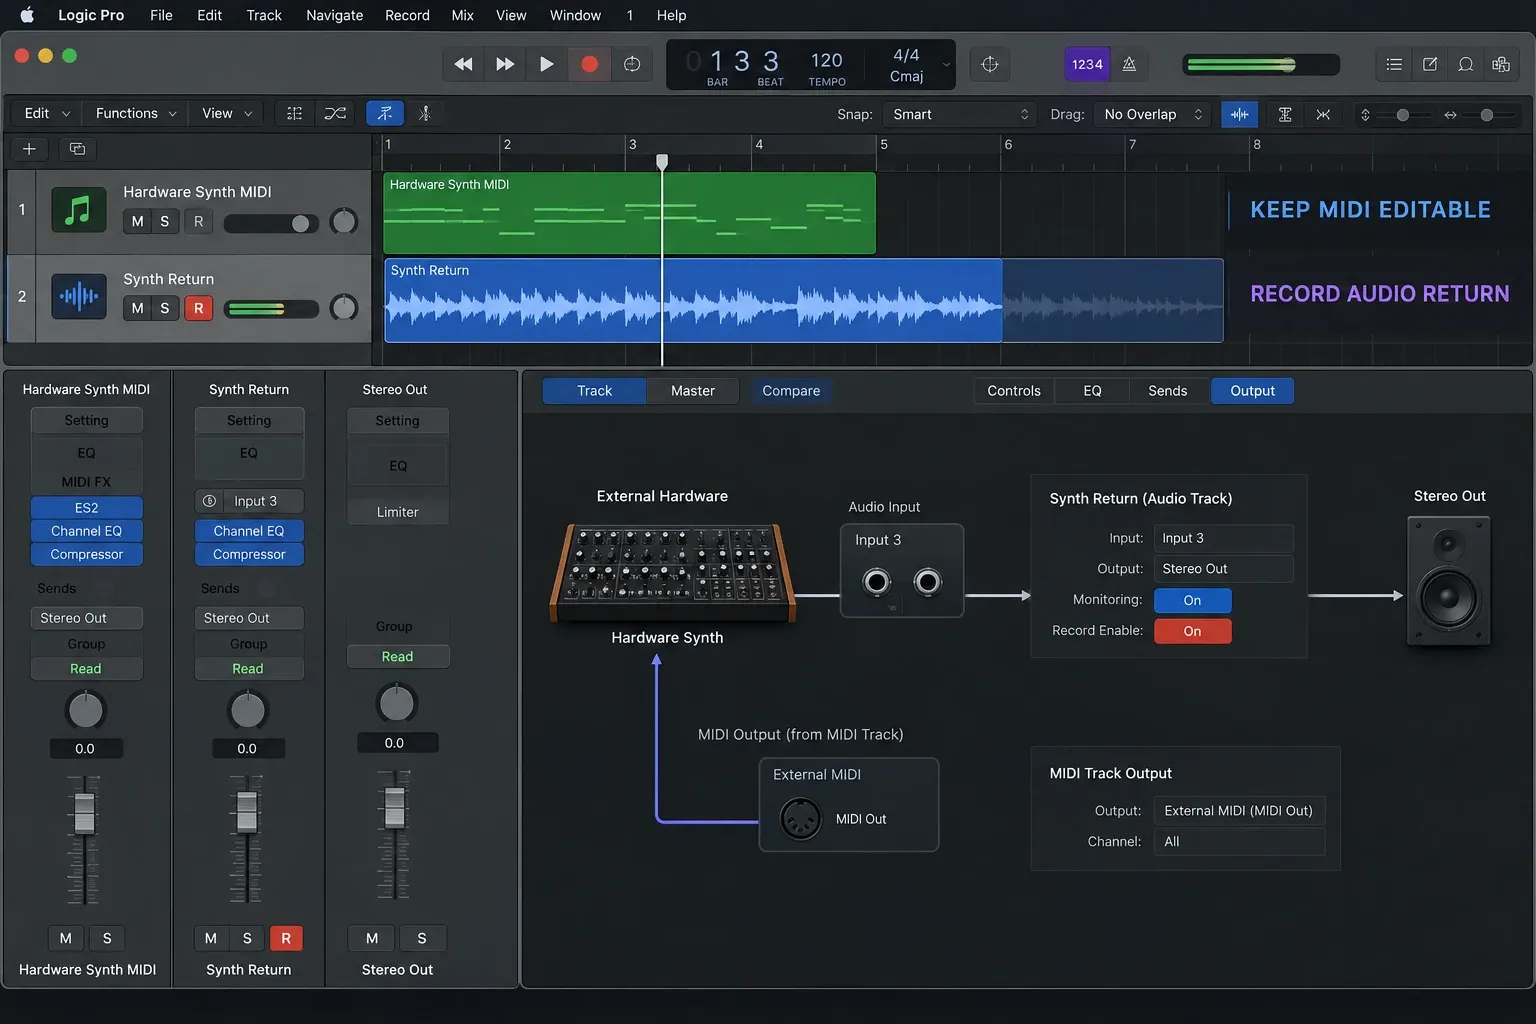
After recording, you can comp the strongest pass, trim the start and end, automate the external part, or bounce the finished sound into a new file. Keep the MIDI region and the recorded audio together until you are sure the patch, timing and performance are final.
Fix common hardware-synth routing problems
| What you hear or see | Most likely path | What to check |
|---|---|---|
| Notes appear in Logic, but the synth is silent | MIDI destination or synth channel | Confirm the selected port, MIDI channel, synth volume and whether the cable is connected to MIDI In rather than MIDI Out. |
| The audio meter never moves | Audio return | Check the synth output, interface input number, cable type, input gain and whether the track is listening to the interface rather than the Mac microphone. |
| The meter moves, but you hear nothing | Monitoring or output | Turn on input monitoring or the interface's direct-monitor path, then confirm the track and interface outputs reach the headphones or speakers. |
| The sound is doubled or has a short echo | Two monitoring paths | Mute either direct monitoring or Logic input monitoring and leave only one path active. |
| The synth starts out of time | Clock master or delay | Choose one master, verify the project tempo, enable clock for the correct MIDI destination and adjust the destination delay only when the rhythmic offset is consistent. |
| The synth feeds back or gets louder by itself | Return routed back to the input | Mute the return, inspect the track output and interface mixer, then remove any route that sends the synth return back toward the synth input. |
| The audio recording is empty | Record enable or wrong input | Record enable the audio track, select the interface input with signal, and confirm the input meter moves before pressing record. |
| Playback timing feels late | Buffer or round-trip delay | Use a stable lower buffer for live work, avoid monitoring the same path twice, and inspect delay compensation before manually moving regions. |
The fastest diagnosis is always sequential: first prove MIDI activity, then prove the audio meter, then prove the monitoring output, and only after that add clock. Changing all three layers at once makes it difficult to know which correction helped. If the controller itself disappears or stops triggering notes, use the MIDI keyboard troubleshooting guide before changing the audio return.
What to do after the round trip works
Once the synth plays, returns and records reliably, save the project before changing the routing. Then decide what should remain flexible. Keep the MIDI region when you may change notes, timing, transposition or the patch. Keep the recorded audio when the sound itself is part of the arrangement. Keep both when you may need to recreate or layer the part later.
For a stable template, name the MIDI destination, interface inputs and clock master in the track notes or track names. A short label such as “Synth MIDI 1 → Interface In 1–2” is more useful six weeks later than a vague track name. Add the hardware to the same project template only after the signal path has been confirmed, because a template with an incorrect port can create silent tracks across every new song.
That is the complete hardware-synth round trip in Logic Pro: MIDI leaves the project, the synthesizer turns it into sound, audio returns through the interface, one monitoring path lets you hear it, and clock is added only when tempo synchronization is part of the musical job. For the wider sequence of Logic Pro recording and production workflows, continue through the Logic Pro music-creation hub.


