How to Record MIDI in Logic Pro: Complete Workflow
Connect a controller, choose the right recording behavior, capture a playable part, and keep the performance editable.

To record MIDI in Logic Pro, create a software instrument track, load a playable patch, and select that track. Press a key and confirm that MIDI activity appears, set the tempo and count-in, then press R. Play the part, then press the Space bar to stop. Logic creates a MIDI region that you can edit without rerecording the sound.
MIDI is not audio, and that distinction drives everything else. The region stores instructions: which note played, when it began, how long it lasted, its velocity, and messages such as sustain, modulation, or pitch bend. Sound comes from the instrument plug-in reading those instructions. That’s why you can turn a piano performance into a synthesizer after recording, transpose notes, repair timing, or alter velocity without ever editing a waveform.
Checked August 10, 2026: this workflow, the current recording choices, Flashback Capture behavior, key commands, and screenshots were verified against Apple’s Logic Pro for Mac 12.3 guide.
The complete MIDI recording workflow
- Connect the MIDI controller and install its current driver if the manufacturer requires one.
- Create a new software instrument track and load a patch that produces sound.
- Select the track and confirm that Logic Pro receives notes in the MIDI activity display.
- Set the project tempo, metronome, count-in, and playhead position for the performance.
- Open Recording settings and choose what overlapping MIDI and cycle passes should create.
- Record-enable the intended track and play once before recording to check sound and latency.
- Press R and perform with the MIDI controller or Musical Typing.
- Press Space to stop and rename the new MIDI region by musical purpose.
- Listen once before quantizing, then fix only the notes, lengths, or velocities that need attention.
- Save the project while the original performance remains recoverable.
If this is the first track in a brand-new session, the Logic Pro first-project guide lays out the larger order: project settings, tracks, arrangement, mix, and bounce. This guide stays on one job: capturing a playable MIDI performance.
Know what MIDI records—and what it does not
| MIDI region stores | MIDI region does not store |
|---|---|
| Note pitch and start position | The acoustic sound of the room |
| Note length and velocity | A microphone or line-input waveform |
| Sustain, modulation, pitch bend, and other messages | The permanent tone of the current patch |
| Editable performance events | A finished audio file for sharing |
A USB MIDI keyboard sends control data to Logic; it doesn’t send the keyboard’s internal sound unless the device also acts as an audio interface and is routed that way. To capture the hardware instrument’s own tone, record its audio outputs on an audio track, or set up an External Instrument workflow. And don’t troubleshoot an audio cable as though it were MIDI input.
Connect and verify a MIDI controller
Connect a class-compliant USB keyboard straight to the Mac, or through a reliable powered hub. A keyboard with five-pin MIDI ports needs a MIDI interface. And check the current support page before you assume every controller is driverless: Apple’s current USB music keyboard setup notes that some devices still require the manufacturer’s driver.
Open Logic and press a few keys. Watch the MIDI activity display in the control bar. Activity there proves Logic is receiving events; it doesn’t prove the selected channel strip has an instrument, or that the audio output is working. That separation is what makes diagnosis faster:
- No MIDI activity: check cable, power, driver, port, controller mode, and macOS recognition.
- Activity but no sound: check the focused software instrument track, patch, instrument plug-in, channel strip, and output device.
- Sound but no region after recording: check record enable, selected track, playhead, and recording mode.
When a normal setup doesn’t restore input, the dedicated MIDI keyboard troubleshooting guide follows that signal path in detail.
Create a software instrument track and choose a patch
Choose Track > New Software Instrument Track, or click the Add Tracks button and pick Software Instrument. Load a patch from the Library, or drop an instrument plug-in on the channel strip. Then select the track so it becomes the focused track; Logic can record-enable the focused software instrument track automatically, depending on the Auto Record Enable setting.
Play before you press Record. Confirm pitch range, sustain pedal, velocity response, and whether modulation or pitch bend behaves the way you expect. A part recorded in the wrong octave, with an extreme velocity curve or a stuck sustain, can be edited later, but catching the setup problem before the performance is usually faster.
Focused track and record enable are related, not identical
In the ordinary one-instrument workflow, the track with editing focus is the destination. A red R means record enable is on. In Logic Pro > Settings > Recording, Auto Record Enable decides whether the focused track or all selected software instrument tracks become ready. On a layered template, check for the red R before you trust selection colour alone.
Record without a MIDI keyboard
Choose Window > Show Musical Typing or press Command-K. Apple’s Musical Typing reference maps the Mac keyboard onto notes and a few basic performance controls: Z and X change octave, C and V adjust velocity, 4 through 8 set modulation, 1 and 2 bend pitch, and Tab switches sustain.
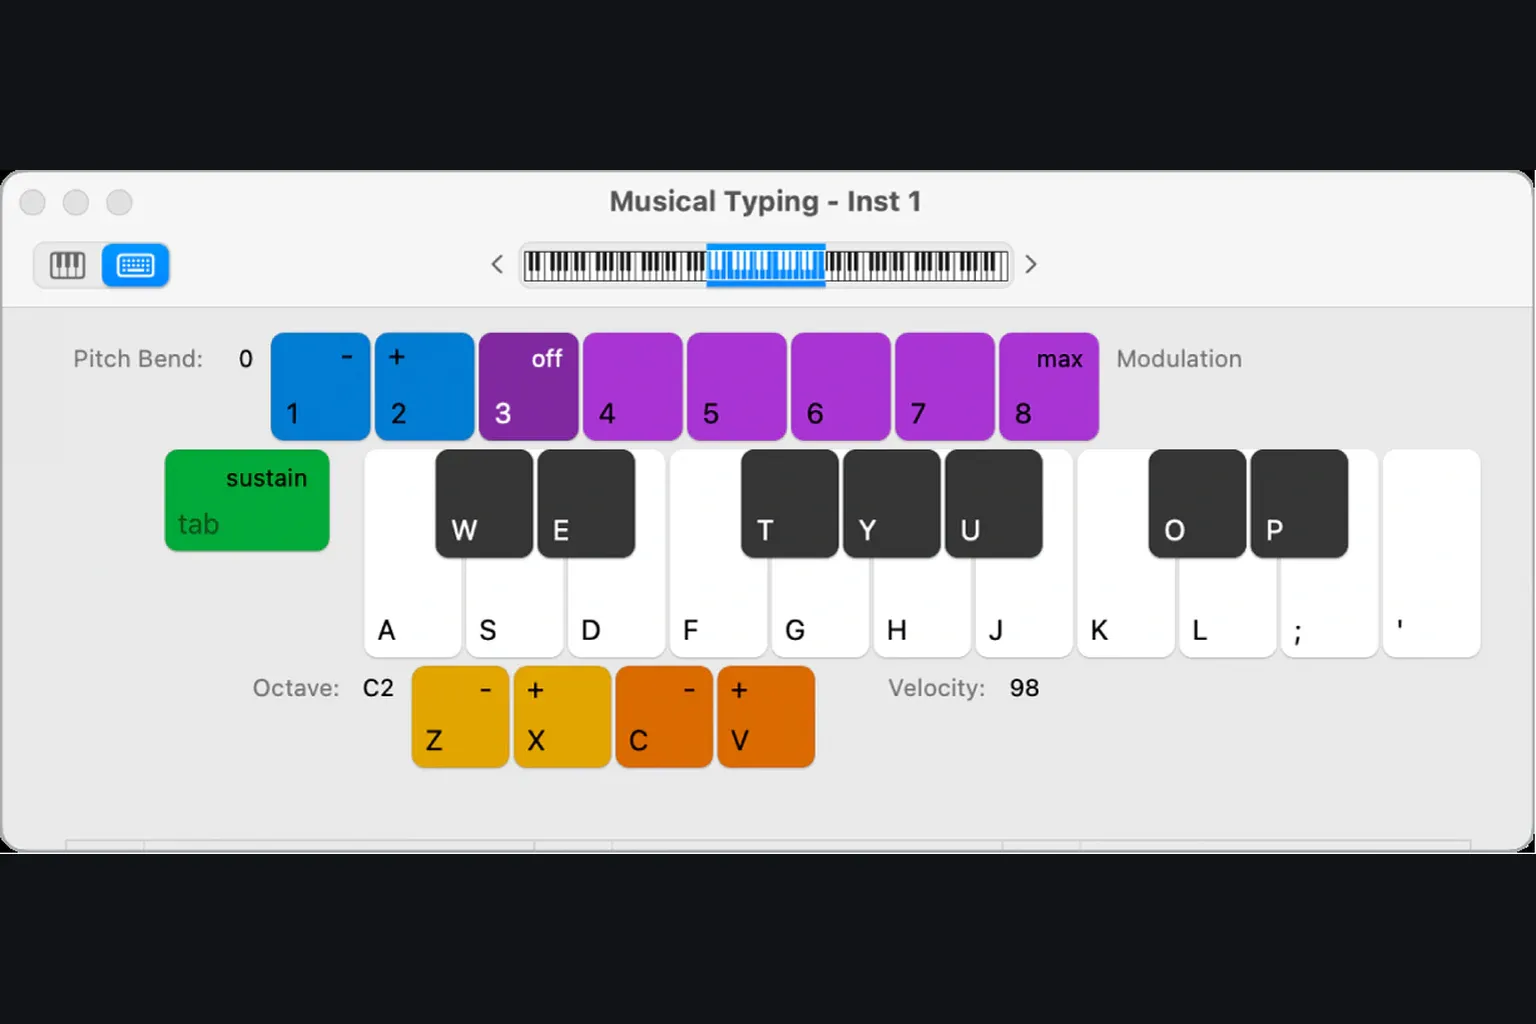
Musical Typing is enough for a bass line, drum pattern, chord sketch, or emergency edit. Its velocity choices are stepped and a QWERTY layout can’t match a responsive controller, so catch the idea first and refine the performance only if the song asks for it. Logic’s onscreen keyboard is another option, though clicking notes with a pointer suits auditioning better than a fluid performance.
Set tempo, count-in, and latency before the take
Set a stable project tempo, or a tempo map, before recording a part that has to follow the grid. Park the playhead far enough ahead of the entry that the player hears musical context. Turn the metronome on only when it helps, and pick a count-in long enough to prepare without breaking concentration.
MIDI input can arrive on time while the instrument still sounds late, because the audio buffer or plug-in chain delays monitoring. The delay lives in the audio return; the MIDI notes are not crawling through the cable. Bypass high-latency mix plug-ins, switch on Low Latency Mode when it suits, and follow the Logic Pro latency diagnostic if the key-to-sound response feels disconnected.
Try not to record through a patch with a deliberately slow attack and then drag every note earlier to compensate. Swap to a faster sound while you judge performance timing, or keep the musical offset as an intentional instrument choice.
Record the first MIDI region
Select the software instrument track, park the playhead, and press R. Play the part all the way through its release, then press the Space bar. Apple’s current software-instrument recording steps confirm the same basic sequence: selected instrument track, playhead, optional metronome, Record, performance, Stop.
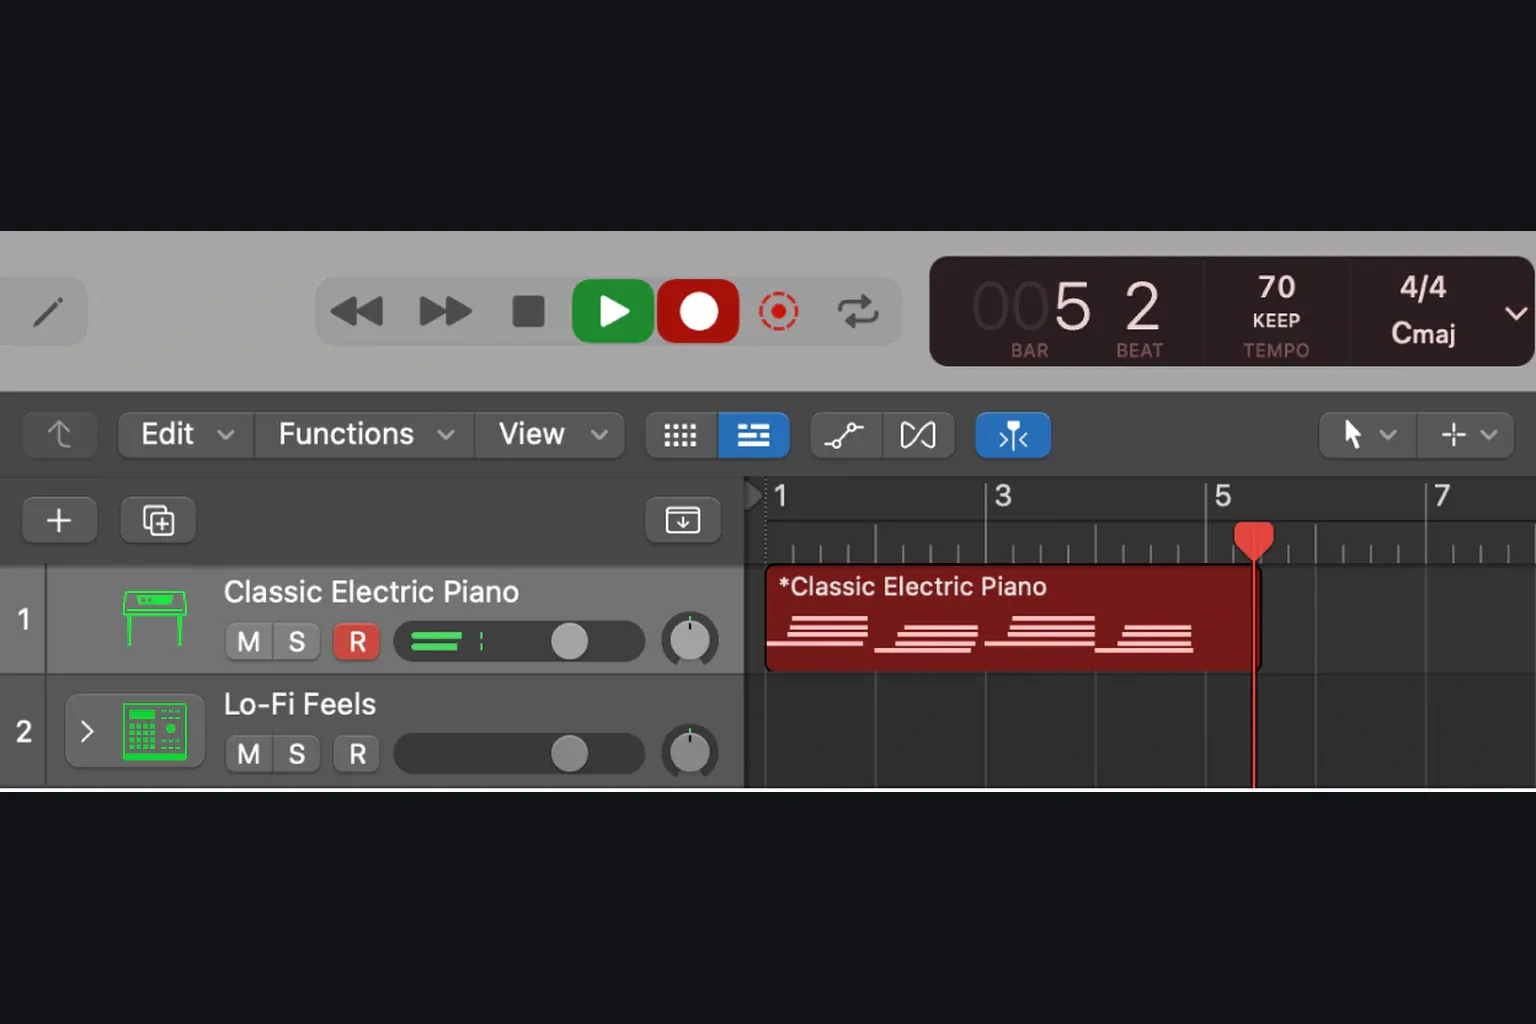
Rename the region for its job—Verse bass live, Chorus chords take 2, or Hi-hat overdub—instead of leaving a row of identical instrument names. Listen once before you open an editor. The first question is musical: does the performance work? Whether every rectangle aligns with a line comes later.
Choose takes, overdubs, or separate versions before cycling
Open Logic Pro > Settings > Recording. Under Overlapping Track Recordings: MIDI, set separate behavior for Cycle Off and Cycle On. Apple’s current Recording settings list several valid choices, and that makes sense: alternate performances and additive overdubs are different jobs.
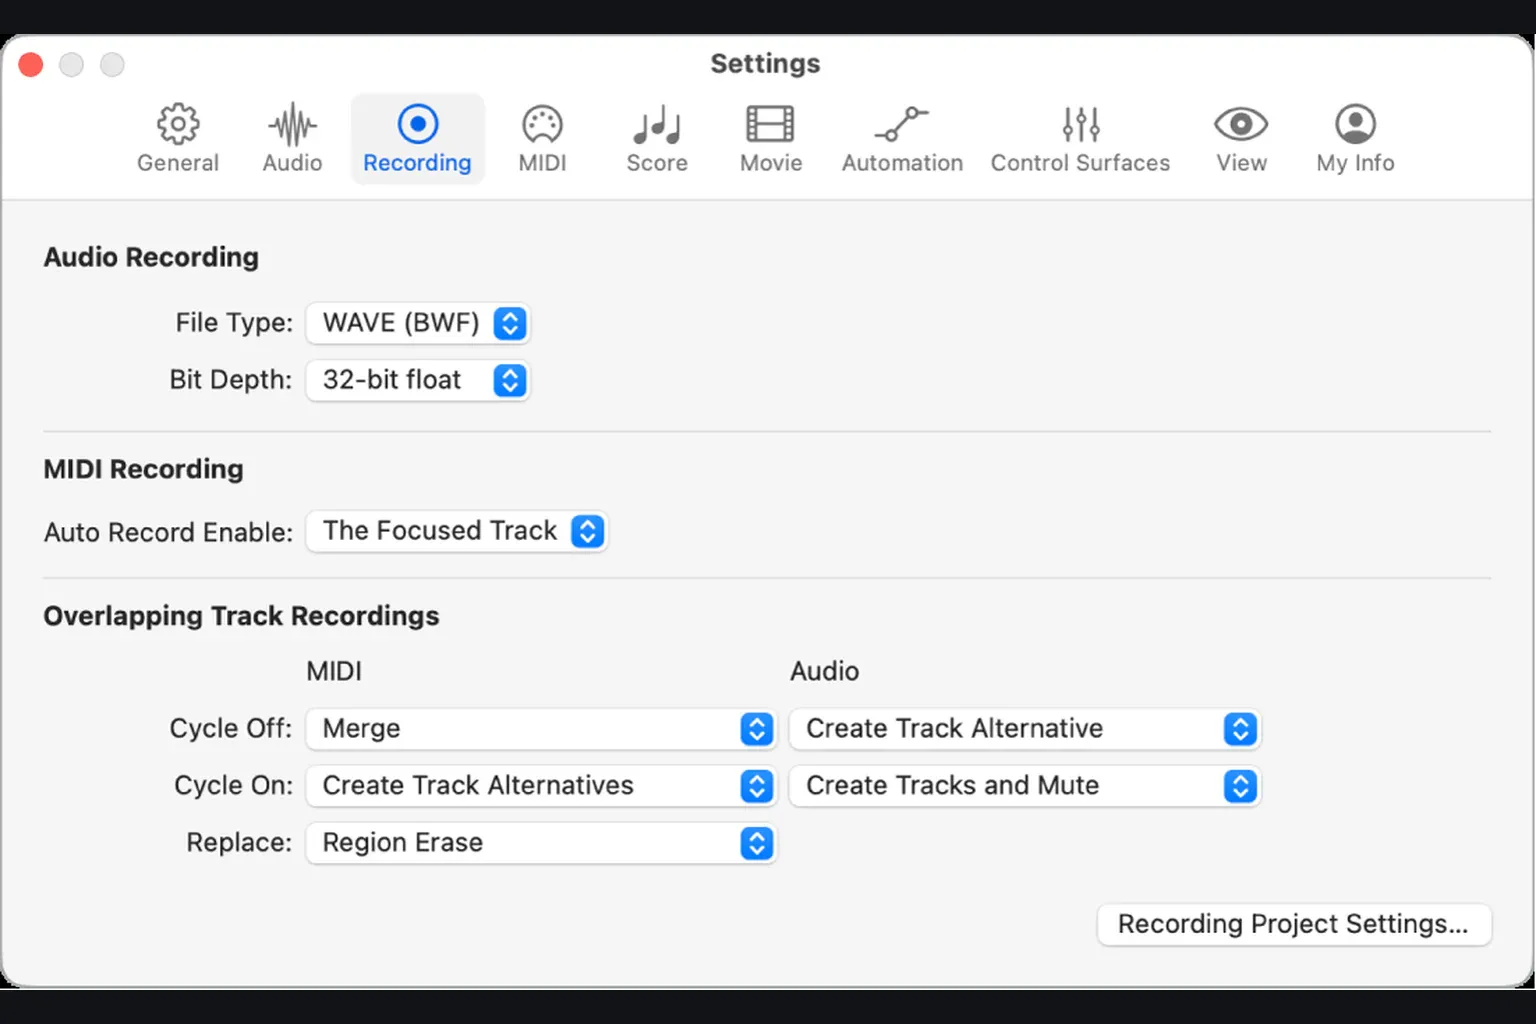
| Setting | What it is good for | Main risk |
|---|---|---|
| Create Take Folder | Alternative keyboard, bass, or lead performances | MIDI folders do not use audio Quick Swipe Comping. |
| Merge | Adding kick, snare, hats, and percussion over several passes | Unwanted notes join the same region. |
| Merge Current Recording Only | Build one new layered pass without altering earlier overlaps | Overlapping regions can become hard to see. |
| Create Tracks | Keep each cycle pass visible on its own track | Many tracks accumulate quickly. |
| Create Tracks and Mute | Preserve passes without hearing all previous ones | The useful take may remain muted. |
| Create Track Alternatives | Whole-track versions with a clean arrangement view | Only one alternative is active at a time. |
Merge suits additive drum programming, not three competing piano performances. Create Take Folder suits alternatives, with one key limitation to remember: Quick Swipe Comping is an audio workflow. MIDI takes can be selected and edited, but they don’t give you the swipe-based composite performance described in the audio take-folder guide.
Recover a performance with Flashback Capture
If the best idea happened before anyone pressed Record, keep the software instrument track focused and press Shift-R. The Flashback Capture button works too, as does its command in the Record button menu. Apple’s Flashback Capture documentation says it can recover recent MIDI whether playback is running or stopped.
The stopped-mode limits matter. Apple states that Flashback Capture creates a separate region from MIDI received since the last playback, though input before a 20-second pause is discarded. It also documents a 1.5-bar-or-longer pause behavior that can leave earlier notes outside the visible portion of the region. So treat Shift-R as a rescue tool. It isn’t an infinite performance archive.
In Cycle mode, Flashback Capture can create take regions when MIDI Cycle On is set to Create Take Folder. If the setting is Merge or Merge Current Recording Only, Apple notes that only data from the last cycle is merged. Where you can, choose the destination behavior before the improvisation starts.
Edit the performance without erasing its character
Double-click the region to open the Piano Roll Editor. Notes show up as rectangles: horizontal position is time, vertical position is pitch, length is duration, and colour can indicate velocity. Move only the notes that distract, repair the obviously wrong pitches, and check sustain data before you shorten notes that seem to overlap.
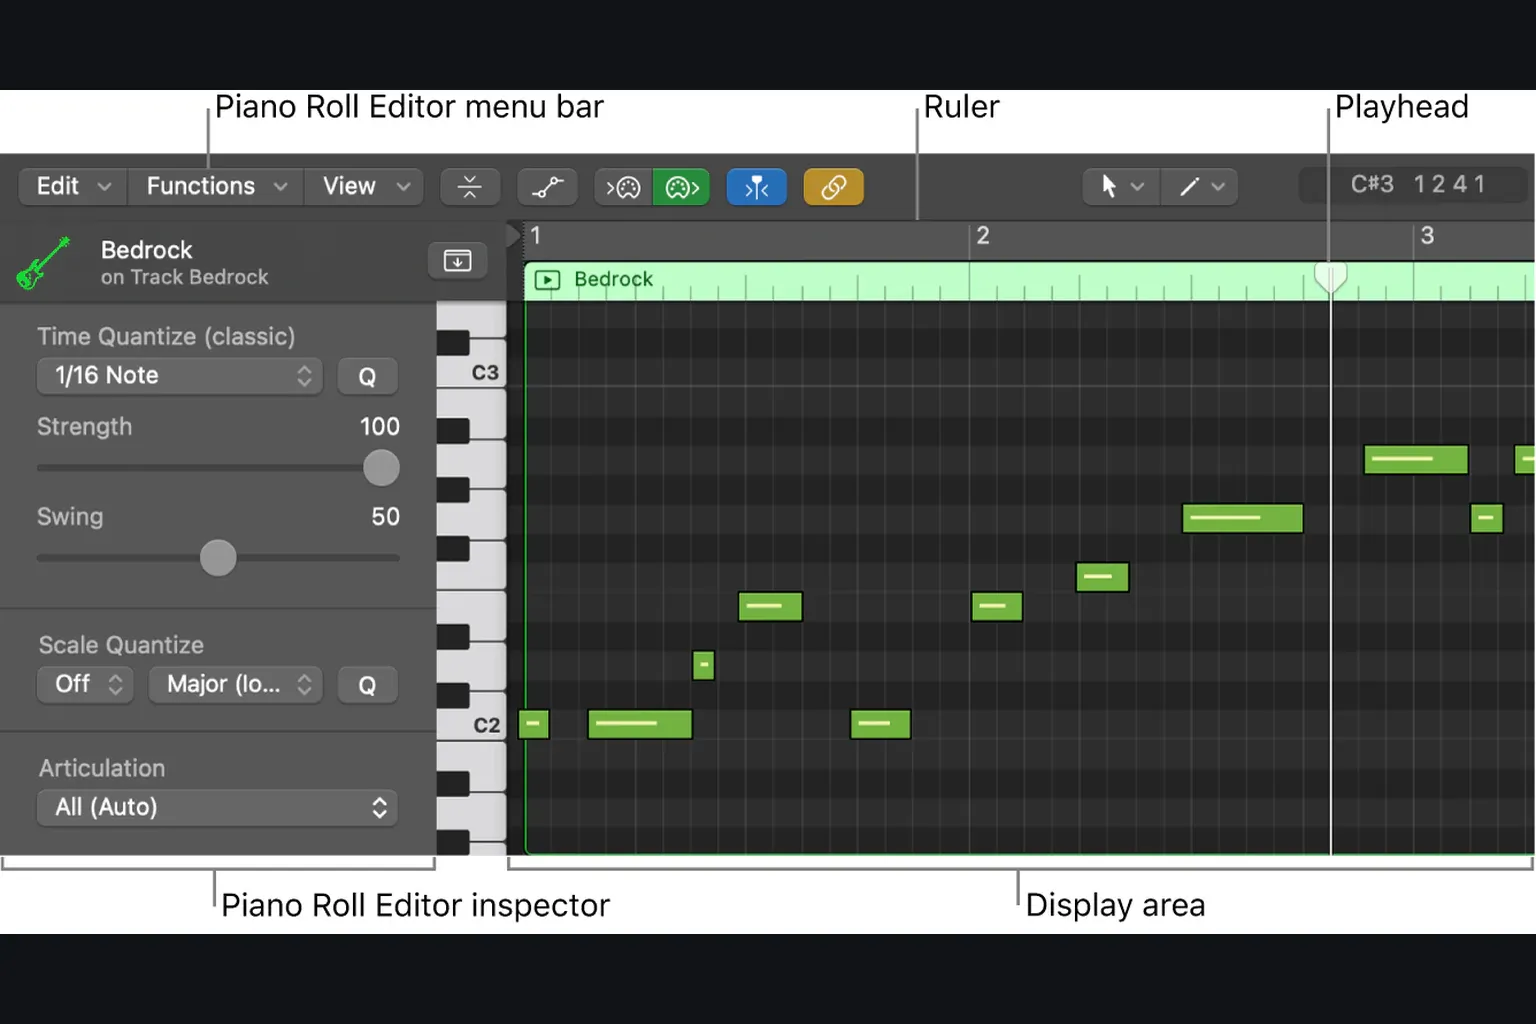
The upcoming complete Piano Roll workflow covers selection, snapping, note length, velocity, controller lanes, and multi-region editing. For timing, the separate audio and MIDI quantization guide walks through grid choice, Strength, Q-Range, swing, and why picking the right notes matters more than pressing Q.
Save an unquantized version before any broad correction. Region parameters change playback without rewriting the underlying events, but later edits can still bury the original past easy recovery. A project alternative or a duplicate region beats hoping repeated Undo survives the rest of the session. The Logic Pro backup guide covers that safety layer.
When MIDI will not record or play
| Symptom | Check in this order |
|---|---|
| No MIDI activity | Controller power, cable, USB port, driver, macOS Audio MIDI Setup, and controller output mode. |
| Activity but no sound | Focused software instrument track, loaded instrument plug-in, patch, channel-strip mute/volume, and audio output. |
| Sound but no recorded region | Record enable, selected track, Record state, cycle boundaries, and whether the playhead moved. |
| Wrong instrument records | Focused track and Auto Record Enable behavior for selected tracks. |
| Every cycle adds notes together | MIDI Cycle On is probably Merge; choose Create Take Folder for alternatives. |
| New pass hides the old pass | Inspect overlap mode and use take folders, tracks, or track alternatives intentionally. |
| Notes sound late | Audio buffer, high-latency plug-ins, Low Latency Mode, and the patch’s attack. |
| Notes move to the grid automatically | Selected region Quantize value, template defaults, and any recording-specific timing setting. |
| Sustain remains stuck | Pedal polarity/setup, recorded CC64 events, and MIDI reset or panic command. |
| Flashback misses the early idea | Stopped-mode pause limits, last playback, focused track, and whether input actually reached Logic. |
Final MIDI recording checklist
- Logic’s MIDI activity display reacts to the controller.
- The intended software instrument track is focused and record-enabled.
- The patch responds correctly to velocity, sustain, modulation, and pitch bend.
- Tempo, metronome, count-in, and playhead support the performance.
- Monitoring latency feels playable before the take begins.
- MIDI Cycle On is set to takes, merge, tracks, or alternatives by intent.
- The complete release is played before stopping.
- The first playback happens before quantization.
- Only necessary notes, lengths, velocities, and controller events are corrected.
- The original performance remains recoverable.
The Logic Pro recording and editing hub connects MIDI capture to Piano Roll cleanup, quantization, and commit decisions inside the broader Logic Pro Tutorials path. Once the part is ready to leave the project, exporting a listening copy creates audio that other devices can play; on its own, a MIDI region is still just performance data.
Frequently asked questions
Does MIDI record the sound of my keyboard?
No. A MIDI region stores performance messages such as note, timing, length, velocity, sustain, and pitch bend. A software instrument or external sound module turns those messages into audio.
Can I record MIDI without a MIDI keyboard?
Yes. Press Command-K to open Musical Typing and play from the Mac keyboard, or use Logic Pro’s onscreen keyboard. You can also enter notes later in the Piano Roll or with step input.
Why is my MIDI controller detected but silent?
First confirm that Logic’s MIDI activity display reacts. Then select a software instrument track, load a working patch, check that the track is focused or record-enabled, and confirm the project’s audio output device and channel-strip volume.
Should I use Merge or Create Take Folder for MIDI cycle recording?
Use Merge when each pass adds complementary notes to one region, such as drum-kit layers. Use Create Take Folder when each pass is an alternative performance and you want to choose a complete take later.
What is Merge Current Recording Only?
It merges the passes made during the current cycle recording into one new MIDI region without merging that result into pre-existing overlapping regions. A later recording creates another overlapping region.
Can Logic Pro recover MIDI if I forgot to press Record?
Often, yes. Keep the software instrument track focused and press Shift-R for Flashback Capture. Apple documents different behavior while playback is running and stopped, including a 20-second pause rule for stopped input.
Why are my MIDI notes being quantized automatically?
Inspect the selected region’s Quantize value and any recording or template settings that affect timing. Set Quantize to off if you want the recorded timing heard unchanged, then apply timing correction deliberately after the performance.
How do I edit the MIDI after recording?
Double-click the MIDI region to open the Piano Roll Editor. There you can move notes, change pitch or length, edit velocity and controller data, and quantize selected material without rerecording the part.


