How to Use a MIDI Controller in Logic Pro
Get the keys playing, map knobs and transport buttons, then choose whether each assignment follows the selected track or stays pinned to one project.

Checked September 30, 2026 against Apple’s current Logic Pro for Mac documentation and the Logic Pro 12.4 release notes. The quick connection steps below cover USB and standard five-pin MIDI; Bluetooth and Wi-Fi keyboards need the pairing procedure supplied by their manufacturer.
To use a MIDI controller in Logic Pro, connect it before opening Logic, create a software instrument track, choose a patch, and play a few notes. Once the keys work, map knobs and faders with Auto Assign, Smart Controls, or Controller Assignments. Use Key Commands for transport buttons. Treat note input and control mapping as two separate tests.
Quick setup: get notes playing first
- Connect a USB MIDI controller directly to the Mac or through a powered hub that you know works. For a keyboard with only standard five-pin MIDI ports, connect its MIDI Out to a MIDI interface’s MIDI In, then connect the interface to the Mac.
- If the manufacturer supplies a current macOS driver or setup utility for your model, install that version before troubleshooting in Logic.
- Open Logic Pro and choose Track > New Software Instrument Track.
- Choose a stock patch from the Library so the sound source is known.
- Select the track and play the keys or pads. Check the MIDI Activity display in the control bar; it is available with the LCD set to Custom.
Apple's current software instrument setup guide separates the common connection routes: USB can connect directly, while a standard MIDI connection needs an interface. Apple also tells users to check the device maker's instructions for any required driver. That qualification matters. Some controllers work without extra software. Others need a driver, firmware update, or vendor integration package for their deeper controls.
Apple’s MIDI Activity display distinguishes incoming from outgoing messages. If incoming activity appears but you hear nothing, the controller is probably reaching Logic. Check that the selected track is a software instrument track, a patch is loaded, the track is not muted, and the audio output works. MIDI carries performance and control data, not the audio from a Logic instrument.
MIDI note input and control mapping are separate jobs
Keys and pads normally send note messages. Knobs, faders, encoders, and buttons often send control-change messages or device-specific data. Logic can receive the notes even when it has no useful assignment for the other controls. This is why “the keyboard plays, but the knobs do nothing” isn't a connection failure.
| What you want to do | Best first test | Mapping route |
|---|---|---|
| Play a Logic instrument | Software instrument track with a stock patch | No manual mapping is usually needed |
| Control the selected patch quickly | Move one on-screen Smart Control | Smart Controls External Assignment |
| Control a specific mixer or plug-in parameter | Select the exact on-screen parameter | Controller Assignments Easy View |
| Use Play, Stop, Record, Cycle, or navigation | Find the matching command | Key Commands Learn New Assignment |
| Use a supported integrated controller | Check Logic's MIDI Controllers pane | Auto Assign or the maker's supported setup |
Choose the right mapping method
Use Auto Assign for a supported USB controller, Smart Controls for the selected patch’s screen controls, and Controller Assignments for a specific mixer or plug-in parameter. With Controller Assignments, choose whether the target follows focus or stays pinned to a track. Key Commands suit buttons that trigger Play, Record or another command.
These methods can overlap. That doesn't mean they should. If a vendor script already maps the transport and faders, add only the missing controls. Duplicate assignments are hard to diagnose because one movement can reach more than one target.
Use Auto Assign for a supported controller
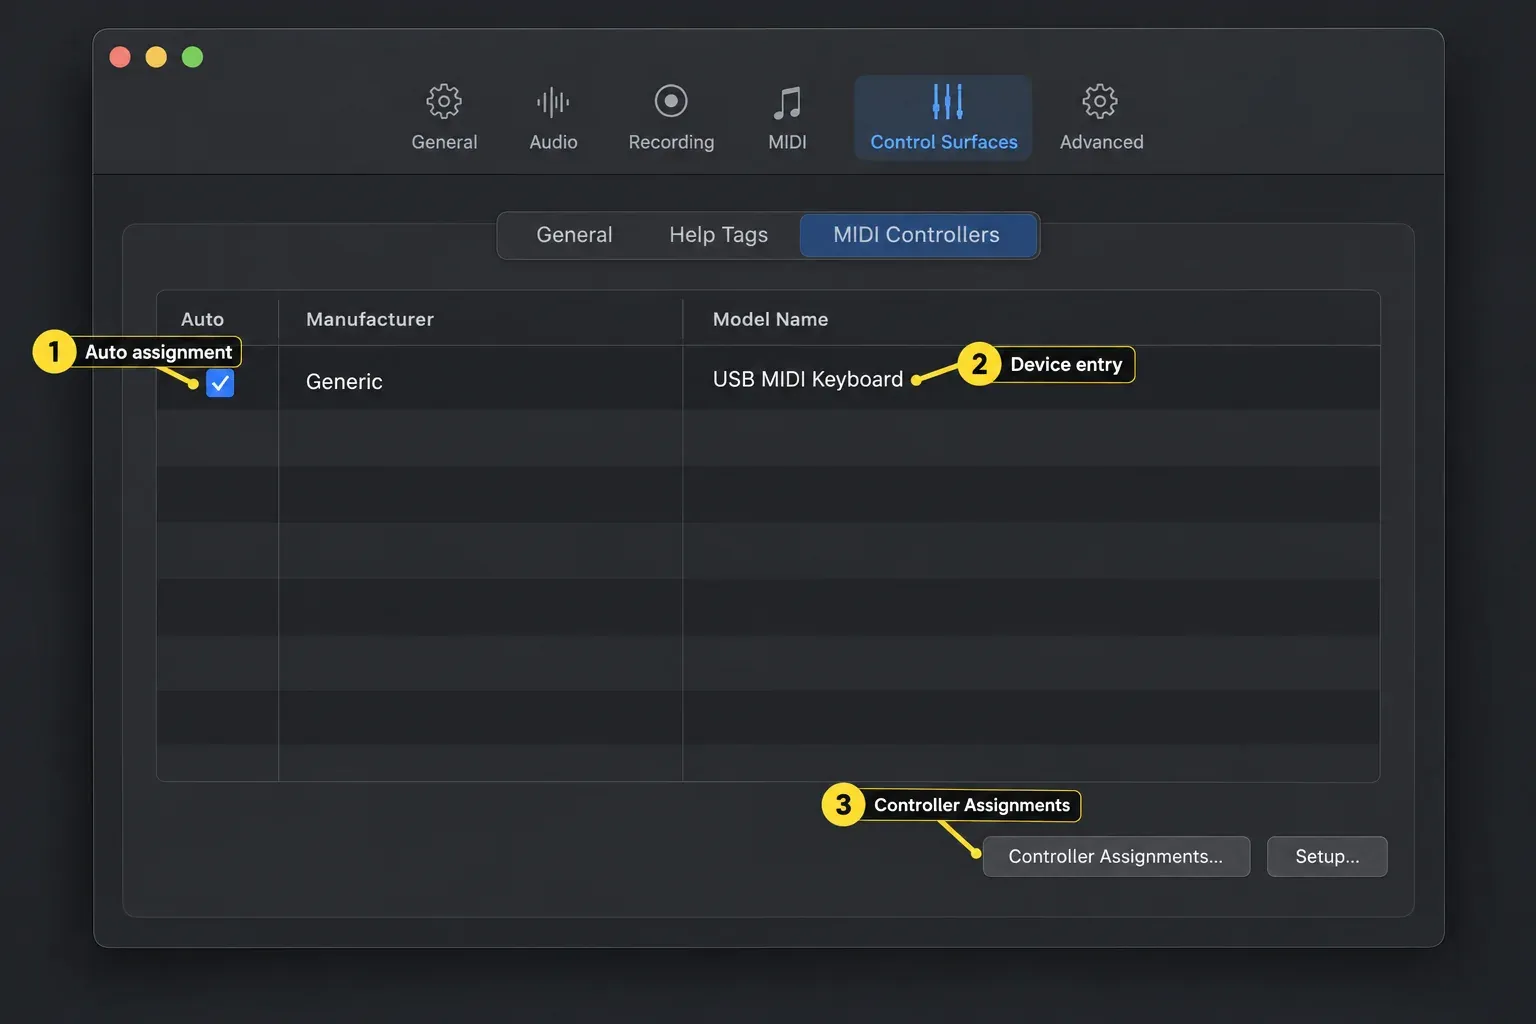
The first time Logic sees a supported USB controller, it can ask whether you want to use the device as a control surface. Choose Auto Assign when you want Logic's supported mapping for buttons, knobs, faders, and Smart Controls. Choose No when you only need MIDI input or when you plan to use a specific manufacturer setup.
Apple limits this feature to supported USB MIDI controllers. If the prompt never appears, that alone doesn't prove the device is broken. The keys can still send MIDI notes, and the remaining controls can still be assigned manually.
To review the choice later, open Logic Pro > Control Surfaces > Settings > MIDI Controllers. The current pane lists supported devices that use Logic's controller scripts and gives you access to Auto, Controller Assignments, and Setup.
Turning off Auto is not a reset of every mapping. Apple’s MIDI Controllers settings reference says it removes Lua-script assignments and stops the script’s MIDI processing while retaining user-modified assignments. If a control still moves something afterward, inspect those remaining assignments and any other mapping route before learning it again.
Map a knob or fader with Smart Controls
This route follows Apple's External Assignment workflow and works well when a controller knob should follow a useful control on the selected track: filter cutoff on one patch, drive on another.
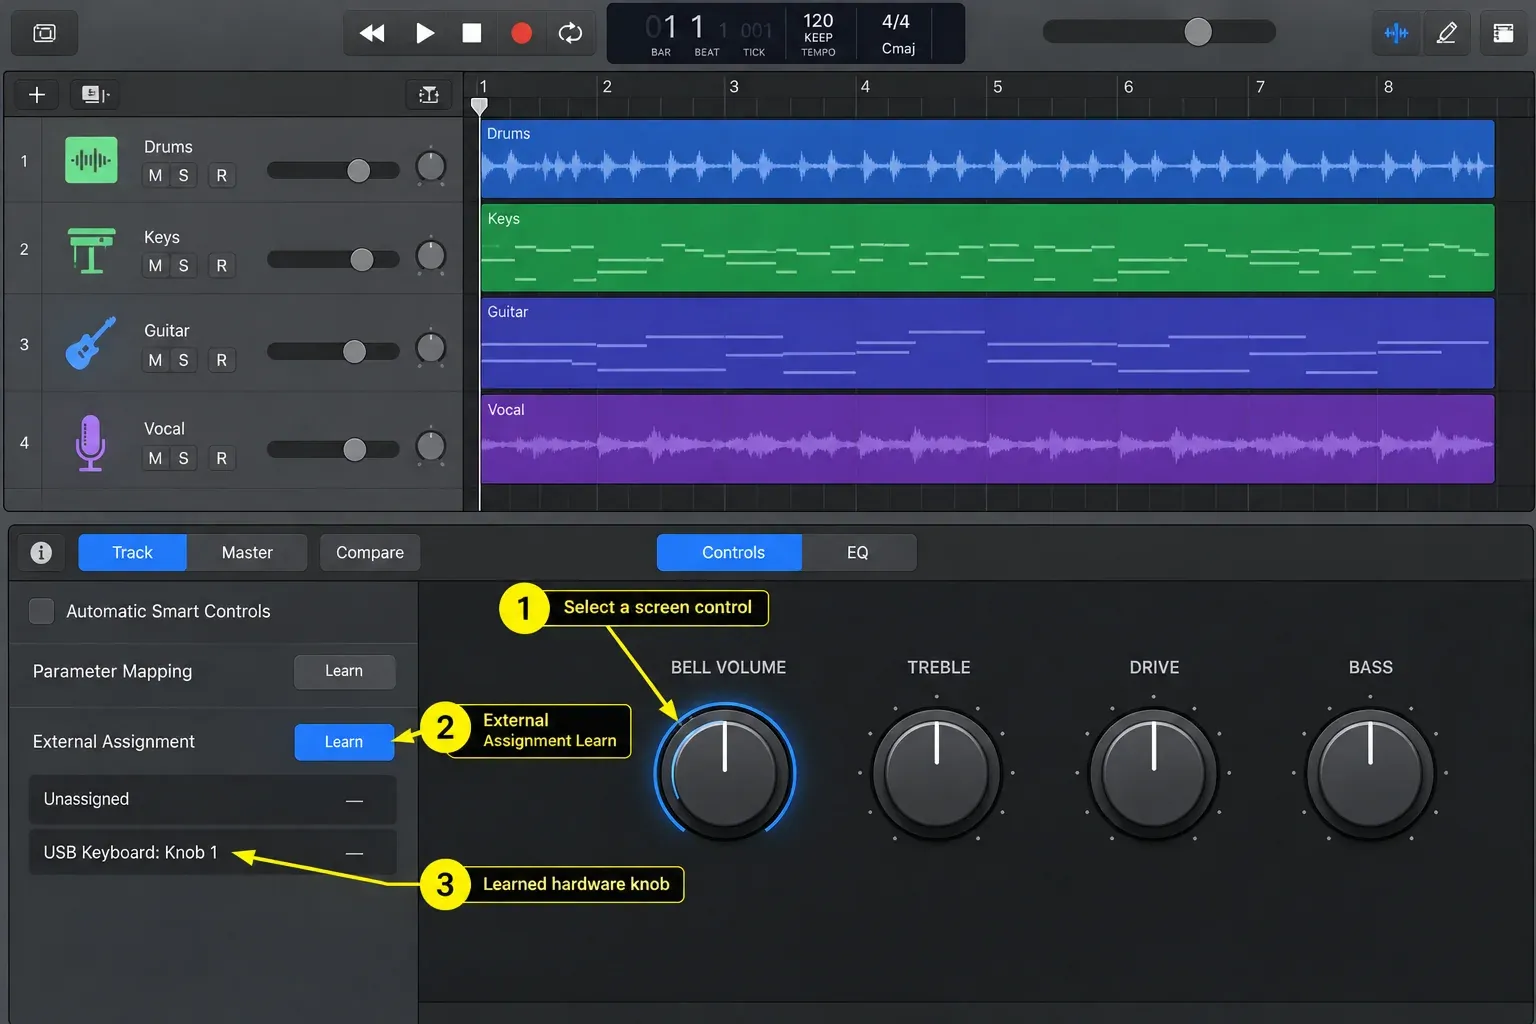
- Select the software instrument track and choose View > Show Smart Controls.
- Click the Inspector button in the Smart Controls menu bar.
- Select the on-screen knob, switch or other screen control you want to operate.
- Click External Assignment in the inspector.
- Click Learn, then move the physical knob or fader through part of its range.
- Click Learn again to stop listening for a new message.
- Move the hardware control slowly and confirm that only the intended screen control responds.
Check an existing assignment before replacing it. Apple distinguishes pinned and focused assignments: a pinned track or plug-in assignment belongs to that project; a focused assignment follows the selected track across projects, provided the target parameter exists there. Decide which behavior you want before setting up several faders. If you plan to rebuild defaults in the Controller Assignments window, update first: the Logic Pro 12.4 release notes say a rebuild no longer deletes assignments that are pinned to the project.
External Assignment versus Parameter Mapping
Smart Controls have two layers. External Assignment connects your physical control to a screen control. Parameter Mapping connects that screen control to an instrument, effect, or channel-strip parameter. Apple documents that parameter mappings are saved with the patch. If the hardware moves the screen control but the sound doesn't change in a useful way, inspect Parameter Mapping rather than relearning the same hardware knob.
Make a fixed Controller Assignment in Easy View
Easy View learns the incoming control and target parameter. Learning alone does not make the target stay on one track: track and plug-in assignments follow focus by default. Use the pinning step below when that is not what you want.
- Open the Mixer or plug-in window and select the parameter you want to control.
- Choose Logic Pro > Control Surfaces > Learn Assignment for [parameter name]. Command-L is the default Learn shortcut; custom key-command sets can differ.
- For new fixed track assignments, open the Action pop-up menu in Easy View and select New Track Assignments Are Pinned to Track.
- Move the hardware knob, fader or button once. Its MIDI message should appear in the Input message field.
- Click Learn Mode to finish. Do not leave it active while touching other controls.
- Close the window, select a different track and move the hardware control. A pinned assignment should still address its original track or plug-in instance in this project.
- Save the project, quit Logic normally, reopen the same project and test again. A focused assignment should follow the selected compatible target; a pinned assignment should stay with its original target.
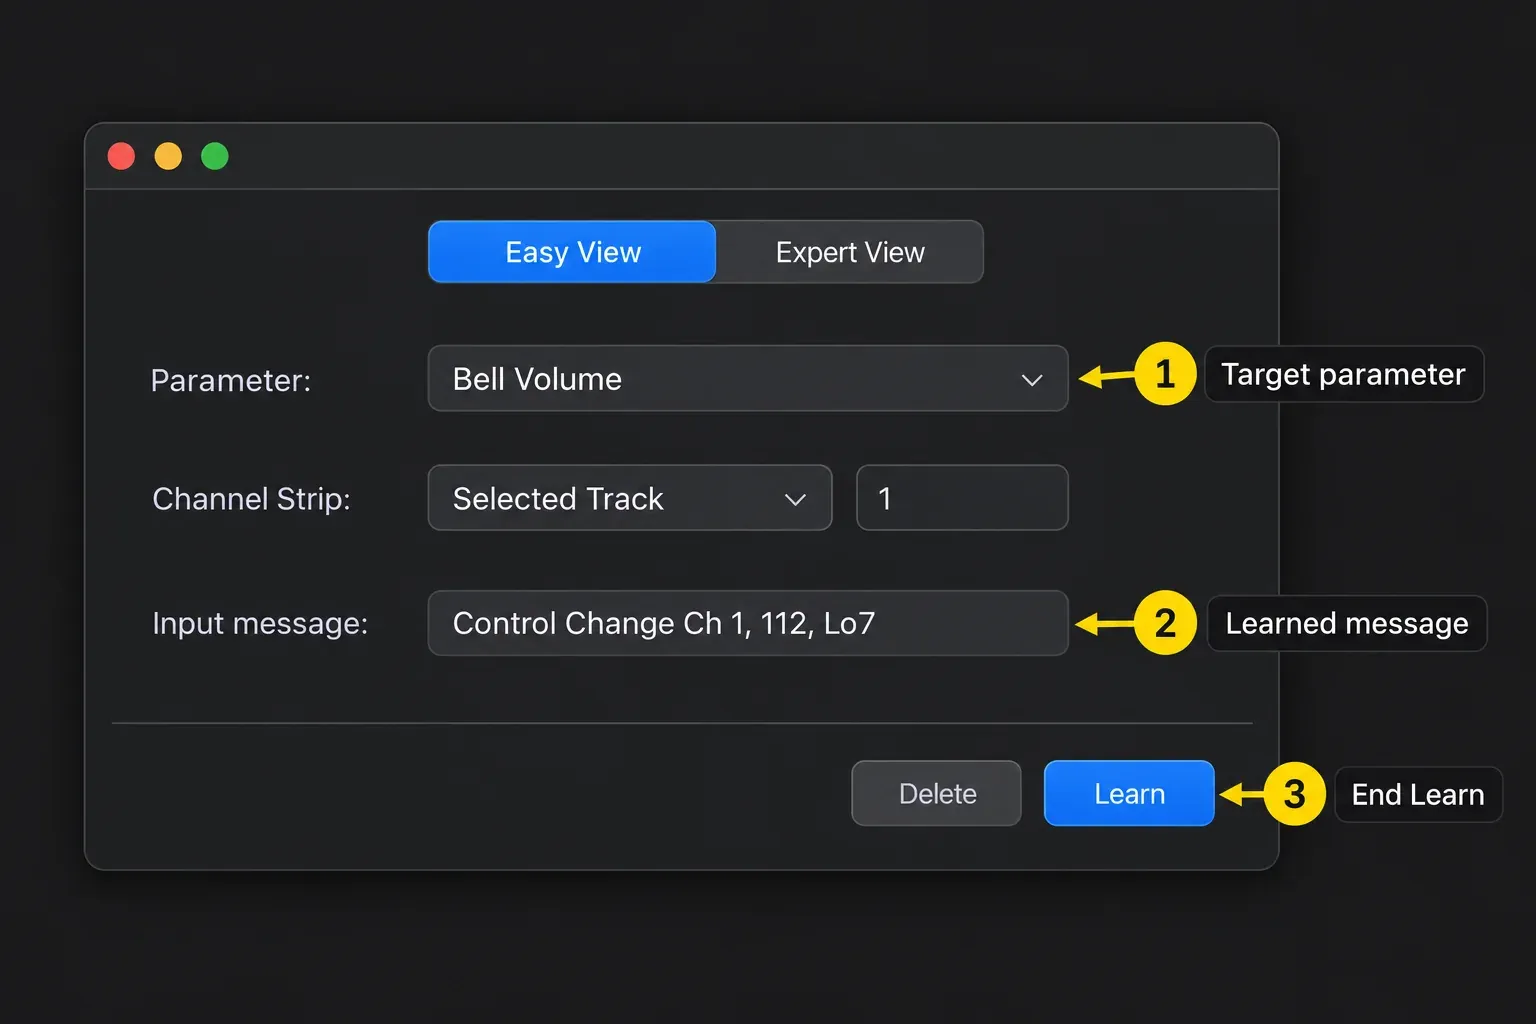
Apple’s Easy View instructions explicitly require ending Learn Mode. To pin an assignment you already learned, select it in Expert view and choose Pinned to Track from the Channel Strip pop-up menu, following Apple’s pinning instructions. The new-assignment option above changes the default for later track assignments; turn it off again when you want new assignments to follow focus.
If a button sends MIDI notes but Learn ignores it, open the Actions pop-up menu and deselect Ignore MIDI Notes While Learning. Learn that button, end Learn Mode, then restore the option if you want keyboard notes ignored during future mapping sessions. This exception is not evidence of a broken cable.
Assign transport buttons through Key Commands
For an unsupported controller, Play, Stop, Record, Cycle, marker navigation, and other command-style actions can be learned in the Key Commands window.
- Open Logic Pro > Key Commands > Edit.
- Search for the command you want, such as Play or Record.
- Click Learn New Assignment.
- Select the command in the Command column.
- Press the controller button once and wait for Logic to receive the complete MIDI message.
- Test the button while the Key Commands window is closed.
Apple's controller-assignment procedure for key commands also provides a Delete Assignment control. Use it when the learned button triggers the wrong command. Do not stack a second assignment over a bad first attempt.
Keep assignments predictable across tracks and projects
- Write down the target and scope. “Fader 1 = focused track volume” differs from “Fader 1 = pinned vocal track volume.”
- Save and quit normally before testing persistence. Save the project for pinned assignments. Apple’s Controller Assignments overview says app-level assignments and Control Surfaces settings are stored automatically on quit in
~/Library/Preferences/com.apple.logic.pro.cs. - Preserve the existing setup before replacing files. If a model-specific installer requires replacing that preference file, quit Logic first and keep a backup of the original file and your project. Follow the current manufacturer procedure; deleting preferences is not a routine mapping step.
- Test the same project, then an empty project. A pinned assignment should return in its original project and is not expected to work in an unrelated empty one. A focused assignment is app-global, but needs a track or plug-in with the assigned parameter. Smart Control parameter mappings belong to the patch.
- Avoid conflicting routes. Check existing vendor, Auto Assign, Smart Control and manual assignments before adding a replacement. Do not remove a working map just because another setup method exists.
If you want a knob movement recorded over time, mapping is only the setup. The next job is writing or recording that movement as Logic Pro automation.
Fix the common MIDI controller setup failures
Logic shows no MIDI activity
Reconnect the controller before launching Logic, try a known data-capable cable and another port, and check Audio MIDI Setup in macOS. Confirm that the device is powered and that any required current driver or firmware is installed. Do not start by deleting Logic settings.
Notes work, but knobs or faders do not
The connection is carrying MIDI notes. Check whether the controller has a Logic-specific mode, whether Auto Assign is available, and whether the control sends a message in Controller Assignments. Then learn one control with the method that matches its job.
One control moves the wrong parameter
First check the assignment’s target and scope. A focused assignment changes target when you select another track; pin it if you need a fixed target. If the mapping is wrong, select that assignment and delete it before relearning. Check active vendor mappings too. Multiple routes can make one movement affect more than one target.
If an encoder jumps, moves backward or reaches an extreme, compare the controller’s output mode with Expert view’s Value parameters. Absolute controls normally use Scaled; relative encoders normally use Relative. Match the device’s documented message format and inspect the range and Multiply value. Do not blindly set every endless knob to Relative: use the mode that the device actually sends.
The controller is detected, but there is no sound
Select a software instrument track and load a known patch. MIDI activity without audio points away from the cable and toward track selection, the sound source, mute state, or audio output. The full Logic Pro MIDI keyboard troubleshooting guide follows the failure from input to output without mixing it into this mapping tutorial.
Logic behaves strangely after mapping
End Learn Mode and temporarily choose Logic Pro > Control Surfaces > Bypass All Control Surfaces as an isolation test. If the problem stops, inspect control-surface assignments and duplicate device entries. Turn control surfaces back on after the test. This is a reversible check, not a fix by itself.
Frequently asked questions
Does any MIDI controller work with Logic Pro?
Many controllers can send standard MIDI notes to Logic, but automatic mapping and deeper integration depend on the model, its operating mode, current drivers, and Logic's supported-device scripts. Check the current manufacturer and Apple documentation for the exact controller.
Why does my MIDI keyboard play notes but the knobs do nothing?
Note input and control mapping are separate. The keys can reach a software instrument while the knobs have no assigned Logic target. Use Auto Assign for a supported controller, Smart Controls for a patch-facing control, or Controller Assignments for an exact parameter.
How do I map a MIDI knob in Logic Pro?
Select the target parameter, choose Logic Pro > Control Surfaces > Learn Assignment for it, move the physical knob, then end Learn Mode. For a fixed track or plug-in target, set Expert view > Channel Strip > Pinned to Track. For a Smart Control, use its inspector’s External Assignment > Learn route.
How do I map Play and Record buttons?
Open Logic Pro > Key Commands > Edit, choose Learn New Assignment, select the Play or Record command, and press the controller button once. Test it after closing the window and delete the assignment if it triggers the wrong command.
Are MIDI controller assignments saved with the Logic project?
Pinned track and plug-in assignments are saved with the project and work only in that project. Focused-track assignments are saved globally with Logic and follow a compatible selected target across projects. Smart Control parameter mappings are saved with the patch. Save the project, quit Logic normally, then reopen it and test the intended scope.
How do I record what I play on the controller?
Once note input works, record-enable or select the software instrument track, set the count-in and metronome as needed, and record a MIDI region. Continue with the Logic Pro MIDI recording guide for takes, overdubs, quantization, and editing.
Map one control, then make music
The setup is ready when notes play, the intended control responds, and its behavior survives a restart. Test track selection as well as reopening the project: those checks separate a focused mapping from a pinned one. The Create Music in Logic Pro hub continues with recording, beat making, synthesis, sampling and arrangement.


