How to Use Sample Alchemy in Logic Pro
Sample Alchemy makes one sample playable and strange in the useful sense. Start with the source, choose its playback behavior, then add synthesis and Motion only where they serve the part.

Start with one useful sample, choose how it should play, then shape the source and synthesis in separate passes. Sample Alchemy turns one audio file, loop or region into a playable instrument that can move, stretch and resynthesize the source. Touching every control at once is the fastest way to get lost.
These steps follow the current Mac workflow. They cover what the five play modes change, how the A, B, C and D sources relate to one loaded sample, and where Motion, Trim and MIDI recording fit. For a one-shot or slice workflow, use Quick Sampler in Logic Pro instead.
Load one sample and start with the right track
Sample Alchemy is built around one loaded sample. The four source modules read and reshape that same material in different ways. They aren’t four separate audio files. Adding more sources makes one instrument denser, but it doesn’t create a four-sample multisample map.
Use one of Apple’s documented loading routes:
- Drag a sample or Apple Loop from the Loop Browser into Sample Alchemy’s waveform display.
- Drag an audio region from the arrangement into the waveform.
- Drag an audio file onto a software instrument track header, then choose Sample Alchemy in the Create New Track using dialog.
- Open the Sample pop-up menu at the top of the instrument, choose Load Audio, and select the file in Finder.
Apple’s Sample Alchemy source-material guide describes these routes. Keep the original region or file available while you shape the instrument. The waveform view is the working source, so you need a clean way back when a trim or motion pass goes too far.
Choose playback behavior before synthesis
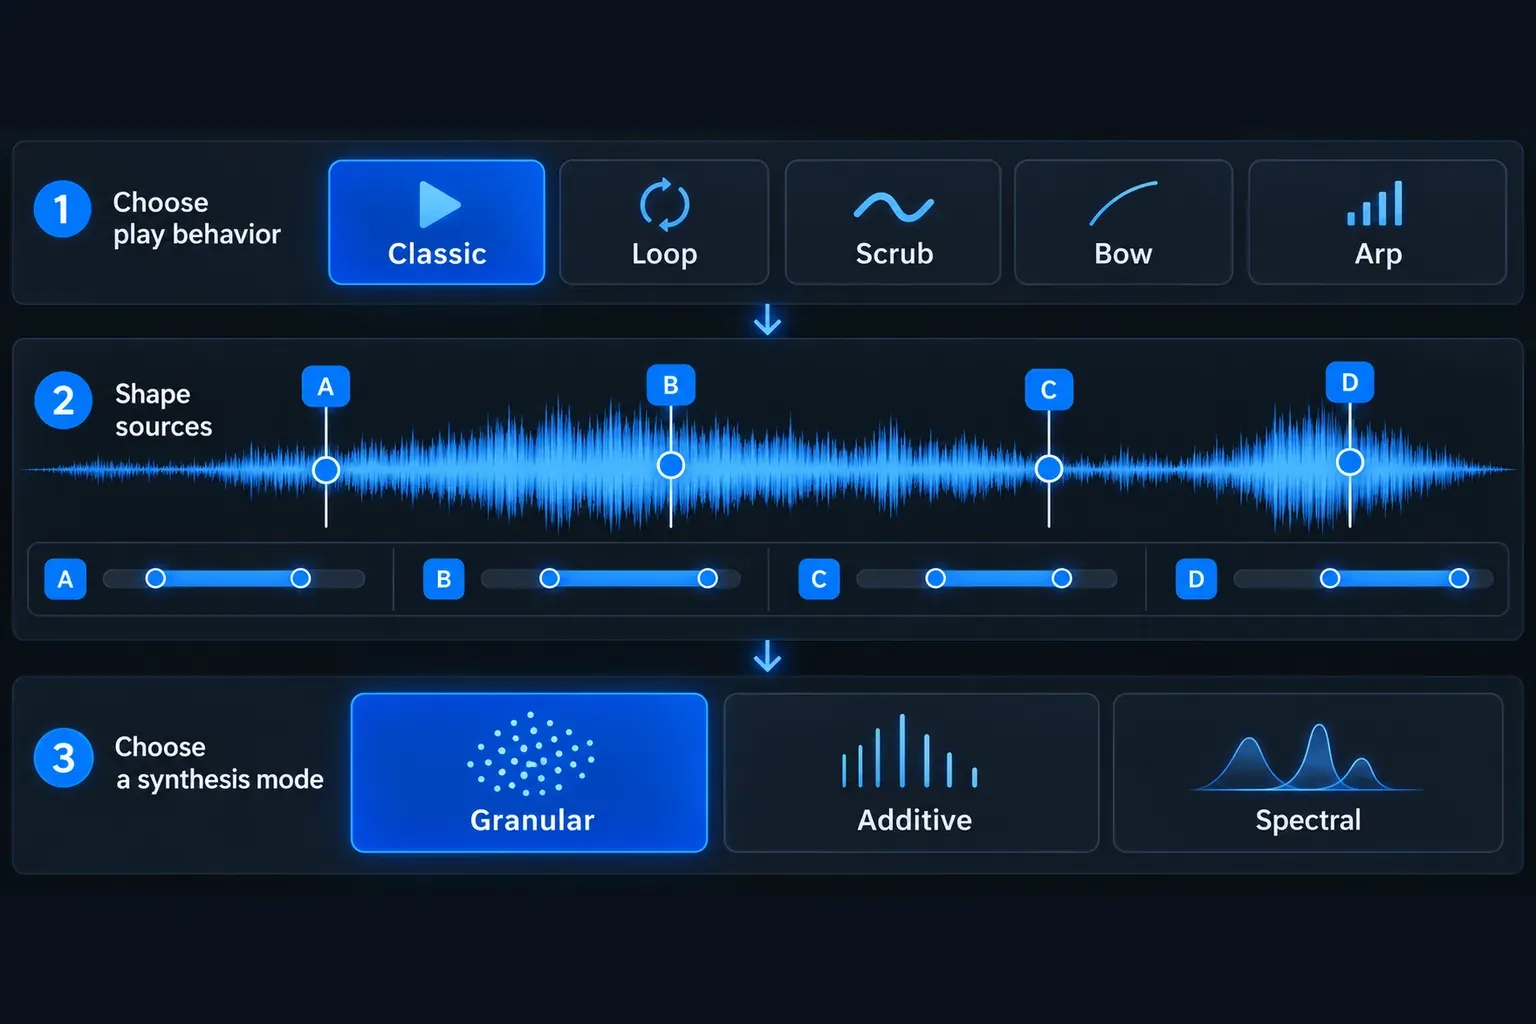
Select Play, then choose a mode. Apple documents five choices, and each one answers a different question about how a held MIDI note should read the waveform.
| Mode | What it does | Good starting use |
|---|---|---|
| Classic | Starts at the source handle and plays toward the end of the sample. | A conventional playable sound or a phrase that should run forward. |
| Loop | Repeats between the source handle and its loop end point. Reversing their order plays the section backward. | A sustained texture or rhythmic fragment that needs a repeatable region. |
| Scrub | Plays around the handle position, with up to four enabled sources sounding together. | A tight texture, rough tape-like movement or a fixed part of a recording. |
| Bow | Alternates forward and reverse motion around the handle like a bowed action. | A sustained motion that should travel back and forth through the source. |
| Arp | Creates repeating patterns from different source sections in response to incoming MIDI notes. | A rhythmic pattern when the sample should behave like a playable sequence. |
Apple’s play-mode reference is the useful source for these boundaries. Do not start with Arp because it looks active, or with Loop because the word sounds familiar. Choose the mode that matches the part. A held pad and a chopped rhythmic hook need different playback rules before any synthesis is added.
Shape the four sources without losing the original
Click a source button to select A, B, C or D. Turning a source on makes it a sound-generating module, while the Mixer controls its level. The handles sit on the waveform so you can place each source where the useful material begins.
Horizontal handle movement changes playback position. Vertical movement changes the first parameter in the selected source module, and that parameter depends on the play mode. In Classic it’s Playback Speed, Loop uses Loop Speed, Scrub uses Scrub Jitter and Bow uses Bow Rate. The source controls reference documents those relationships and the separate pan and tuning controls.
Use the source buttons and Mixer before adding a new engine. Start with one source, find the useful section of the waveform, then enable a second source only when it supplies a different role. A, B, C and D can be balanced independently. Select All is useful for a broad move, but individual sources are where the instrument gets its contrast.
Use Snap when the handles or trim markers need to land on meaningful points. The menu provides Auto, Off, Transients, Beat and Fixed. Transients and Beat are useful for rhythmic material. Fixed restricts handle movement to the vertical axis in Play and Motion modes, so it isn’t a beat subdivision. Some speed-sync buttons are active only when the loaded sample contains tempo information. A disabled Sync control reflects the source and doesn’t mean the instrument is broken.
Choose Granular, Additive or Spectral per source
Once the playback behavior feels right, choose a synthesis mode for the selected source. Each source can use a different mode, so a single instrument can combine the three approaches. No single mode is the best one. Choose by the kind of change the source needs.
| Mode | Useful question | What the documentation describes |
|---|---|---|
| Granular | Should the sample break into small moving pieces? | It splits sound into grains for textures, pads and fragmented movement. |
| Additive | Should the tone be rebuilt from controllable frequency components? | It combines sine waves at different frequencies and amplitudes. |
| Spectral | Should the frequency content be reshaped directly? | It analyzes the frequency spectrum so the timbre can be shifted and reworked. |
The descriptions above come from Apple’s Sample Alchemy synthesis-mode guide. Granular fits when the useful result is motion inside the source. Additive suits harmonics that need a more deliberate rebuild, and Spectral is for cases where the tone’s frequency shape is the important decision. Keep the first pass simple: one source, one mode, one clear change. If you pick Granular, Apple’s starting points help: with the Classic effect, Size around 100 ms and Density around 5 suit smooth pads, while Size between 40 and 80 ms with Density around 2 suits drums and other sharp transients.
After the synthesis choice, finish the tone in the filter and envelope sections before recording any Motion. The Sample Alchemy filter module offers lowpass, bandpass, highpass, Comb PM, Downsampler and FM types. Each source can keep its own filter until you turn on Global, which applies one filter type and configuration to all sources. Use the Amp envelope’s Attack and Release to set how a note fades in and how long it takes to die away after you let go of the key. For brightness that moves with each note, open the Mod Matrix, click the filter cutoff control to make it the target, choose the modulation envelope in the Source pop-up menu, then use the Amp/Mod button to shape that envelope.
Trim the source before recording Motion
Open Trim when the usable material is only part of the loaded file. Set the start and end markers around the section that should feed the instrument, then use Snap if the cut should land on a transient or beat. Trim markers define the usable sample. They’re separate from the source handle and the loop bounds in Play mode.
Motion is for recorded handle movement. In Motion mode, click Record, move a source handle, and release it or click Stop. The record control waits for a handle move or MIDI input, so pressing Record alone doesn’t create a finished movement. The resulting sequence loops and follows the project tempo. Duration stretches the motion and its loop points, while Loop Start and Loop End decide which part repeats.
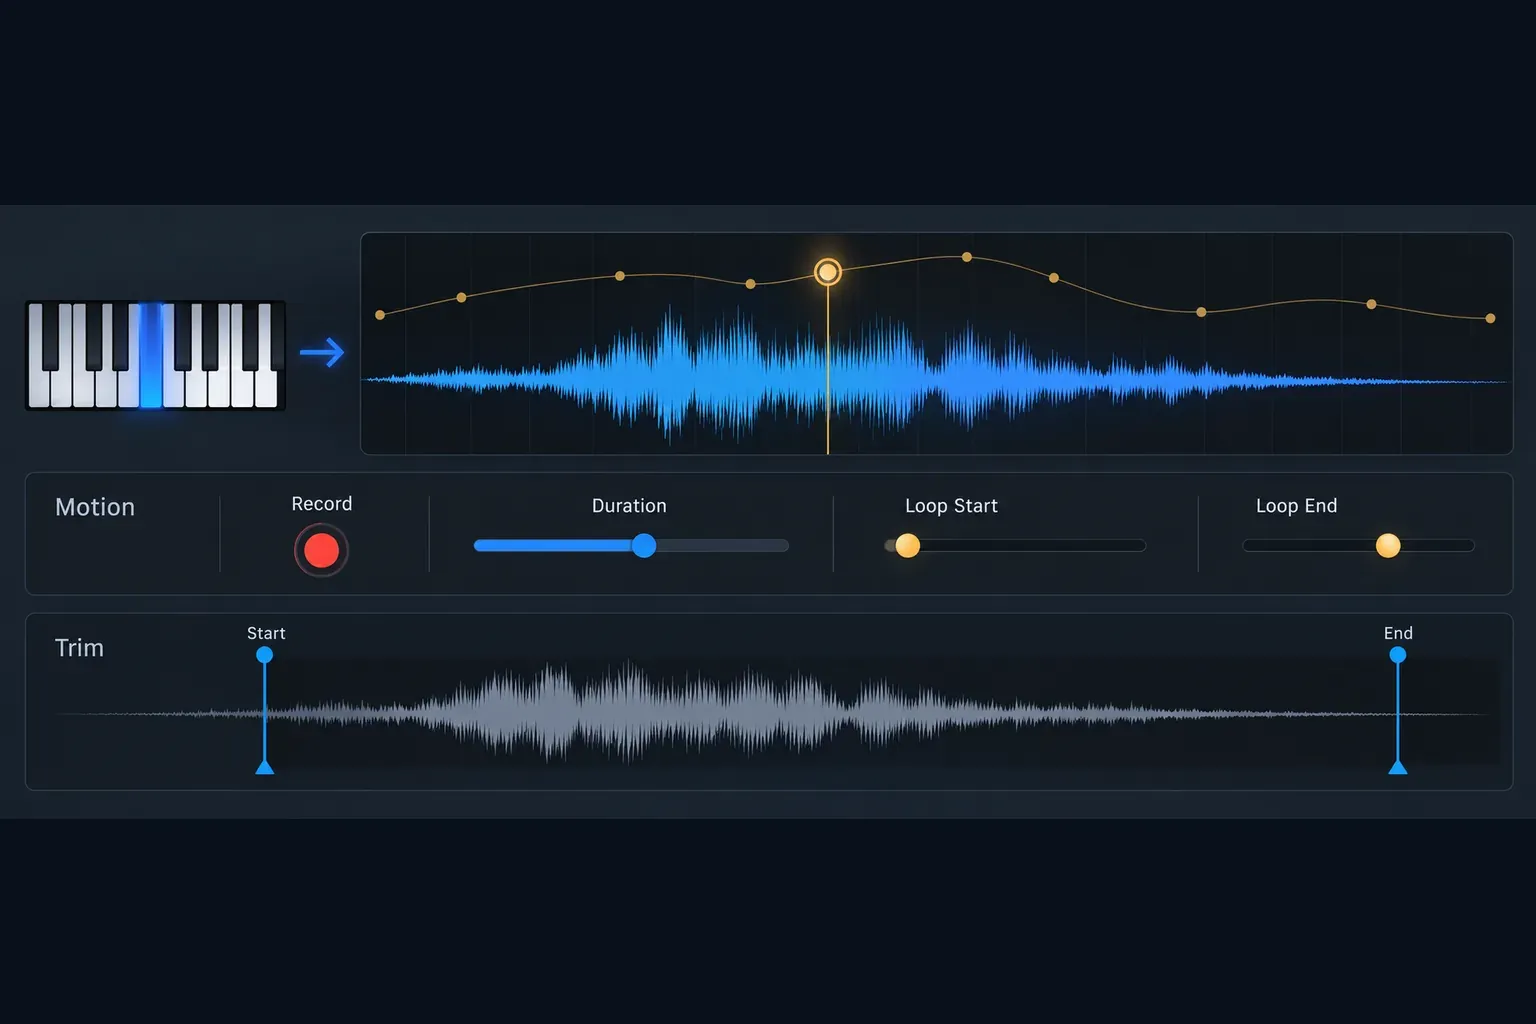
Apple’s Trim mode guide and Motion mode guide keep these jobs separate. Use Trim to remove irrelevant material. Use Motion to automate movement over time. If both are changing at once, troubleshooting becomes guesswork.
Make Preview, MIDI and sample settings explicit
In the More menu, Preview mode controls what happens when you click a source handle. With Preview on, the handle click generates a MIDI note. With Preview off, the click is silent and that preview note can’t be recorded into a Logic MIDI region. That’s an audition setting. It doesn’t mean the instrument has no audio.
When a handle performance needs to become editable MIDI, select the software instrument track under Internal MIDI In > Instrument Output, then record the movement as documented in the source and MIDI reference. For pitch-heavy material, Pitch Lock can make the source follow one root key before keyboard playback. Sample Lock keeps the current sample when you change presets. Those locks solve different problems, so don’t use one as a substitute for the other.
The same More menu exposes Root Key, Root Cents, sample Tempo and Derive Tempo from Loop Length. Set tempo information only when the source has a meaningful rhythmic relationship to the project. Speed Sync and Loop Speed Sync depend on that information. If the sample isn’t rhythmic, leave the tempo relationship out of the instrument instead of forcing a grid onto it.
Export the source and keep the instrument portable
The Sample pop-up menu can load a file, show the current sample in Finder or use Export Audio to save the source sample. Exporting the source isn’t the same as rendering a full performance with Motion, MIDI and effects. If another part of the project needs the original audio, export that source on purpose. Don’t assume the instrument is a bounce.
The More menu also includes Create Alchemy track, which creates a new Alchemy track containing the current Sample Alchemy audio material. Use that route when the sound needs the deeper Alchemy environment. For the current instrument, save the Logic project after the source, play mode, synthesis and Motion decisions are in place. A descriptive project name makes the relationship between the sound and the source easier to recover later. Apple’s source-material guide documents the import and export menu paths.
Fix the common Sample Alchemy failures
- No sound from a handle: check that the source is enabled and that the selected Play mode is doing what you expect. If the click itself is silent, check Preview mode. If a MIDI performance is silent, check the software instrument track and its audio output.
- Sync is unavailable: the loaded sample may not contain tempo information. Use free speed control or set a meaningful sample tempo in More before expecting a tempo-synced result.
- The loop clicks: move the loop start or end to a steadier waveform area, then use Snap or a different section. A trim marker and a loop marker solve different problems.
- The patch becomes crowded: turn off B, C or D and rebalance the remaining source. Four sources are available; four sources are not required.
- A preset changes the source: turn on Sample Lock before changing presets when the current audio must stay in place.
- The motion feels too long or too short: adjust Duration, then check Loop Start and Loop End. Motion follows the project tempo, so changing the project can change how the same beat length feels.
Choose the right Logic Pro sampler
Sample Alchemy is the right choice when one sample should become a playable, moving instrument with source handles and resynthesis. For a one-shot, slice or straightforward recorded sound, I’d go straight to Quick Sampler, since none of those jobs needs resynthesis. If the decision is about mapping several files and choosing the right sampler workflow, read Sampler versus Quick Sampler. Use full Alchemy when the sound needs its broader synth architecture rather than Sample Alchemy’s focused sample-first path.
That choice keeps the session easier to read. Load the source once, decide how it should play, shape the few controls that matter, and save the project while you still know what each source is doing.


