How to Use Alchemy in Logic Pro
Use Alchemy without getting lost: find a useful preset, shape it in context, then import audio or open Advanced view only when the sound needs deeper work.

To use Alchemy in Logic Pro on Mac, load it on a software instrument track, click Browse and choose a preset. Play your MIDI part, then use the Transform Pad and performance knobs to change the sound. Advanced view gives you the source, sample-import and modulation controls when you need to go further.
Start with a preset if you need a playable bass, pad or lead. Start with an initialized patch if you want to build the sound yourself. Both workflows are below, along with sample import, saving and CPU troubleshooting.
Load Alchemy and get sound first
- Create a software instrument track.
- Click the channel strip’s Instrument slot and choose Alchemy. If another instrument is already loaded, use the arrows at the right of its slot to replace it; save any sound you want to keep first.
- Click the center of the Alchemy slot to open its window, then click Browse.
- Choose a category that matches the musical job, then audition presets while the project plays.
- Record a short MIDI phrase before redesigning the sound, because note range, rhythm, and velocity change whether a preset works.
Without a MIDI keyboard, select the Alchemy track and choose Window > Show Musical Typing or press Command-K. Apple’s Musical Typing instructions also cover octave and velocity changes from the Mac keyboard.
If the preset list looks empty, clear the search field and choose All in the browser’s filter columns first. If the sound content itself is missing, check the installed content and library location using the Sound Library guide. Alchemy’s File > Refresh Library rescans default preset locations; it does not download missing samples. The Name bar reference distinguishes this command from the separate Save and Save As buttons.
Use the view that matches the job
| View | Use it for | Leave it when |
|---|---|---|
| Browse | Finding, filtering, rating, and auditioning presets | You have a sound that already fits the part |
| Simple | Performing and automating a compact set of assigned controls | You need to change the sound source or modulation routing |
| Advanced | Editing sources, filters, voices, modulation, morphing, arpeggiator, and effects | The musical problem is already solved |
Apple’s interface overview describes all three views. Click Browse explicitly if Alchemy opens in Advanced view; there is no need to edit sources just to choose a preset.
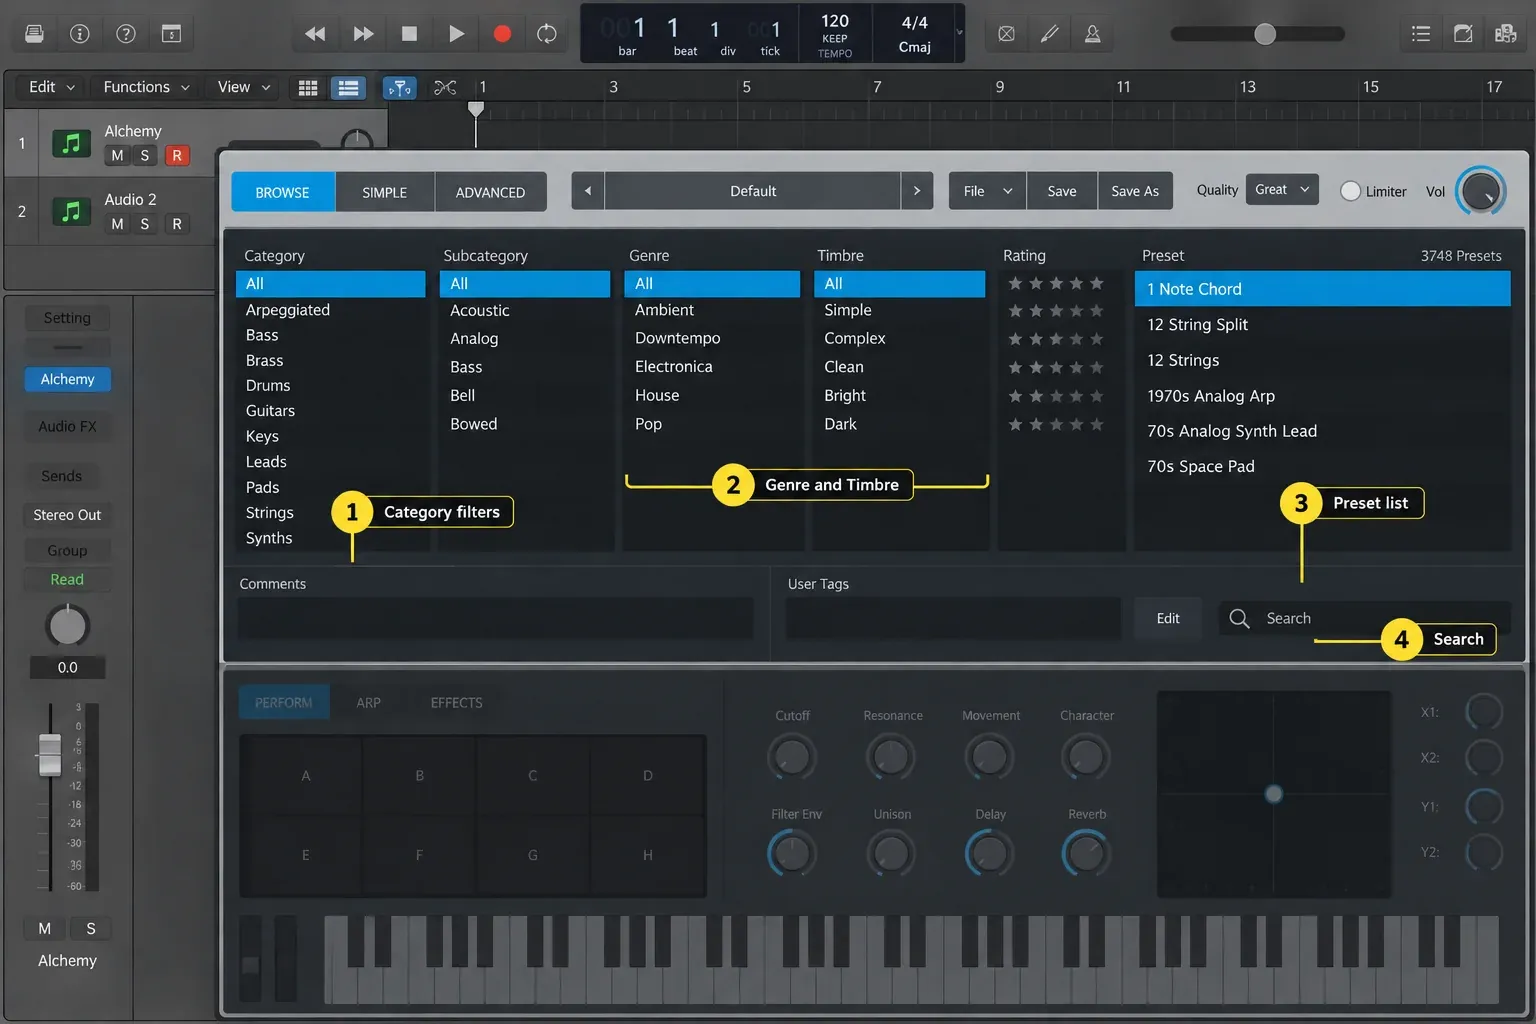
Find a preset without auditioning the whole library
Choose a category that fits the part, then narrow the results with a subcategory or attribute. For text search, type a term and press Enter or click the magnifying glass. A minus sign excludes a term: Apple’s browser instructions use analog -bass to find analog presets without bass matches. Column filters still apply to text searches, so clear them if the results seem incomplete.
Play the same MIDI phrase through each candidate. Listen for a usable range, a suitable attack and release, and movement that fits the rhythm. A slow pad may miss the start of a short chord even when its tone is right. Click the rating stars beside a useful preset, or use User Tags > New Tag to give it a searchable label.
Shape a preset with the Transform Pad
The Perform section provides eight knobs, two XY pads and envelope controls. Its Transform Pad has eight snapshots of performance-control settings, not four complete presets. Drag the framing box between them to morph the assigned controls. Which sound parameters change depends on the preset’s assignments.
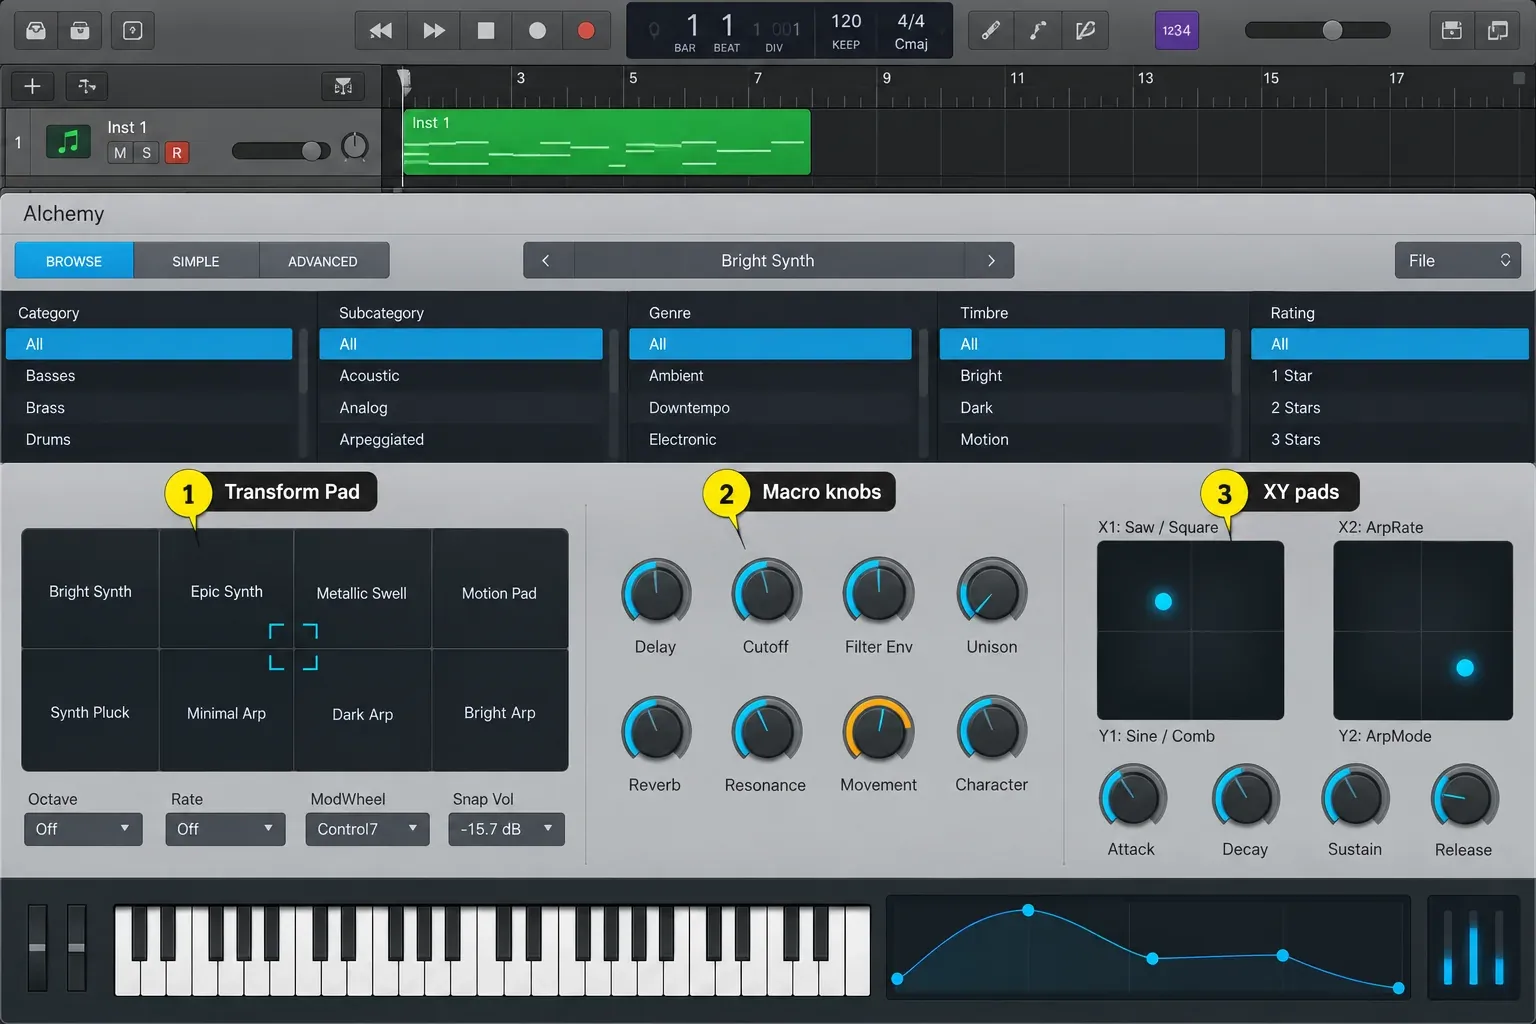
Use a movement you can hear in the arrangement: brighten a chorus, reduce motion under a vocal or lengthen a release. Apple confirms that performance controls are available to track and region automation. The Logic Pro automation guide explains how to record and edit that movement. If a snapshot edit reverts when you move the pad, check Snapshot Update in the Transform Pad’s action menu; it controls whether edits update the nearest snapshot.
For an unwanted repeating phrase, open Browse or Advanced view, click Arp and set Mode to Off. Check All and any separately configured A–D arpeggiators, because sources can use different patterns. Apple’s arpeggiator controls explain those targets. A pulse that remains may come from modulation or an effect rather than extra MIDI notes.
Click Save As in Alchemy’s Name bar to save your variation as a new .acp preset. For a copy with referenced user audio, choose File > Save Consolidated. Apple explicitly excludes supplied factory samples from that copy, so the destination Mac still needs the relevant library content. Open the saved preset there and check every source before treating the transfer as complete. Save As preserves a named version; even the Save button opens Save As when the original belongs to App Presets.
Understand sources and synthesis engines
Alchemy can combine up to four sources, A through D, and each can use more than one synthesis element. You can crossfade or morph between sources. Start with one, then add another only when you can identify what it contributes.
| Engine or import mode | Useful starting job |
|---|---|
| VA | Build a conventional synthesized oscillator sound without imported audio |
| Sampler | Play imported audio in a relatively direct form across the keyboard |
| Granular | Stretch, scatter, freeze, or turn a sample into an evolving texture |
| Additive | Resynthesize a pitched single note for detailed harmonic manipulation |
| Spectral | Resynthesize chords, loops, and other complex or polyphonic material |
| Add+Spec | Keep a tonal body while capturing noisy detail such as a strike or breath |
These are starting choices, not sound-quality rankings. Apple’s Import browser reference lists WAV, AIFF and Sampler .exs instruments. Multiple-file import accepts WAV and AIFF. Pitch information in a filename can affect root-note mapping, so audition the imported notes rather than assuming every mode has detected the pitch correctly.
Import audio into Alchemy
- Save the current preset if you want to keep it, then switch to Advanced view.
- Select source A, B, C, or D.
- Click that source’s select field and choose Import Audio.
- Choose Sampler, Granular, Additive, Spectral, or Add+Spec from the job the source must do.
- Choose Pitch mapping for chromatic playback or Drum to map separate files to individual keys beginning at C1.
- Select the file, use Preview to audition it, then click Import. For multiple files, Command-click or Shift-click; use the Dropzone to collect files from different folders. If the Dropzone contains files, Import uses that list rather than the selection in the file browser.
- Play the intended key range and check the imported pitch, source level and envelope before adding another layer. For a stereo file, enable the source’s double-circle Stereo button if you need both channels; the single-circle setting plays only the left channel.
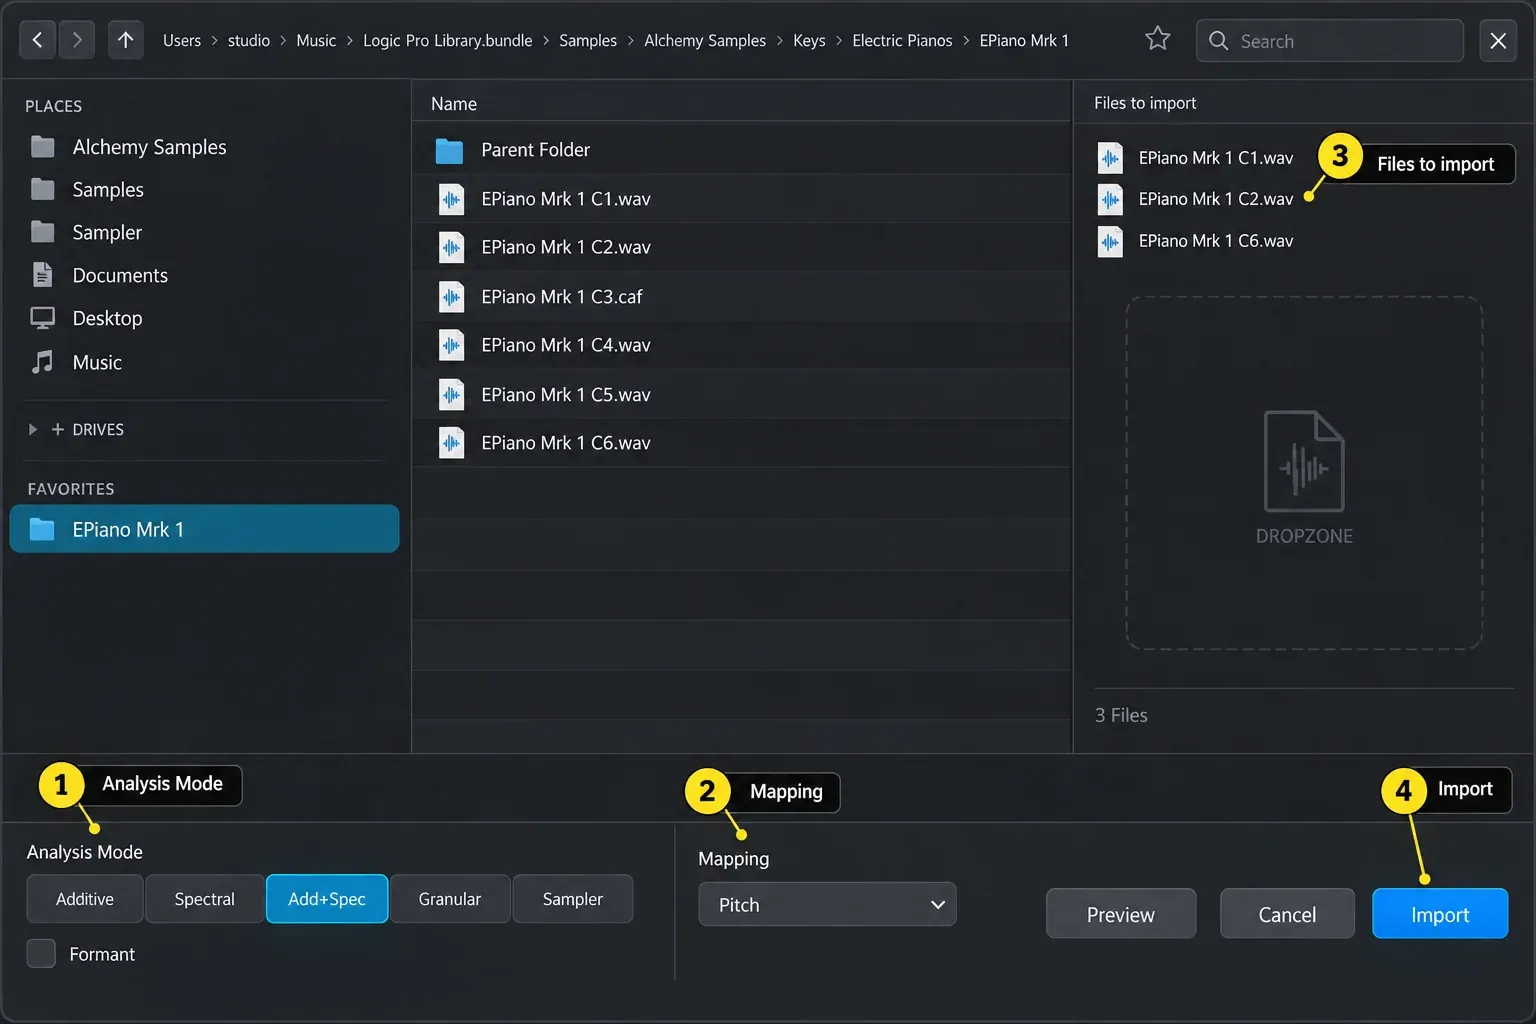
Another route is to drag an audio file, region or Apple Loop onto the track header of an existing Alchemy instrument. The “Replace existing sound with” choices are Additive, Granular and Spectral. This replaces the sound, so save your current version first. Dragging onto a source field inside Advanced view is a different route. Use the full Import browser for Add+Spec, Formant analysis or explicit multi-file mapping.
If some keys switch snapshots instead of playing notes, set the Transform Pad’s Octave menu to Off. For an imported sample that loses its stereo image or changes pitch unexpectedly, inspect the selected source’s Stereo and Keyscale controls. Apple’s source controls distinguish Key+PBend, Key and Off; Off ignores MIDI note and pitch-bend changes. For a granular texture, Speed at zero holds the playback position while Position selects the material you hear. Speed has no effect in Sampler mode.
Add one modulation you can hear
In Advanced view, Control-click the target control, such as filter Cutoff, then choose Add Modulation and a source such as LFO 1, an AHDSR envelope, velocity, or a Perform control. Click the target again to see its modulation rack. Alchemy can assign up to ten modulators to one target, but the first useful assignment should be clear before you add the second.
Try LFO 1 on a source’s Volume knob: select the target, choose LFO > LFO 1 in an empty modulation slot, then adjust the Depth knob beside that slot while holding a note. Click LFO to edit Rate. Apple’s modulation guide walks through this tremolo assignment; the LFO controls reference confirms that Depth belongs to the rack, not the LFO panel.
Build a simple patch from scratch
- Save any work you want to keep before choosing File > Initialize Preset in Alchemy’s Name bar. It resets the instrument to a basic sawtooth and enables wide unison; adjust unison if you do not want it.
- Keep source A active and choose a VA oscillator or import one source.
- To shape the initialized patch’s amp envelope, click Global, then the master Vol knob and select its AHDSR 1 assignment. Adjust Attack and Release while playing the intended phrase; keep the sound’s start and end audible in the mix.
- Use a main filter to remove or shape harmonics before reaching for effects.
- Add one modulation that creates necessary movement.
- Add only the delay, reverb, distortion, or other effect the part needs in context.
- Match the output level to the other sounds in the project, then save the patch with a searchable name.
Choose Alchemy, Quick Sampler, Sampler, or Sample Alchemy
- Quick Sampler: use one audio file in Classic, One Shot, Slice or Recorder mode. Follow the Quick Sampler guide for that workflow.
- Sampler: use multiple files, key and velocity zones, groups or existing sample instruments. The Sampler comparison explains when that mapping workflow is useful.
- Alchemy: choose deep preset shaping, four sources, resynthesis, morphing, and a large modulation system.
- Sample Alchemy: choose the more focused single-sample workflow when you want immediate additive, spectral, or granular manipulation without Alchemy's full architecture. Apple describes that boundary in its current Sample Alchemy overview.
Alchemy is not the same plug-in as Sample Alchemy. The latter works from one sample even though it can have four playback sources. Choose the interface that gives you the edit you need; more synthesis controls do not automatically produce a better part.
Fix Alchemy CPU overloads
- In Alchemy’s Name bar, lower Quality to Good while editing if the track overloads the CPU.
- In Logic’s Audio > Devices settings, raise I/O Buffer Size if you can tolerate more monitoring latency. Apple advises avoiding values below 64 samples for Alchemy; 64 is not a guarantee against overload, and a higher value may be needed.
- Click Advanced, then Global. In the master voice section, select All and reduce Num to the lowest polyphony that still plays the chords and release tails correctly.
- Disable sources and processing that do not change the audible result.
- Once the MIDI and sound are stable, Freeze the track or use Bounce in Place. Retain the original MIDI instrument if you may need to change the sound later.
- Before the final offline render, choose Great or Ultra and compare the result. Unfreeze first if necessary; an existing bounced audio file will not improve when you change Alchemy’s Quality. Render the instrument again if you need the revised setting.
Apple’s Alchemy performance guidance covers Quality, the buffer and rendering options. Its master voice reference identifies Num as the polyphony limit. Changing Browse to Simple view is not a substitute for those audio-processing adjustments.
Frequently asked questions
Where is Alchemy in Logic Pro?
On a software instrument track, choose Alchemy from the Instrument slot. If the slot is occupied, use its right-hand arrows to choose a replacement. Click the center of the loaded Alchemy slot to open its window. It is an instrument, not an Audio Effect insert.
Is Alchemy included with Logic Pro?
Yes. Alchemy is a built-in Logic Pro software instrument. Some presets and source content may require the relevant Logic Pro Sound Library content to be installed.
How do I import a sample into Alchemy?
Save the current sound first. In Advanced view, click a source’s select field and choose Import Audio. Choose an analysis mode and Pitch or Drum mapping, select the audio, then click Import and check the playable result.
What does the Alchemy Transform Pad do?
It morphs the preset's assigned performance controls between eight snapshots. You can move between snapshots in real time and automate the performance controls in Logic Pro.
Should I use Granular or Sampler mode?
Use Sampler for relatively direct sample playback. Use Granular when you want time stretching, grain-based movement, freezing, scattering, or a texture that departs from the original file.
Why is Alchemy using so much CPU?
Complex sources, high quality, overlapping voices, long releases, and processing can increase load. Work at Good quality, use the lowest workable polyphony, raise the buffer when practical, then freeze or bounce a finished part.
How do I save an Alchemy preset with my samples?
Click Save As in Alchemy’s Name bar to save a new .acp preset. File > Save Consolidated also copies referenced user audio, but not Apple’s supplied samples. Make sure the other Mac has the required library content and verify the preset there.
Save the sound and check the part
Save the preset, replay the MIDI part and check that its attack, release and movement still fit the song. The Create Music hub connects this sound-design step to beats, sampling and arrangement. For an 808 bass line, use the 808 tuning and envelope workflow; for a keyboard sound shaped by speech, follow the EVOC 20 PS vocoder guide.


