How to Use Quick Sampler in Logic Pro
Turn one audio file into a playable instrument, one-shot, sliced loop or fresh recording without losing track of the controls that matter.

To load a sound into Quick Sampler in Logic Pro for Mac, drag one audio file to the empty area below the track headers and choose Quick Sampler (Original) or Quick Sampler (Optimized). Logic creates a software instrument track. If you already have an instrument track, insert Quick Sampler in its Instrument slot and drag the file into the waveform display.
Choose Classic for a sound you want to hold and play across the keyboard, One Shot for a triggered hit or phrase, or Slice for a loop you want to chop. Loading the file does not record a part in your song: play the instrument with MIDI notes, then record those notes or create a slice pattern as described below.
Open Quick Sampler and load a sound
Choose Track > New Software Instrument Track. In its channel strip, click the Instrument slot and choose Quick Sampler, then click the plug-in name to open the window. You can drag in a file from Finder, the Files Browser or the Loop Browser, or a region from the Tracks area. Apple’s Quick Sampler setup instructions cover these loading routes.
The waveform display offers two import choices. Original retains the source characteristics; Optimized analyzes the sound and prepares initial settings:
| Load option | What Logic does | Choose it when |
|---|---|---|
| Original | Uses the source's original tuning, loudness, looping, and length characteristics | You already prepared the sound or want a predictable starting point |
| Optimized | Analyzes tuning and loudness, searches for loop points, crops edge silence, and can add loop and crossfade markers to cyclical material | You want Logic to prepare a rough playable version quickly |
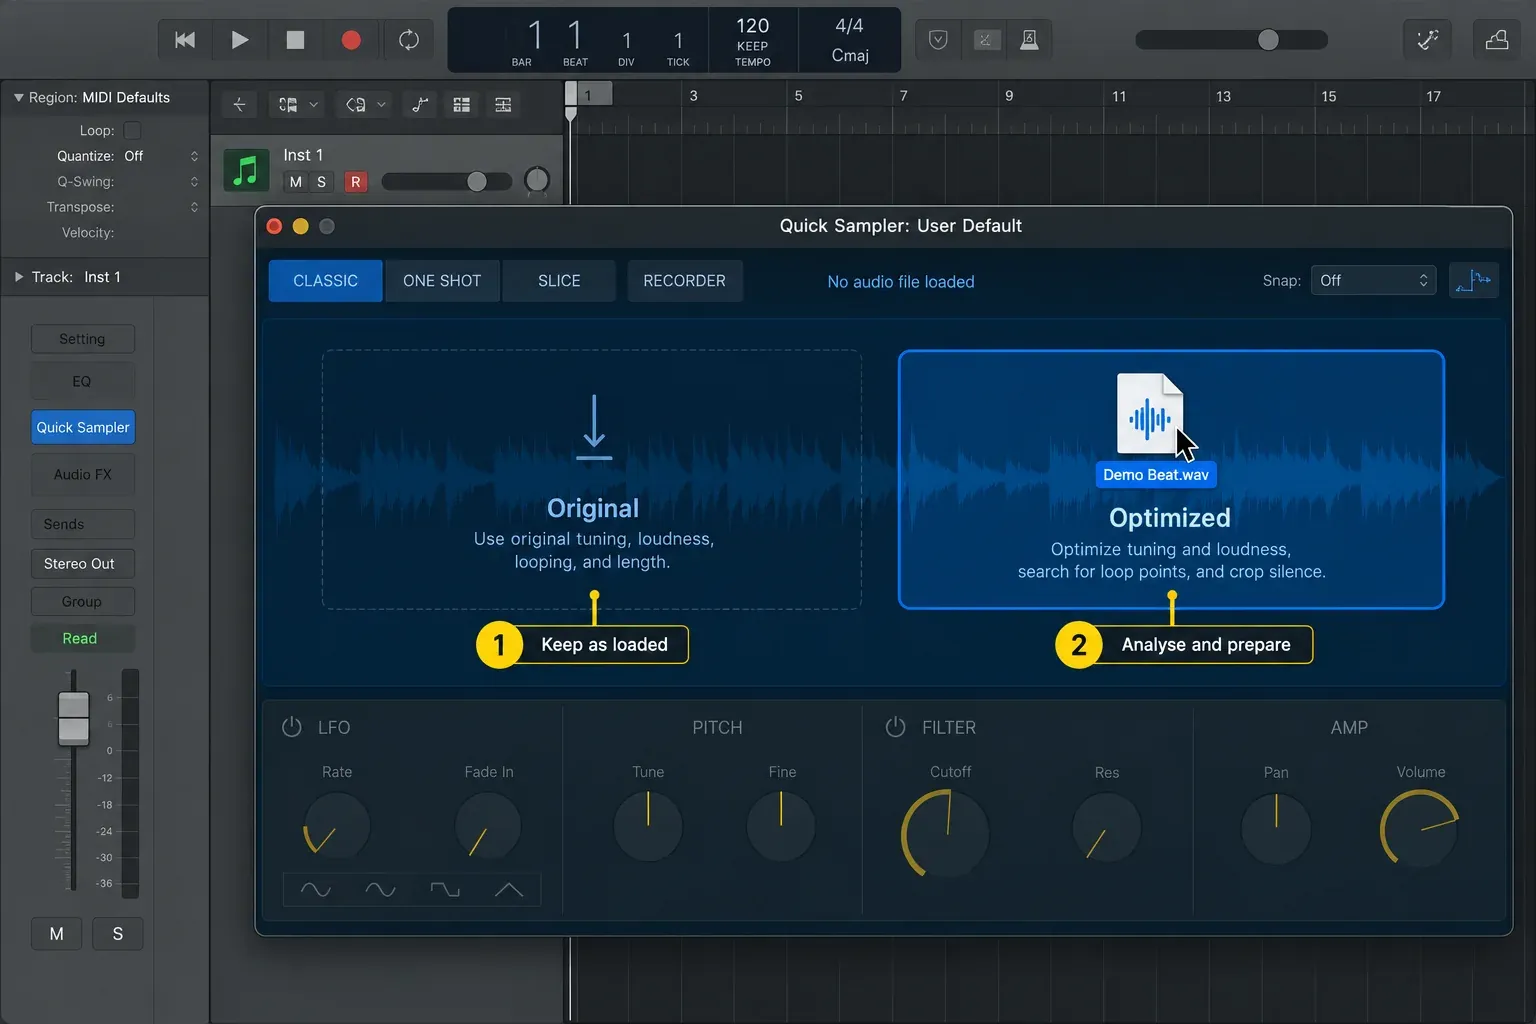
Try Original for a drum hit you have already trimmed. Optimized can help with a rough pitched recording, but audition the result: check the detected root note, the start of the sound and any loop join before recording a part. Dragging a new file onto an existing Quick Sampler track header replaces its current sound, so save a working setting before doing that.
Build your first playable Quick Sampler instrument
- Create a Software Instrument track and load Quick Sampler in its Instrument slot.
- Drag one audio file or audio region into Original or Optimized.
- Choose Classic, One Shot, or Slice according to what the sound should do.
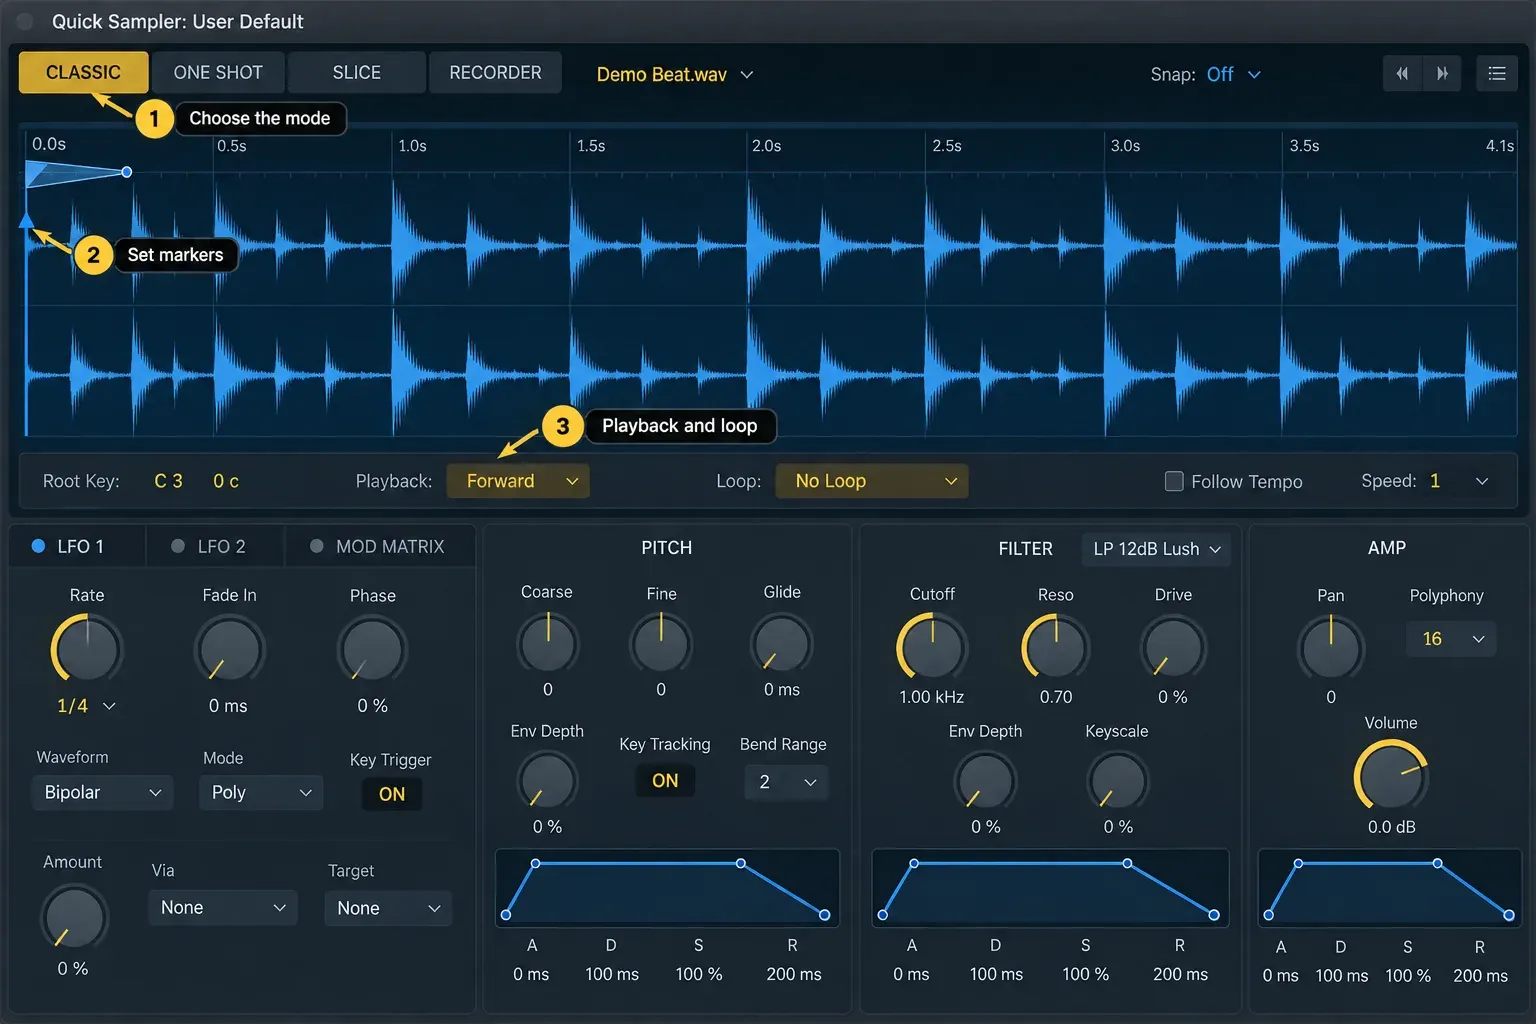
- Drag the start and end markers so the useful sound begins immediately and unwanted tail is excluded.
- For pitched material, set Root Key to the note in the original recording. Use Tune for any remaining pitch correction.
- Turn on Flex when you want different notes to keep the source duration. If tempo-aware material must also follow the project, enable Follow Tempo after Flex.
- Audition the sound. Hover over Root Key below the waveform and click the play button, or select the instrument track and play MIDI notes. Adjust the amplitude envelope and filter if needed.
- Choose Save As from Quick Sampler’s Settings menu, enter a filename and location, then click Save. Save the Logic project too. A Library patch can preserve the instrument and its associated channel-strip setup.
Without a MIDI keyboard, select the Quick Sampler track and choose Window > Show Musical Typing (Command-K). Use the displayed computer-keyboard layout to play notes; Z and X shift its octave range. To record a part, place the playhead where you want it, press R, play, then press Space to stop. Logic creates a MIDI region that triggers the instrument on playback. Apple documents Musical Typing and recording software instruments.
Choose Classic, One Shot, Slice, or Recorder
| Mode | Playback behavior | Best starting use |
|---|---|---|
| Classic | Responds to held notes and the amplitude envelope; looping is available | Bass notes, vocal tones, textures, sustained sounds |
| One Shot | Starts at the start marker and plays toward the end marker after a trigger; the Amp envelope can shorten the note | Kicks, snares, impacts, complete phrases |
| Slice | Divides one file into slices mapped from a chosen start key | Drum loops, rhythmic phrases, chopped vocals |
| Recorder | Captures an audio input directly into Quick Sampler | Voice, hardware, instruments, quick found-sound sampling |
Classic is for playing a sample like an instrument. One Shot starts playback from one trigger without making you hold the key, though the Amp envelope can still shorten the audible note. Slice is for changing the order and rhythm inside a longer file. Recorder is the capture stage. After recording, switch to another mode when you want to edit the sample. Apple describes these boundaries in its current Quick Sampler mode reference.
Trim, tune, loop, and shape the sample
Move the blue start and end markers to keep the part you want to hear. Leading silence can make a drum sound late even when the MIDI note is on the grid. In Classic or One Shot, use the gray fade handles to soften a clicking boundary, or move the boundary to a cleaner part of the waveform. Avoid trimming off the attack just to remove a click. Apple’s waveform display reference identifies the markers and handles.
For pitched material, set Root Key to the note represented by the original sample. Without Flex, notes below the root play lower and more slowly. Notes above it play higher and more quickly. That tape-like relationship may be exactly what you want. If it isn't, turn on Flex.
Classic and One Shot also have a playback-direction control. Switch it to reverse when the complete Quick Sampler source should run backward between its start and end markers. Classic can include reversed loop playback. To reverse an audio region without turning it into an instrument, use the separate nondestructive Logic Pro reverse-audio workflow.
In Classic mode, choose a loop mode and use the yellow markers to set the repeated section. A steady portion after the attack is often easier to loop than a changing phrase. Adjust the gray loop-crossfade handle and listen through the join. The amplitude envelope still affects how long the sound is audible; looping does not override it. Apple’s Classic mode controls explain loop direction and release behavior.
Flex vs Follow Tempo
Flex separates pitch from duration, so a higher note doesn't automatically become much shorter and a lower note doesn't automatically become much longer. Follow Tempo synchronizes tempo-aware audio to the project, but it's available for this job only while Flex is active. The two controls solve related stages of the same timing problem.
- Turn on Flex for a vocal phrase, texture, or sustained note when keyboard pitch changes should keep a similar length.
- With Flex active, turn on Follow Tempo for a loop or region with tempo information when it should stay synchronized as the project tempo changes.
- Leave Flex off when the natural speed-and-pitch shift is part of the sound.
Tempo information matters. Apple Loops and audio analyzed with Smart Tempo are examples of suitable sources. If a loop runs at the wrong rate, check its source tempo and the Flex Speed setting before changing your MIDI notes. In the Action menu, Derive Tempo from Loop Length can recalculate the source tempo from the selected loop length; it is not a guarantee that an incorrectly marked loop will synchronize. Apple’s Flex controls guide explains the source requirements.
Slice a loop and turn it into MIDI
In Slice mode, use Transient to place markers at detected attacks, Beat Divisions for musical divisions, or Equal Divisions for a chosen number of equal sections. You can also place markers yourself: click the waveform to add one, drag a marker to move it, or double-click the marker—not its handle—to remove it. Start Key sets the first mapped note; Start Key Mapping offers chromatic, white-key or black-key mapping. Audition the assigned notes and correct missed hits or duplicate markers. Apple’s Slice mode reference documents these controls.
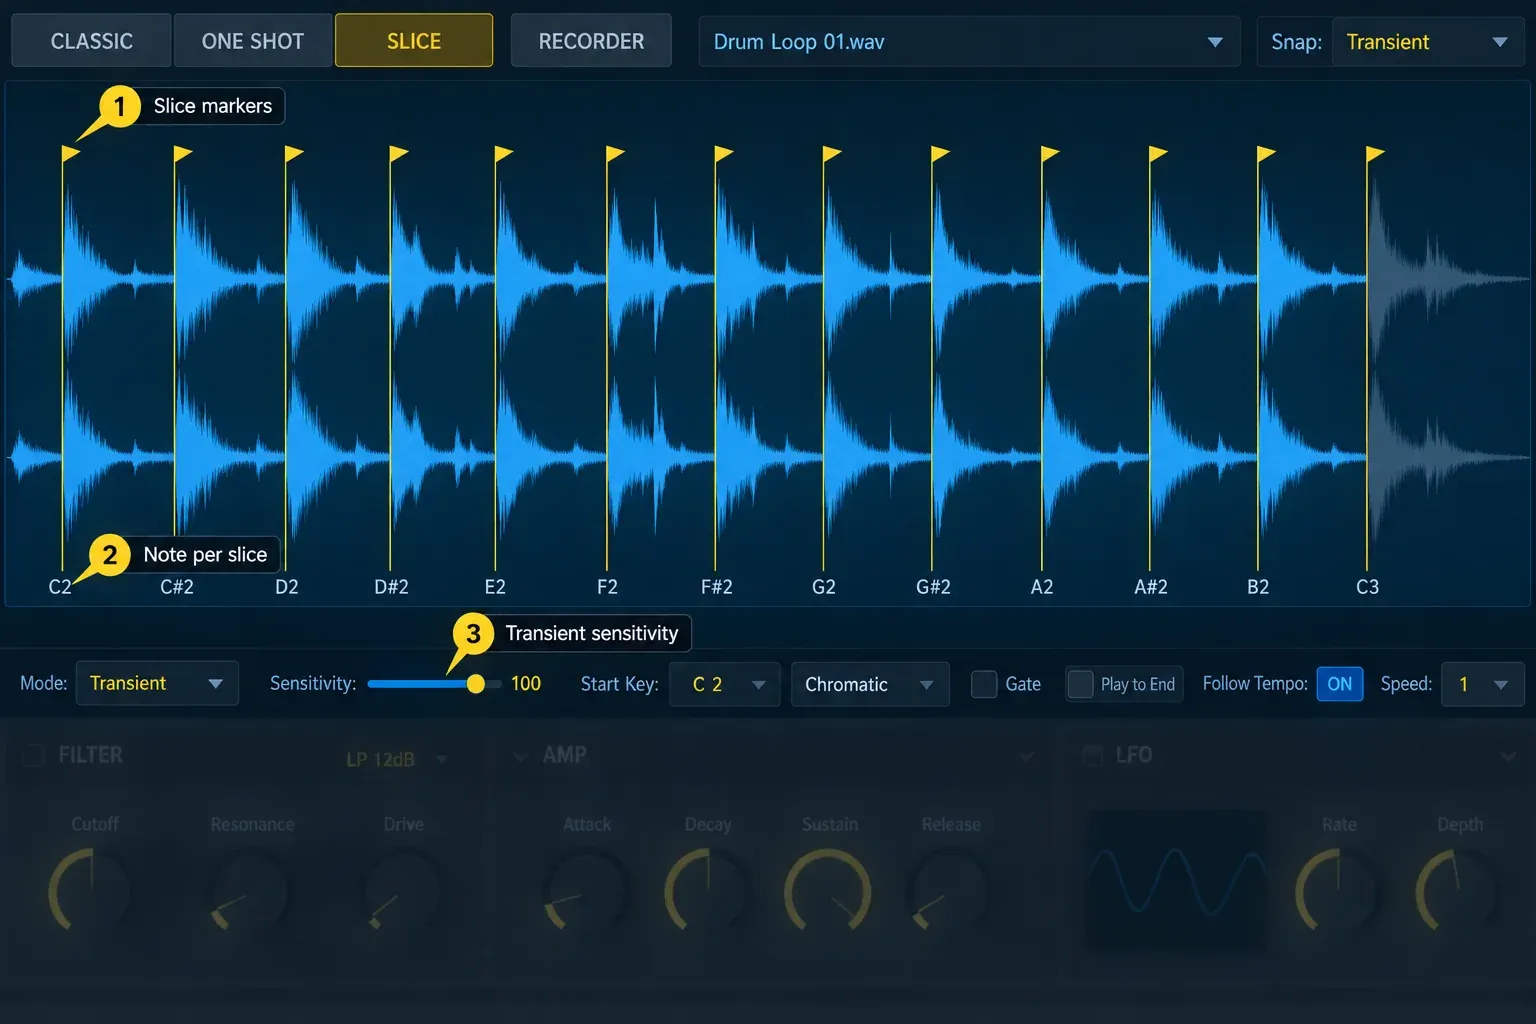
If slices stop too soon, check Gate: when enabled, releasing a key starts the release phase of the pitch, filter and amplitude envelopes. With Gate off, slices behave as one-shots. Play to End lets a triggered slice continue to the sample’s end marker. For clicking slice edges, click a slice handle to reveal Fade In and Fade Out below the waveform; those values apply to all slices, not just the selected one.
To recreate the loop as MIDI, drag from the lower part of the waveform into the lane of the same Quick Sampler track, or into a Live Loops cell on that track. Alternatively, choose Copy MIDI Pattern in the Action menu, select that track and the intended playhead position, then paste the pattern. The resulting notes trigger the slices in their original order. Edit those notes in the Piano Roll to repeat a hit, leave a gap or rearrange the phrase.
For separate drum pads and channels, choose Create Drum Machine Designer Track from the Action menu or the waveform’s shortcut menu. Logic creates a kit from the slices and a MIDI region. Use the Drum Machine Designer guide when you need that pad-based setup rather than all the slices inside one Quick Sampler instance.
Record directly into Quick Sampler
Choose Recorder, select an audio input, and decide how capture should start. Start immediately begins when you press Record. Wait for signal to pass Threshold arms the capture and begins when the incoming level crosses the threshold you set. You still have to press Record first. Use Monitor only when you can hear the input without creating feedback.
Press Record again to stop, then switch to Classic, One Shot, or Slice to edit and play the result. Apple's Recorder mode instructions confirm the input, monitoring, immediate-start, and threshold-start controls. For a quick vocal chop or a sound from external hardware, this avoids recording to a track and dragging the region back into the sampler.
Save the sampler setting or the whole patch
Choose Save As in Quick Sampler’s Settings menu, enter a filename, choose a location and click Save. Save A Copy As writes another named copy. Save updates an existing setting under its current filename; use Save As if you want to keep the original. Save As Default changes the starting setting for future instances, so it is not the normal command for storing each new sound.
To keep the instrument with its associated channel-strip setup, select its track, open the Library, click Save, choose a location and name the patch. Apple’s Quick Sampler loading and saving guide distinguishes these settings and patches. Save the project as well, and keep the source audio available. When moving a project, review project asset copying and reopen the copied project to check that the sound plays before deleting or moving its original files.
When Quick Sampler is not enough
Stay in Quick Sampler when one file is the instrument: one hit, one note, one phrase, or one loop. Open the setting in Sampler when you need a multisample instrument, deeper mapping, multiple zones, or a larger instrument-building workflow. Apple allows a Quick Sampler setting to open in Sampler, but a Sampler setting cannot be opened back in Quick Sampler. Save a copy before moving a working sound into a more complex edit. The Sampler vs Quick Sampler comparison covers that choice without repeating this one-sample workflow.
Don't switch just because Sampler has more controls. If the job is to trim a kick, pitch a vocal, or rearrange one loop, the smaller interface keeps the important decisions visible.
Fix common Quick Sampler problems
If you hear nothing, first use the play button that appears when you hover over Root Key. Then select the Quick Sampler instrument track and test it with Musical Typing or a MIDI keyboard. Pressing the project’s Play button alone will not trigger an empty track: it needs MIDI notes or a recorded pattern. This distinguishes “no part recorded yet” from a problem you also hear when auditioning inside the instrument.
The sample changes speed when I play a different note
That's normal pitch-linked playback with Flex off. Turn on Flex if you want notes at different pitches to hold approximately the same duration.
The loop does not follow the project tempo
Enable Flex first, then Follow Tempo, and check that the source has usable tempo information. Audio without reliable tempo information may need Smart Tempo analysis. If the result is twice or half the expected rate, inspect the source tempo, loop boundaries and Flex Speed setting; do not assume changing the project BPM will fix the source.
A drum hit stops when I release the key
Classic responds to held notes and the amplitude envelope. Use One Shot when the hit should continue after one trigger. If it still ends early, check the end marker and Amp envelope. In Slice mode, check Gate and Play to End as well: those controls change how a triggered slice responds to note release and where playback ends.
Slice mode cuts the loop in the wrong places
In Transient mode, adjust Sensitivity or edit the slice markers manually. In Beat Divisions or Equal Divisions, change the relevant division or slice count. Remove duplicate markers around one attack and add a marker where a quieter event was missed.
The sample sounds late or clicks at the start
Move the start marker past unwanted silence. If the new boundary clicks, add a short fade or move the marker slightly to a cleaner waveform crossing.
Frequently asked questions
Where is Quick Sampler in Logic Pro?
Create a Software Instrument track, click its Instrument slot, and choose Quick Sampler. Click the plug-in name in the slot when you need to reopen the window.
What is the difference between Original and Optimized in Quick Sampler?
Original keeps the source's tuning, loudness, looping, and length characteristics. Optimized analyzes tuning and loudness, searches for loop points, and crops silence at the edges.
Should I use Classic or One Shot?
Use Classic when the sound should respond to how long you hold the key and may need looping. Use One Shot when playback should continue after one trigger, then check the Amp envelope if the note ends before the end marker.
Can Quick Sampler slice a drum loop?
Yes. Slice mode can divide a loop by transients, beat divisions, equal divisions, or manual markers. It maps the slices from a chosen Start Key and can create or copy a MIDI pattern that reproduces the original order.
Can I record into Quick Sampler?
Yes. Recorder mode captures an audio input and can start immediately or when the signal passes a threshold after you press Record.
How do I save a Quick Sampler instrument?
Choose Save As in Quick Sampler’s Settings menu, enter a filename and location, then click Save. Save a Library patch when you also need the associated channel-strip setup. Keep the source audio available, save the project and verify a copied project before removing original files.
Use the sound in a real project
Record a short part and listen to it with the rest of the song. Check the attack, note length and pitch in that context before adding more modulation. For beats, instruments and arrangement, continue with the Create Music in Logic Pro hub.


