How to Reverse Audio in Logic Pro
Use the safe region-level Reverse switch first, understand why it may disappear, and know when file-level reversal is worth the risk.

To reverse audio in Logic Pro for Mac, select an audio region, open the Region inspector, expand More and select Reverse. Clear the checkbox to play it forward again. This changes the region’s playback without rewriting the source file.
Use that checkbox for a backward vocal, cymbal swell or reversed sample in your arrangement. The Audio File Editor also has a Reverse command, but it changes the underlying audio file. Use the file command only when you intend that change and have made a backup.
Reverse a region without changing the audio file
- Select one or more audio regions in the Tracks area.
- Open the Region inspector. Press I if the inspector is hidden.
- Expand More to reveal the additional region parameters.
- Select the Reverse checkbox.
- Play across both edges of the region. Trim or fade the boundaries if the reversed attack or tail creates a click.
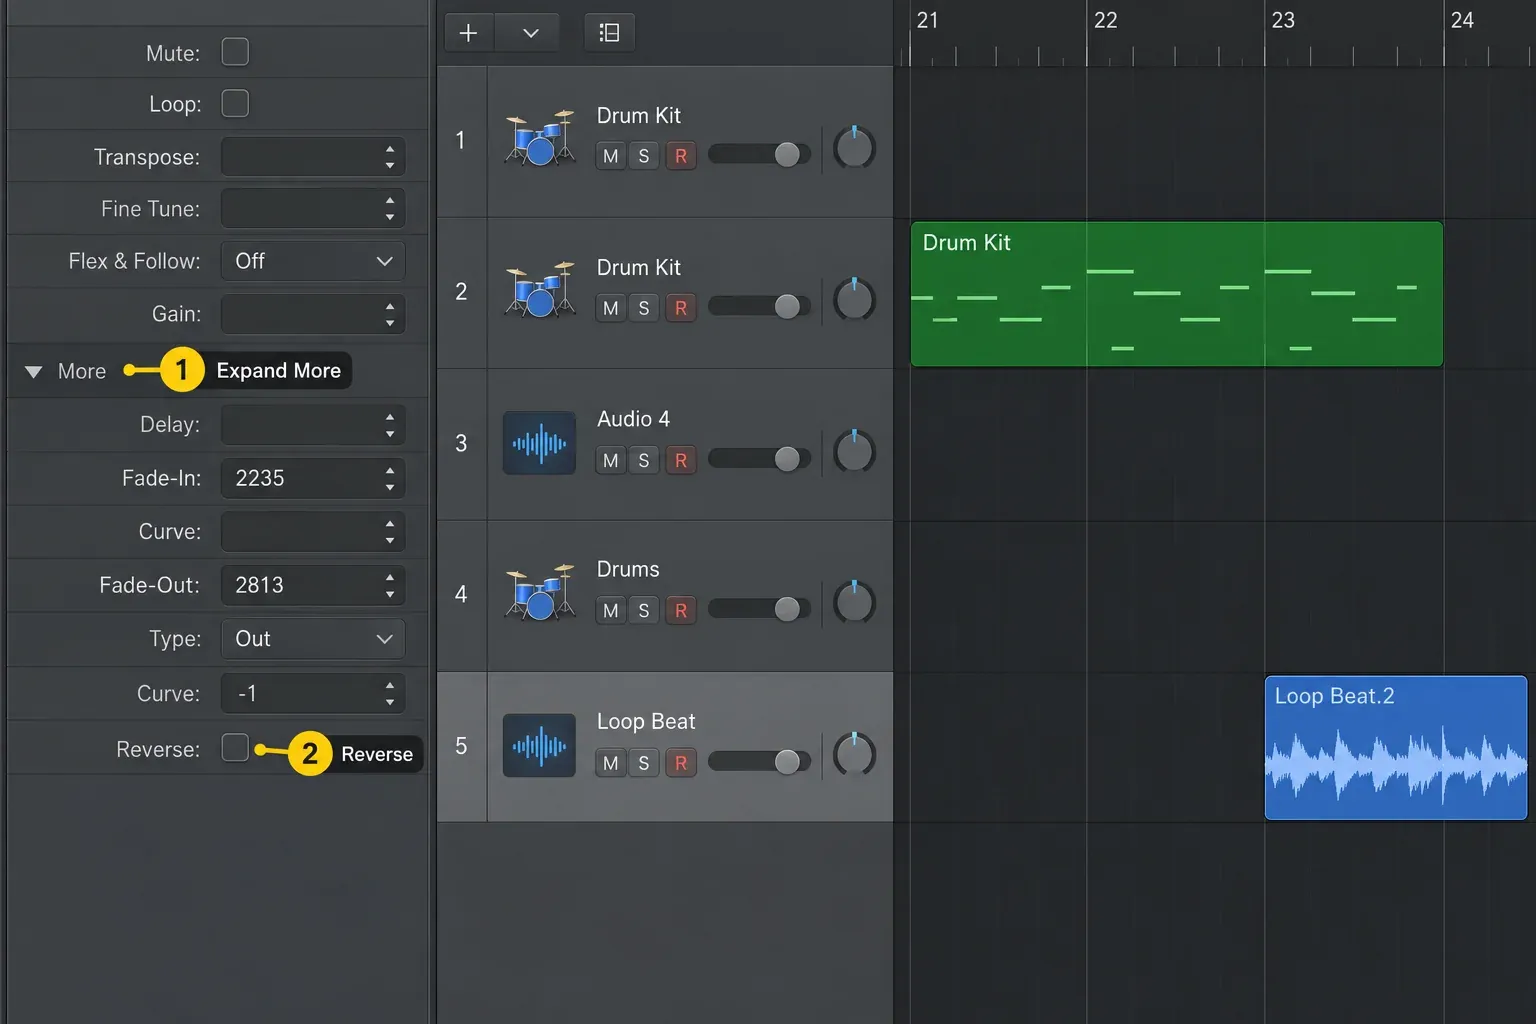
Apple’s instructions for reversing audio regions confirm that the region parameter is nondestructive. To show the main inspector, choose View > Show Inspector or press I. That’s separate from opening an audio editor.
On iPad, Reverse is a switch. Tap the audio region, tap the Inspector button on the left side of the view control bar (or press I on an external keyboard), tap the General disclosure arrow, then tap Reverse. Apple’s Logic Pro for iPad instructions add that the switch isn’t available while flex is turned on in the Region inspector.
Reversal changes where the loud part of a sound lands. A normal cymbal decays after its hit. Reversed, that decay becomes a swell that ends at the hit. Move the region so the new endpoint lands on the intended beat, then audition it in the full arrangement.
For a momentary reverse effect played over the mix, use Remix FX instead of the region setting. Choose Multi Effects > Remix FX in an Audio Effect slot. Apple’s Remix FX reference says its Reverse button reverses playback of incoming audio, the Settings button sets a note division for the effect, and every parameter can be recorded as automation. Apple intends it mainly for the stereo output bus, but you can insert it on any signal.
Why the Reverse checkbox is missing
If Reverse is missing, check Flex Time first. Logic does not offer the Reverse region parameter on a track with Flex Time active.
Before switching Flex off, check whether you need its timing edits, quantization or tempo matching. Preserve the version that already plays correctly. Apple’s Flex Time overview explains how this processing adjusts audio timing.
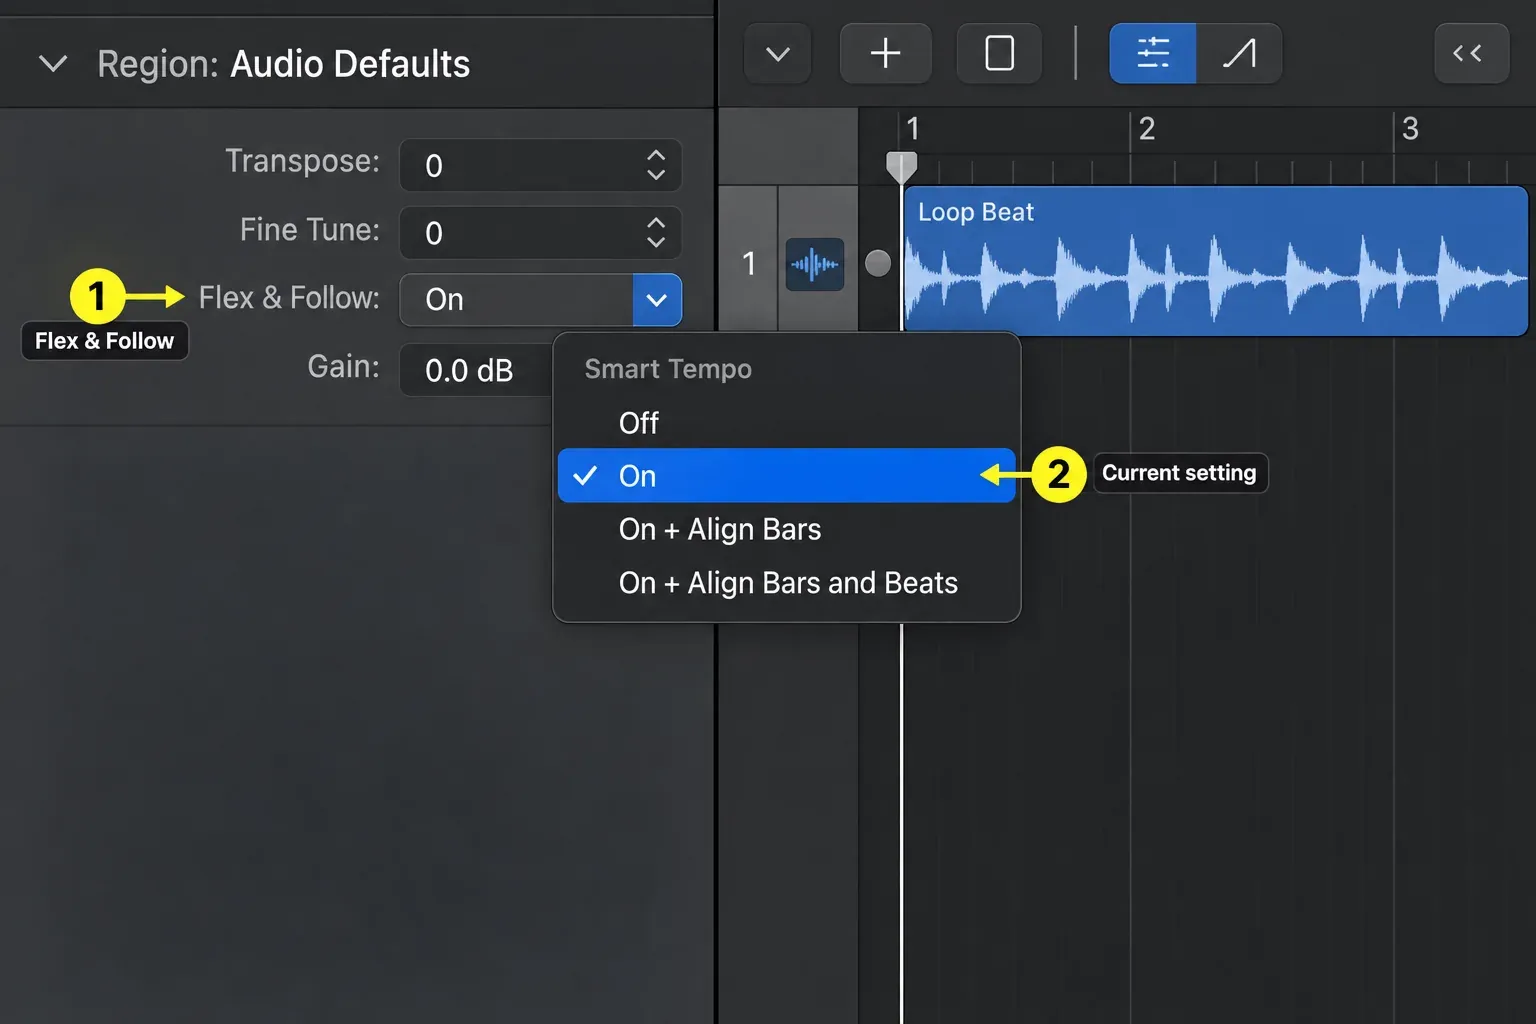
Use one of these routes:
- Flex is not needed: turn it off with the track’s Flex button, then select the audio region and use Reverse. Hiding the Flex controls does not turn processing off.
- You need the existing Flex timing: select the region and choose File > Bounce > Regions in Place. Set Destination to New Track and Source to Leave or Mute, not Delete. After bouncing, check that Flex Time is off on the new track, then reverse the new audio region. Keep the original track until you have compared the result.
- You still need to repair timing: finish the Flex Time edit before committing a new audio file.
If you selected a MIDI region, first render the software instrument to audio with Bounce Regions in Place. Choose New Track and Leave or Mute as above, keep the MIDI performance, and reverse the new audio region. For an effect tail, the bounce dialog’s Add Effects Tail to File and Add Effects Tail to Region options let the rendered region include the decay. Listen to the bounce before reversing it.
Reverse only part of a recording
To reverse one word, drum hit or chord while leaving the rest of the recording forward:
- Duplicate the region or keep the original on a muted safety track.
- Select the region, put the playhead at the start of the passage and use Split Regions/Events at Playhead (Command-T in the U.S. default key-command preset). Split again at the end of the passage.
- Select only that new region and enable Reverse.
- Move the region if needed so the reversed sound lands where you want it in the arrangement.
- Add short fades at both edges if the cuts click.
Each resulting region has its own Reverse setting. Consider three chords, A → B → C: reversing one region containing all three plays their contents in the order C → B → A. Splitting them into three regions first, then reversing each, keeps the regions at A → B → C on the timeline while each chord plays backward internally. Apple’s region Reverse command affects each selected region; it does not rearrange those regions. Check the cuts, tails and timing afterward, because the chosen boundaries change the result.
For a click at a cut, use a short region fade and listen across the join. Choose the Fade tool and drag across the region edge, or adjust Fade In and Fade Out in the Region inspector. Apple’s region fade instructions cover both methods. The fade-in, fade-out and crossfade guide explains how to clean up joins without fading the whole track.
When to use the Audio File Editor
The Audio File Editor can reverse a whole file or a selected waveform range. Functions > Reverse changes the source audio, so other regions using that part of the same file can change too. Duplicating a region isn’t the same as making an independent copy of its audio file.
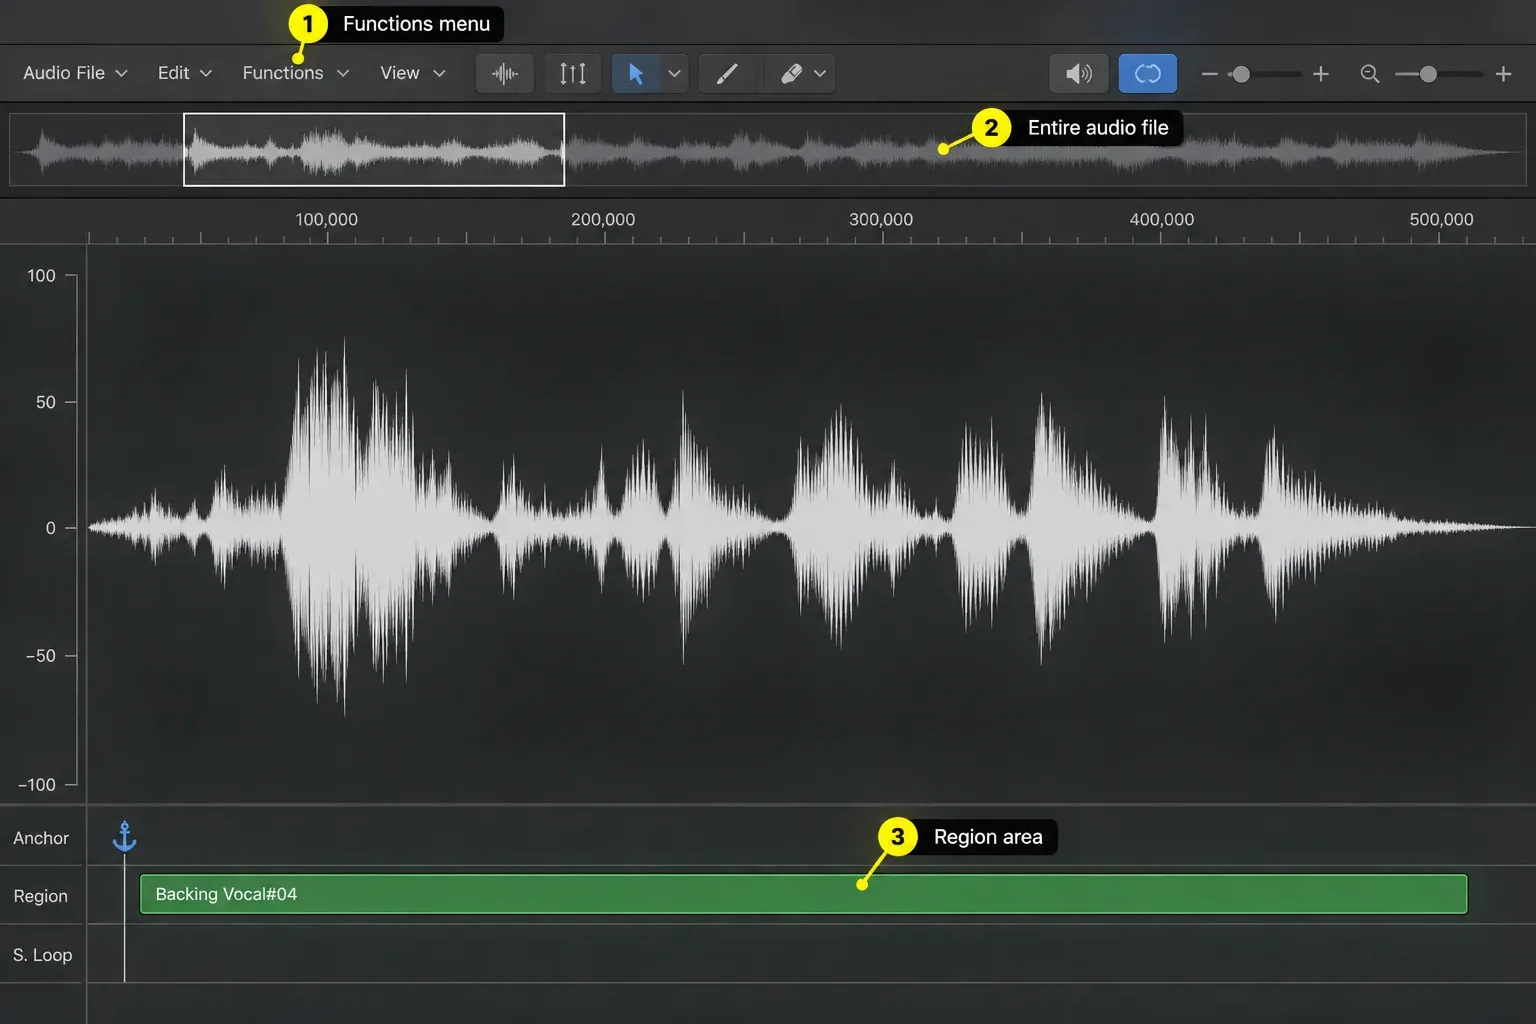
For an intentional file-level edit, protect the file before processing:
- Select the audio region and open the Audio File Editor (Command-6 in the U.S. default preset). Choose Audio File > Create Backup before changing the waveform. If other regions must stay unchanged, work on a separate audio file instead.
- Select the exact waveform range to reverse in the Audio File Editor.
- Choose Functions > Reverse, or press Control-Shift-R while the Audio File Editor has focus.
- Audition the result, then check every region that uses that file.
Apple’s file-level Reverse warning lists Apple Loops, untagged loops, surround files and regions on tracks with Flex Pitch as unsupported for this command. Use the region parameter where available, or bounce to a separate audio file. If you need to recover the original, Apple documents Audio File > Revert to Backup. It replaces the current file with the backup, and that restore operation cannot be undone. Save a separate copy of any later work you need before restoring.
Reverse shortcuts: Control-Shift-R is context-sensitive
Apple’s Main Window Tracks key-command table assigns Control-Shift-R to Reverse On/Off. The Audio File Editor table assigns the same keys to destructive Reverse. So window focus decides whether Logic toggles a region parameter or processes the selected audio file.
Before pressing Control-Shift-R, check which editor has focus. I’d use the Region inspector checkbox whenever focus is unclear, because it can only change region playback and never processes the source file.
In Apple’s U.S. default preset, Shift-R is Flashback Capture as Recording, not Reverse. Custom assignments can differ. To inspect yours, choose Logic Pro > Key Commands > Edit Assignments (Option-K), as described in Apple’s key-command guide. Older versions may label that menu item Edit.
Reverse is not phase invert
These commands are easy to confuse because both appear in audio editing:
| Command | What changes | What you hear |
|---|---|---|
| Reverse | The sample order over time | The sound plays backward |
| Invert | Positive and negative sample polarity | Usually no obvious change in isolation; interaction with another signal can change |
If two microphones sound thin when combined but sound normal separately, check their polarity and timing relationship. Reversing the recording changes the performance itself. It isn’t a substitute for aligning the microphones.
Fix common reverse-audio problems
Reverse is greyed out or absent
Confirm that you selected an audio region and check the track’s Flex Time state. If you need the Flex edits, use the New Track bounce workflow above and reverse the rendered copy with Flex off. In Logic Pro 12, don’t look for an Advanced settings switch: Apple says advanced features are always available. Older troubleshooting guides may refer to a settings pane that’s no longer there.
The reversed sound starts or ends with a click
An abrupt cut can click. Zoom in at the boundary, try a short region fade and listen both soloed and with the surrounding tracks. Adjust the fade length by ear so it removes the click without losing the part of the sound you wanted.
The effect lands late
For a reversed cymbal swell, align the attack now near the end of the region to the target beat. Other recordings may have their strongest transient elsewhere. Listen and position that sound, and don’t assume the region start is the point that should land on the beat.
Other copies of the audio changed
If you used Functions > Reverse in the Audio File Editor, you changed the shared source file. Undo the processing if it’s still available, or use your file backup. Remember that Revert to Backup replaces the file and can’t itself be undone. Use the Region inspector for independent forward and backward playback of regions sharing one file.
The shortcut did something unexpected
Check window focus and your key-command assignment. Control-Shift-R can mean region toggle or destructive file processing depending on the active editor. Shift-R is Flashback Capture as Recording in the default U.S. preset.
Reverse audio FAQ
How do I reverse an audio region in Logic Pro?
Select the audio region, open the Region inspector, expand More, and select Reverse. This region parameter is nondestructive, so clearing the checkbox restores forward playback.
Why is the Reverse option missing in Logic Pro?
The region Reverse setting is unavailable while Flex Time is active on the track. If you need that timing, bounce the region with Destination set to New Track and Source set to Leave or Mute. Check that Flex is off on the new track, then reverse the rendered audio region.
What is the shortcut to reverse audio in Logic Pro?
Control-Shift-R is the default Reverse command in the U.S. key-command preset, but its effect depends on window focus. In the Tracks area it toggles the region parameter; in the Audio File Editor it performs destructive file processing.
Does Shift-R reverse audio in Logic Pro?
No. In Apple's U.S. default key-command preset, Shift-R is Flashback Capture as Recording. The default Reverse command is Control-Shift-R, and context determines whether it is nondestructive or destructive.
Can I reverse only part of an audio file?
Yes. Split the passage into its own audio region and use the nondestructive Reverse setting. The rest can keep playing forward. The Audio File Editor can also reverse a selected waveform range, but that changes the underlying file.
Is reversing audio the same as inverting phase?
No. Reverse changes the order of audio over time. Invert flips positive and negative sample polarity; it usually does not sound different by itself, but it can change how combined signals interact.
Use the reversed sound in context, then return to the Logic Pro Create Music hub for the next writing or arrangement step. If the transition still needs cleanup, continue in the recording and editing workflow.


