How to Fade In and Fade Out in Logic Pro
Fade one audio region, a MIDI instrument, overlapping edits or the complete mix with the correct Logic Pro tool for each job.

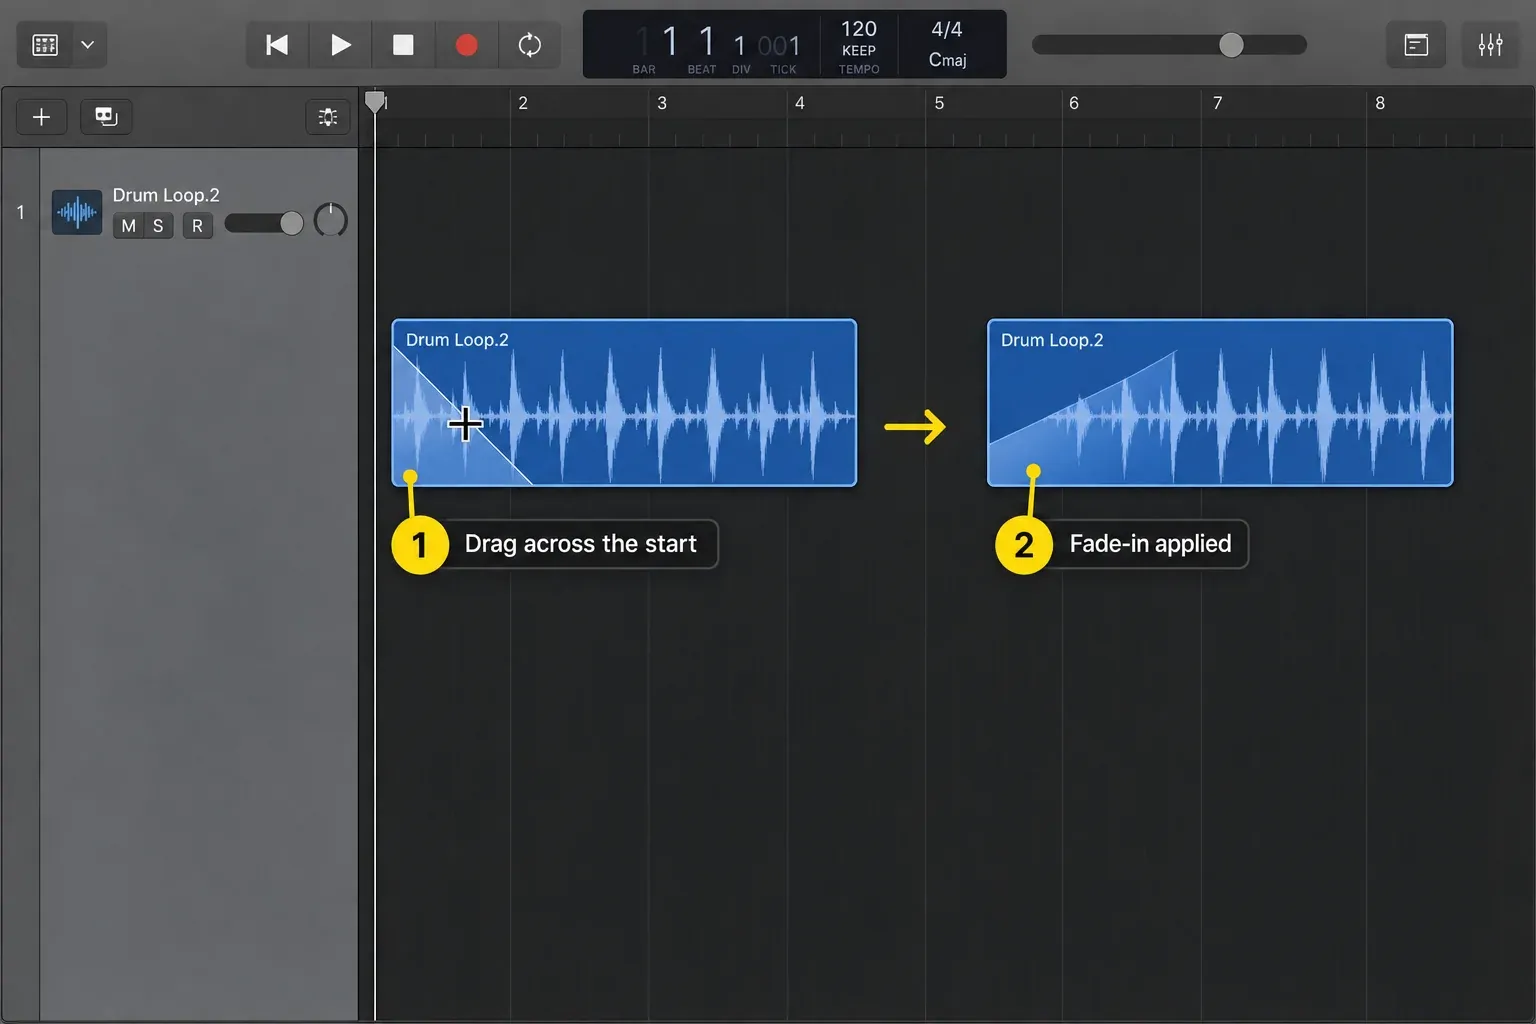
To fade in or fade out an audio region in Logic Pro, choose the Fade tool and drag across the region’s start or end. With the pointer over the Tracks area, the default shortcut is T, then A. Drag inward from the start for a fade-in or from the end for a fade-out.
For a software instrument, MIDI part or the whole song, use Volume automation instead. A region fade changes one audio clip; an output fade changes everything routed through that output.
Instructions checked against Apple’s Logic Pro for Mac User Guide on September 8, 2026 (UTC).
This guide covers Logic Pro for Mac. Logic Pro for iPad uses Fade Start and Fade End controls in the inspector, so the Mac tool shortcuts and menus below don’t apply there.
Choose the right fade method
- One audio clip: use the Fade tool for its beginning or end.
- Several audio regions: enter matching Fade In or Fade Out values in the Region inspector.
- An edit between two audio regions: use a crossfade.
- MIDI, Pattern or Session Player parts: automate the software instrument’s volume.
- A complete track: use Track Volume automation.
- The finished stereo mix: automate the output carrying the mix, including its effects returns.
How to fade one audio region with the Fade tool
- Zoom in until you can see the waveform. Logic displays region fades only when the waveform is visible.
- Select the Fade tool from the Tracks area Tool menu. With the pointer over that area, press T, then A using the default key commands. Custom assignments can differ.
- Drag from the beginning of the audio region toward the right for a fade-in. Drag from the end toward the left for a fade-out.
- Set the length by how far you drag. A short drag makes a fast fade; a longer drag makes a slower one.
- With the Fade tool, drag the fade curve to reshape the transition if needed. You can also edit Curve in the Region inspector.
- Play from before the fade to beyond it. Check that the edit does not cut off a consonant, drum attack or wanted decay.
Apple’s Tool Menu key-command table distinguishes A inside the Tool menu from A on its own, which shows automation. Its region-fade instructions describe the start/end drag. These region fades do not rewrite the original audio file.
Optional: turn on Fade Tool Click Zones
If you add fades constantly, open Logic Pro > Settings > General > Editing and select Fade Tool Click Zones. The regular Pointer tool then becomes a Fade pointer over the upper-left and upper-right edges of an audio region, so you don’t need to switch tools for every edit. Hold Option in either corner when you need the Loop pointer instead.
This setting can also explain a pointer that seems to change by itself near a region corner. Apple’s current tool-assignment guide documents both click zones and the Option override.
Change the fade length and curve
With the Fade tool selected, drag over the start or end of an existing fade to change its length. Drag the curve itself to change how quickly the level rises or falls. The Region inspector offers Fade In, Fade Out and Curve values for the same edits.
Start with the shortest fade that removes the unwanted edge without softening the sound you want to keep. For a longer musical fade, listen to the transition with the surrounding tracks playing. Adjust the curve if the level seems to drop too early or hang on too long; there is no single fade length that suits every recording.
For a normal volume fade, leave the inspector set to Fade In or Fade Out. Speed Up and Slow Down change playback speed, creating a different effect. Apple explains these separate controls in its fade-editing guide.
Enter exact fades in the Region inspector
The inspector is faster when several edits need matching values:
- Select one or more audio regions.
- Choose View > Show Inspector, or press I with the default key commands.
- Expand the Region section and its More controls.
- Drag the Fade In or Fade Out value vertically, or double-click the value and type it.
- Adjust Curve after setting the length, then listen to each affected edit.
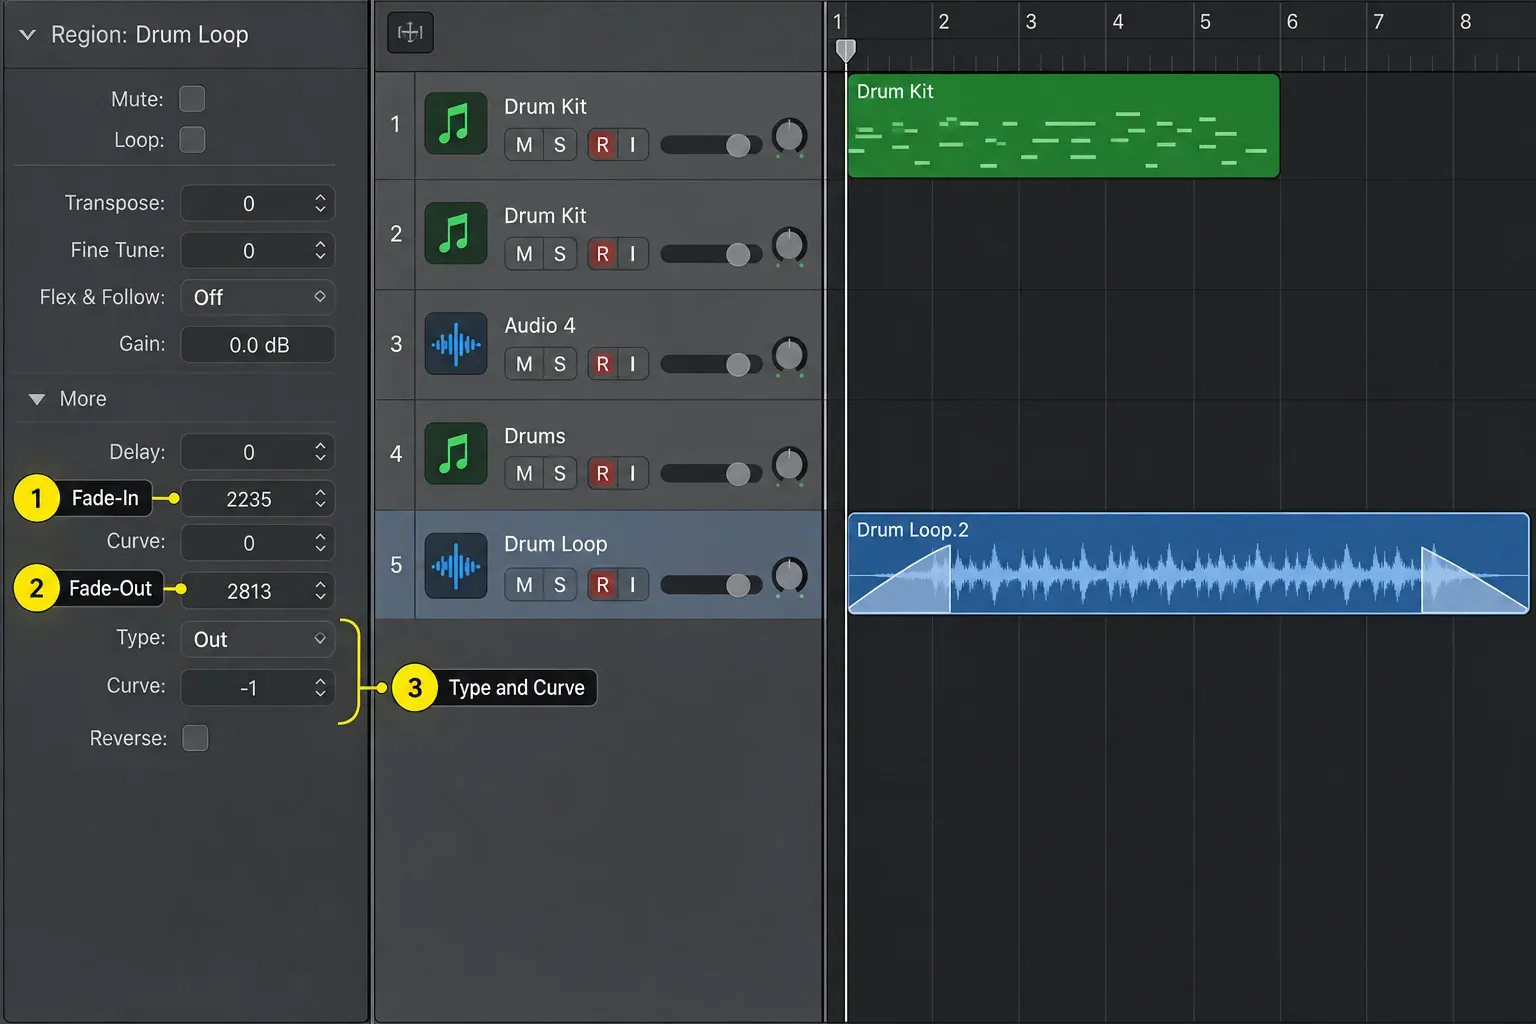
The Region inspector’s More controls let you refine a fade drawn with the tool. For repeated edits, Apply Last Fade or Fade Marquee Selection copies the last fade’s time and curve to selected regions; the crossfade/out type adapts to adjacent regions or gaps. With a marquee selection, the command uses the selection boundaries to choose and place a fade. Search its exact name in Key Commands to check or assign a shortcut.
Crossfade between two audio regions
A crossfade lowers the first region while raising the next. Use it where an edit joins two takes, ambience beds or adjacent clips:
- Manual: place two audio regions consecutively on the same track, then drag the Fade tool across the junction from the end of the first into the start of the next. Dragging across a gap can create fades at both edges, but it does not fill the gap with audio.
- Automatic: choose X-Fade from the Tracks area Drag pop-up menu, then overlap the two audio regions on that track.
- Type: the Region inspector offers Out, X, EqP and X S. Out is an ordinary fade-out; the other three apply to consecutive regions. EqP means Equal Power and can reduce a dip in level between them. Compare it with a regular crossfade by listening to the edit.
When X, EqP or X S is selected, its crossfade replaces the separate Fade In and corresponding Curve controls. If you need two independent fades with silence between them, use ordinary fades rather than a crossfade type.
X-Fade drag mode affects how later overlaps behave, so switch the Drag menu back when you no longer want automatic crossfades. Apple’s automatic crossfade guide also confirms that these region fade parameters remain non-destructive.
Fade a MIDI region or software instrument
A MIDI region contains performance instructions, not an audio waveform. So the Fade tool has no audio edge to process. Use Volume automation:
- Select the software-instrument track and press A to show automation.
- Choose Track, then select Main > Volume from the Automation Parameter menu.
- If the lane has no automation yet, click it once to create the starting value. Then click the volume line at the intended start and end of the fade.
- For a fade-out, keep the first fade point at the existing level and lower the end point. For a fade-in, start low and bring the end point up to the track’s intended level, not automatically to 0 dB.
- Set the track to Read and make sure the Volume automation curve is enabled. Play through the transition.
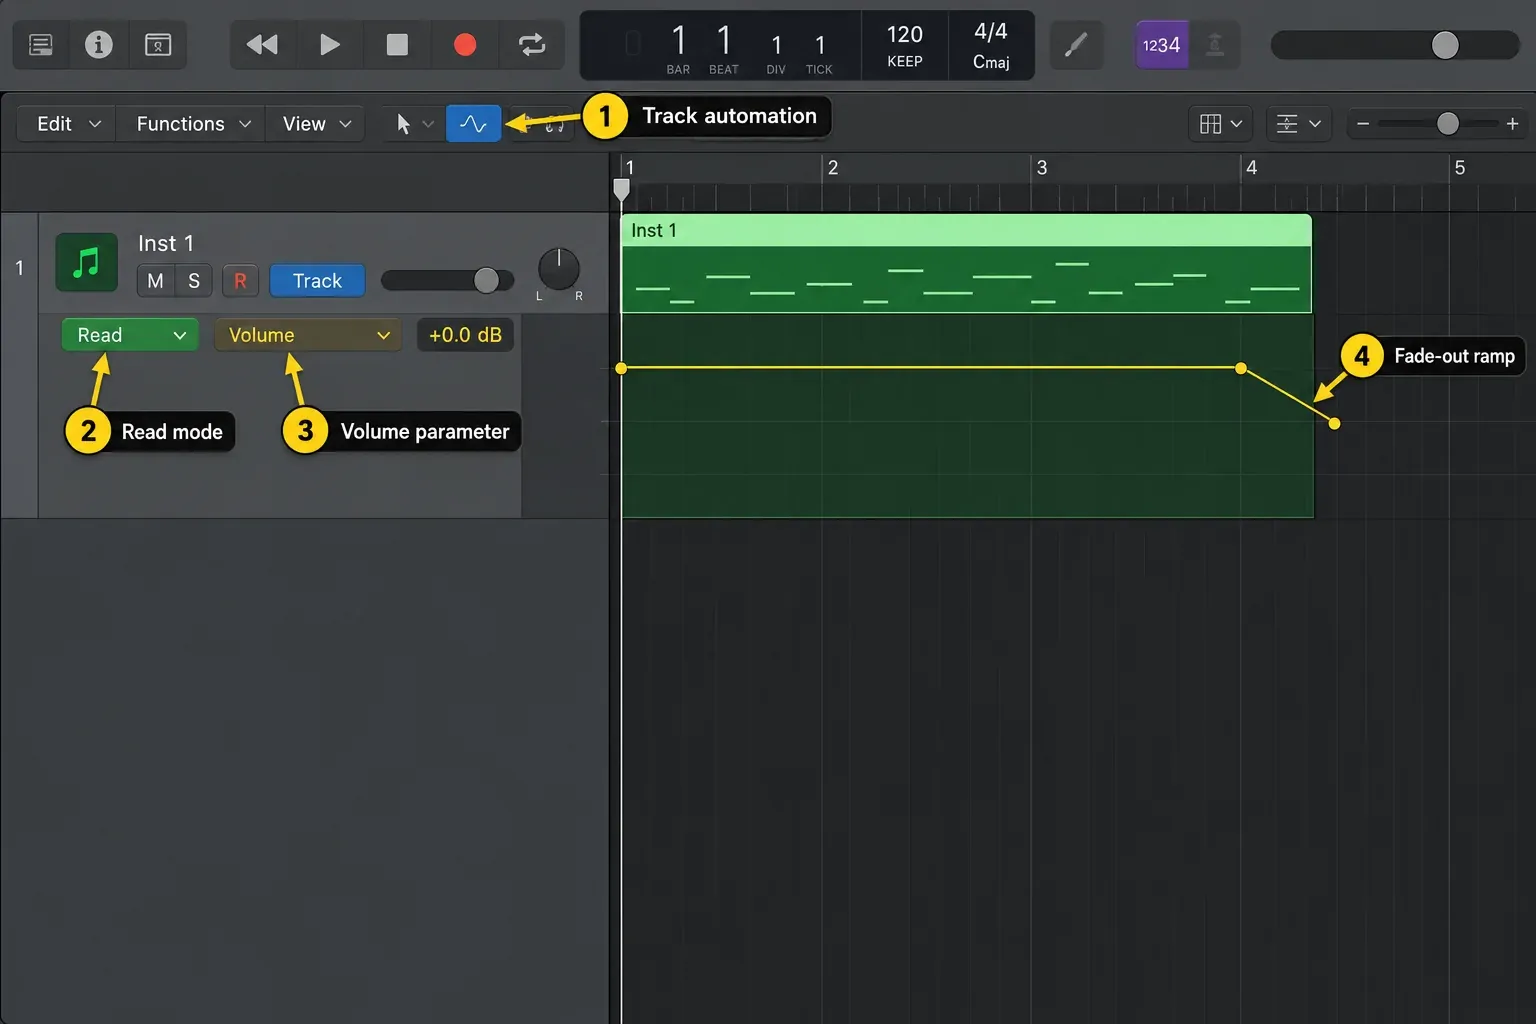
On a blank lane, the first click creates an automation point at the project start using the current fader value; it does not place that first point at the clicked time. Apple’s automation-point instructions explain this distinction. Leave existing level changes intact when adding your fade.
If other phrases on this track should keep their level, add points before and after the faded passage to hold or restore that level. Otherwise a Track Volume fade can change what you hear outside the selected region too.
Track automation is tied to the timeline; region automation travels with a moved or copied region. If the fade must belong to a movable MIDI phrase, choose Region automation. The Logic Pro automation guide covers that choice, moving automation and editing curves. Apple’s automation display reference shows the Track/Region switch and parameter menus.
Fade out the whole song
For a stereo song fade, automate the output channel strip carrying the whole mix. Check that the tracks and effects returns you want to fade actually reach that output:
- Open the Mixer and select the output carrying the mix, normally Stereo Out in a standard stereo project.
- Choose Options > Create Tracks for Selected Channel Strips, or press Control-T. This adds the output to the Tracks area.
- Show automation with A, choose Track and Main > Volume, and set the automation mode to Read.
- If the lane is empty, click once to initialize its starting value. Add points on the volume line where the final fade should begin and end. Preserve any earlier automation.
- Keep the first fade point at the existing mix level and pull the last down to silence. Check that the Volume curve is enabled.
- Listen through the ending, then set the bounce range to include the whole fade and any decay you want to keep.
Apple documents creating tracks for output and aux channel strips specifically for tasks such as automation. Fading one output does not fade tracks routed to a different output.
Use File > Bounce > Project or Section for the finished mix. Check the Start and End range, especially if Cycle was enabled, and listen to the saved file. A region or track export is a different operation; see Bounce in Place vs Export if you need stems or a handoff instead.
Why the Fade tool is not working
- The region is MIDI, Pattern or Session Player data: use software-instrument Volume automation. Bounce the part to audio only if you need to work on a rendered audio region.
- The waveform is too small to see: zoom in before judging whether the fade is visible.
- The wrong tool is active: put the pointer over the Tracks area, then use T, A with the default assignments. For a Command-click Fade tool, hold Command while dragging.
- You are working in another editor: return to the main Tracks area and drag over the audio region’s start or end.
- The region is silent but an effect remains: a reverb or delay return can have its own signal path. Fading the source track alone does not guarantee that return fades with it.
- One clip fades but the song does not: use automation on the output carrying the combined mix, not a fade on one region.
A Pre Fader send is not lowered by the source track’s volume fader. Post-fader sends follow that fader, but an effect on an aux can still have a decay to finish. For a complete ending, automate the return too or use the output carrying both dry and wet signals. The buses, sends and aux guide explains how to trace those paths.
If automation is visible but has no effect, check both Read mode and the curve’s On/Off control. Do not switch to Write as a troubleshooting shortcut: Apple’s automation mode reference warns that Write replaces existing automation as playback passes over it.
Keep routine fades non-destructive. The Audio File Editor’s Fade-In and Fade-Out functions permanently change the original audio file. Use the Tracks-area Fade tool or Region inspector unless you deliberately need a file edit and have a separate backup of that file.
Logic Pro fades FAQ
What is the shortcut for the Fade tool in Logic Pro?
With the pointer over the Tracks area, press T to open the Tool menu, then press A for the Fade tool. These are default Tool menu assignments; custom key-command sets can differ.
Why is the Fade tool not working on a MIDI region?
The Fade tool works on audio regions, not MIDI, Pattern or Session Player regions. For a software instrument, press A to show automation, choose Track and Main > Volume, draw the fade, and play it in Read mode with the curve enabled.
How do I fade out a whole song in Logic Pro?
Add a track for the output carrying the complete mix, show Track Volume automation, and draw the ending down to silence. Keep Read mode and the curve enabled. Only signals routed through that output are included.
Can I enter an exact fade time instead of drawing it?
Yes. Select one or more audio regions, open the Region inspector, then drag the Fade In or Fade Out value vertically or double-click it and enter a value.
How do I crossfade two audio regions in Logic Pro?
Put two audio regions consecutively on one track and drag the Fade tool across their junction. Alternatively, choose X-Fade from the Tracks area Drag menu, then overlap the regions. Try EqP if a regular crossfade dips in level.
How do I remove a fade in Logic Pro?
Option-click the fade area with the Fade tool, Control-click it and choose Remove Fade, or set the corresponding Fade In or Fade Out value in the Region inspector to 0. These are Apple’s documented ways to remove a region fade; they do not remove Volume automation.
For the next edit, the Recording & Editing hub links to comping, timing, automation and delivery guides.


