Punch In and Cycle Recording in Logic Pro
Replace one weak section without damaging the performance around it, or loop the passage and keep every useful pass.

To punch in Logic Pro without damaging the take around the mistake, pick the mode by the job: Quick Punch-In when you want to enter recording by feel, Autopunch when the exact replacement range is known, and Cycle mode when the performer needs repeated attempts. For the most controlled loop, make the yellow cycle area wider than the red punch range. The performer hears the run-up every time, while Logic records only the section that should change.
A clean punch is more than pressing Record at the right bar. The headphone feed has to switch at the right moment, the performer needs enough musical lead-in, and both joins must survive playback in context. A technically successful recording can still fail if it clips the first consonant, changes the room tone, or ends before a guitar decay.
The audio-recording commands below were checked against Apple’s Logic Pro for Mac documentation on September 12, 2026. MIDI has separate overlap and Replace settings; do not apply the audio settings below to MIDI recordings.
Choose the recording mode before pressing R
| Need | Best starting mode | What defines the recording |
|---|---|---|
| Repair a mistake as playback rolls | Quick Punch-In | You trigger the entry and exit in real time. |
| Re-record one exact phrase | Autopunch | Red punch-in and punch-out locators. |
| Capture several full passes | Cycle recording | The yellow cycle area and overlap setting. |
| Repeat one repair with the same run-up | Cycle + Autopunch | A wide yellow loop around a smaller red punch range. |
The yellow range loops playback; the red range limits recording. Cycle does not create a take folder unless the overlap setting is configured for one, and Autopunch does not repeat the passage unless Cycle is on.
How to replace one section with Autopunch
- Preserve the original: choose File > Project Alternatives > New Alternative, enter a name and click Done before making the repair. Keep a separate project backup for file recovery.
- Record-enable only the intended audio track. Keep Replace off, and choose Create Take Folder under Logic Pro > Settings > Recording > Overlapping Track Recordings > Audio Cycle Off for a non-looping punch, or Audio Cycle On when looping.
- Choose Record > Auto Input Monitoring, turn off the track’s manual Input Monitoring button, and test the cue mix before recording.
- Show Autopunch through Customize Control Bar and Display, enable it, and drag the red punch-in and punch-out locators around the phrase.
- Place the punch-in locator after the lead-in and the punch-out locator after the final sound that must change.
- Start the playhead early enough for the performer to hear the groove and prepare.
- Click Record to begin from the lead-in, perform through the complete red range, and continue naturally past its end.
- Stop, then listen from before the punch-in point through the punch-out point.
- Adjust or comp the replacement if the performance or transition is not clean.
- Keep the original take recoverable until the repair is approved in the full mix.
If the original recording has noise, clipping, or the wrong input, repair the signal path first with the complete Logic Pro audio recording setup. A punch can replace a performance. It can’t restore detail that never reached the interface cleanly.
Use Quick Punch-In for an on-the-fly repair
Choose Record > Allow Quick Punch-In, or Control-click the Record button and switch on the same option. Apple’s current punch recording reference describes Quick Punch-In as the practical method when the entry point isn’t decided in advance.
First choose Record > Record Button Options > Record/Record Toggle. This configures the Record button to switch between recording and playback; Apple documents it in advanced recording commands. Start playback before the mistake, click Record at the entry, then click it again at the exit. Playback continues after the second click. Quick Punch-In records in the background from the start of playback; it is a different process from recording only inside an Autopunch range.
Quick Punch-In needs twice as many available channel strips as tracks enabled for recording, according to Apple. On a large session, arm only the tracks you need. Without Quick Punch-In, toggling from playback into recording can cause a delay and audio dropout.
Keep Replace off when you want to preserve takes
Check the Replace button before recording. Apple’s audio Replace instructions warn that existing regions within the recording range are erased even if you play nothing. Leave Replace off for this take-preserving workflow. The Audio Cycle Off and Audio Cycle On menus in Recording settings separately control overlapping recordings: choose Create Take Folder in the menu matching whether you are looping. A red punch range is not a backup of the old performance.
Set the red Autopunch range precisely
Show the Autopunch button by Control-clicking the control bar and choosing Customize Control Bar and Display. Enable Autopunch under Modes and Functions. Apple’s current control-bar customization steps cover the same panel. You can also Option-Command-click the ruler to activate Autopunch and drop the range.
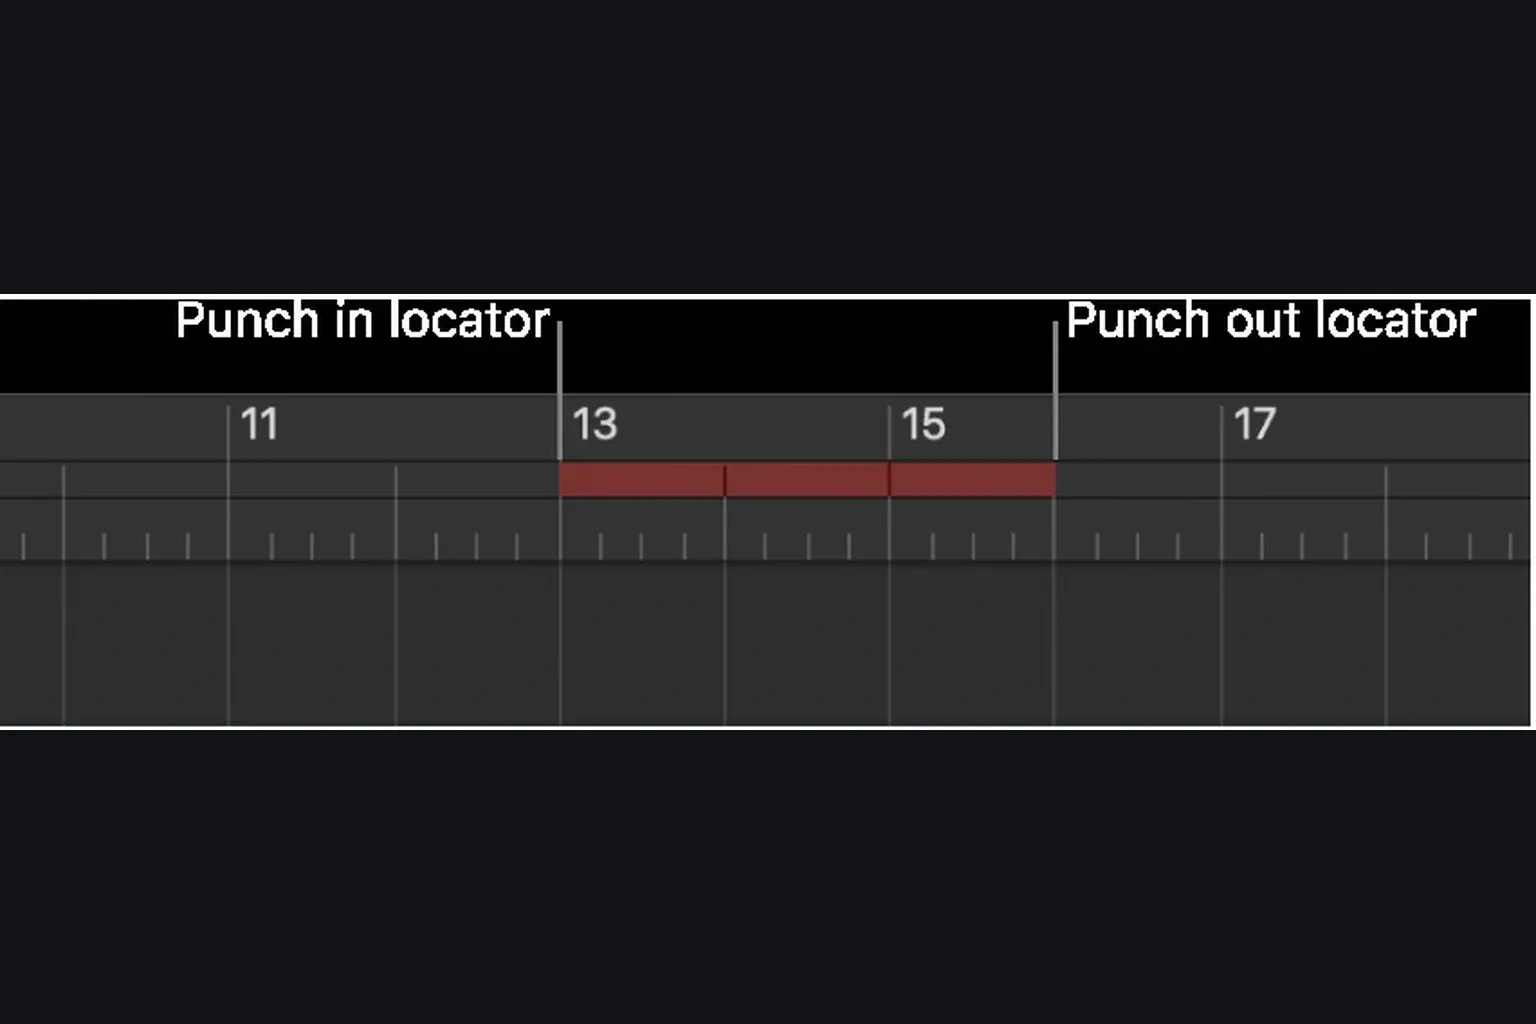
The red stripe sits in the middle third of the ruler. Drag its left and right locators to set the entry and exit. For finer adjustment, drag vertically in the Autopunch locator fields in the control bar. If your LCD does not show the extra fields, open its display menu with the arrow on the right and choose Custom; Apple’s LCD display modes explain the additional information available there.
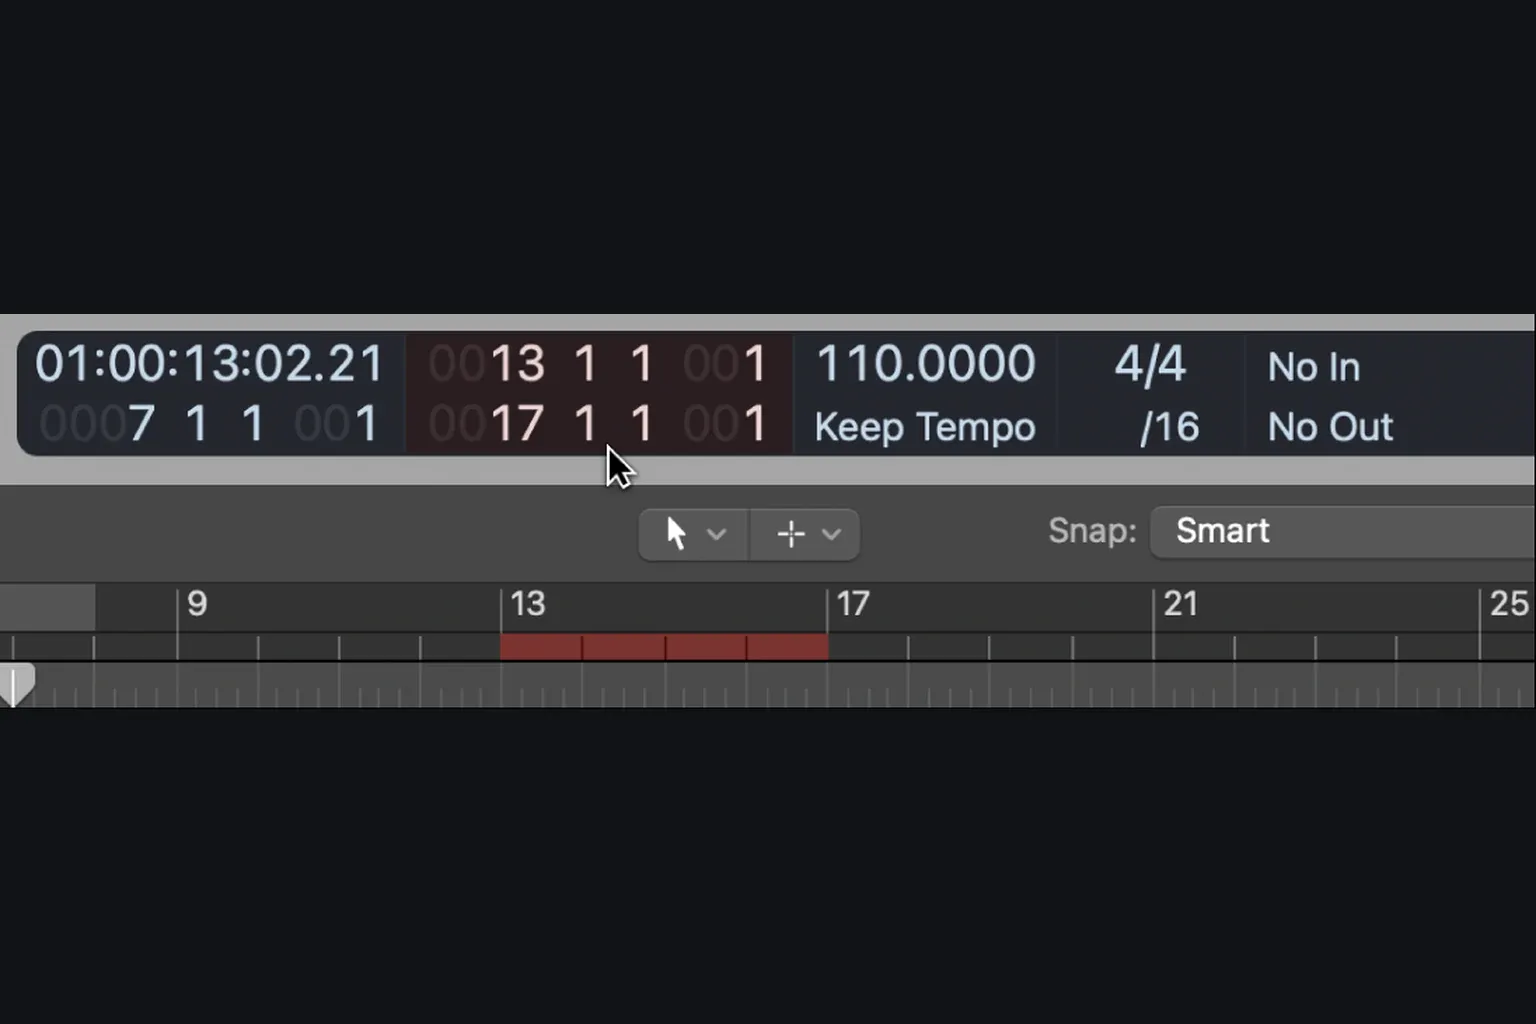
You can also drag the cycle area into the punch area. To use a Marquee selection, Control-click Autopunch and enable Marquee Selection Engages Autopunch Recording. Be careful with selections spanning several tracks: Apple’s Marquee recording instructions say recording activates every track inside the selection and deactivates the others. Limit the selection to the intended tracks and check the range before starting.
Give the performance room at both boundaries
Do not set the red range tightly around the visible wrong note. Start early enough to catch the breath, pick movement, consonant, or note attack that belongs to the replacement. End after the new phrase has settled. The performer should play through the punch-out point rather than stopping because the red stripe ended.
Put boundaries in stable audio where you can: a quiet gap, a held tone with matching timbre, or a decay that can take a short crossfade. Steer clear of hard drum transients, the middle of a consonant, changing vibrato, and noisy guitar movement. A few extra beats of recorded material give the edit somewhere to go.
Set monitoring so the performer hears the handoff
Enable Auto Input Monitoring from the Record menu. Apple’s input-monitoring guide describes the intended punch behavior: the recorded track plays before the punch, the live input is heard during recording, and the existing track comes back after the punch.
For this automatic handoff, turn off the track’s manual Input Monitoring button (I). When I is on, incoming audio remains audible regardless of Auto Input Monitoring or record-enable status. Test playback before the punch, the live input during it, and playback after it before asking for another take.
If the voice or instrument sounds doubled, the interface may be feeding direct monitoring while Logic returns a delayed copy of the same signal. Choose one intentional path. The Logic Pro latency troubleshooting guide separates direct monitoring, plug-in delay, buffer delay, and Bluetooth latency instead of treating every echo as the same problem.
Use the yellow cycle area for repeated passes
Drag across the upper part of the ruler to create a yellow cycle area, or press C to turn Cycle mode on once the locators are set. When recording reaches the end, transport jumps back to the beginning and another pass starts.
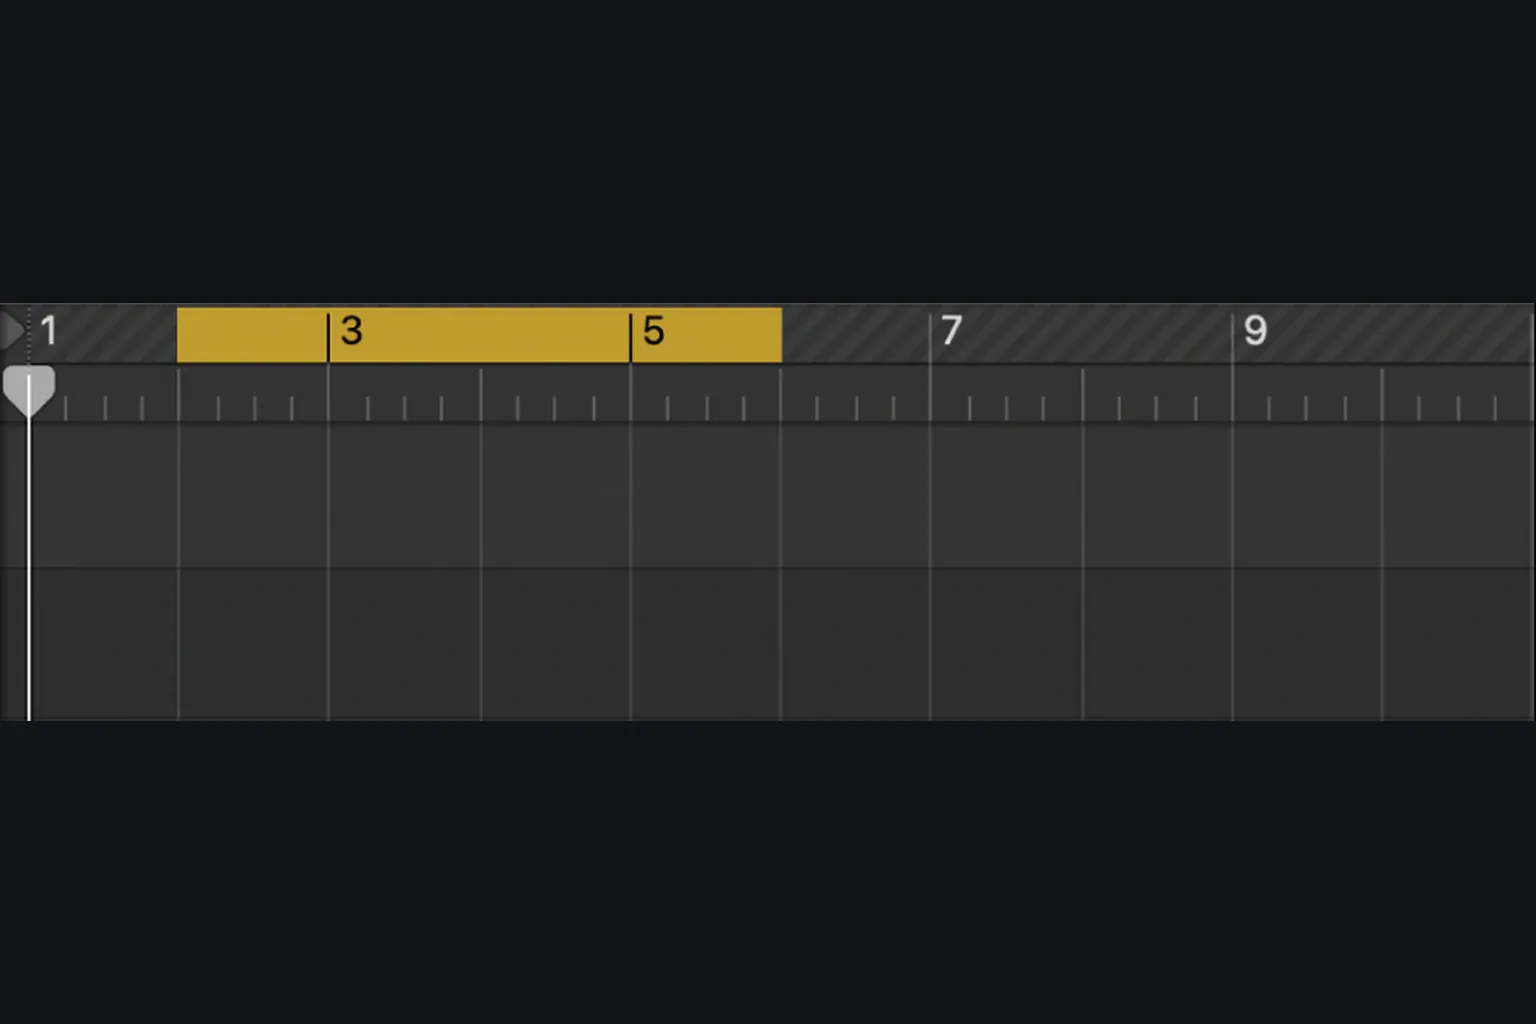
Before you record, open Logic Pro > Settings > Recording. Under Overlapping Track Recordings, pick the Audio Cycle On result you want. Create Take Folder keeps successive passes in one folder. The other current audio choices are Create Tracks and Mute and Create Track Alternatives. That setting decides what happens to these overlapping audio recordings, not the colour of the ruler alone. Apple’s current Recording settings reference is the reliable place to check the exact options for the installed version.
With Create Take Folder selected, Apple’s multiple-take recording steps say a folder appears after the second cycle pass and later passes are added as takes. Press Space to stop, then open the folder with its disclosure arrow. Listen back before recording more; if the same problem repeats, adjust the cue mix or punch boundaries first.
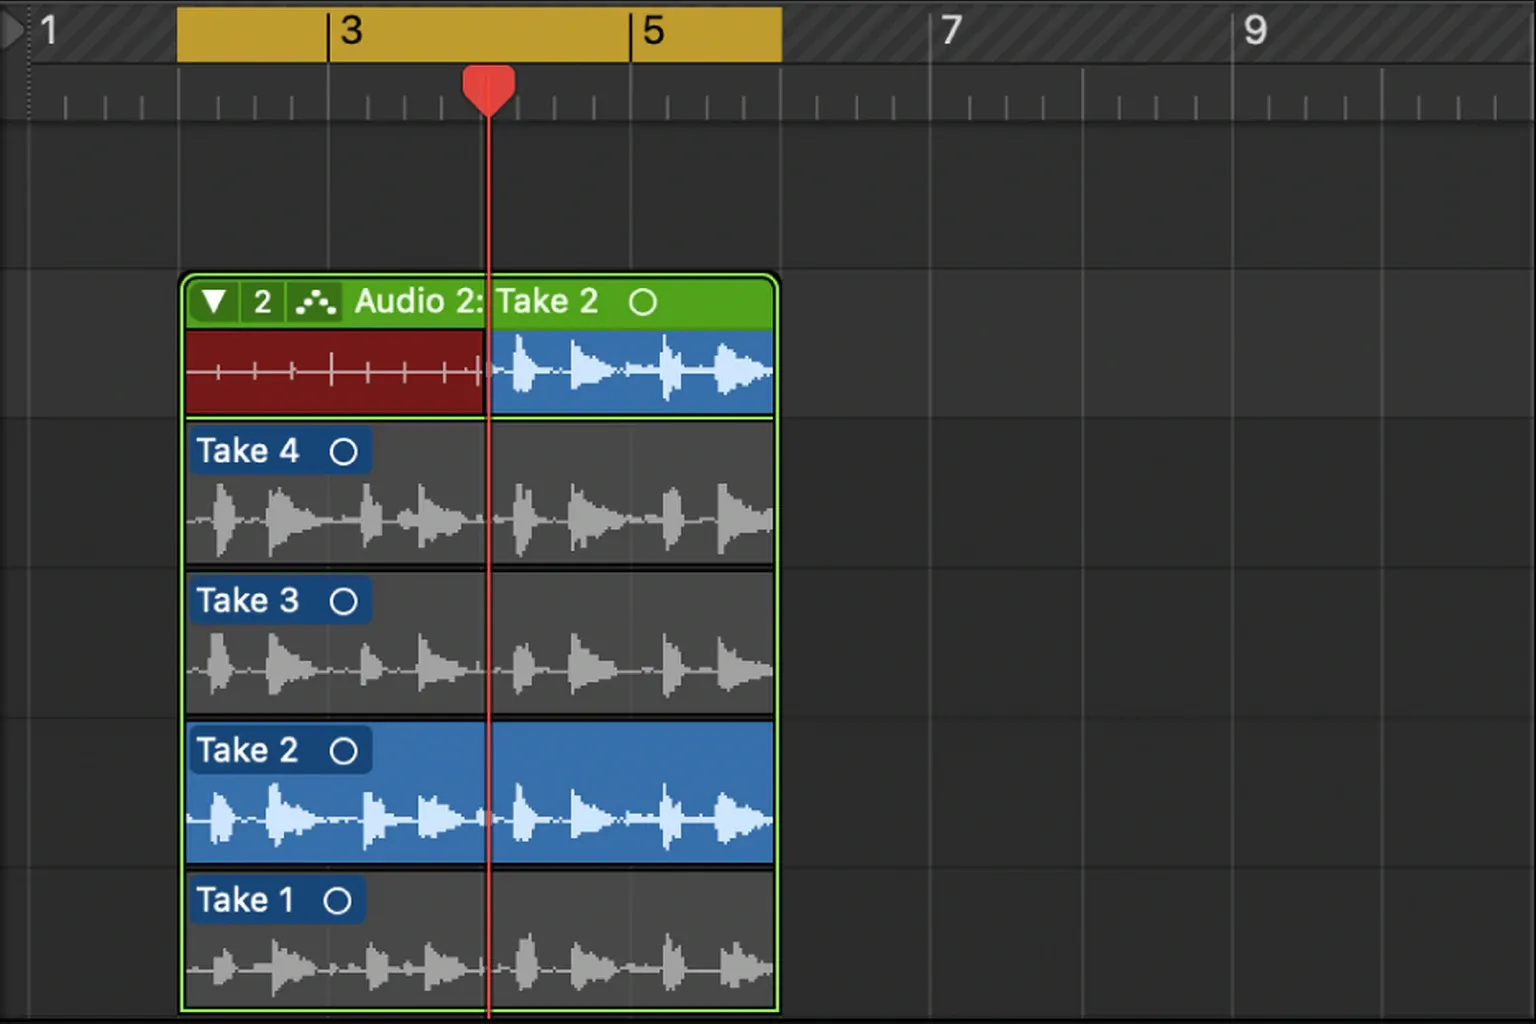
Once the passes exist, move to the dedicated take folders and Quick Swipe Comping workflow to compare complete performances and build the approved take without flattening too early.
Combine Cycle and Autopunch for a controlled loop
Set the yellow cycle wider than the red Autopunch range. A useful shape is count or groove before the red range, the replacement phrase, then enough music afterward to finish the line. Logic repeats the whole yellow loop but records only while the playhead crosses the red section.
Leave enough lead-in for a breath, pickup or guitar attack, and enough music afterward to finish the phrase. For example, a loop can begin before the vocal line while the red recording range starts nearer the phrase. Choose the spacing by listening to the performance, not by a fixed number of bars.
During Autopunch, input outside the red range passes through Logic but is not recorded. Do not expect to recover an unrecorded breath by extending that new region later. If you need more lead-in in the recording itself, move the red punch-in earlier and record again. After stopping, check the take folder, tracks or alternatives created by your overlap setting.
Use a one-sided punch for a replacement to the project end
For a replacement from one point onward, Control-click Autopunch and enable Marquee Line Engages Autopunch Recording. With the Marquee tool, click the intended entry point to place a line. Apple’s one-sided punch procedure extends the recording range to the project end; you can stop recording earlier. Check the affected track and the red range before starting.
This is useful for a new ending or an extended narration, but it affects more than a short phrase. Preserve the previous arrangement first and keep Replace off if you need the earlier take. Use a finite punch-out point instead when later material must remain outside the recording range.
Check the performance and both joins
Start playback several seconds before the entry. Listen through the repair and past the exit without stopping. Judge timing, pitch, tone, room noise, headphone spill, breath pattern, pick attack, sustain, and the energy carried into the following phrase. Then listen in the full arrangement, where a transition that sounded obvious in solo may disappear, or the reverse.
If the replacement itself is strong but a join clicks, move the region boundary into cleaner material and add a short fade or crossfade only where it’s needed. Do not solve a mismatched performance with an excessively long fade. For vocals, the vocal recording guide covers room, microphone, distance, and cue-mix decisions that determine whether two takes can join naturally.
If you preserve the take on another track, use Track > Other > New Track with Duplicate Settings and Content. Apple’s track duplication instructions distinguish this from an empty settings-only duplicate. Confirm the regions were copied, check which track is record-enabled, and keep the unused copy from playing alongside the working track. A project alternative preserves an arrangement state but shares its audio assets; it is not an independent file backup. For file recovery, follow the project backup workflow before destructive edits.
Punch-in and cycle recording troubleshooting
| Symptom | Likely check |
|---|---|
| Autopunch button is missing | Customize Control Bar and Display, then enable Autopunch in Modes and Functions. |
| A red bar limits recording and will not go away | Turn off the Autopunch button. The red range is the punch window, not the yellow Cycle loop. |
| Logic records a longer section than expected | Confirm the red punch range rather than judging by the wider yellow cycle area. |
| The passage loops but no useful take structure appears | Check Audio Cycle On under Overlapping Track Recordings. |
| The old part cannot be heard before the entry | Use Auto Input Monitoring and check whether manual input monitoring is overriding the intended cue. |
| The performer hears a doubled signal | Look for simultaneous interface direct monitoring and Logic software monitoring. |
| Entry feels clipped | Move the punch-in earlier and capture the breath, attack, or pickup that belongs to the phrase. |
| Exit cuts off a decay | Move the punch-out later and ask the performer to continue naturally beyond it. |
| Record Toggle causes a pause | Verify Allow Quick Punch-In before toggling recording during playback. |
| A join clicks | Move the boundary away from the transient or discontinuity, then use a short fade if required. |
| Nothing records | Check record enable, input assignment, permissions, and signal level with the Logic Pro recording diagnostic. |
| The old phrase disappears after a silent pass | Check Replace: it erases existing audio regions in the recording range even if nothing is played. Preserve the arrangement and leave it off for take recording. |
| Marquee recording arms unexpected tracks | Limit the selection to the intended tracks. Recording activates tracks inside the Marquee selection and deactivates others. |
Final punch checklist
- The correct mode matches the job: Quick Punch-In, Autopunch, Cycle, or both.
- Only the intended track is targeted, including any tracks inside a Marquee selection.
- The performer hears the old take before the punch and the live signal during it.
- The pre-roll is long enough to establish tempo, pitch, and tone.
- The red range includes the complete attack and release that must change.
- The yellow range is wider than the red range when repeated practice is useful.
- Replace is off, and Audio Cycle On or Audio Cycle Off matches the desired take, track or alternative behavior.
- The performer continues through the punch-out point.
- Both transitions are checked in solo and in the full arrangement.
- The original take remains recoverable until approval.
The Logic Pro recording and editing hub ties punch recording to comping, timing repair, and a safe commit. It sits inside the broader Logic Pro Tutorials path. If the whole session still feels shaky, the first-project workflow gives you the wider sequence before you record another take.
Frequently asked questions
What is the difference between Quick Punch-In and Autopunch?
Quick Punch-In lets you enter and leave recording during playback. Autopunch uses preset entry and exit locators for a known phrase. Use Record/Record Toggle for manual switching, or set the red range for Autopunch; preserve the original and check Replace and overlap settings with either method.
What is the difference between the red and yellow ranges in Logic Pro?
The red range is the Autopunch recording window; the yellow range is the Cycle loop. You can use either one alone or make the yellow cycle wider than the red punch so the performer gets the same lead-in on every pass.
Does Autopunch record audio outside the red range?
No. Apple says audio input outside the red Autopunch range passes through Logic but is not recorded. Move the red start earlier before recording if you need to capture a breath or pickup. Extending the resulting region cannot recover audio that was never recorded.
Why can I not see the Autopunch button?
Control-click the control bar, choose Customize Control Bar and Display, and enable Autopunch in Modes and Functions. You can also Option-Command-click the ruler to activate Autopunch and set its range.
How do I remove the red Autopunch bar in Logic Pro?
Click the Autopunch button to turn the mode off. If the button is hidden, Control-click the control bar, choose Customize Control Bar and Display, and enable Autopunch first. The red stripe is the punch-in/punch-out range; the yellow stripe belongs to Cycle mode.
How should monitoring work during a punch-in?
With Auto Input Monitoring enabled and the track’s manual Input Monitoring button off, you hear existing audio before the punch, live input during it, then existing audio again afterward. Test that transition and avoid hearing both interface direct monitoring and a delayed software copy.
Can I combine Cycle recording with Autopunch?
Yes. Set a yellow cycle area for the full practice loop and a smaller red Autopunch range for the section that should be replaced. Each pass then has a consistent run-up while recording remains confined to the red range.
Why did repeated cycle passes not create a take folder?
Check Logic Pro > Settings > Recording. Under Overlapping Track Recordings, Audio Cycle On must be set to Create Take Folder if that is the result you want. Other choices create tracks or track alternatives instead.
How do I avoid clicks at the punch boundaries?
Place the punch points in stable audio rather than on a hard transient, keep enough material around the repair, and audition across both joins. If a click remains, edit the resulting boundary and use a short fade or crossfade without blurring the timing.


