Multi-Output Instruments in Logic Pro: Separate Drums and Mix Each Output
Route kick, snare and hats to separate Logic Pro aux channels, mix them independently, and export the result without losing the instrument workflow.

A multi-output instrument lets one Logic Pro software instrument feed separate mixer channels. Put the kick on the instrument’s main stereo pair, send snare to 3–4, hats to 5–6, create the matching aux channel strips, then mix each output as if it were its own track.
This is the clean way to keep a sampled kit together while giving the important parts their own EQ, compression, sends and automation in a wider Logic Pro mixing workflow. You do not need a separate Sampler instance for every drum sound, and you do not need to turn every internal sound into audio before you can balance it.
What multi-output means in Logic Pro
A multi-output instrument is one plug-in instance with more than one output pair. The instrument channel strip carries the first stereo pair. Additional pairs—3–4, 5–6, 7–8 and so on—become available through aux channel strips in the Mixer. Apple’s Logic Pro multi-output guide describes the same model: route individual sounds inside the plug-in, then use aux strips to isolate them for processing.
That distinction matters because the extra channels do not appear just because an instrument contains several samples. The plug-in must expose a multi-output configuration, and the sounds must be assigned to outputs other than Main. If every zone stays on Main, adding aux strips gives you more faders but no separated signal.
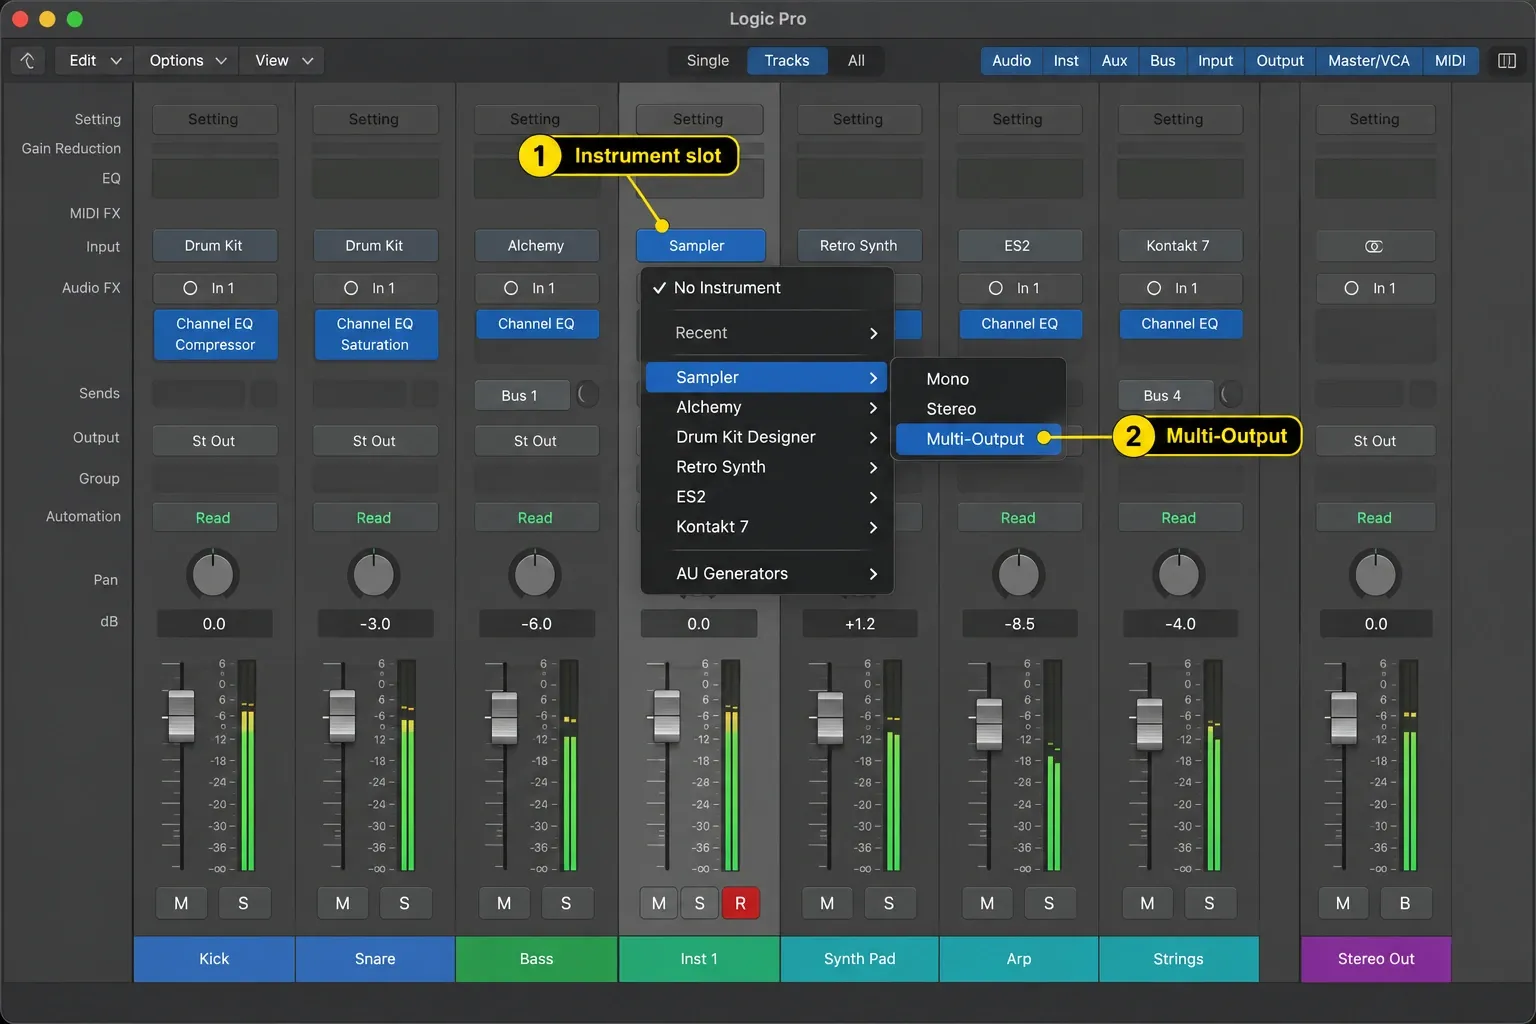
Load Sampler as a multi-output instrument
The example below uses Sampler because its zones make the routing logic easy to see. The same idea applies to another instrument when its plug-in menu offers a multi-output option.
- Select the software instrument track that should host the kit.
- Click the Instrument slot in the channel strip.
- Choose Sampler, then choose Multi-Output.
- Open the Sampler window and confirm that the expected zones or samples are loaded.
- Leave the main stereo pair available for the sound you want to keep on the instrument strip—often the kick or the full kit reference.
Do not start by creating every possible aux channel. First decide which sounds need independent treatment. A small kit may need only snare and hats separated from the main output; a larger kit may also justify toms, percussion or a room layer.
Route Kick, Snare and Hats to different outputs
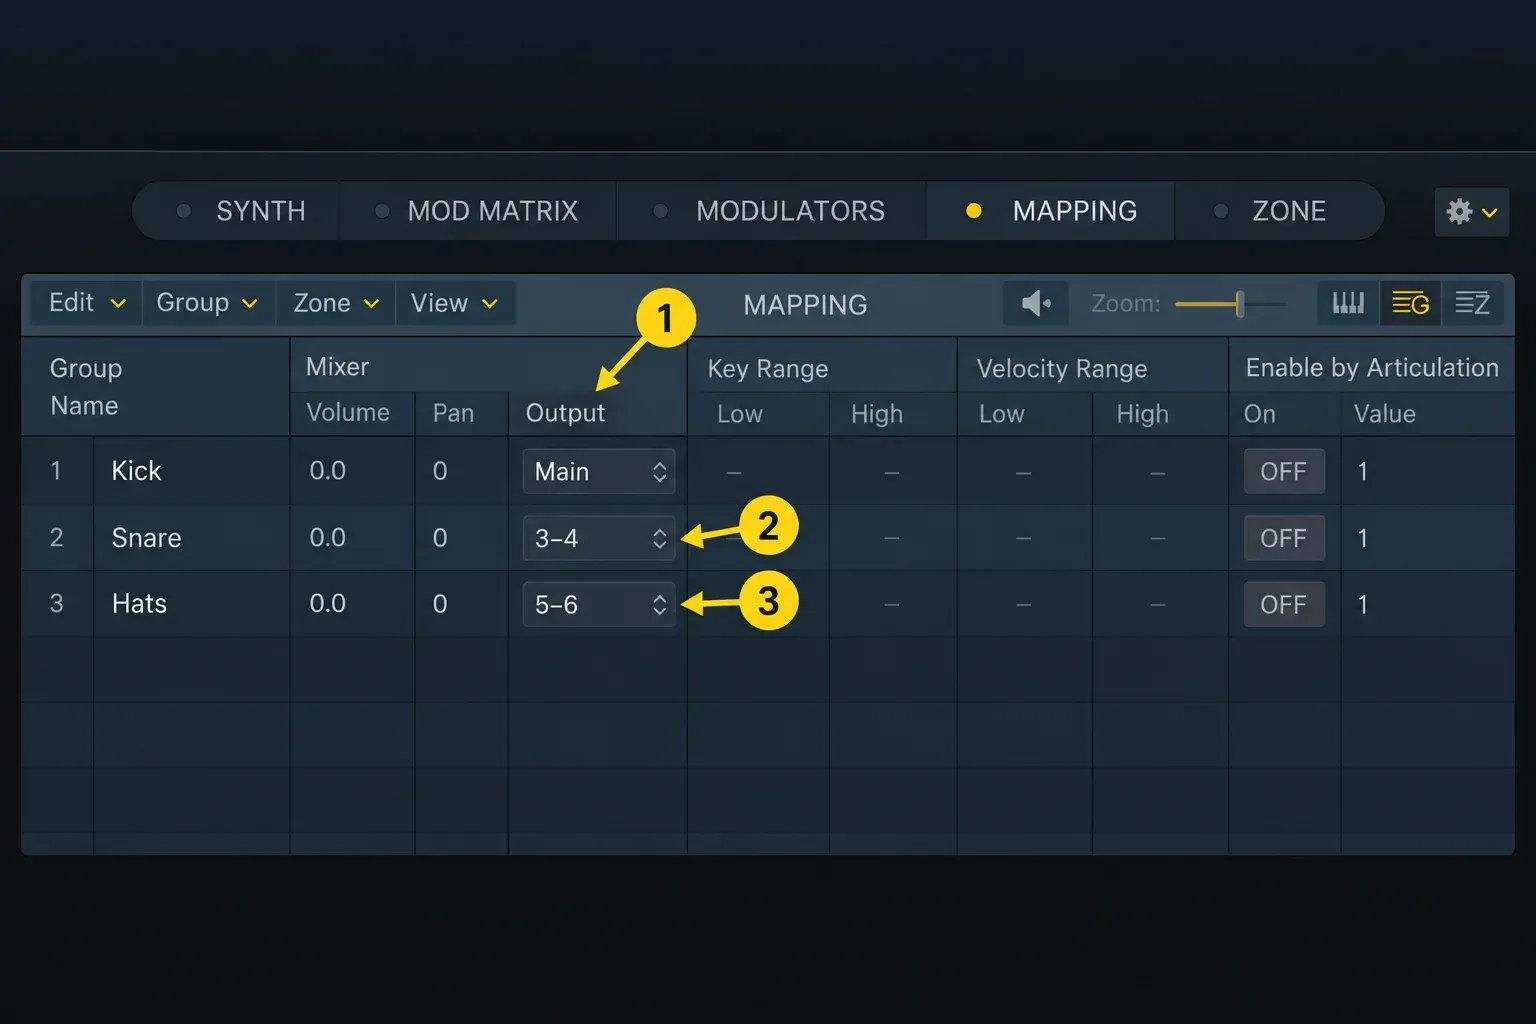
In Sampler, open Mapping and switch to Group view. Assign each drum group in the Mixer > Output column. Apple’s Sampler Group view guide shows that column and its output menu. If your kit assigns outputs by zone instead, use the corresponding zone output control. Choose Main for the instrument strip, then 3–4 and 5–6 for the two separate sounds in this example.
- Kick → Main keeps the low-end anchor on the instrument channel.
- Snare → 3–4 gives the backbeat its own insert chain and send balance.
- Closed hats → 5–6 keeps high-frequency control away from the kick and snare path.
The output number does not change the sample itself. It changes where the signal appears in the mixer after it leaves Sampler. If a zone remains on Main, it will continue to ride the main instrument fader even after you create aux strips.
Create the matching aux channel strips
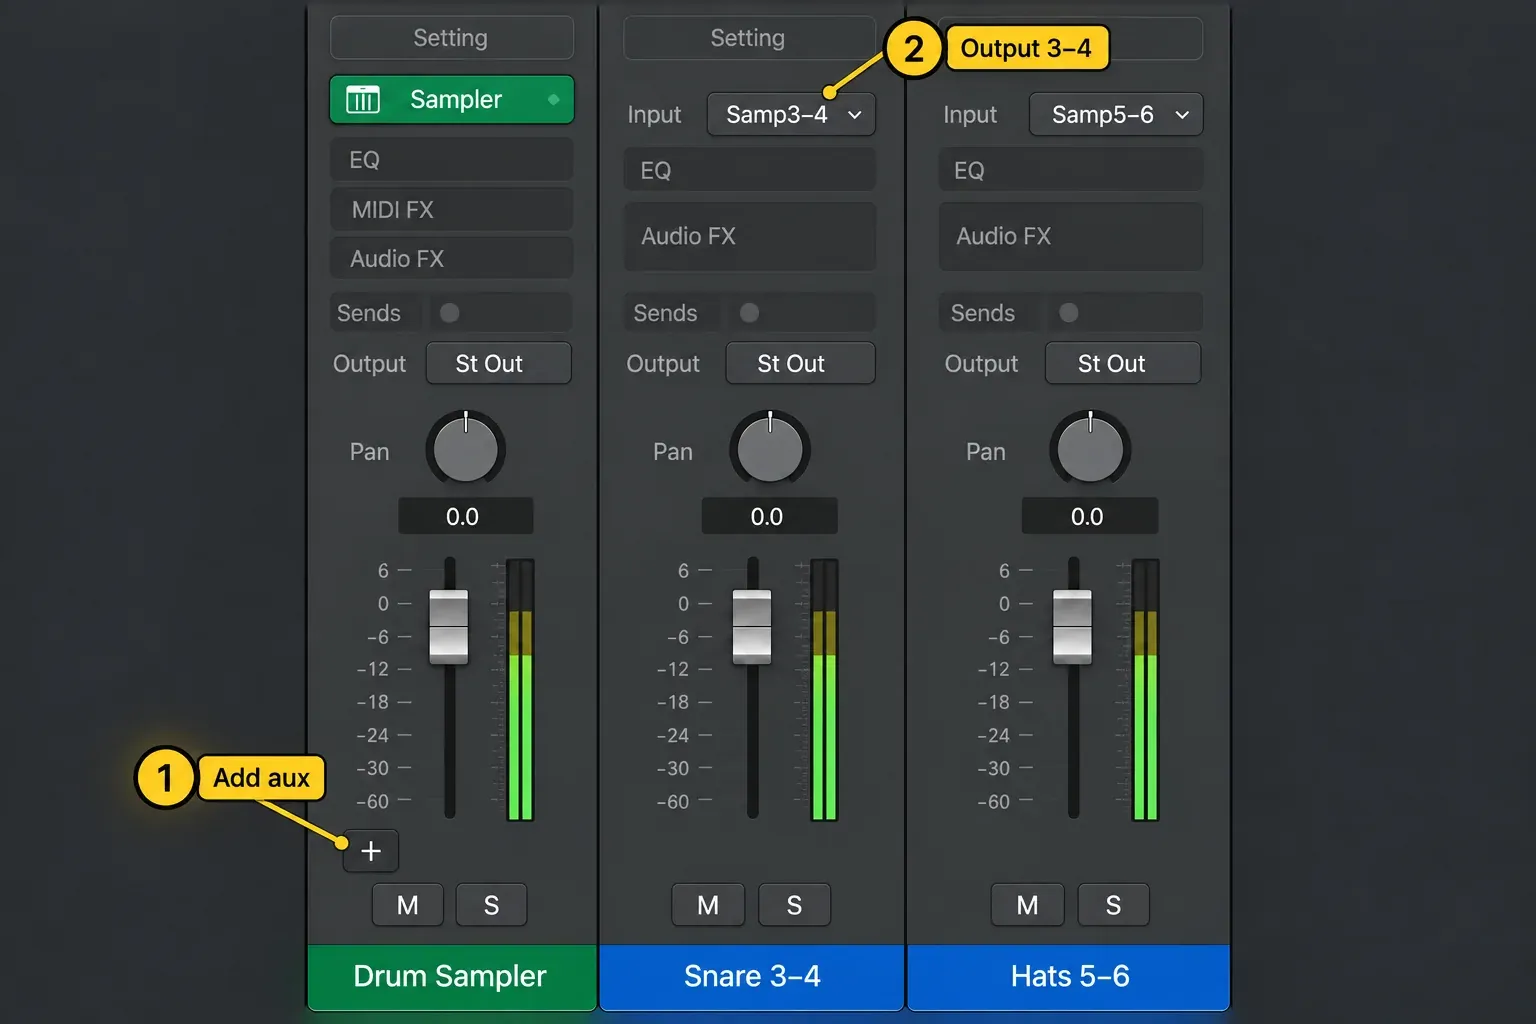
Return to the Mixer and find the channel strip that contains the multi-output Sampler. Click the small + button at the bottom of the strip. Logic Pro creates an aux channel strip for the next available output pair. Repeat the click for every output pair you actually used.
For the example above, create two aux strips: one for 3–4 and one for 5–6. The main Sampler strip carries Main, while the new strips carry the additional pairs. Apple notes that the Add button is available on multi-output instrument strips and that the aux appears beside the instrument strip; it also recommends creating only the number of aux strips required by the outputs in use.
Aux output versus bus: keep the routing clear
The aux strips created by the multi-output instrument are output paths. They receive the signal that Sampler sends to 3–4 or 5–6 in this example. Add 7–8 when you need a third independent output. A bus is a separate routing destination you might use to group several channels, build a parallel effect or send a signal to another processing chain.
That is why a bus cannot replace the Add button in this workflow. Sending the whole Sampler channel to a bus does not split Kick, Snare and Hats into separate sources. Start with the multi-output aux strips, then send those aux strips to a drum bus if you want shared glue compression or a common room effect. The site’s guide to buses, sends and aux channels covers that second stage.
Mix each drum output independently
Once the signal is separated, treat each aux like a normal mixer channel. Rename them immediately: Snare and Hats. Clear names prevent the common mistake of adjusting the wrong pair later in a dense session.
Typical decisions become simple:
- Use a short EQ cut on Hats when the top end crowds a vocal or cymbal.
- Compress Snare without flattening the kick or the rest of the kit.
- Send Hats to less room than Snare when the groove needs a tighter image.
- Automate the Snare aux for a fill instead of drawing volume changes across every MIDI zone.
- Route all drum auxes to a common drum bus only after their individual balances are stable.
Keep the Sampler instrument strip visible while mixing. If Main still contains several sounds, a change to that fader may affect more than the part you intended. The cleanest arrangement is one where the low-end anchor and any intentionally combined sounds stay on Main, while the sounds that need their own treatment live on named auxes.
Check the signal when an aux is silent
A silent aux is usually a routing mismatch, not a broken instrument. Trace the signal in this order:
- Play the exact MIDI note or pad that should trigger the sound.
- Watch the Sampler instrument meter. If it is silent, the issue is before the output assignment: wrong note, unloaded zone, mute or MIDI routing.
- If Main moves but the expected aux does not, reopen the zone and verify its output pair.
- If the aux meter moves but you hear nothing, check the aux fader, mute, solo, output destination and plug-in chain.
- Confirm that the aux belongs to the same multi-output instrument. A similarly named bus will not receive Sampler’s 3–4 signal automatically.
Do not create another aux until you know which stage is silent. Extra strips can hide the real problem and make the Mixer harder to read.
Export separate drum files
Keep the kit as MIDI while you mix through the instrument’s aux outputs. When you need audio files for another session, select the Sampler software instrument track and use File > Export > 1 Track as Audio File. In the export dialog, choose One File per Channel Strip under Multi-Output Software Instruments. Apple’s track export instructions explain that this option creates additional files for the aux channel strips fed by the selected instrument’s outputs. One File per Track mixes those outputs with Main into one file instead.
Set the range and starting point for the delivery. Choose Include Audio Tail if releases, reverb or delay need to continue beyond the last event. Check Bypass Effect Plug-ins and Include Volume/Pan Automation according to whether the recipient needs your processing and fader moves committed to the audio; do not assume every setting is included automatically. Keep the MIDI project for later edits and check the resulting files by name, length and intended drum part. The related Logic Pro stem export guide covers broader delivery choices.
If you want one combined drum file instead, One File per Track is the simpler choice for this instrument. A separate drum bus can still be useful in the mix, but its routing is a different decision from the channel-strip export setting.
Multi-output Sampler versus Drum Machine Designer
Drum Machine Designer is built around pads, cells and a dedicated drum interface. Apple’s Drum Machine Designer overview describes that pad-based workflow. A Sampler multi-output setup starts from one instrument instance and exposes its additional output pairs through aux strips.
Choose Sampler multi-output when the kit already lives in one Sampler and you want to preserve its zone mapping. Choose Drum Machine Designer when you want each pad to behave like an obvious drum slot with its own pad-level controls and channel-strip relationship. Neither approach is automatically better; the deciding question is where you want to make edits later.
If you are building a kit from individual samples, compare this workflow with the site’s Drum Machine Designer guide. If you are deciding between samplers before loading anything, see the Sampler versus Quick Sampler comparison.
Troubleshoot common multi-output problems
The Multi-Output choice is missing
The instrument may not expose multiple outputs in the selected plug-in format, or you may be opening a different instrument menu than the channel strip’s Instrument slot. Check the plug-in’s available configurations and confirm that you selected the instrument itself, not an audio effect slot.
The aux exists but receives no drum sound
Open the instrument and inspect the zone’s output assignment. A zone on Main will not appear on 3–4. Also check that you created the aux from the same multi-output instrument strip rather than adding a generic aux or bus elsewhere in the Mixer.
Several drum sounds still move together
That is expected while those sounds share Main or the same output pair. Assign the sound that needs independent processing to its own pair, create the corresponding aux and leave related sounds together only when that is musically useful.
The exported stem is empty
Select the software instrument track that hosts the multi-output Sampler, choose One File per Channel Strip in the track export dialog, and check that the relevant aux receives signal from the instrument output. Also inspect the export range and mute or solo state. An unused output pair will not produce the drum part you expected.
The Mixer is full of unused auxes
Remove aux strips you created for output pairs that are no longer in use. A smaller Mixer makes the active signal path easier to audit and reduces the chance of editing a stale channel.
A clean multi-output pass
- Load the instrument in a Multi-Output configuration.
- Keep Main for the sound or group that should stay on the instrument strip.
- Assign only the sounds that need separate treatment to 3–4, 5–6 or later pairs.
- Click Add once for each output pair you actually use.
- Rename each aux by sound or drum role.
- Check meters before changing plug-ins or creating more routing.
- Send the separated auxes to a drum bus only after their individual paths are clear.
- For separate audio files, export the Sampler track with One File per Channel Strip and keep a MIDI copy for later edits.
Multi-output routing earns its place when it removes a repeated task from the mix. Keep the instrument together, split only the sounds that need independent decisions, and let the auxes expose those decisions in a readable Mixer.


