How to Add Reverb to Vocals in Logic Pro
A vocal reverb works when the singer stays clear and the space supports the arrangement. Build a send, keep the return wet, then shape timing and tone around the words.

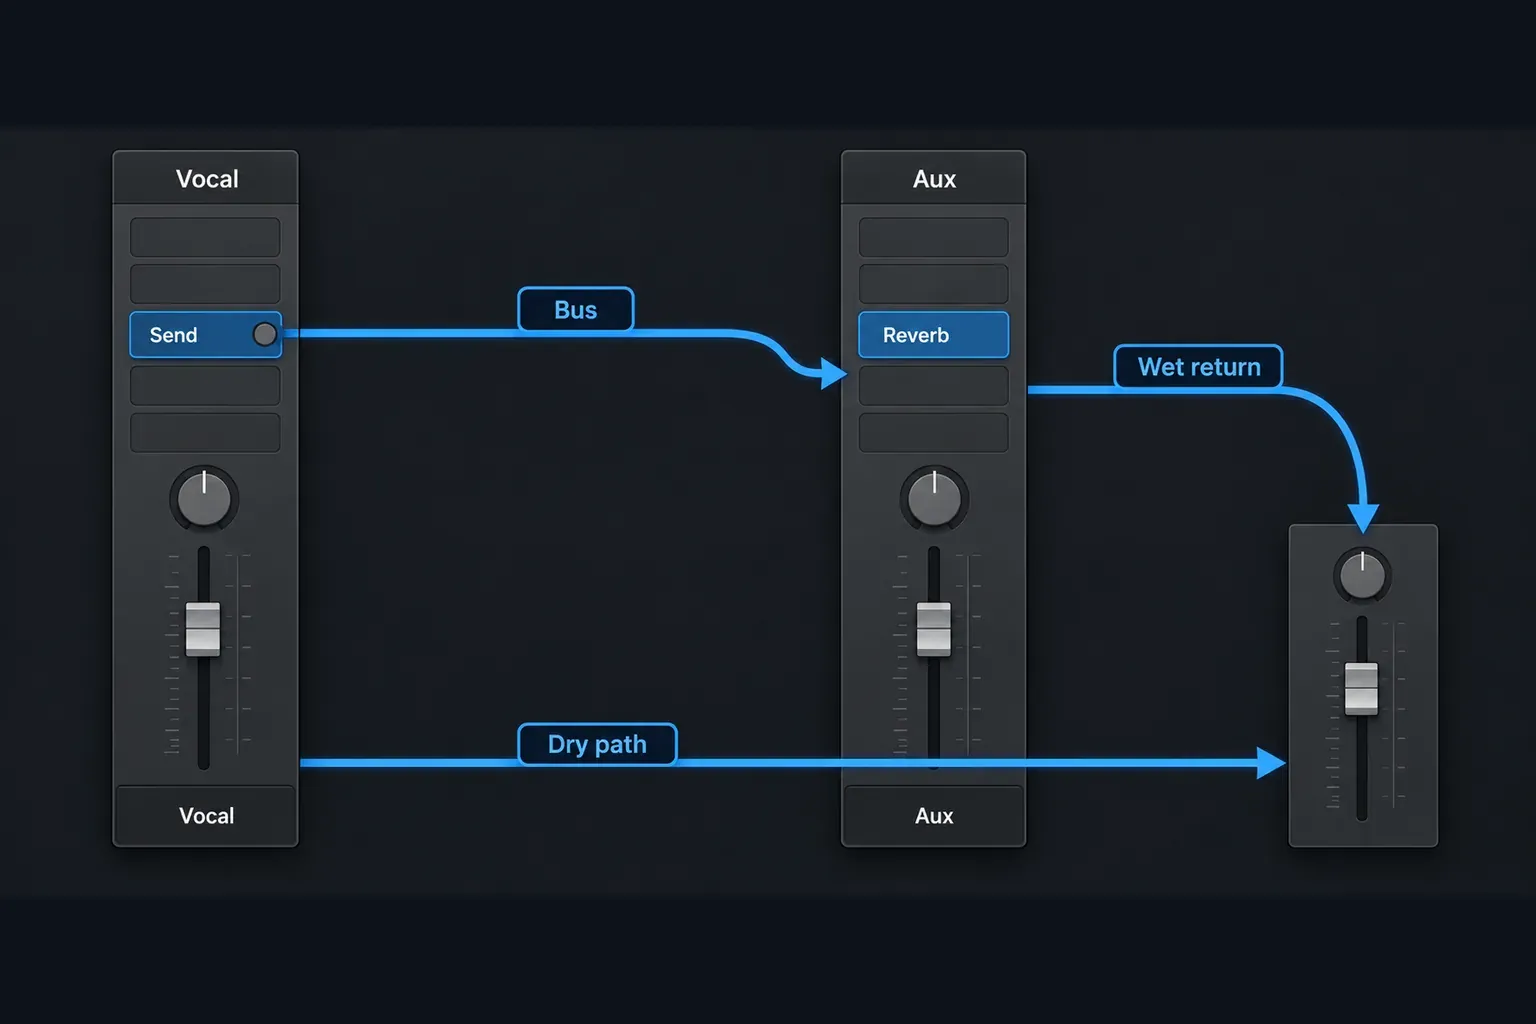
In Logic Pro, start vocal reverb on a send to an aux: the vocal keeps its dry route while a parallel signal feeds a reverb return. Apple’s send-effects guide explains that split path. Keep the return fully wet, then fit the space, predelay, decay and return tone around the lyric. That gives the vocal a believable place to sit without moving the words behind the track.
These steps cover Logic Pro on Mac. You get a repeatable routing decision and a way to diagnose the result. You won’t find one preset or one millisecond value presented as right for every singer, microphone or arrangement.
Set up a vocal reverb return
I’d start with one shared return for ordinary vocal ambience. It leaves the dry vocal easy to balance, lets several vocal layers occupy the same space, and gives you one fader for the effect. A direct insert still makes sense when the reverb is meant to replace the dry signal or belong only to one sound.
- Open the Mixer and find the vocal channel. Keep its normal output assignment.
- Click an empty Send slot and choose an unused bus. Logic Pro can create the receiving aux when you make the send; Apple documents that aux-channel behavior.
- On the receiving aux, choose a reverb from an Audio Effect slot. Rename the aux something useful, such as Vocal Room or Vocal Plate.
- On the reverb plug-in, mute the dry path when it is serving as an aux effect, so the return carries only the reverb. Space Designer’s output controls describe this aux-return condition.
- Raise the vocal Send Level from its minimum, then balance the overall effect with the aux fader. Judge the return with the full arrangement playing.
Choose the send mode with a reason. Post Fader follows the vocal fader but not its pan, Post Pan follows both, and Pre Fader follows neither. For a normal mix, Post Fader is a useful starting point when level rides should also change the reverb. Pre Fader is more deliberate: it can keep the return moving while you pull the dry vocal down. The current Logic Pro send reference defines all three modes.
Choose the space from the song’s job
Pick the job before you pick a preset. A close room can give a dry vocal some shared air without making it sound far away. A plate or chamber can keep a sustained line present while adding color. A hall can make a sparse chorus feel wider, but its tail has more chances to cover the next phrase.
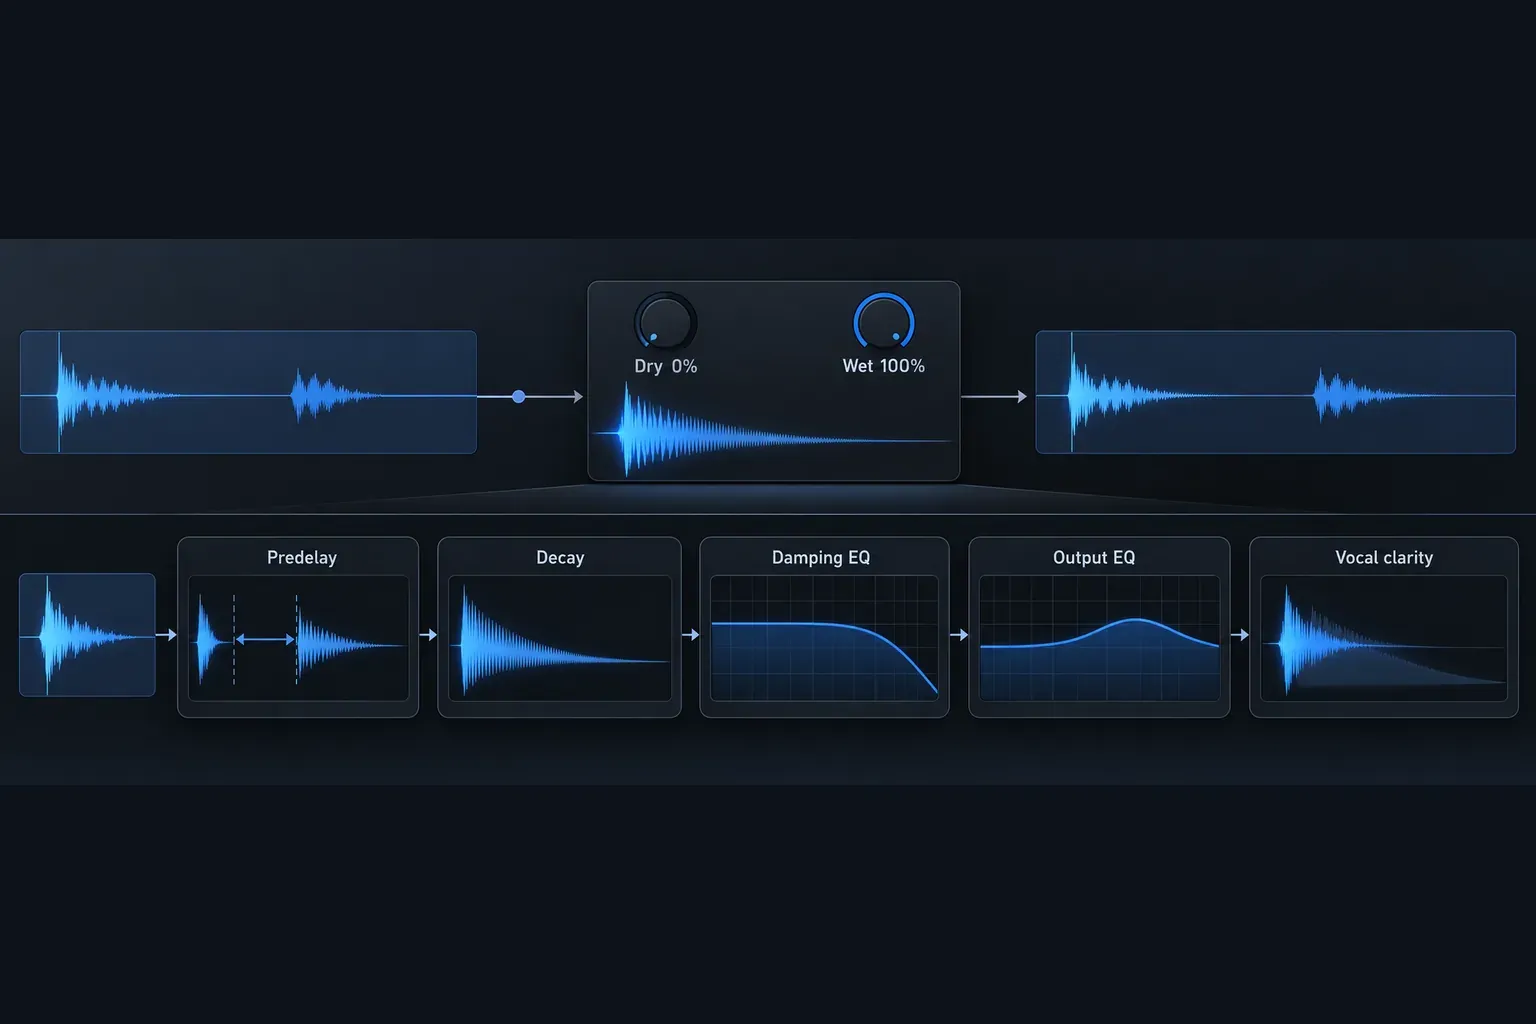
ChromaVerb provides 14 room-type algorithms and separate Main and Details views. It’s a good choice when you want to shape an algorithmic space directly. The ChromaVerb guide covers its room choices, predelay, decay, Damping EQ and Output EQ in detail.
Space Designer is a convolution reverb: it combines the incoming signal with an impulse response that describes a space. Use it when the recorded character of an IR is the useful decision. The Space Designer guide covers IR loading, envelopes and missing-file problems.
Logic also includes the Quantec Room Simulator, an algorithmic reverb built to recreate the resonant modes of natural spaces. Apple’s Quantec Room Simulator overview says the plug-in uses the original hardware code in two models, QRS and YardStick. It’s worth auditioning when the vocal needs a natural, transparent room rather than an obvious effect.
Do not compare a long reverb in solo and then leave its level unchanged in the mix. A tail that sounds impressive by itself can push the singer behind the guitars or keys. Compare the first consonants, the spaces between phrases and the end of the line against the arrangement.
Use predelay to keep consonants forward
Predelay is the time between the dry signal and the first early reflections. It gives the vocal a little room to speak before the space arrives. Apple describes the tradeoff clearly for Space Designer: a very short value can color the original signal, while an excessive value can sound like an echo or leave a gap between the vocal and its reflections.
Start shorter, then increase predelay until the words separate from the return without sounding detached. If the first consonants disappear, the return is probably arriving too early or too loudly. If the vocal sounds dry and the reverb appears as a delayed copy, shorten the setting or reduce the return level. Predelay is about the distance between source and reflections. It’s no substitute for shortening a tail that lasts too long.
Set decay by phrase spacing
Decay determines how long the reverb remains audible after the source. Listen to the gap before the next lyric rather than choosing the longest tail the plugin offers. A fast arrangement usually needs a tail that clears quickly enough for the next line. A sparse arrangement may leave room for a longer hall or chamber.
A muddy vocal calls for a lower send or a shorter decay before you change five other controls. When the vocal feels too dry but the return is already loud, try a different space or a little more predelay instead of extending the tail. iZotope’s vocal-reverb guide also treats aux routing, pre-delay, decay and clarity as connected decisions, although its examples use a third-party plugin.
Use tempo-linked values when a reverb offers them and they help the tail land with the phrase. The sync choice is only a starting point, though. A mathematically tidy tail can still mask a word, so return to the vocal and arrangement when you make the final decision.
Shape the return instead of burying the dry vocal
The return is another signal in the mix. If it carries low-frequency buildup, remove that energy on the return rather than thinning the dry vocal. If its top end keeps drawing attention, darken the return or choose a less bright space. The goal is for the listener to feel a room around the singer without hearing the room compete with every syllable.
In ChromaVerb, Damping EQ and Output EQ do different jobs. Damping EQ changes the frequency-dependent decay through Ratio. Frequency and Q identify the affected band. Output EQ shapes the level of the reverb signal. Use Damping when one range hangs around too long, and Output EQ when the return has the right length but the wrong tone.
On a fully wet aux, the reverb return is easy to filter without changing the vocal itself. On a direct insert, any EQ inside the reverb plug-in may also affect the dry component if Dry is above zero. That’s one reason the send-and-return layout stays easier to reason about.
Use two returns when one space cannot do both jobs
One short return can provide the sense that the vocal belongs in the track. A second, quieter return can supply a longer plate or hall for selected words and chorus lines. Send the whole vocal to the short space, then automate the second send only where the larger effect helps.
This keeps the intimate center and the dramatic tail on separate faders. It also gives you a clean way to pull back the long effect when the arrangement becomes dense. Two returns are useful only when they have different jobs. Duplicating the same long preset twice usually creates a louder blur.
Automate the send when the lyric needs room
Static reverb levels force you to choose between a dry verse and a crowded chorus. Automate the send or the aux fader when the arrangement changes. Raise the send at the end of a line if you want a tail to carry into the next section, then bring it down before the next phrase needs to be understood.
Automation is easier to edit when the dry vocal and wet return stay separate. The vocal-reverb workflow in iZotope’s guide uses the same wet and dry separation for level control and automation. A ducking compressor on the return comes later, as a refinement. First make sure the routing, wet/dry state, decay and tone are already doing the right job.
When that groundwork holds and the tail still crowds the words, duck the return. Insert Compressor after the reverb on the aux, click the Side Chain button in the Compressor window, then choose the vocal track from the Side Chain pop-up menu in the plug-in header. Lower Threshold until the return dips while the singer is active, and set Release so the tail comes back up in the gaps between phrases. Apple’s Compressor guide explains that the side chain signal serves only as the detector and isn’t routed through the compressor.
Fix the symptom before changing the plugin
- No reverb: confirm the Send Level, the selected bus, the aux input, plug-in bypass, the aux fader and the output assignment. Shift-clicking a Send slot helps locate its receiving aux.
- The vocal gets louder but not wetter: check that the return’s Dry control is muted. A dry signal on the aux can add another copy of the vocal without adding the space you intended.
- The words lose their edges: lower the send, shorten the decay, then adjust predelay. If the return is still in the way, change the room or filter the return.
- The tail sounds detached: shorten predelay or lower the aux level. A long gap can make the reverb sound like a separate repeat rather than the room around the singer.
- The vocal is silent while tracking: mixing a reverb return and monitoring a live input are separate problems. If you want to hear Logic effects while recording, use software monitoring and the track’s Input Monitoring control, and do not hear a second hardware-monitoring path. Our Logic Pro recording setup guide explains that boundary.
Once the return behaves, stop chasing a preset that sounds impressive in solo. The Logic Pro vocal mixing workflow is the right place for the broader chain, while this page owns the reverb decision: route it in parallel, protect the words with timing, shape the return, and automate only where the song asks for more space.


