Master a Song in Logic Pro: Manual vs Assistant
A complete Logic Pro mastering workflow for choosing a manual stock chain or Mastering Assistant, comparing fairly, metering and bouncing the final file.

To master a song in Logic Pro, first confirm the mix survives quiet listening, mono, section changes and reference comparison. Then create either a manual stock-plug-in chain or a Mastering Assistant candidate, level-match the result against the unmastered mix, measure the complete song, bounce an uncompressed file with Normalize off, and inspect that file outside the project.
A manual chain gives you direct control over each problem. Mastering Assistant gives you a fast, integrated analysis and an adjustable starting result. Neither route wins by default. The useful master is the one that improves translation without making the vocal harsher, the low end smaller, the transients duller or the stereo image less reliable.
The Mac controls and delivery guidance below were checked against current Apple and Spotify documentation on September 12, 2026. This is a documentation check, not a claim of a listening test on your mix.
Mastering is the handoff at the end of the complete Logic Pro mixing workflow. If a global processor damages several instruments while fixing one, return to the channel or bus that owns the problem.
Fast workflow: save a mastering alternative, disable accidental double limiting, choose a representative reference, diagnose the mix, add only the processors with a defined job, put loudness and true-peak metering last, make a second candidate with Mastering Assistant, compare at matched level, check the complete song and several playback systems, then bounce and re-import the final file for one last inspection.
Decide whether the mix is ready to master
Mastering works on the entire stereo picture. That makes it good for small global changes and bad at rescuing one isolated source. If a broad EQ cut fixes the vocal but removes the snare and guitars, the vocal needs a mix-stage repair. If the limiter reacts to one bass note and pulls down the whole chorus, control that note on the bass channel or bus.
Before adding a mastering processor, play the loudest section, the quietest section and every major transition. Lower the monitor level until the balance is barely audible. Fold the mix to mono. Check the opening and ending for clicks, clipped tails and accidental noise. Listen for:
- a lead element that disappears when the level is low;
- kick and bass notes that produce disproportionate peaks;
- harsh consonants, cymbals or guitars that become tiring across a full song;
- low-end or stereo information that collapses in mono;
- automation moves that make one section unexpectedly louder or darker;
- clipping on tracks, buses, Stereo Out or an already active output chain.
A mix doesn’t need a ritual amount of empty peak space if its output is clean and controllable, but it must leave the mastering route room to work without clipping. The Logic Pro gain-staging workflow explains those level handoffs. If the premaster already hits a limiter, decide whether that limiter is part of the sound or just a temporary loudness preview. Do not unknowingly send a limited mix through another full loudness chain.
Choose a manual chain or Mastering Assistant
| Choose this route | When it fits |
|---|---|
| Manual stock chain | You can name the tonal, dynamic or peak problem and want direct control over every stage. |
| Mastering Assistant | You need a fast first candidate, a second opinion or a controlled reference from Logic’s integrated analysis. |
| Both as separate candidates | You want to learn what each route changes and choose by level-matched translation rather than expectation. |
| Return to the mix | A stereo fix helps one element but damages several others, or the processor must work too hard to contain one source. |
| Independent mastering engineer | The release needs experienced external judgment, calibrated monitoring, sequencing across a project or formal delivery quality control. |
Choose a manual chain when you know which part of the sound needs changing. Try Mastering Assistant when you want an initial result to evaluate. Keep the same source mix for both, and compare them at similar loudness before choosing.
Prepare a clean Logic Pro mastering project
You can master inside the mix project or import a stereo premaster into a new project. A separate project makes versioning, references, metering and accidental routing easier to see. Staying in the mix project makes source fixes immediate. Use whichever keeps the signal path unambiguous.
- Save a separate project copy with its audio assets before experimenting. Apple’s Project Alternatives documentation explains that alternatives share assets; they are useful for different settings, not independent audio backups.
- Confirm the source. Use the approved mix, not an old bounce with different vocal or limiter settings.
- Match the project sample rate to the source. Changing a number does not restore information that was never captured.
- Route the premaster once to Stereo Out. Check for hidden sends, duplicate output paths and active mastering plug-ins.
- Import one or more relevant references. Route them so they bypass your mastering processors and turn them down for a fair comparison.
- Mark test sections. Include the loudest chorus, a sparse passage, a bass-heavy moment, the brightest moment and the song ending.
- Set up final meters after all audible processing. The meter must describe what will be bounced.
Compare vocal level, bass weight, brightness and transient impact against a reference in a related style. For the simplest comparison, import the reference and your two finished candidate bounces into a blank project with no mastering effects on Stereo Out. Play only one track at a time and lower the louder tracks for auditioning. This avoids sending an already mastered reference through your processing.
Build a manual Logic Pro mastering chain
Start with the manual processors bypassed. Identify a problem you can hear across the song, enable one processor, and match its output level before comparing. If it does not improve the mix, remove it. The order below is a starting point, not a requirement to use every plug-in.
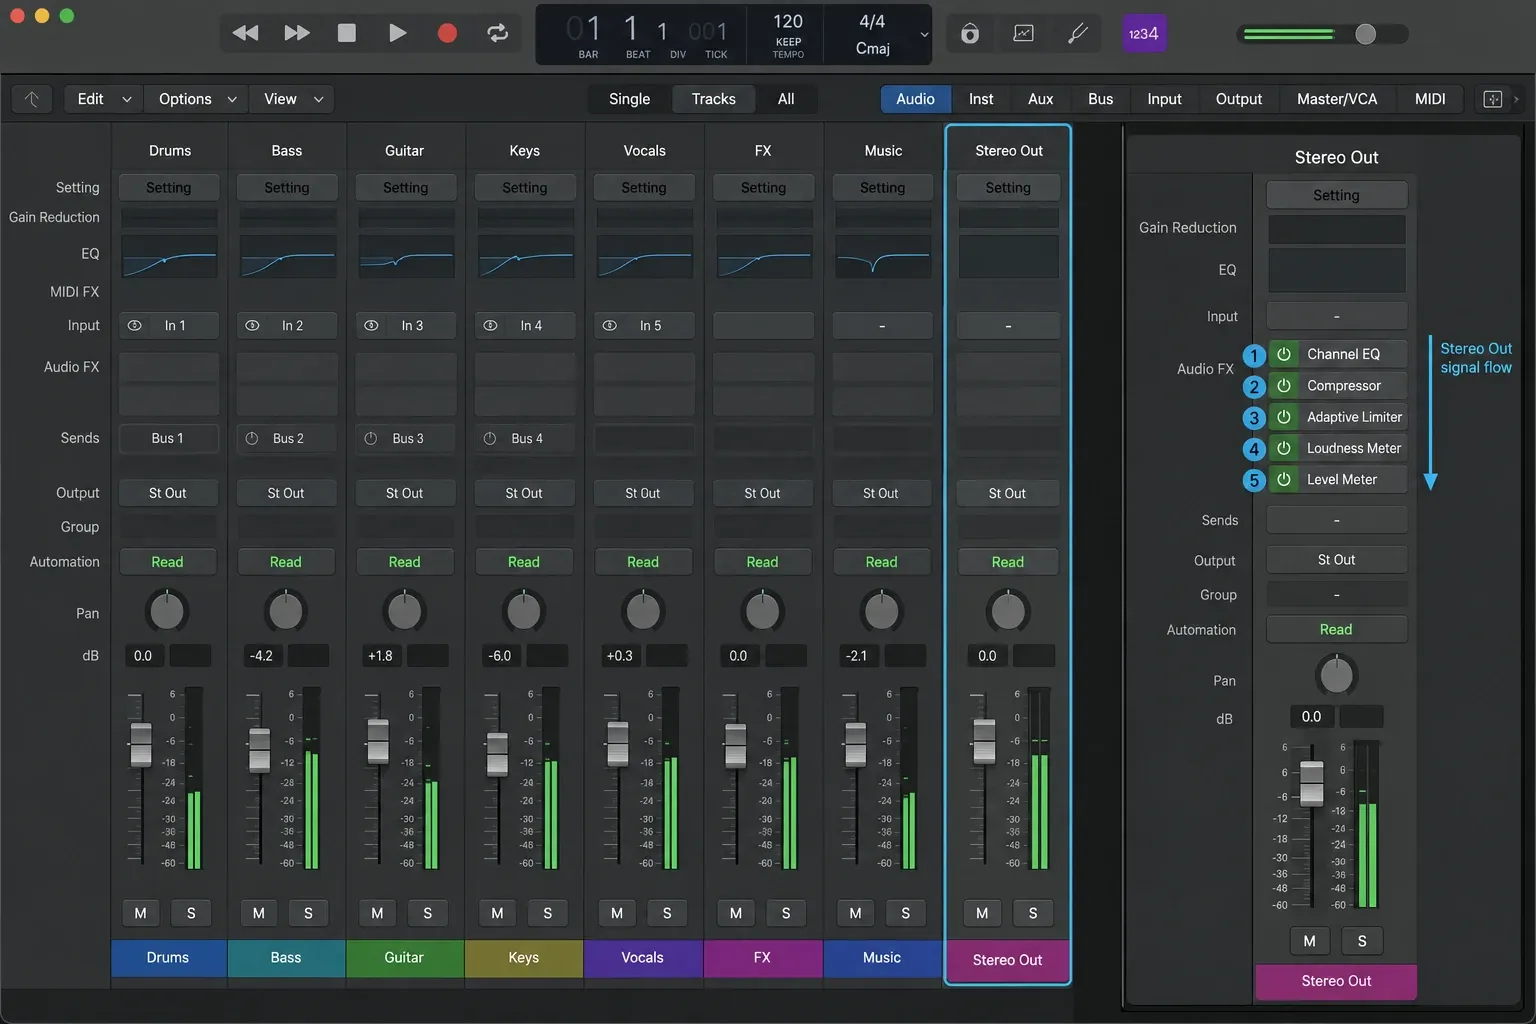
1. Use EQ for broad tonal balance
Insert Channel EQ or Linear Phase EQ only when the mix has a repeatable tonal imbalance. Make a small move, bypass at matched loudness, and check several sections. A low shelf that helps one verse can overfeed the limiter in the chorus. A high-frequency cut that softens cymbals can also push the vocal behind the track.
Linear Phase EQ isn’t automatically the mastering choice. Apple’s current Linear Phase EQ guide says it preserves phase, adds more latency than Channel EQ and can affect the onset of transients, especially with steep cuts or narrow, large boosts and cuts. Use the equalizer whose audible result fits the material rather than choosing by label. For narrow resonances that belong to one instrument or note, return to the mix instead of carving the complete stereo signal.
2. Add compression only for a defined movement problem
Logic Pro Compressor can shape macro movement, density and the relationship between peaks and sustained material. Start by asking what should become more stable: the chorus, the vocal-led body of the song, or occasional peaks. Then set Threshold, Ratio, Attack and Release while watching gain reduction and listening to the groove.
Fast timing can dull kick and snare attacks. Slow recovery can hold down the next phrase. Auto Gain can make the processed path louder and bias the decision, so use manual output matching while you work. If the compressor must move heavily on one bass note or one vocal syllable, repair that event in the mix.
3. Treat multiband processing as optional surgery
Logic’s Multipressor can split the signal into as many as four bands and process them independently. That makes it useful when a limited frequency region has a dynamic problem you can’t solve cleanly with static EQ or source automation. It also creates more thresholds, crossovers and gain relationships that can damage tone or movement.
Do not insert Multipressor just because a mastering template includes it. Bypass it first. If the song becomes clearer and more alive without it, leave it out. When only one band needs control, monitor the full result instead of the soloed band, and confirm that the cure holds across every section.
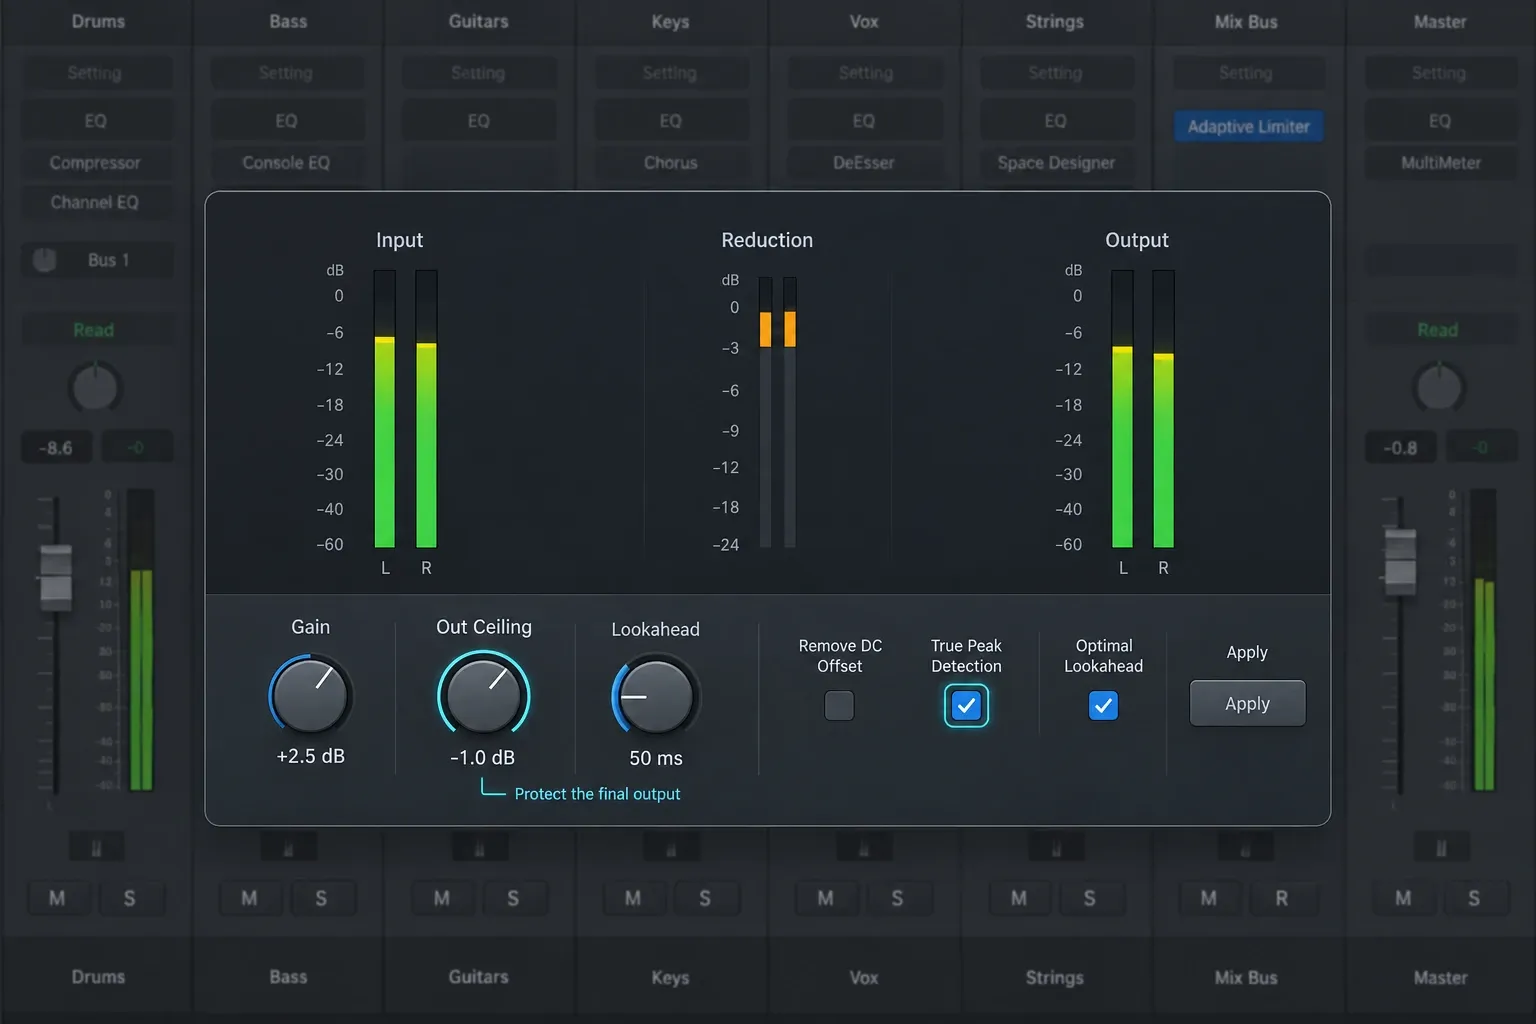
4. Use Adaptive Limiter for peak control and final level
Place Adaptive Limiter after tone and dynamics processing, before the final meters. Apple’s Adaptive Limiter reference documents Gain, Out Ceiling, Lookahead and True Peak Detection. The plug-in can control peaks and raise perceived loudness, but it can also color the result. Enable true-peak detection when the delivery requires inter-sample peak control, then increase level while listening for softened transients, distortion, pumping, narrowed depth and low-end instability.
Don’t judge the limiter only in the loudest loop. A setting that survives the chorus may pull a quiet verse forward unnaturally or exaggerate noise in the outro. Listen to the complete song, and compare the limited path against a level-matched bypass.
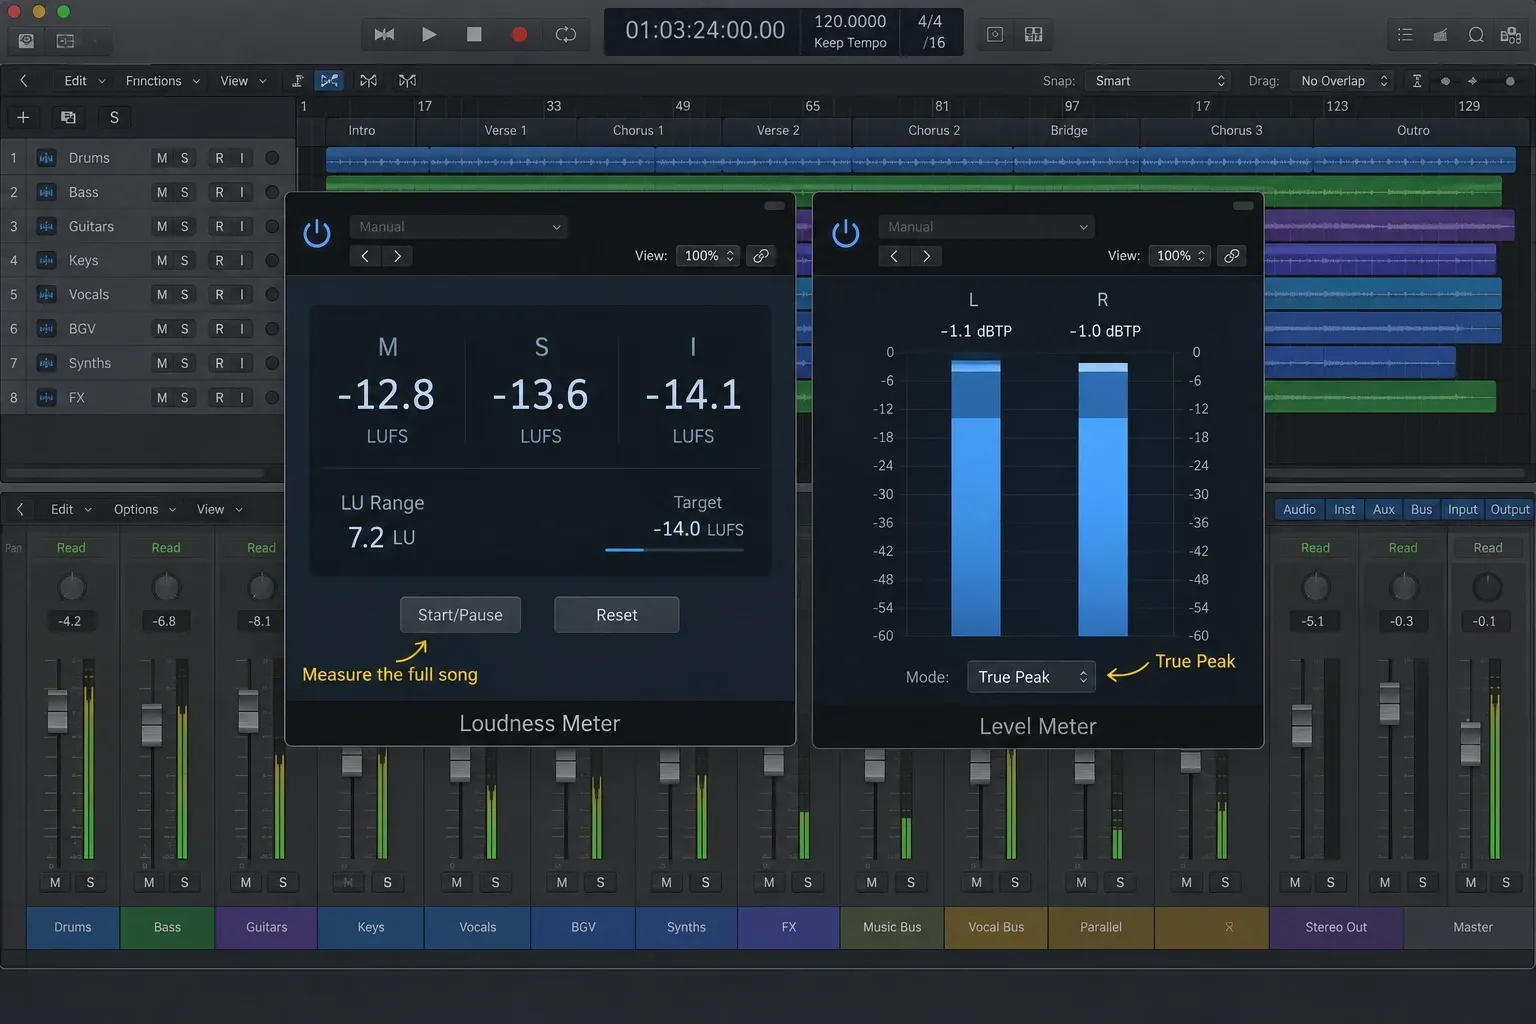
5. Put loudness and true-peak metering last
After the last audible processor, choose Metering > Loudness Meter in an Audio Effect slot. Apple’s Loudness Meter instructions distinguish momentary, short-term and integrated loudness. Click Reset, enable Start/Pause for integrated measurement, and play the song from beginning to end once. Record the Integrated reading after the ending has finished. Pausing measurement retains its values; a chorus loop does not measure the whole song.
For true peak, add Metering > Level Meter after the processing and choose True Peak in its Mode menu. Apple’s Level Meter instructions describe this separately from Loudness Meter: channel-strip sample peaks are not a substitute. Play the full song and read the held peak before restarting playback, which resets that value. Encoding can introduce additional peaks, so check an encoded copy too. For the dBTP versus dBFS distinction itself, see what true peak actually measures.
Run Mastering Assistant as a separate candidate
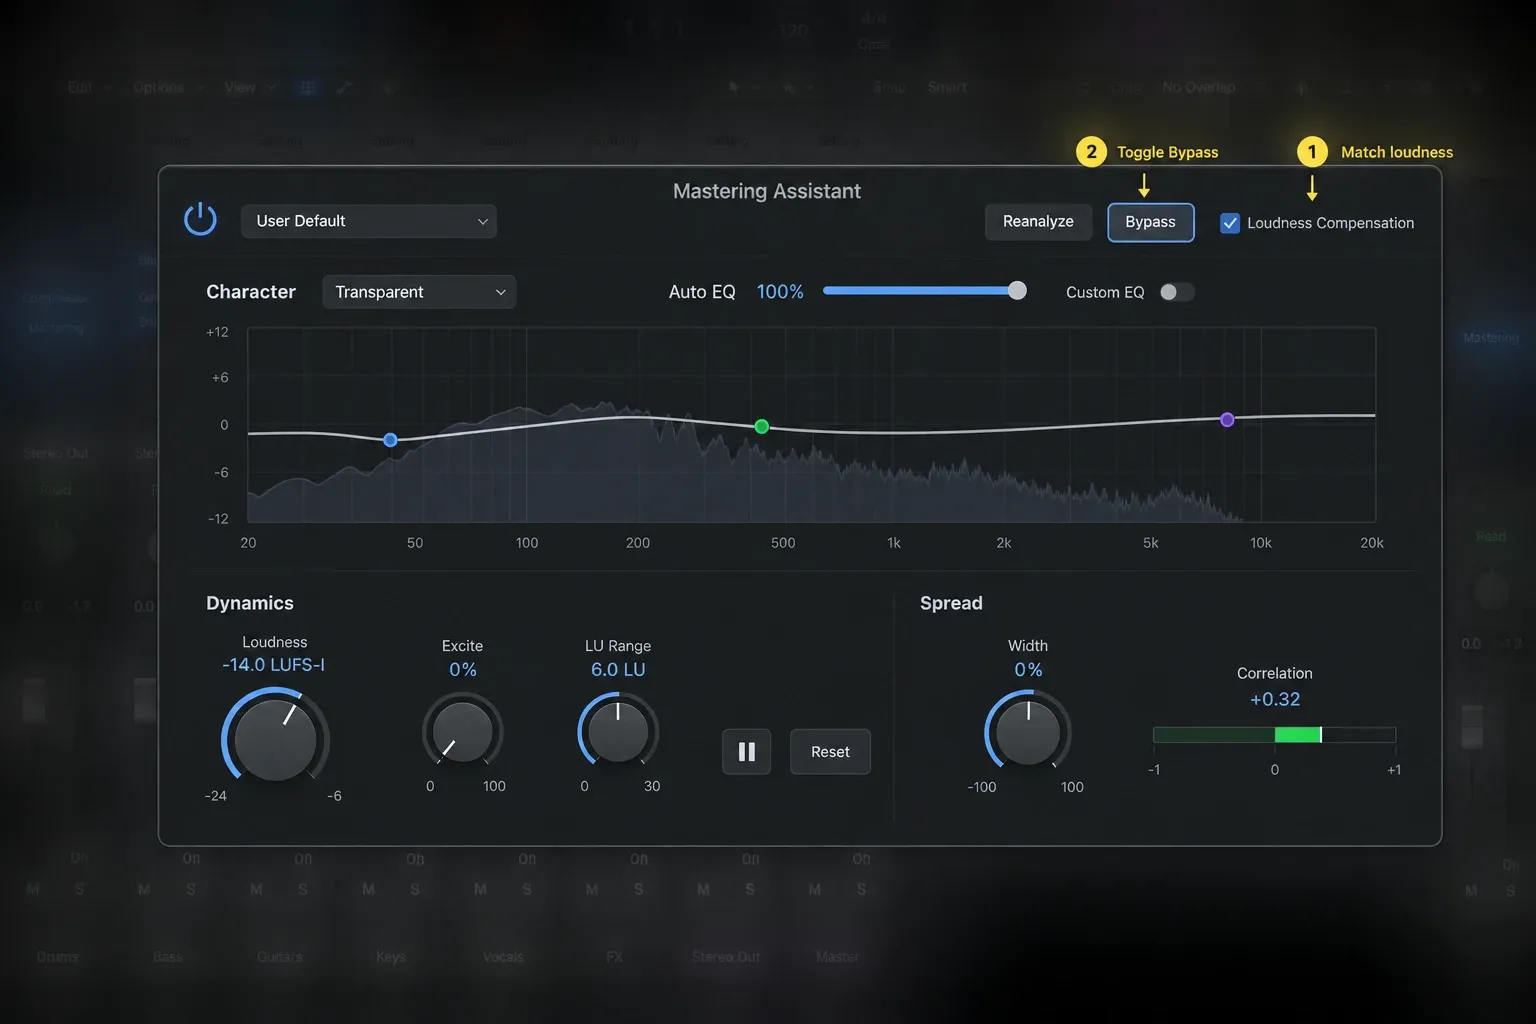
Save a separate version or bypass the manual mastering chain before trying Assistant. Click Mastering in the last Audio Effect slot on Stereo Out, or choose Mix > Mastering Assistant. Apple’s Mastering Assistant setup instructions explain the initial analysis. Do not leave your completed manual limiting chain feeding Assistant unless you deliberately want both processes.
- Start from the same approved mix used for the manual candidate.
- Remove accidental double processing but keep intentional mix-bus processing.
- Analyze the complete song or set locators around a representative section.
- Play every major section rather than limiting playback to the analyzed passage.
- Use Loudness Compensation with Bypass while judging processing.
- Reduce or change any suggested processing that harms tone, dynamics or mono compatibility.
- Reanalyze after meaningful mix changes.
- Turn both Bypass and Loudness Compensation off before the final bounce.
Our complete Mastering Assistant guide covers Character availability, analysis range, EQ, Dynamics, Excite, Loudness, Width and reanalysis. Use it for the individual controls; the comparison here uses the same mix for the manual and Assistant versions.
Compare manual mastering and Mastering Assistant fairly
Louder processing usually sounds more impressive for a few seconds. That’s why a fair comparison needs level matching. Mastering Assistant provides Loudness Compensation for processed-versus-bypass checks. For separate manual and Assistant bounces, reduce the louder candidate for auditioning so the short-term or integrated loudness is close enough that tone, movement and translation drive the choice instead of level.
Use a repeatable listening order:
- Level-match. Do not compare the release levels yet.
- Switch blindly if possible. Hide filenames or ask another person to switch candidates.
- Check the same short sections. Listen to vocal tone, kick/bass separation, snare attack, cymbal edge, depth and stereo stability.
- Play the complete song. Confirm that the winning moments do not create fatigue or uneven transitions.
- Check mono and quiet playback. Important elements should remain intentional.
- Check several real devices. Use the monitoring you know, then headphones, a small speaker and another ordinary playback system.
- Restore delivery level and meter again. The comparison gain must not become an accidental export change.
The result may be the manual version, the Assistant version or a revised mix followed by a simpler master. Do not combine both candidates just because each one contains an attractive moment. Identify the useful change and rebuild it deliberately.
Set loudness without treating one LUFS number as law
Apple says the center position of Mastering Assistant’s Loudness control typically lands around −14 LUFS-I, a common reference for many streaming platforms. Apple’s current Mastering Assistant parameter guide also says strict adherence is not always the best approach and that suitable loudness varies with the mix and genre.
Spotify’s current loudness-normalization documentation describes Normal playback at −14 dB LUFS. It recommends a maximum below −1 dBTP, or below −2 dBTP when a master is louder than −14 LUFS-I, to reduce the risk of extra distortion during encoding. Spotify applies normalization during playback rather than rewriting the uploaded master, and it documents Loud and Quiet settings plus exceptions such as the web player and some third-party devices. Treat these as Spotify playback and encoding guidelines, not a universal mastering target.
Choose final level by combining:
- the song’s transient and dynamic needs;
- aesthetic comparison with relevant current releases;
- the distributor’s current delivery specification;
- integrated loudness across the complete song;
- true peak and encoded playback;
- whether added loudness damages tone, impact or depth.
Mastering Assistant has a fixed −1 dBFS true-peak ceiling, according to Apple; it has no adjustable Out Ceiling control. If your delivery requires a lower ceiling, such as Spotify’s advice for masters louder than −14 LUFS-I, use a route that lets you set it, such as the manual Adaptive Limiter chain, and measure the bounced file. Turning Assistant’s Loudness control down is not the same as selecting a new ceiling. Stop adding level if the kick loses impact or the vocal becomes harsh.
Bounce the master with controlled settings
Open File → Bounce → Project or Section. Check the start and end points manually. Leave enough room for intentional release and reverb tails. Apple notes that Include Audio Tail can extend a bounce, but some mastering plug-ins add noise that makes the generated tail impractically long. Set the end range deliberately when that applies.
Use the exact distributor or client specification. For a common uncompressed stereo delivery candidate:
- choose Uncompressed and the requested WAVE or AIFF file type;
- use Interleaved for one stereo file unless split channels were requested;
- keep the project’s native sample rate unless the destination requires conversion;
- select the requested bit depth;
- set Normalize: Off so Logic does not add another peak-normalization step;
- consider dither only when reducing bit depth; if you use it, apply it once at the final reduction stage. Apple’s dithering guide says that some material may work best without dither and explicitly warns against dithering the same signal multiple times;
- use Realtime bounce when external instruments, hardware inserts or another real-time dependency requires it.
Apple’s current Uncompressed bounce reference lists AIFF, WAVE and CAF, bit depths through 32-bit float, and interleaved or split formats. Its project bounce guide documents Normalize Off, Overload Protection Only and On. Use Off for a master whose level you’ve already set and verified.
The Apple Digital Masters technology brief asks for a 24-bit source at the highest native sample rate appropriate to the project and explicitly warns against upsampling just to create a higher-resolution label. Other distributors may specify something different. Check the current destination requirement before delivery rather than reusing an old export preset.
Inspect the bounced file after approving the project
Create a blank Logic project and import the final uncompressed bounce. Make sure it isn’t routed back through another mastering chain. Confirm the duration, channel format, sample rate and bit depth, then listen to the opening, loudest passage, transitions and final decay.
On the clean playback route, reset Loudness Meter, enable Start/Pause and measure the complete imported file. Use Level Meter in True Peak mode for the held peak. For an AAC audition, Apple’s Digital Masters tools include the Apple Digital Masters Droplet: drag an AIFF or WAVE master onto it to create an encoded listening copy. Compare that copy against the original for clipping, harshness and lost transient detail. It checks AAC, not every distributor’s codec; deliver the requested uncompressed master, not this audition copy.
Use clear version names such as song title, master revision, sample rate and bit depth. Keep the approved premaster, manual candidate, Assistant candidate, final delivery master and audition encode separate. The guide to exporting stems and alternate files covers the same discipline for alternate files and stems.
Troubleshoot a master that does not translate
| Symptom | What to check next |
|---|---|
| Master sounds better only because it is louder | Level-match processed and bypassed paths; use Loudness Compensation with Mastering Assistant. |
| Kick or snare loses impact | Reduce limiter or compressor action, review Attack, and control isolated source peaks in the mix. |
| Vocal becomes harsh | Bypass Excite or high-frequency boosts; repair vocal, de-essing or competing instruments in the mix. |
| Low end pumps | Find the event driving gain reduction; revise bass or kick balance before adding more multiband processing. |
| Stereo image weakens in mono | Reduce width processing, check correlation and inspect phase-sensitive mix elements. |
| Integrated LUFS seems inconsistent | Reset Loudness Meter, enable Start/Pause and measure the full file once from start to finish, after all processing. |
| Bounce differs from playback | Check output routing, bypass states, Loudness Compensation, Normalize, real-time dependencies and imported-file routing. |
| Encoded copy clips or sounds brittle | With Adaptive Limiter, enable True Peak Detection and lower Out Ceiling or final level, then encode again. Assistant has no adjustable ceiling; use a controllable manual route if a lower ceiling is required. |
| Assistant result changes after mix edits | Reanalyze the updated project and repeat the level-matched comparison. |
| One fix damages several elements | Stop mastering and repair the responsible track, bus or automation move in the mix. |
Final Logic Pro mastering checklist
- The approved mix version is clearly identified and backed up.
- No accidental limiter, duplicate output path or hidden send processes the signal twice.
- Every manual processor has a defined audible job.
- Mastering Assistant, if used, was tested as a separate candidate.
- Processed and bypassed versions were compared at matched loudness.
- The loudest, quietest, brightest and bass-heaviest sections were checked.
- The complete song was checked in stereo, mono, quiet playback and more than one device.
- Integrated loudness was measured across the complete final path.
- True peak and encoded playback were checked.
- The bounce range includes the intentional ending without an uncontrolled tail.
- File type, interleaving, sample rate and bit depth match the current destination specification.
- Normalize is off. If dither is needed for a final bit-depth reduction, it is applied once.
- The bounced master was re-imported into a clean route and inspected.
- Versions and filenames make the approved delivery file impossible to confuse.
Use the Logic Pro tutorials hub for the surrounding recording, editing, routing and mix workflows. If final level changes between sections need deliberate musical control rather than more compression, use the Logic Pro automation workflow before rebuilding the master.
Frequently asked questions
Is Logic Pro good for mastering a song?
Yes. Logic Pro includes EQ, compression, multiband dynamics, limiting, loudness and true-peak metering, plus Mastering Assistant. Those tools can produce a finished master, but the result still depends on monitoring, level-matched decisions, full-song checks and inspection of the bounced file.
Is Mastering Assistant better than a manual mastering chain?
Neither wins automatically. Mastering Assistant is fast and integrated; a manual chain gives direct control over each decision. Create separate candidates, level-match them, and keep the one that translates better without damaging the mix.
Should I master every song to -14 LUFS?
No. Apple describes roughly -14 LUFS-I as typical for many streaming platforms but says strict adherence is not always best. Loudness should suit the song and its destination while preserving acceptable dynamics and true peak.
Should I master on Stereo Out or in a new Logic Pro project?
Either can work. A separate project with a stereo premaster simplifies versioning, metering and comparison; mastering on Stereo Out preserves instant access to the mix. Keep the route controlled and do not process the signal twice.
What order should a Logic Pro mastering chain use?
A practical starting order is corrective EQ, optional dynamics or color, limiter, then loudness and true-peak metering. It is not a mandatory recipe: omit processors with no defined job and place the final meters after all audible processing.
What bounce settings should I use for a Logic Pro master?
Follow the distributor or client specification. A common delivery candidate is an interleaved uncompressed WAVE or AIFF file at the project’s native sample rate and requested bit depth, with Normalize off. Consider dither only when the final export reduces bit depth, and apply it no more than once.
When should I return to the mix instead of fixing the master?
Return when a broad mastering move repairs one element but damages several others. For example, controlling one bass note may thin the whole song, or taming vocal harshness may dull the cymbals. Source-level fixes are usually cleaner.


