Logic Pro Mastering Assistant: How to Use It
A careful Mastering Assistant workflow covering pre-master prep, analysis, matched comparisons, Character, EQ, loudness, width and final-file QA.

Logic Pro’s Mastering Assistant can analyze a finished stereo mix, apply corrective EQ, manage loudness and dynamics, and adjust stereo width. It’s useful for a release candidate, a client reference, and learning what the mix may need. It can’t decide whether the vocal emotion is right, repair a clipped mix, clear sample rights, or replace independent quality control.
Checked September 12, 2026 against Apple’s current Mac guide and Logic Pro 12.3.1 release notes. This is a stereo mastering workflow: finish the mix, analyze it, compare at matched loudness, then check the actual bounced file. It is not a Dolby Atmos delivery guide.
Fast answer: finish the mix with headroom, add Mastering Assistant from its dedicated slot on Stereo Out, analyze the full song or a representative Cycle area, compare Bypass with Loudness Compensation, adjust Character, EQ, Loudness, Excite, and Width only when they improve translation, reanalyze after mix changes, turn off Bypass and Loudness Compensation, and bounce to the distributor’s required format.
What Mastering Assistant changes
| Section | What it controls | Main risk |
|---|---|---|
| Character | Overall processing behavior and tone | Choosing a genre label instead of listening |
| Auto EQ / Custom EQ | Broad corrective frequency balance | Fixing an arrangement problem on the stereo mix |
| Dynamics / Loudness | Perceived level and dynamic control | Trading punch and depth for loudness |
| Excite | Upper-mid saturation and crispness | Making vocals, cymbals, or distortion harsh |
| Width / Correlation | Stereo spread and phase relationship | Weak or unstable mono playback |
Apple’s current Mastering Assistant guide confirms that analysis may apply corrective EQ, adjust loudness, and change overall stereo spread.
Prepare the mix before analysis
- Finish balances, automation, edits, fades, and effect tails.
- Remove accidental clipping on tracks, buses, and Stereo Out.
- Leave practical headroom; do not normalize the mix into the assistant.
- Check the full mix in mono and at low playback level.
- Compare with level-matched references appropriate to the song.
- Save a protected pre-master project alternative.
If the mix changes dramatically when you bypass an old limiter, bus compressor, or saturator, decide whether that processing is part of the mix. Apple places Mastering Assistant after existing Stereo Out plug-ins, so every active processor before it becomes part of the signal being analyzed. You don’t want two independent loudness chains fighting by accident.
For unstable projects, follow the Logic Pro backup workflow before committing changes.
How to use Mastering Assistant in Logic Pro
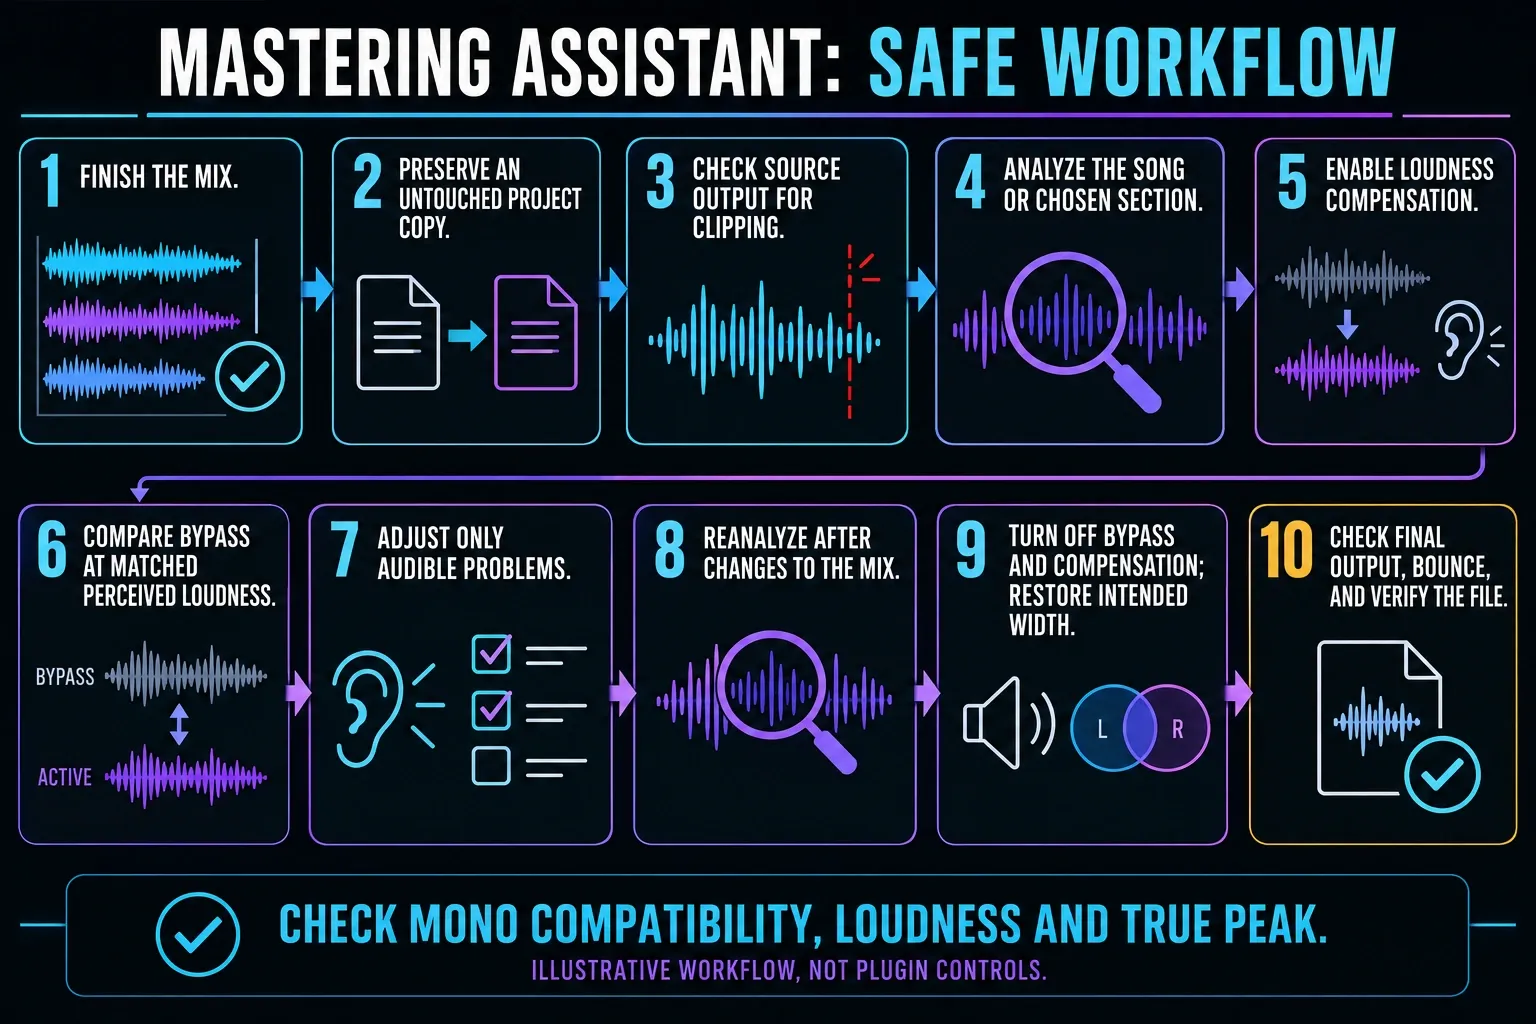
- Finish the mix and save a protected pre-master version.
- Confirm that Stereo Out is not clipping before mastering processing.
- Leave Cycle off for a full-song analysis, or set the Cycle area around a representative loud section.
- Enable Mastering Assistant from its dedicated effect slot on Stereo Out.
- Let the analysis complete with all intended instruments and effects active.
- Turn on Loudness Compensation and compare Bypass at matched perceived level.
- Adjust Character, EQ, Loudness, Excite, and Width only for audible improvements.
- Reanalyze whenever you change the underlying mix.
- Check mono compatibility, correlation, dynamics, loudness, and true peaks.
- Turn off Bypass and Loudness Compensation, and restore your chosen stereo Width before bouncing the final file.
On Mac, click the Mastering Assistant effect slot on Stereo Out, or choose Mix → Mastering Assistant. The assistant immediately analyzes the project, including active software instruments and effects. Apple’s insertion and bounce guidance places it after the other processors on that output.
Analyze the whole song or a Cycle area
Leave Cycle off and Mastering Assistant analyzes the whole project. Switch Cycle on and it analyzes only the Cycle area. A loud, dense chorus is a useful short range because it exposes low-end buildup, cymbal energy, vocal density, and dynamic stress. Use the whole song when the arrangement or tonal balance changes substantially between sections.
An intro that’s intentionally quiet and dark shouldn’t define the entire master on its own. And if the loudest chorus is unusually bright, don’t assume it represents the whole song. Test both approaches and choose the result that translates across sections.
Choose Character by result, not genre
Your Character menu depends on the Mac and how Logic is launched. Apple’s current Mastering Assistant parameter reference says Transparent, Valve, and Punch are available only on Apple silicon. Its feature-availability page also excludes those three while Logic runs through Rosetta. Clean isn’t in that exclusion list. Apple’s separate general support article calls Transparent the default, so confirm the menu on the target Mac instead of assuming every system shows the same choices:
- Transparent: a general-purpose option that Apple describes as suitable for most genres.
- Clean: designed for a clean, punchy result.
- Valve: emphasizes deep low end and refined high end.
- Punch: adds a more aggressive midrange character.
These descriptions aren’t assignments. A quiet acoustic mix may benefit from Punch. An electronic track may remain best in Transparent. Loudness-match each option and listen to vocal tone, kick/bass separation, snare transients, depth, and fatigue.
Adjust Auto EQ and Custom EQ
Auto EQ scales the correction suggested by the analysis; it starts at 100%. Reduce it if the mix becomes too thin, dark or bright. For manual changes, switch Custom EQ on. Drag a blue control point left or right to choose its frequency and up or down to change gain. There are three broad bands, each with a ±6 dB gain range. Toggle Custom EQ off to hear what your manual curve adds.
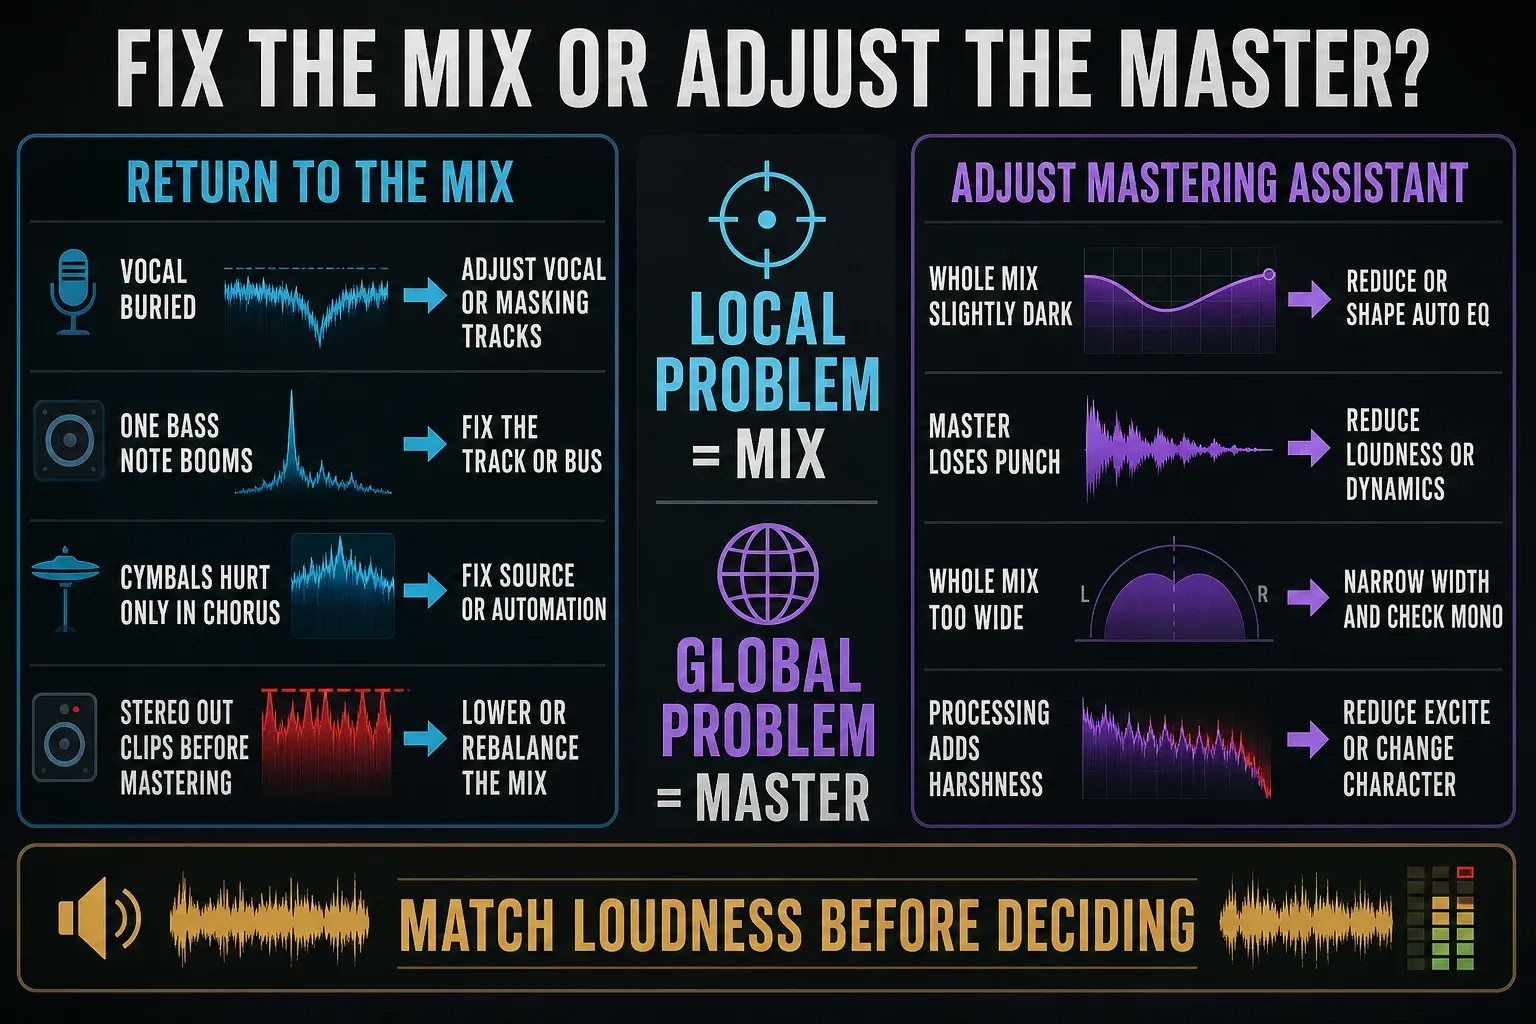
If the curve demands a large fix, bypass Mastering Assistant and repair the source mix first. A harsh vocal, buried snare, or uncontrolled bass note is easier to solve on its own channel or bus than with a broad stereo correction that changes everything else too. The vocal-mixing workflow covers the source-level checks for the lead.
Set loudness without confusing louder with better
At the center position, Apple says the Loudness control produces approximately −14 LUFS-I, a common reference for many streaming platforms. Treat that as a reference rather than a universal delivery rule. Distributors, genres, programs, and mastering goals differ, and playback services may normalize without requiring every master to be identical.
Apple’s linked parameter reference also says Mastering Assistant limits its processed output to −1 dBFS True Peak. Still meter the final bounced file. Other routing, post-processing, format conversion, or a destination-specific requirement can change what you’re required to deliver.
Increase Loudness only while listening for lost transients, pumping, softened low end, vocal harshness, and reduced depth. Use Loudness Compensation with Bypass so the processed version doesn’t win merely because it’s louder. Apple explicitly provides that button for a fairer comparison.
To measure in Mastering Assistant, reset the loudness readings, start the meter, and play the song from beginning to end with Cycle off. Read I for integrated loudness; M and S show momentary and short-term levels. A looped chorus is not a full-song measurement. Then check the bounced file with a loudness/true-peak meter and compare it with the actual destination’s delivery requirements.
Use Loudness and Excite conservatively
Dynamics is the name of a section, not a separate compression knob. Its documented controls include Loudness and Excite, plus True Peak, LUFS and loudness-range measurements—not a gain-reduction meter. Listen to the kick, snare and vocal as you raise Loudness. If transients flatten or the vocal pumps with the drums, lower it, compare another Character, and inspect the mix-bus chain before pushing harder.
Excite adds upper-mid saturation. It can restore presence, but it can also exaggerate sibilance, cymbals, guitar edge, and codec fatigue. Toggle it at matched level and keep it off when the mix already has enough forward energy.
Check stereo width and mono compatibility
The Width control can narrow or widen the mix. Fully left creates a mono check. Note your chosen Width first and restore it after the check, unless you intend to deliver mono. Apple recommends watching the Correlation meter and says a result above zero supports good mono compatibility.
Do not judge by the meter alone. Listen in mono for lost vocals, hollow instruments, disappearing reverbs, and unstable low end. Widening a mix that already uses phase-heavy synths or stereo effects can look impressive on headphones and fall apart on a phone, club, radio, or single smart speaker.
When to reanalyze
Click Reanalyze after changing track volume, EQ, arrangement, bus processing, Stereo Out processing, or anything else that materially alters the mix. Apple lists reanalysis as a required pre-bounce check after mix adjustments.
Don’t endlessly tune the mix around a stale analysis. Fix the mix, reanalyze once, level-match, and decide whether the new result is genuinely better.
If the Mastering Assistant button is missing
First select the stereo output channel strip. In Logic Pro 12.3, open Logic Pro → Settings → Mixer → View and enable Show “Mastering Assistant” Button in Stereo Output. You can also open it from Mix → Mastering Assistant. Apple documents both routes in its current insertion guide.
If Character choices are missing, check the processor and launch mode. Apple’s feature-availability note excludes Transparent, Valve and Punch on Intel and under Rosetta; that note describes feature restrictions, not eligibility for every current Logic release. Check the installed version’s requirements separately. On Apple silicon, quit Logic, Control-click the app in Applications, choose Get Info and deselect Open using Rosetta if your plug-ins do not require it. Confirm ARA compatibility with the plug-in maker before changing the launch mode.
Final bounce and quality-control checklist
- Confirm the intended Mastering Assistant settings and active Stereo Out chain.
- Reanalyze after the final mix change.
- Turn off Bypass and Loudness Compensation; restore the intended stereo Width after mono checks.
- Turn Cycle off for the full song and check the exact bounce start and end, including tails.
- Use File → Bounce → Project or Section. Choose PCM and the required uncompressed format, sample rate and bit depth; leave Normalize off to preserve your mastered level.
- Open the bounced file outside Logic and listen from beginning to end.
- Measure full-song loudness and true peak on the file that will be delivered.
- Check metadata, filename, version, channel format, and silence at both ends.
- Test headphones, a small speaker, mono, and one unfamiliar playback system.
Use the project bounce, not a single-region export, for this Stereo Out workflow. Apple’s project bounce instructions explain that an active Cycle area limits the initial bounce range. Normalize On can raise the level after you have set the master; Off leaves it unchanged. Extend the end past the last region to retain reverb. If a plug-in adds continuous noise, an explicit end is safer than relying on Include Audio Tail to find silence.
Mastering Assistant can produce a usable self-master when the underlying mix already works. Use independent quality control for a paid release, an album that needs consistent sequencing, or a mix you can no longer judge objectively.
If you’re still choosing between this tool and a stock plug-in chain, compare the decision points in the manual-chain versus Mastering Assistant workflow. More production tools are organized in the Logic Pro features hub, and current hardware/software compatibility is covered in the Logic Pro system requirements guide.
Frequently asked questions
Where is Mastering Assistant in Logic Pro?
On Mac, click the Mastering Assistant effect slot on the Stereo Out channel strip or choose Mix → Mastering Assistant. If the button is hidden, enable it under Logic Pro → Settings → Mixer → View.
Should I remove my master-bus plugins first?
Keep intentional mix-bus processing, but remove accidental or duplicate limiting. Mastering Assistant sits after existing Stereo Out plug-ins and analyzes their processed result.
What loudness does Logic Pro Mastering Assistant target?
Apple says the centered Loudness control produces around −14 LUFS-I. Treat that as a reference, not a universal rule; verify the destination’s current delivery specification.
Do I need to reanalyze after changing the mix?
Yes. Reanalyze after changes to track level, EQ, processing, arrangement, or other mix elements so the assistant responds to the current signal.
Does Logic Pro Mastering Assistant use AI?
Yes. Apple lists Mastering Assistant among the AI features on its Logic Pro product page. The user guide describes automatic analysis and adjustable processing, but does not specify a generative model or its training data. There is no basis here for naming a particular model or claiming how it was trained.
Can Mastering Assistant replace a mastering engineer?
It can produce a useful self-master, but it cannot provide independent perspective, project-to-project sequencing decisions, delivery accountability, or repair every mix problem.
Is Logic Pro Mastering Assistant good enough for release?
It can be when the mix is already balanced and the bounced file passes loudness, true-peak, mono, format, and listening checks. Use an independent mastering engineer when an album needs sequencing consistency, the mix still has source-level problems, or you no longer trust your own listening judgment.
Are all Mastering Assistant Character presets available on Intel Macs?
No. Apple’s specific feature-availability page says Transparent, Valve, and Punch are unavailable on Intel Macs and when Logic runs through Rosetta on Apple silicon. Clean is not listed in that exclusion. Because Apple’s general how-to uses different default wording, confirm the Character menu actually shown on the target Mac.


