Logic Pro Compressor: A Practical Mixing Workflow
A listening-first Logic Pro Compressor workflow for gain reduction, envelope control, circuit choice, parallel blend and reliable bypass checks.

Logic Pro Compressor works best when you decide what should become more consistent and what must remain alive before moving a knob. Start with Auto Gain off, choose a representative section, set Threshold and Ratio to create audible gain reduction, shape the transient with Attack, make the recovery follow the performance with Release, then match the output level before deciding whether the compression helped.
This guide was verified against Apple’s current Logic Pro for Mac documentation on September 12, 2026. It doesn’t prescribe one attack time for every vocal or one threshold for every drum. Threshold depends on the level reaching the plug-in, while attack and release depend on the source envelope, tempo, ratio, circuit model, and the result you want.
Compression comes after diagnosis in the complete Logic Pro mixing workflow. Use the hub when the real fix may be a fader ride, clip gain, EQ, routing or arrangement change rather than gain reduction.
Fast starting workflow: on the track’s channel strip, open an Audio Effect slot and choose Dynamics > Compressor. Then select Platinum Digital for a neutral baseline, turn Auto Gain, Auto Release, Limiter, and Distortion off, leave Mix at 100% in the Output panel, loop the difficult passage, lower Threshold until the gain-reduction meter responds, set Ratio by how firmly the level should be controlled, tune Attack and Release by listening, add manual Make Up gain, and compare bypass at similar loudness.
What a compressor changes
A compressor reduces gain according to the level detected at its input. In ordinary downward compression, anything above the threshold gets turned down by an amount the ratio decides, shaped over time by attack and release. The result can control uneven peaks, stabilize a vocal’s position, reshape drum punch, add density, or make a group move more cohesively.
Compression doesn’t automatically make a recording “professional.” If a part already holds its place, leave it alone. If one word is wildly louder, clip gain or automation may fix it more transparently. If the problem is tonal, use EQ. Compression can’t repair clipping in a microphone preamp, analog input stage, converter, or ordinary fixed-point recording. Logic Pro is different when a compatible device records a 32-bit float file: Apple says digital clipping in that file can be removed by lowering Region Gain. Make that recovery move before compression, then check whether the analog front end was also overloaded. The Logic Pro gain-staging guide explains the boundary in detail, and Apple documents the current 32-bit float recording behavior.
Apple’s Compressor overview confirms that the plug-in can sit on individual tracks, effects tracks, aux channels, or an overall mix. The location changes what it controls: an insert affects one channel, a subgroup instance responds to the combined group, and a parallel aux return blends a separately compressed path.
Prepare a clean listening test
- Loop a section containing both the problem peak and normal performance.
- Place Compressor where the dynamic problem exists, not by habit on every track.
- Start with Platinum Digital, Auto Gain off, Auto Release off, Distortion off, Limiter off, and Mix at 100%.
- Set Input Gain to 0 dB unless you deliberately need to change the level feeding the detector.
- Use Meter or Graph view and watch gain reduction as well as output level.
- Listen in the full mix at a moderate monitoring level.
Starting neutral makes cause and effect easier to hear. It isn’t a required final sound. Once the core action works, compare circuit types, Auto Release, parallel blend, or color controls one at a time.
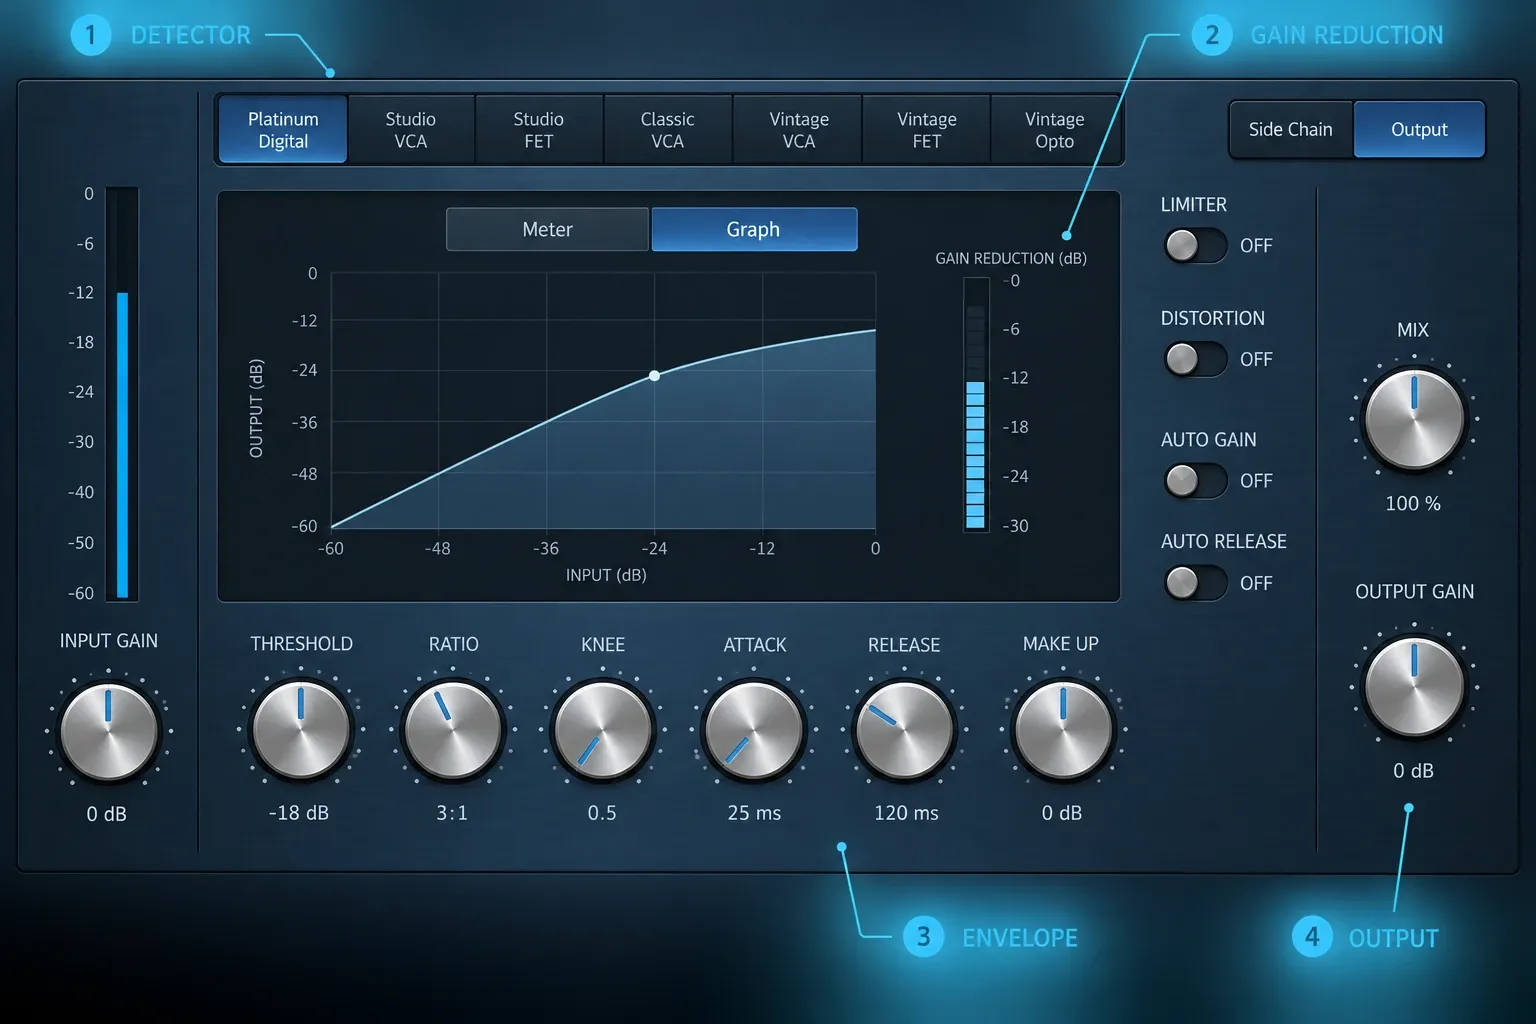
Threshold and Ratio decide how much
Threshold sets the level where compression begins to matter. Lower it and more of the performance crosses into the compression range. Because the plug-in responds to its input, copying someone else’s threshold is meaningless unless the incoming level and material match.
Ratio sets how strongly level above the threshold is reduced. Apple’s Compressor workflow documentation gives the clean mathematical example: at 4:1, a 4 dB increase above threshold becomes a 1 dB increase at the output. That means 3 dB of gain reduction before any timing, knee, or makeup-gain effects are considered.
Don’t chase a universal gain-reduction number. A steady bass line, a spoken phrase, a snare transient, and a mix bus present different envelopes. Lower Threshold until the intended peaks or phrases produce gain reduction, then listen for whether their level is more consistent. Raise or lower Ratio until the correction is firm enough without making the source smaller or static.
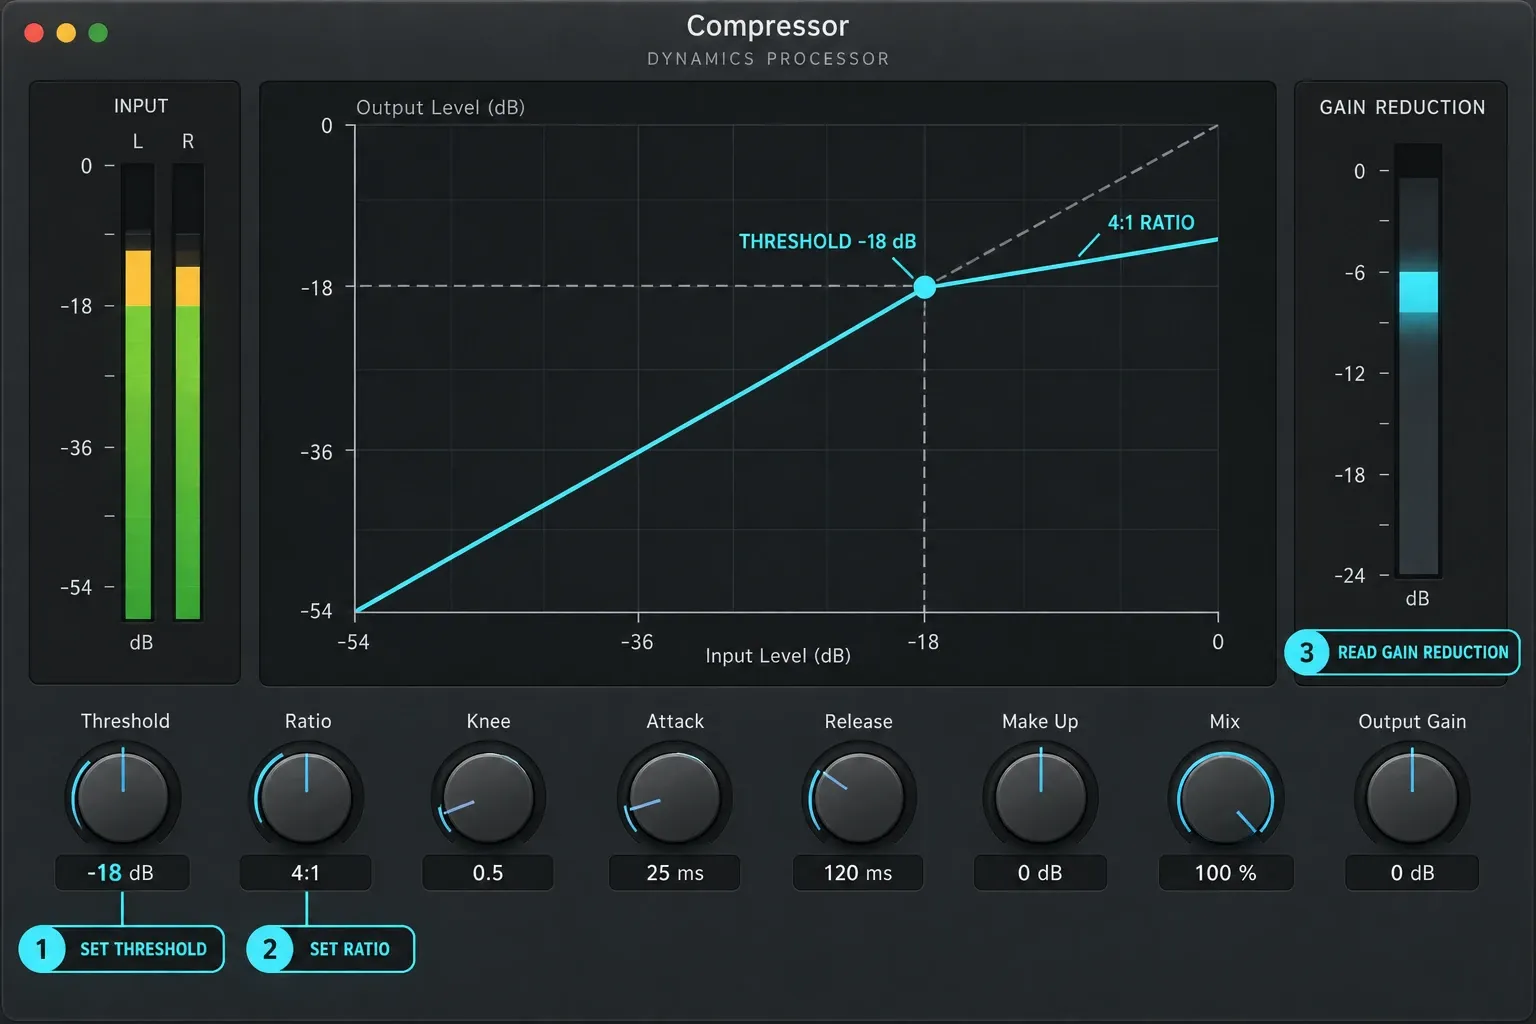
Attack shapes the front of the sound
Attack is best understood as response speed, not as a guaranteed free-pass window. Apple defines it as the time Compressor takes to react after the signal exceeds threshold. A faster attack catches more of the initial peak. A slower attack lets more transient through before the requested reduction is reached.
Listen for the front edge, not the number. On drums, too fast can remove the crack or impact, and too slow may leave the peak uncontrolled. On vocals, too fast can soften consonants and make the performance recede, while too slow lets sharp syllables jump forward. The right choice is the one that fixes the level movement without erasing the source’s identity.
Attack can’t be judged on its own. Lowering Threshold, raising Ratio, changing Knee, or selecting another circuit changes how the same attack value behaves. Apple explicitly notes that attack and release results depend on the material, ratio, and threshold.
Release decides how the gain returns
Release controls how quickly gain reduction stops after the detected signal falls back below threshold. Too short can make level recovery audible as chatter, distortion, or pumping. Too long can hold down the next word, note, or beat and make the performance feel smaller.
Watch the gain-reduction meter across the phrase. It should recover in a way that supports the rhythm and resets appropriately before the next event, unless the desired effect is deliberately sustained. Then stop watching and confirm that the groove and phrasing feel right.
Auto Release dynamically adapts to the material, but Apple notes that its behavior still changes with the Release knob value. Treat it as another envelope option, not a repair switch. Compare it against a manual setting at matched output level.
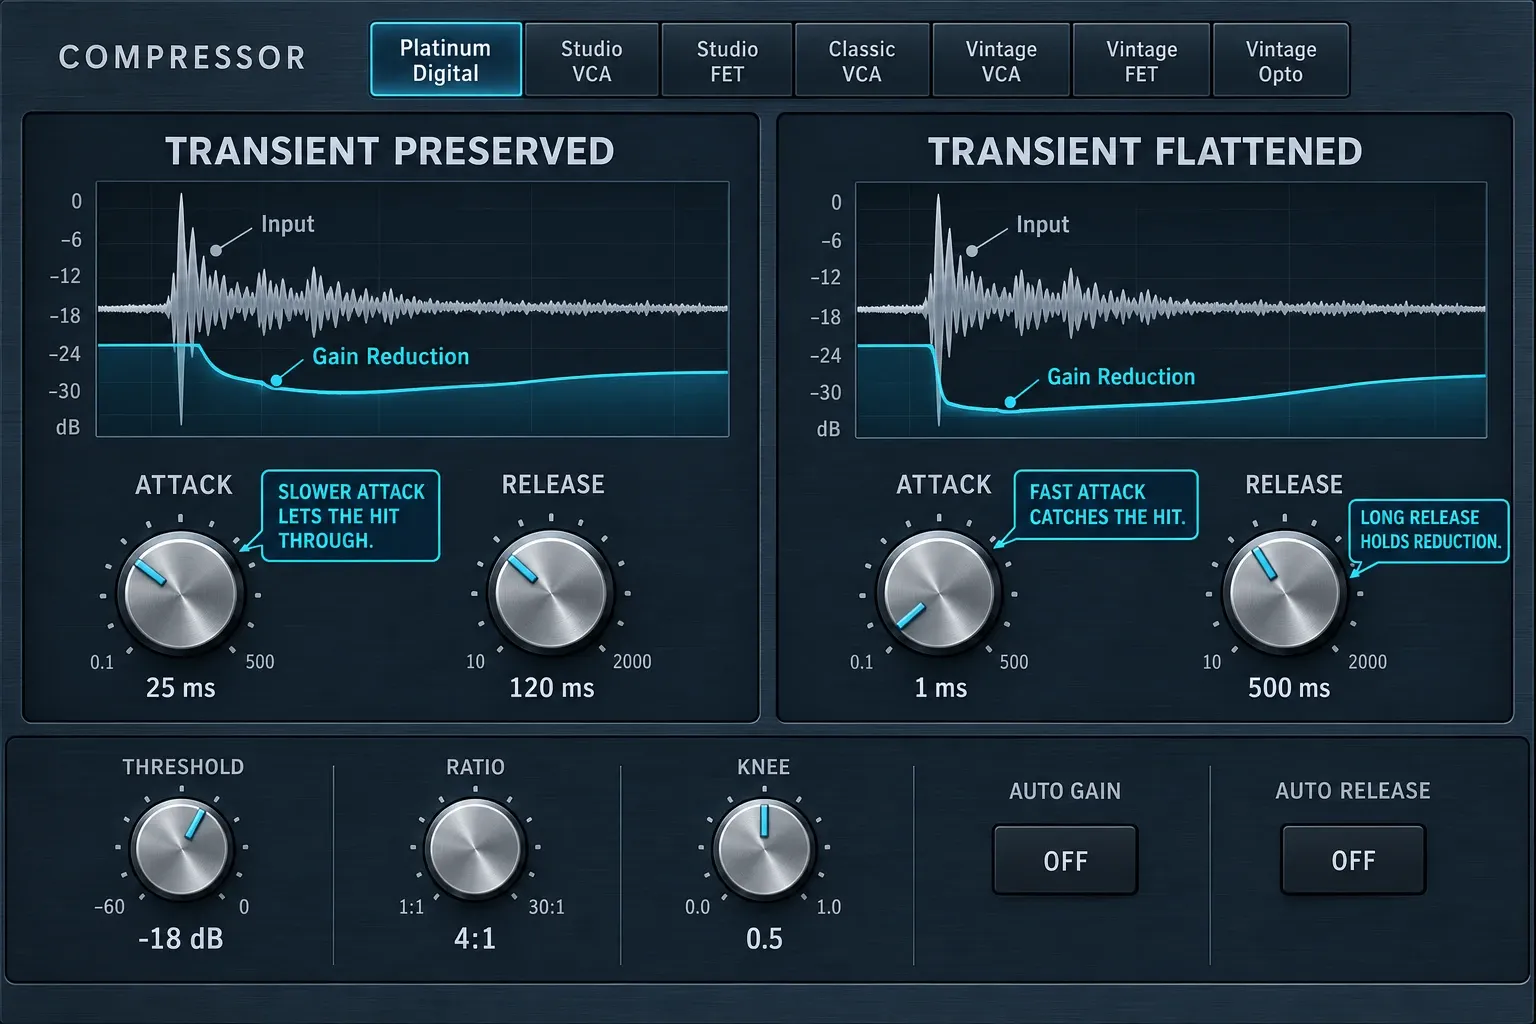
Knee controls the transition
Knee changes how compression approaches the threshold. Near zero, the plug-in moves more abruptly toward the selected ratio: hard-knee behavior. Higher Knee values begin the transition more gradually around the threshold: soft-knee behavior.
A softer knee can make broad level control less conspicuous. A harder knee can make the boundary more definite. Neither is inherently more transparent. The audible result also depends on how often the signal moves through that transition and how much ratio is waiting above it.
Make Up, Output Gain and Auto Gain are not the decision
Compression normally lowers the processed signal. Make Up adds gain to the compressed path. Output Gain sets the plug-in’s overall output. Use either deliberately to compare processed and bypassed states at similar perceived loudness. The goal isn’t to recover a fixed number of decibels. It’s to remove loudness bias from the judgment.
Auto Gain offers Off, 0 dB, and −12 dB compensation. It’s convenient, but it can make a new setting seem better simply because it’s louder. Apple also warns that Auto Gain and RMS detection together can oversaturate the signal. If distortion appears, turn Auto Gain off and set Make Up manually.
- Set the compression while Auto Gain is off.
- Note the loudness and peak behavior with Compressor active.
- Bypass it and compare the same passage.
- Adjust Make Up or Output Gain until the comparison is close.
- Keep the processing only if punch, stability, tone, or groove improved.
A repeatable Logic Pro Compressor workflow
- Name the job. Control a few peaks, stabilize the whole phrase, reshape a transient, add movement, or create density.
- Choose the passage. Include quiet and loud material plus the section where the problem is obvious.
- Insert and prepare Compressor. Choose Dynamics > Compressor in an Audio Effect slot, select Platinum Digital, turn Auto Gain and Auto Release off, disable Limiter and Distortion, and set Mix to 100% in the Output panel.
- Set Ratio. Start moderate enough to hear movement without forcing the source flat.
- Lower Threshold. Stop when the targeted events trigger useful gain reduction.
- Tune Attack. Preserve or reduce the front edge according to the job.
- Tune Release. Make the recovery follow the phrase or groove without chatter or hold-down.
- Adjust Knee. Choose a firmer or smoother transition.
- Match output. Use manual gain and compare in context.
- Audition options. Only now compare circuit types, Auto Release, Mix, distortion, or limiter.
- Remove unnecessary processing. If the benefit vanishes in a matched bypass, take the plug-in off.
Choose among the seven circuit types
Logic Pro Compressor offers Platinum Digital, Studio VCA, Studio FET, Classic VCA, Vintage VCA, Vintage FET, and Vintage Opto. Apple’s current parameter reference describes broad circuit-family behavior but doesn’t say one model is mandatory for a specific instrument.
| Choice | Documented family behavior | Useful audition question |
|---|---|---|
| Platinum Digital | Clean sound and fast transient response | Can the level problem be solved without intentional color? |
| Studio VCA / Classic VCA / Vintage VCA | VCA family can respond slowly or quickly, tends clean, and can attenuate or amplify | Does a VCA model make the movement feel firmer or more cohesive? |
| Studio FET / Vintage FET | FET family has fast transient response and can move from clean or warm toward crunchy transients; attenuation only | Does the faster, more colored response support the source or shrink it? |
| Vintage Opto | Apple describes fast transient response, non-linear release handling, and a clean sound | Does its recovery follow the performance more naturally than the alternatives? |
Don’t choose from the faceplate color or an internet hardware analogy. Copy the core setting as closely as the available controls allow, match the output, and switch models while the full mix plays. Some parameters are unavailable in some models, so identical knob positions don’t guarantee identical action.
Use Peak, RMS and the side-chain filter correctly
With Platinum Digital selected, Peak detection responds to signal peaks while RMS follows an averaged level that better approximates perceived loudness. Choose Peak when short events are the problem. Compare RMS when broader loudness movement matters. Neither one is universally superior.
The Side Chain panel also affects normal compression when no external source is selected. Apple’s side-chain parameter guide says the compressor input is internally normalled to the detector in that state. Max makes both stereo channels compress when either channel crosses the threshold. Sum waits for the combined level to cross it. The LP, BP, HP, parametric, or high-shelf filter changes what the detector hears. It doesn’t EQ the audible output.
Use Listen to monitor that detector path. Then select On to keep the filter active, or Off for unfiltered detection, before judging the mix. A high-pass side-chain filter, for example, can reduce how strongly deep lows drive broadband compression, but set it from the unwanted detector reaction instead of copying a mix-bus chart. External kick-to-bass ducking and vocal-keyed effects belong in the dedicated Logic Pro sidechain-compression workflow.
Parallel compression with the Mix control
The Output panel’s Mix knob blends dry source and wet compressed signal. That makes quick parallel compression possible inside one instance: create a more assertive compressed sound, then lower Mix until density rises without replacing all of the original transient and movement.
An aux return is still useful when several sources share the same parallel process or when you want separate return EQ, saturation, automation, and routing. The in-plug-in Mix control is simpler for one channel. A bus/aux path is more flexible. Either route can change the listening level: Mix rebalances dry and wet inside the plug-in, while an aux adds another signal path. Match the downstream level before deciding whether the blend helped.
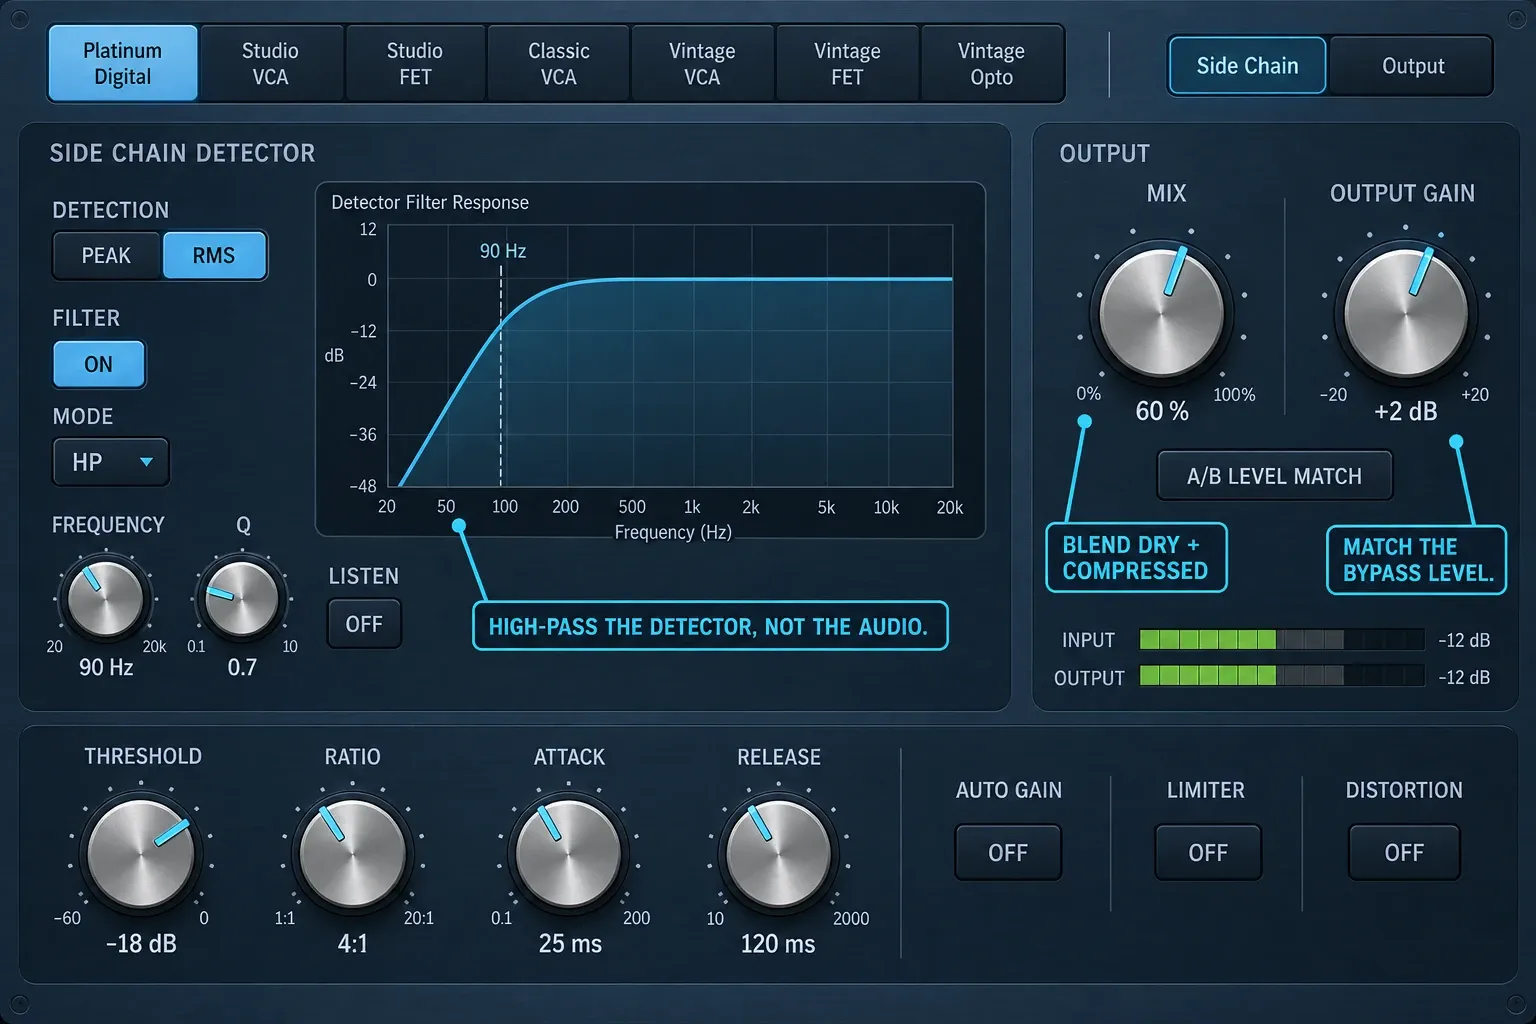
Use Distortion and Limiter as optional output stages
Apple’s Compressor output documentation describes Soft, Hard, and Clip distortion around the 0 dB line, plus an integrated limiter with its own threshold. Treat them as additional processors rather than safety defaults.
Leave them off while learning what the compressor itself does. Enable one only for an audible reason, watch the output meter, and compare level-matched. The integrated limiter can catch output excursions, but it doesn’t fix a clipped recording or poor gain staging. Heavy clipping can trade peak height for distortion even when the meter looks controlled.
Practical source workflows without magic settings
Vocal that will not stay in place
First correct exceptional words with a gain edit or automation. For a Region Gain adjustment, isolate the word in its own region first. In current Logic Pro, you can also make a marquee selection and adjust just that selection with the Gain tool. Then use Compressor for the remaining phrase-level movement: moderate Ratio, Threshold that reacts to louder syllables, Attack that keeps consonants intelligible, and Release that recovers before the next phrase without lifting breaths. The Logic Pro vocal-mixing guide shows where compression fits beside editing, EQ, de-essing, sends, and automation. Apple explains gain edits on regions and marquee selections.
Drums that lost their punch
If the compressed drum sounds smaller, lengthen Attack or reduce Ratio/Threshold action until the useful transient returns. If peaks still jump out, shorten Attack gradually. Set Release by the groove: watch whether gain reduction resets before the next hit, then confirm by listening. For added density without replacing the dry attack, try the Mix control.
Bass with uneven notes
Decide whether the problem is peak variation, sustain, or a few performance errors. Use gain edits for outliers. Let compression address the recurring envelope, and check whether low notes make the detector overreact. A side-chain high-pass filter can change that behavior, but every move must survive a level-matched full-mix comparison.
Troubleshoot Logic Pro Compressor
| Symptom | Diagnose and fix |
|---|---|
| No gain reduction | Cause: possible causes include bypass, Ratio at 1:1, a silent external side-chain source, or input below Threshold. Check: enable the plug-in, select a ratio above 1:1, check the header’s Side Chain source, and play the loud passage while watching input and gain reduction. Lower Threshold if needed. |
| Processed version is much louder | Cause: Auto Gain or too much Make Up/Output Gain. Check: turn Auto Gain off and level-match manually. |
| Transients disappear | Cause: Attack is too fast, Ratio too high, or Threshold too low. Check: lengthen Attack and reduce the amount of gain reduction. |
| Pumping or level chatter | Cause: Release fights the rhythm or the detector follows unwanted energy. Check: adjust Release and audition the side-chain filter with Listen, then return to On or Off. |
| Next note stays buried | Cause: Release is too long or compression is too deep. Check: shorten Release or reduce Ratio/Threshold action. |
| Output clips | Cause: Auto Gain, Make Up, Output Gain, parallel blend, or distortion added too much level. Check: disable output extras, reduce gain, and inspect the following channel stages. |
| Stereo image moves | Cause: detector mode reacts unevenly to left/right content. Check: compare Max/Sum and, with Platinum Digital, Peak/RMS while checking mono compatibility. |
| Different model sounds worse at the same settings | Cause: circuit behavior and available controls differ. Check: match output and retune the envelope instead of comparing knob positions. |
If the session clicks or overloads only after adding more processing, separate CPU failure from audible compressor distortion. The Logic Pro system-overload workflow covers buffer, freezing, plug-in isolation, and project repair.
Final compressor checklist
- The dynamic problem is named before compression begins.
- The loop includes both the worst peak and ordinary performance.
- Auto Gain is off during setup.
- Threshold and Ratio create only the control the source needs.
- Attack preserves or reshapes the transient intentionally.
- Release follows the phrase or groove without chatter or hold-down.
- Make Up or Output Gain creates a fair bypass comparison.
- Circuit types are compared by sound, not by faceplate or copied recipe.
- Mix, side-chain filtering, Distortion, and Limiter are enabled only for a defined job.
- The result works in the full mix, at low level, and in mono.
Continue through the Logic Pro tutorials hub for recording, editing, mixing, and troubleshooting workflows. When compression needs to change over a section rather than react harder everywhere, the Logic Pro automation guide explains track, region, and relative control. For Stereo Out use, apply the processor only inside a measured Logic Pro mastering chain.
Frequently asked questions
Is Logic Pro’s stock Compressor good enough?
Yes for ordinary track, bus, and parallel compression. Control availability varies by circuit; Peak/RMS selection requires Platinum Digital. Across its models, the stock plug-in provides threshold, ratio, knee, attack, release, seven circuit types, Peak or RMS detection, a side-chain filter, dry/wet Mix, distortion, and an output limiter. That does not make every setting good or every third-party compressor unnecessary. Start with the stock Compressor, compare at matched loudness, and add another tool only when it solves a specific problem or gives you a workflow you prefer.
What is the best Logic Pro Compressor model to start with?
Start with Platinum Digital when you want a clean baseline. After the core settings work, level-match and audition the VCA, FET, and Opto models for a response that better supports the source.
What should Threshold be in Logic Pro Compressor?
There is no universal value because Threshold depends on the level entering the plug-in. Lower it until the intended peaks or phrases trigger useful gain reduction, then judge the result in context.
What does Attack do on a compressor?
Attack controls how quickly gain reduction develops after the signal crosses the threshold. Faster settings catch more of the initial peak; slower settings preserve more transient before the requested reduction is reached.
How should I set compressor Release?
Set Release so gain reduction recovers with the phrase or groove without chattering or holding down the next event. Watch the meter, then confirm the timing by listening.
Should I use Auto Gain in Logic Pro Compressor?
Leave it off while setting compression so louder output does not bias the decision. Apple also warns that Auto Gain combined with RMS detection can oversaturate; manual level matching is more controlled.
Can Logic Pro Compressor do parallel compression?
Yes. Use the Output panel’s Mix knob to blend dry and compressed signals inside one instance, or use an aux return when you need shared processing and independent routing.
Does the side-chain filter change the audible tone?
It does not apply EQ directly to the output. It filters the detector signal, which changes when and how much compression occurs; that can change the audible balance and envelope. Use Listen to audition the detector, then select On to keep its filter active or Off for unfiltered detection.


