Logic Pro Channel EQ: A Practical Mixing Workflow
A decision-led Logic Pro Channel EQ workflow for filters, Q, analyzer modes, level matching, stereo processing and reliable mix checks.

Logic Pro Channel EQ is most useful when every band answers an audible question. Start flat and identify a problem in the full mix. Choose the filter shape that matches its width, make the smallest useful move, then match the output level. Keep the change only if the mix improves, not because the analyzer looks smoother.
This guide was checked against Apple’s current Logic Pro documentation on September 12, 2026. There is no single vocal or instrument EQ curve to copy: the note, microphone, room and arrangement all affect which frequencies need attention.
Channel EQ is one decision point in the complete Logic Pro mixing workflow. The hub helps you tell a frequency problem from a balance, arrangement, routing or dynamics problem before you’ve drawn a single curve.
Logic Pro Channel EQ in seven steps
- Choose EQ → Channel EQ from an Audio Effect slot at the point in the signal path you want to adjust.
- Play a representative section and name the audible problem before moving a band.
- Click Analyzer to display the spectrum; select Pre for the input or Post to see the effect of your curve.
- Click the appropriate band’s On/Off button above the display: high-pass, low-pass, shelf or bell.
- Select the band and drag its Frequency, Gain/Slope and Q controls while listening in the full mix. Gain/Slope changes slope for the outer filters.
- Adjust the Master Gain slider or field so processed and bypassed versions have similar perceived loudness.
- Keep the curve only if it improves several notes, phrases, and sections in context.
What Channel EQ gives you
Channel EQ is an eight-band equalizer: a high-pass filter, a low shelf, four flexible bell bands, a high shelf, and a low-pass filter. Apple’s Channel EQ overview also documents the real-time FFT Analyzer. Its parameters match Linear Phase EQ, so replacing one with the other in the same effect slot transfers the current settings.
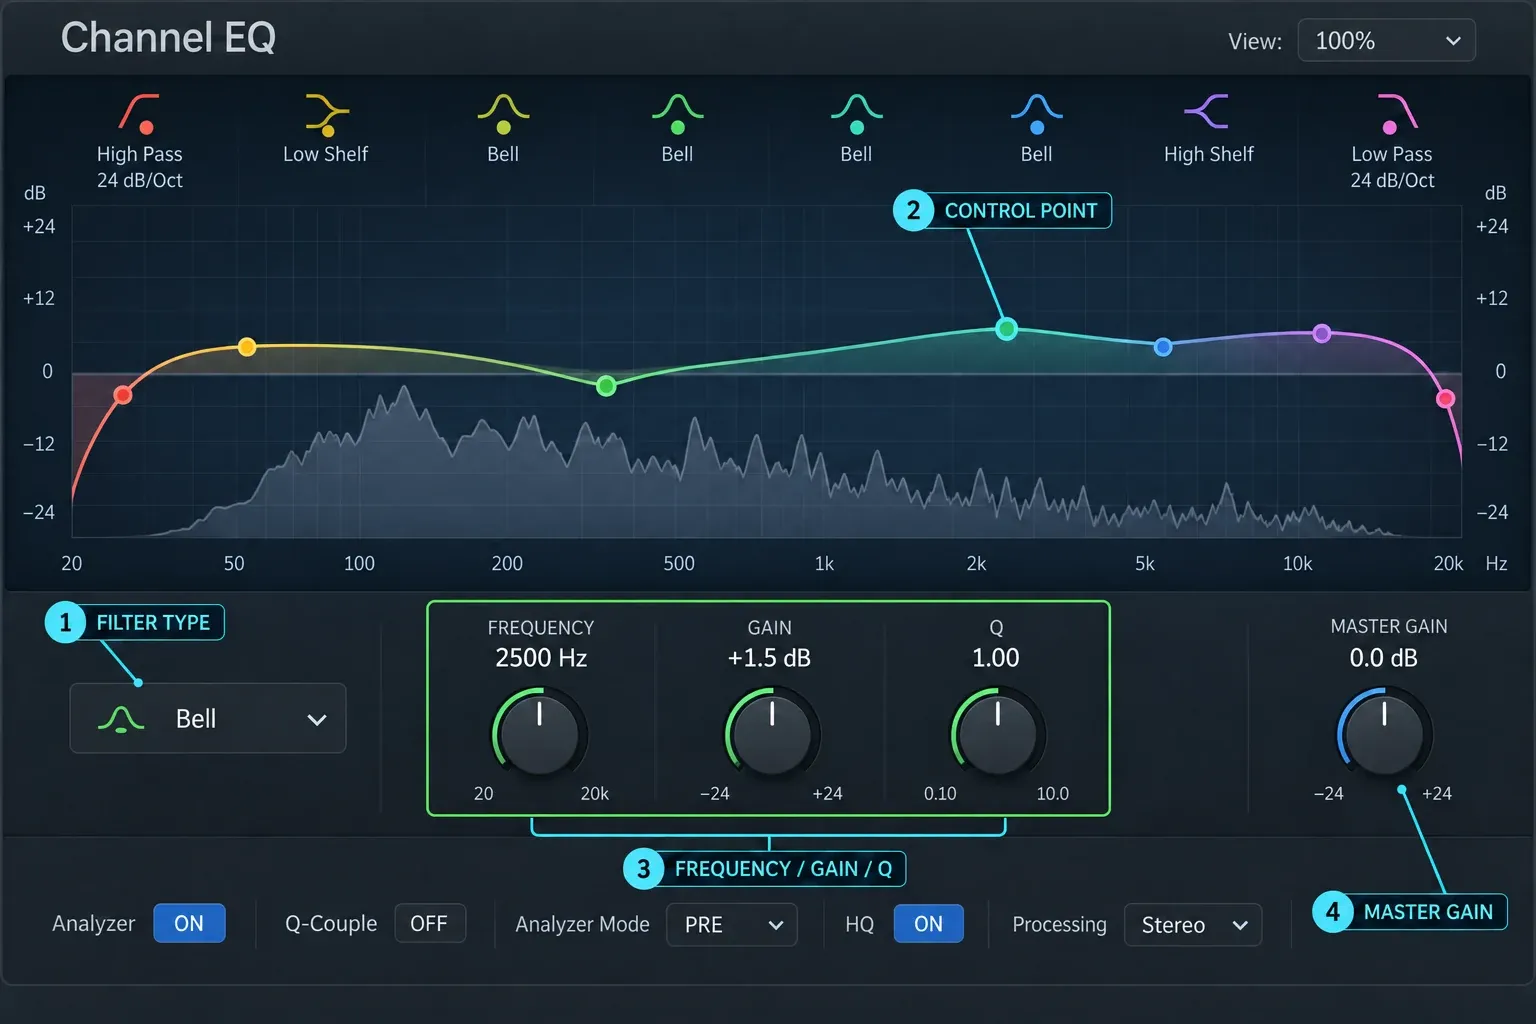
| Band type | What it changes | Useful question |
|---|---|---|
| High-pass filter | Attenuates frequencies below the cutoff | Is unusable low-frequency energy masking the source or mix? |
| Low shelf | Raises or lowers a broad low-frequency area | Does the source need a broad change in weight rather than removal? |
| Four bell bands | Boost or cut around adjustable center frequencies | Is the issue narrow resonance, broad tone, or a competing range? |
| High shelf | Raises or lowers a broad high-frequency area | Does the source need more or less overall brightness? |
| Low-pass filter | Attenuates frequencies above the cutoff | Is excess top-end detail, hiss, or effect brightness distracting? |
| Master Gain | Changes Channel EQ’s overall output | Can the processed and bypassed versions be compared fairly? |
Insert Channel EQ at the right point
To choose a specific position, use EQ → Channel EQ in that Audio Effect slot’s plug-in menu. Apple’s insertion guide documents these shortcuts for the EQ area at the top of the channel strip: click inserts it in slot 1 when that slot is free. When slot 1 is occupied, Option-click inserts Channel EQ first and moves existing plug-ins down, while double-click inserts it in the next unused slot. Shift modifies those actions for Linear Phase EQ.
An early insert is useful for corrective work, but the processing order depends on the problem. Put Channel EQ before Logic Pro Compressor when rumble or a resonance is making the detector react to the wrong energy. Put another EQ after compression when the processor changes tone or exposes a new imbalance. On a reverb aux, place EQ after the reverb when you want to shape only the return.
Before EQ, make sure the input isn’t the real problem. A clipped recording, overloaded processor, or excessively hot instrument needs source repair and correct gain staging. An EQ curve can’t restore missing waveform detail.
Use the Analyzer without mixing with your eyes
Turn on Analyzer and play the passage that really exposes the problem. Channel EQ uses FFT analysis to display the frequency components reaching that instance. It can reveal persistent low-frequency buildup, a stable tonal peak, or the range that shifts between sections. What it can’t tell you is whether that energy is musically necessary.
Apple’s Analyzer documentation notes that you can adjust the display scale, and that high resolution costs more processing power. Use higher resolution when accurate very-low-bass inspection genuinely matters. Turn Analyzer off when you don’t need it any more. To change the spectrum’s vertical range, drag the Analyzer Range display, or Control-click it to choose a value. This changes the display, not the audio level.
Pre and Post show different signals
- Pre shows the spectrum entering Channel EQ. Use it to identify what the source presents.
- Post shows the spectrum after the EQ curve. Use it to inspect how your filters changed that signal.
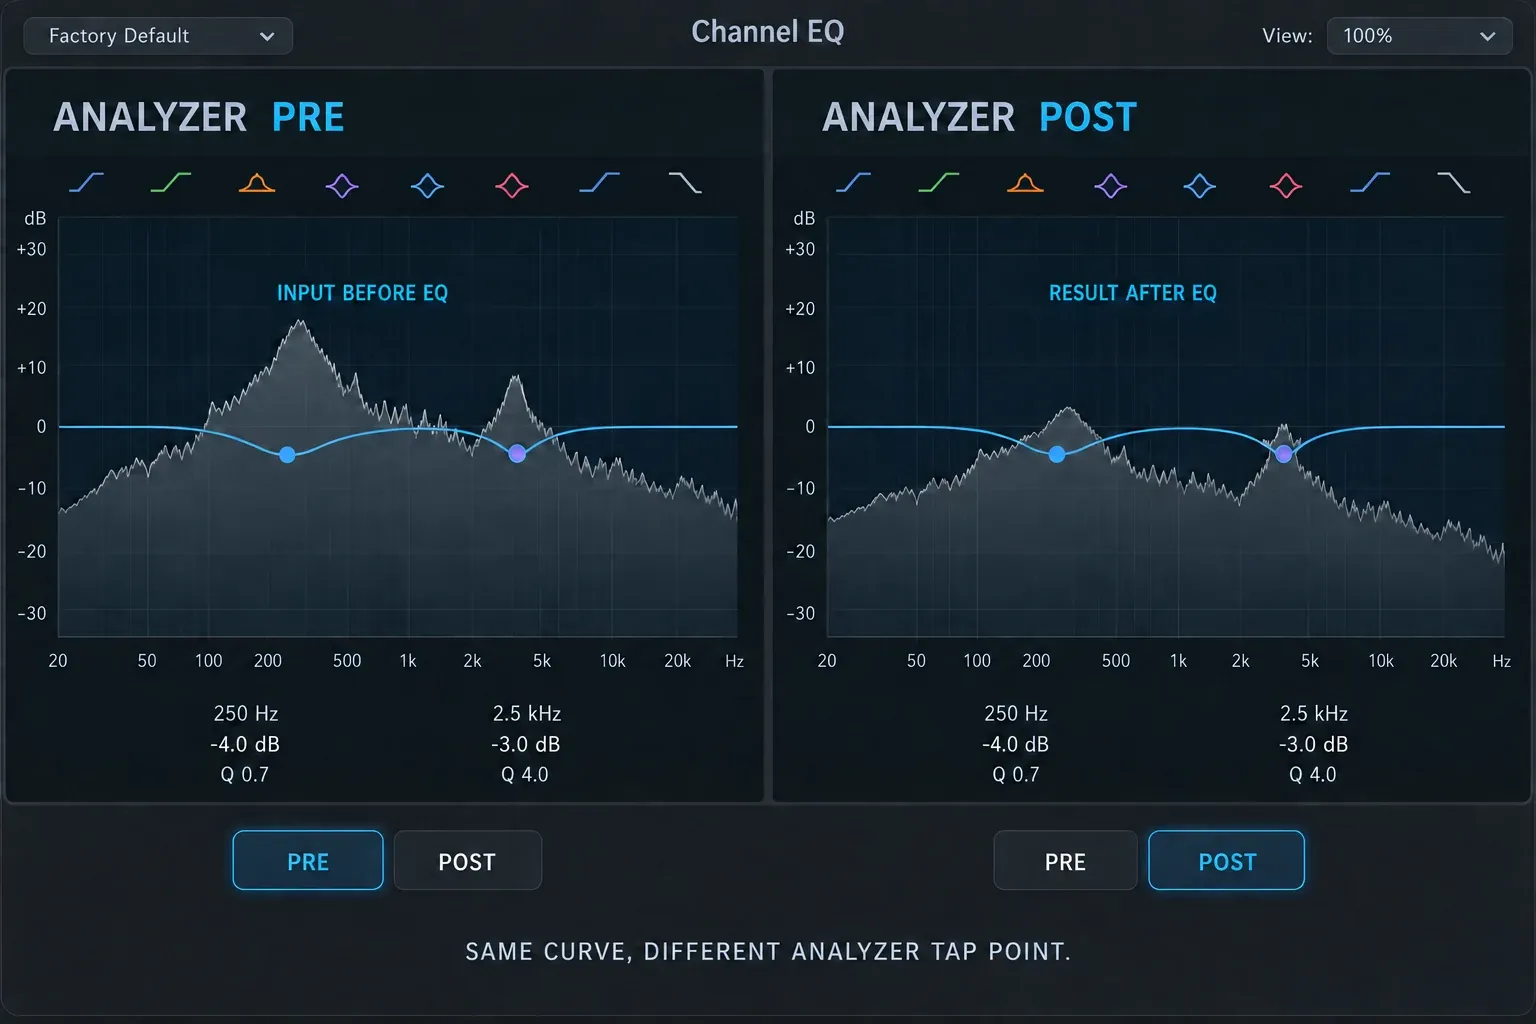
Neither view includes a channel-fader move that happens later in the normal signal path. If the analyzer doesn’t change when you lower the fader, the EQ is still working correctly. Region-level changes and earlier insert processing affect what reaches it. Downstream balance doesn’t.
Peak and RMS answer different questions
Control-click Analyzer to choose Peak or RMS and a low, medium, or high resolution. Apple’s shortcut-menu reference documents 2048, 4096, and 8192 analysis points. Peak mode helps reveal short-lived components; RMS makes sustained energy easier to read. Choose the view that matches the question instead of treating one display as more “professional.”
Set frequency, gain and Q by function
Click a band’s On/Off button above the graph to enable it, then click its control point to select it. Drag the Frequency, Gain/Slope and Q controls below the display to adjust that band. For a bell, these controls have three separate jobs:
- Frequency chooses the center of the move.
- Gain decides how much that area rises or falls.
- Q controls bandwidth: higher Q is narrower; lower Q is broader.
Use a narrow band when a stable resonance or hum component is genuinely local. Use a broad band when the problem spans a tonal range, such as a sound that feels too dark, hollow, forward, or heavy. A narrow boost swept at extreme gain can make almost every frequency sound terrible. If you sweep to locate a suspected resonance, keep it brief, return to realistic gain, and verify the cut in the full arrangement. Apple’s Channel EQ parameter reference covers the band controls and their filter-specific behavior.
Q-Couple can change bandwidth automatically as gain changes. Control-click Q-Couple to choose Proportional, Light, Medium, Strong or Asymmetric coupling strength. Be careful when automating Q: Apple warns that changing coupling strength can make playback use different effective Q values than the setting used when the automation was recorded.
Set a high-pass filter without thinning the source
A high-pass filter can remove handling noise, air-conditioning rumble, stage vibration, or low-frequency content that has no useful role. Raise the cutoff while the full mix plays, then stop before the source loses weight, warmth, or the low part of an intended transient.
The slope changes how quickly attenuation increases below the cutoff. A steeper slope is not automatically cleaner; it makes a more abrupt transition and can alter the sound around the cutoff. Q can add resonance around the corner at applicable slopes. Apple notes that Q has no effect on the outer filters when their slope is 6 dB per octave.
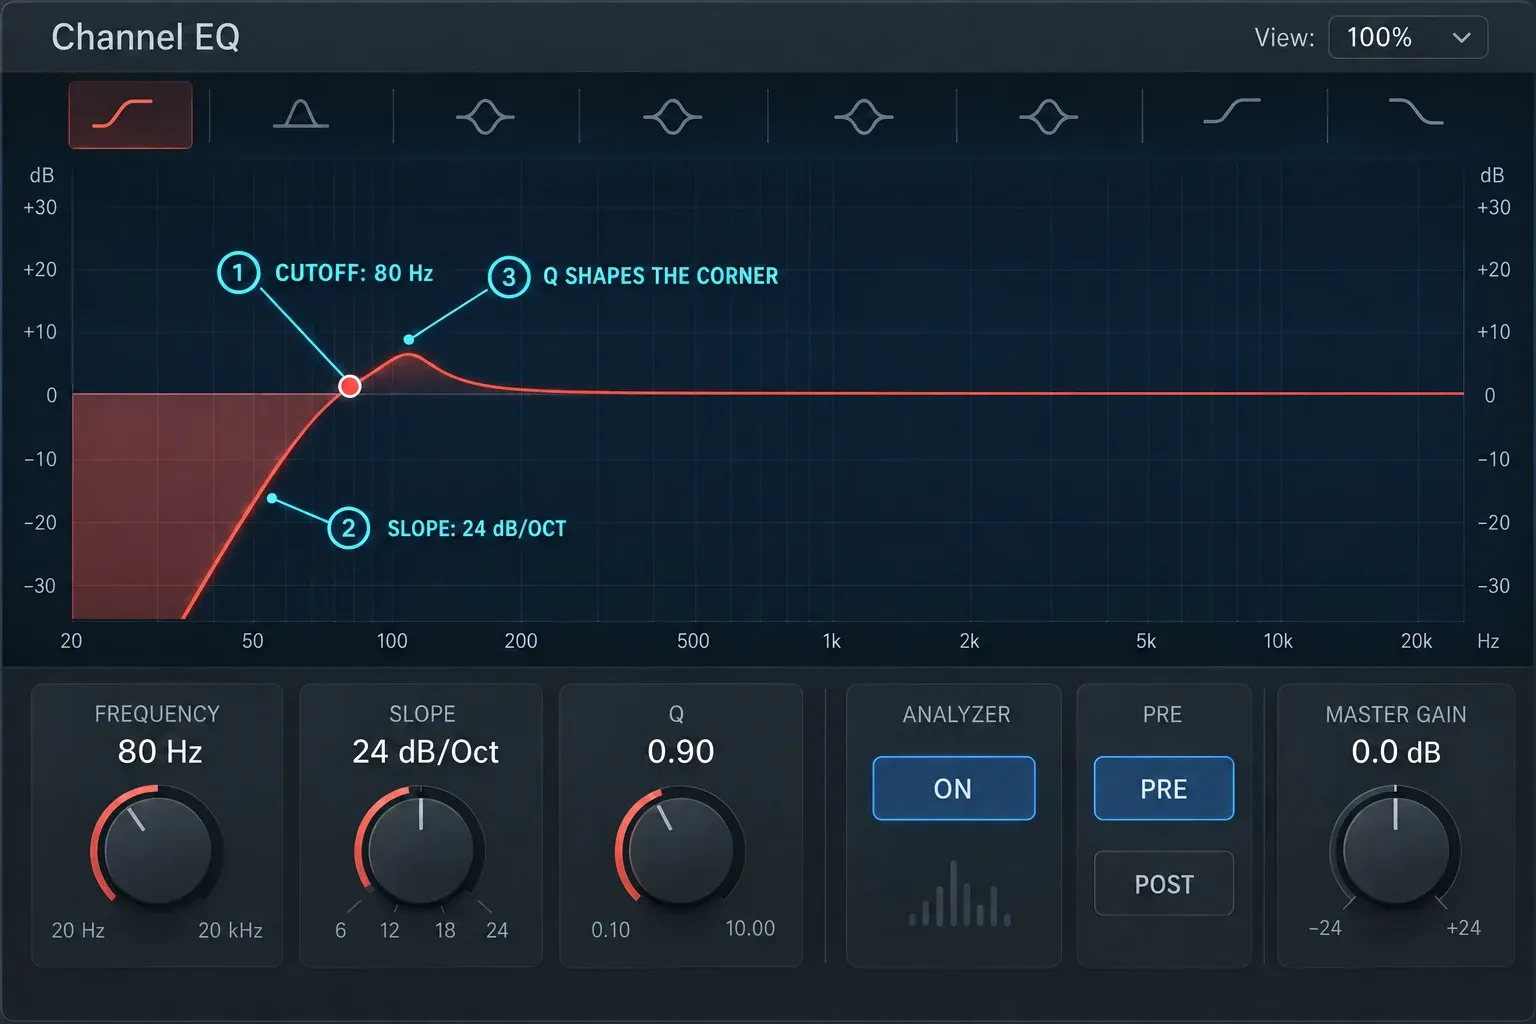
Do not keep raising the cutoff until the analyzer shows an empty low end. A filter rolls off energy rather than drawing a brick wall, and the remaining display may be harmless. Listen to the source in the arrangement and check what disappears when the filter is bypassed.
Use shelves for tone and bells for specific conflicts
A shelf changes a wide area above or below its corner, making it useful for broad weight or brightness. A bell can be broad too, but gives you a center frequency with adjustable bandwidth around it. Choose the shape whose geometry resembles the audible problem.
When two instruments compete, do not automatically boost one and cut the other at the same copied frequency. Decide which sound owns the moment, then test a small complementary change on the source causing the mask. Sometimes an arrangement move, octave change, pan decision, or automation ride creates cleaner separation than more EQ. With piano, settle the source perspective and decide how to pan the piano before using EQ to chase a width problem.
For vocals, identify whether the issue follows the recording, one phrase, the singer’s position, or the entire arrangement. The Logic Pro vocal-mixing workflow separates Region Gain, corrective EQ, compression, de-essing, effects, and automation so Channel EQ is not asked to solve every problem.
Match output before you trust bypass
Several boosts can make the EQ version louder, and louder often appears clearer or more exciting. Several cuts can make it quieter and seem smaller even when the tonal balance improved. Adjust the Master Gain slider or field to bring active and bypassed states close enough in perceived loudness for a useful decision.
- Loop a representative section rather than one isolated note.
- Bypass Channel EQ and remember vocal position, punch, weight, and harshness.
- Enable it and adjust Master Gain until loudness is comparable.
- Compare in the full mix, then solo briefly to identify artifacts.
- Remove any band whose benefit disappears in the level-matched comparison.
Use HQ when the job benefits from it
Channel EQ’s HQ button enables oversampling. Apple says it is useful when EQing at 5 kHz and above while the project sample rate is below 96 kHz; without it, especially peaking filters can become narrower and asymmetrical near the top of the spectrum and sound harsh. See Apple’s HQ and oversampling guidance for the documented sample-rate condition.
That is a specific technical use, not a rule that HQ must be on in every instance. Enable it for high-frequency work, compare the result, and account for the additional processing load in large sessions. If playback becomes unstable, the Logic Pro system-overload guide covers buffer, processing, freezing, and project diagnostics.
Use Mid/Side processing only with a clear stereo goal
The Processing menu can run Channel EQ on Stereo, Left Only, Right Only, Mid Only, or Side Only signals. Mid is the component common to left and right; Side represents their differences. Selecting a mode chooses what the EQ processes—it does not automatically boost that component. That can help shape center weight separately from stereo ambience, but it can also weaken mono translation or make the stereo field unstable.
Apple’s Channel EQ use tips describe using separate instances for Mid and Side processing. Make small moves, level-match the combined result, and check mono. Do not high-pass the Side signal or brighten it because a generic mastering chart says so; decide what the actual mix loses or gains.
Channel EQ versus Linear Phase EQ
Channel EQ is the everyday choice for tracks, buses, and many mix decisions. Its filters can introduce phase shifts around the affected frequencies, while Linear Phase EQ preserves phase coherence. Apple also documents two tradeoffs for Linear Phase EQ: greater latency and an impact on transient onset, most evident with steep cut filters or narrow, high-gain moves. These latency and transient tradeoffs are documented in Apple’s Linear Phase EQ overview.
Linear phase is not a quality upgrade for every curve. Use it when phase relationships across parallel or multi-miked material require that behavior and the audible tradeoff is acceptable. Use Channel EQ when low latency, natural transient behavior, and fast decisions matter. Apple lets the two plug-ins transfer matching parameter settings when replaced in the same slot, which makes controlled comparison easier.
Practical Channel EQ workflows
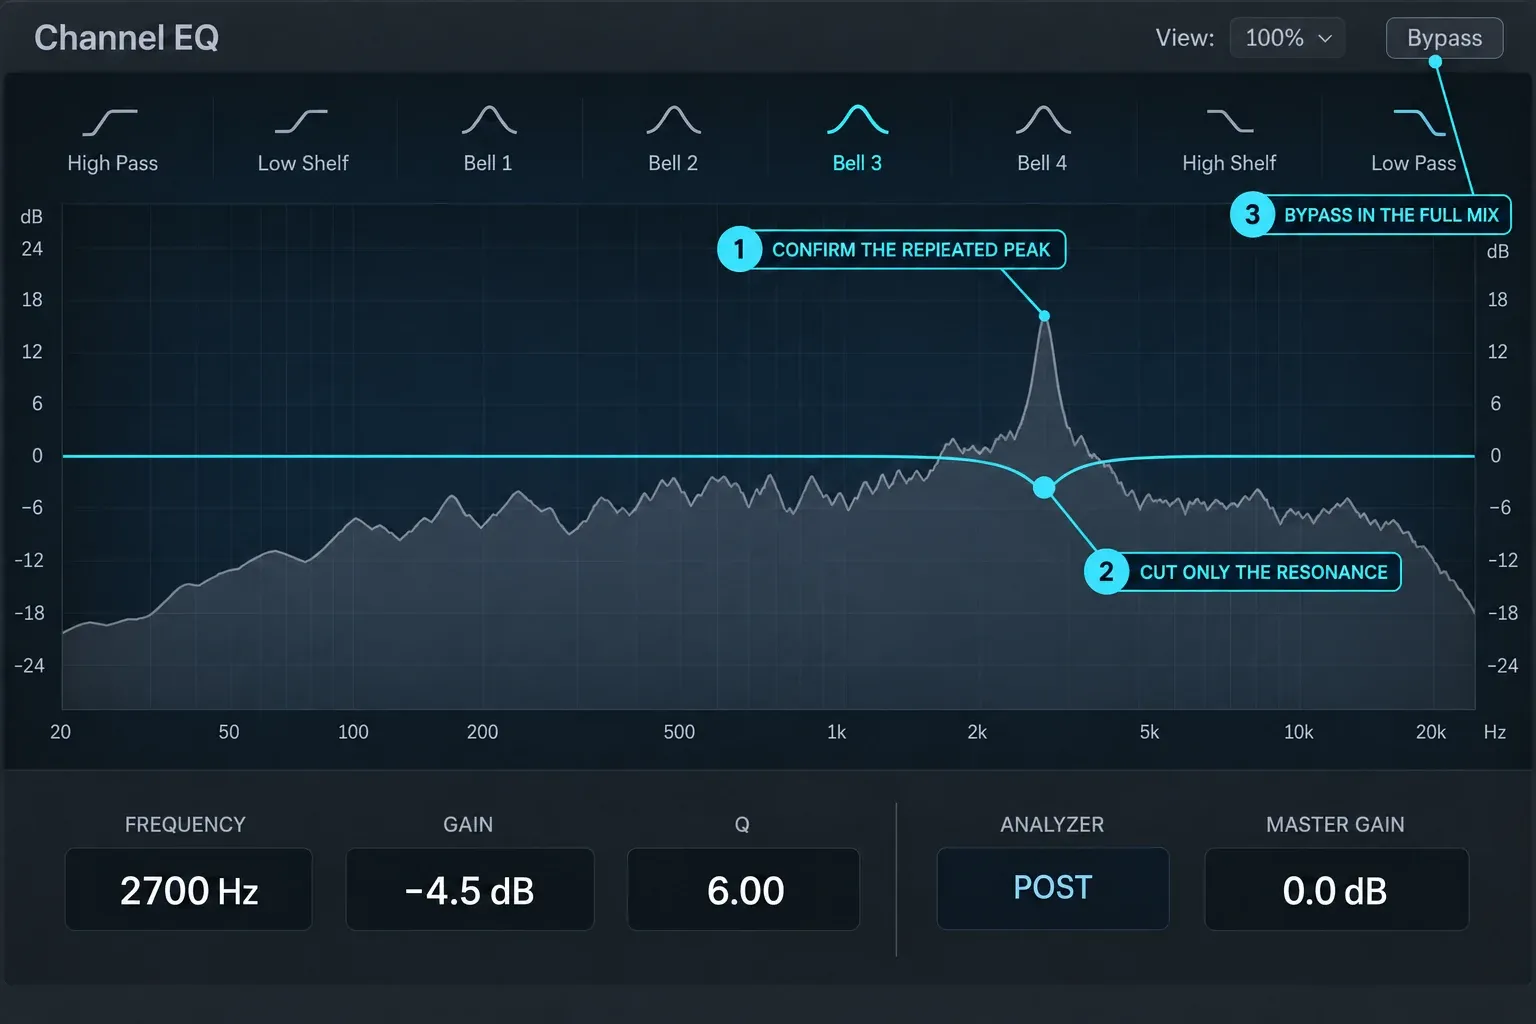
Correct a narrow resonance
- Confirm the ring persists across several notes or phrases.
- Use Analyzer only to narrow the search area.
- Create a bell with enough Q to isolate the problem without cutting neighboring tone unnecessarily.
- Reduce gain until the resonance stops distracting, then back off.
- Level-match and test across the entire section.
Create broad tonal balance
- Describe the issue in sound before touching a band: too dark, heavy, thin, or forward.
- Choose a shelf or broad bell that matches the width of that description.
- Make a small move while the arrangement plays.
- Compensate Master Gain and check whether the source sits better without losing identity.
Shape an effect return
- Place Channel EQ after reverb or delay on the aux.
- Filter only the return while the dry source remains audible.
- Remove low buildup or excessive top end that belongs to the effect, not the source.
- Check the return in mono and across section transitions.
The buses, sends and aux guide explains the complete shared-return route. The existing vocal guide then shows that structure inside a working vocal mix.
Troubleshoot Channel EQ
| Symptom | Likely cause | First check |
|---|---|---|
| Analyzer shows no moving spectrum | Analyzer off, no signal reaches the instance, or display scale hides it | Enable Analyzer, play the track, verify routing, then adjust the Analyzer Range display. |
| Fader move does not change Analyzer | Channel EQ is before the fader | Use Pre/Post for the EQ’s own input/output view; do not expect a later fader to alter it. |
| High-pass seems not to remove lows | EQ or band bypassed, Analyzer set to Pre, or a gradual filter slope | Confirm the plug-in and high-pass band are enabled. Set Analyzer to Post, then inspect slope and compare bypass while listening. |
| EQ sounds better only because it is louder | Boosts raised total output | Reduce Master Gain and level-match the bypass. |
| Top end becomes sharp | Excessive boost, narrow high-frequency filter, or HQ off in the documented use case | Reduce the move, lower Q to broaden the bell, and compare HQ when working at 5 kHz or above with a project sample rate below 96 kHz. |
| Source becomes thin after cleanup | High-pass cutoff or slope is too aggressive | Lower the cutoff, soften the slope, or remove the filter. |
| Mono mix loses body | Mid/Side processing changed stereo relationships | Bypass Mid/Side instances and check mono before keeping the move. |
Final Channel EQ checklist
- The source or arrangement problem is named before a band is added.
- The filter type matches the width and direction of the issue.
- Analyzer Pre/Post mode answers the intended question.
- Q and slope are chosen by audible effect, not visual neatness.
- Master Gain makes bypass comparison fair.
- The curve works across multiple notes, phrases, and sections.
- The decision survives full-mix, low-level, and mono checks.
- HQ and Mid/Side modes are enabled for a reason, not by habit.
Use the Logic Pro tutorials hub for the surrounding recording, routing, compression and automation workflows. For the finished stereo mix, compare the manual EQ decision inside the complete Logic Pro mastering workflow; the Mastering Assistant guide explains why automated EQ still requires level-matched listening and source-level repair.
Frequently asked questions
How many bands does Logic Pro Channel EQ have?
It has eight bands: high-pass and low-pass filters, low and high shelves, and four flexible parametric bell bands.
Should I use the Channel EQ Analyzer in Pre or Post mode?
Use Pre to inspect the signal entering Channel EQ and Post to inspect the spectrum after its curve. Choose the view that answers your current question.
What does Q do in Logic Pro Channel EQ?
Q controls bandwidth. Higher Q values make a bell band narrower; lower values make it broader. On the outer filters, Q can control resonance around the cutoff at applicable slopes.
Should every track use a high-pass filter?
No. Use one when low-frequency content is unwanted or masking the mix. Remove or relax it if it takes away useful weight, warmth, or transient body.
What does the HQ button do in Channel EQ?
HQ enables oversampling. Apple says it is useful for EQ work at 5 kHz and above when the project sample rate is below 96 kHz, especially to avoid narrowed, asymmetric high-frequency peaking filters.
Why does Channel EQ sound louder when I boost?
Boosts add energy and can raise total output. Reduce Master Gain until active and bypassed states are close enough in perceived loudness for a fair comparison.
Is Channel EQ a dynamic EQ in Logic Pro?
No. Channel EQ applies a static curve: its bands do not change gain in response to a threshold. If a frequency problem appears only on certain words or hits, automate the relevant control, use a purpose-built dynamics processor such as DeEsser 2 for sibilance, or choose a dynamic EQ Audio Unit for threshold-controlled bands.
Is Linear Phase EQ better than Channel EQ?
No. Linear Phase EQ preserves phase coherence but adds latency and can affect transient onset. Use it for a specific phase-sensitive need; use Channel EQ for most low-latency track and mix work.


