How to Use DeEsser 2 in Logic Pro
Control sharp S sounds with the stock DeEsser 2. Understand the detector, choose the right range and mode, and keep the vocal clear.

For a sharp S or SH in a Logic Pro vocal, insert Dynamics > DeEsser 2 on the vocal channel. Start with Relative mode and Split range, find the offending band with Filter Solo, then adjust Threshold so the consonants trigger reduction. Use Max Reduction to limit the amount and turn Filter Solo off before judging the voice.
I’d start there because it separates two decisions: which sound should trigger the processor, and how much of the voice should change when it does. A bigger reduction number isn’t the goal. The lyric should become easier to hear without losing its consonants.
This guide covers the stock DeEsser 2 in Logic Pro for Mac. For the surrounding editing, compression, sends and automation, use the complete vocal mixing workflow.
Set up a phrase that exposes the problem
Loop a short passage containing a harsh consonant, an ordinary word and a quieter phrase. One isolated S helps locate a frequency, but it can’t show whether the same setting attacks vowels or misses the next line.
- Select the vocal track and open its channel strip. Click an Audio Effect slot, then choose Dynamics > DeEsser 2.
- Choose Relative from Mode and click Split under Range. These are a useful starting combination, not a required final setting.
- Choose the peak filter when you want to concentrate on a narrow area. Switch on Filter Solo and move Frequency until the troublesome consonant is prominent in the monitored band.
- Switch Filter Solo off. Adjust Threshold until the distracting consonants activate the detector while ordinary syllables remain mostly untouched.
- Bring Max Reduction back to a restrained amount, then increase it only until the sharpness stops pulling attention. Watch the Reduction meter to see the attenuation actually being applied.
- Listen with the instrumental playing and compare bypassed and active states. Check the quieter phrase too. Back off if S sounds turn into a lisp or the vocal loses clarity.
Apple’s vocal sibilance setup also recommends putting Channel EQ before DeEsser 2 and watching its analyzer to locate the problem. Use the analyzer as a clue. A bright peak can be a useful part of the voice. The Channel EQ guide covers its analyzer and filter controls.
Find the consonant, not a universal frequency
There’s no useful “best de-esser frequency” without a recording. The same voice can need a different band after a microphone change, a different performance or a bright EQ boost. Don’t choose a frequency only because a chart assigns it to a male or female singer. Apple’s DeEsser 2 guide places sibilance in human voices typically between 5 and 10 kHz. Sweep that span first, and let the recording decide where the setting lands.
In Split range, Filter Solo lets you hear the filtered band. Move Frequency slowly across the sharp passage and compare the unwanted hiss with the surrounding words. If almost the whole vocal seems equally strong in the monitored band, reconsider the filter shape and center before lowering Threshold further.
Once the band is found, turn Filter Solo off. Monitoring a band makes it sound extreme by design. The final decision belongs to the complete vocal and then the mix.
According to Apple’s DeEsser 2 parameter reference, Frequency sets the center or maximum frequency of the detection filter, depending on its shape. Filter Solo monitors that filtered split band when Split is on. It isn’t a DIFF control that plays only the material being removed.
Split and Wide change the reduction range
Split reduces the selected frequency band. That’s why I’d try it first for a consonant that’s harsh while the rest of the voice sounds right.
Wide reduces the full signal when the detector triggers. It doesn’t simply mean a wider patch of treble. The full-range attenuation can make the whole syllable dip, so compare the body of the voice as well as the hiss.
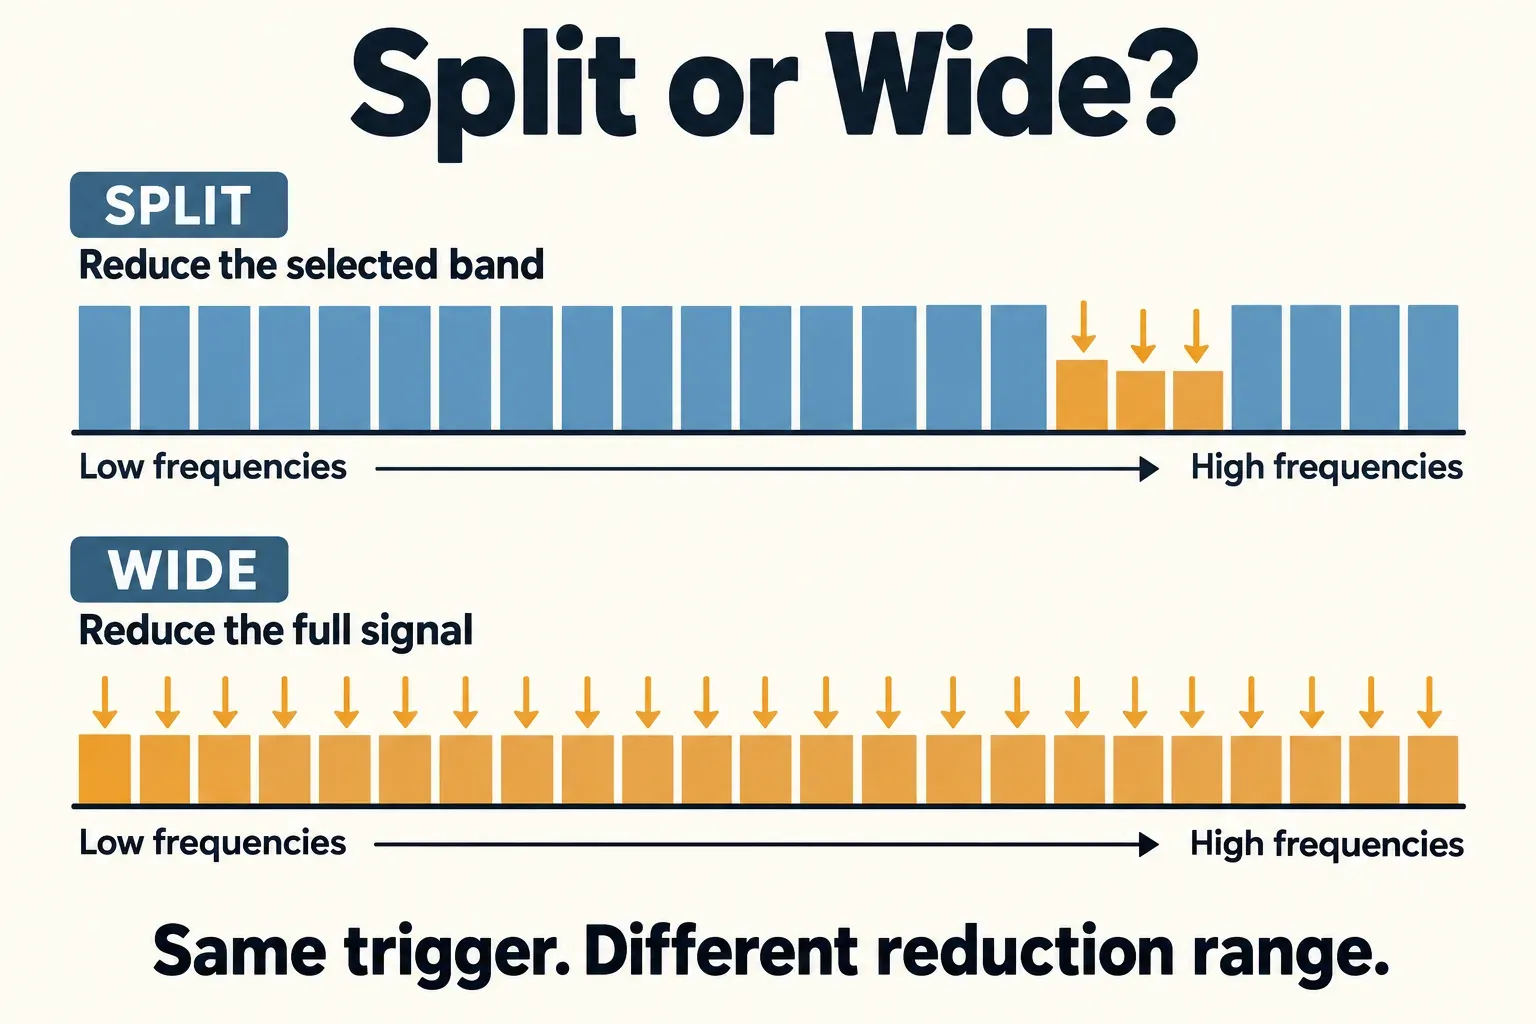
Keep Range separate from Filter. The filter buttons choose a broader shelving shape or a focused peak shape before detection. Range decides whether the resulting attenuation is confined to a band or applied across the signal. Apple distinguishes both controls in its range and filter definitions.
If Wide makes the phrase pump, compare Split before pushing the threshold harder. If Split makes only the top of the word disappear, reduce Max Reduction and check whether the selected band is too broad for the problem.
Relative and Absolute listen differently
Relative compares the filtered signal with the full-band input. It’s useful when sibilance remains distracting across both quiet and loud phrases. Threshold governs that comparison, so read it as sensitivity to the balance of the band. It isn’t a portable input-level setting you can copy between recordings.
Absolute reacts when the filtered signal exceeds Threshold. A quiet S may not cross a setting that catches a loud one. Apple notes that low-level material can need a very low threshold in Absolute mode. Its mode descriptions recommend the default Relative mode for most signals.
To compare them, keep the same phrase and change only Mode. Reset Threshold for the new mode, then include the quiet line in the comparison. Don’t assume a matching displayed threshold means matching detection.
Threshold, Max Reduction and the two meters
Threshold decides when processing starts; Max Reduction caps how far it can go. A maximum setting is permission to reduce up to that amount. It doesn’t mean that amount is being applied throughout the phrase.
The Detection meter indicates the detector response. Apple describes blue as inactive and yellow as active. The separate Reduction meter shows the attenuation applied. Read both: an active detector and a barely moving Reduction meter point to a different adjustment than a detector that never activates.
First get detection to follow the right consonants. Then set the reduction limit by the sound of the whole word. If the detector follows nearly every syllable, increasing the limit will make the wrong behavior stronger.
Place it where the sharpness appears
There’s no compulsory vocal-chain position. Apple’s sibilance guidance identifies the voice, microphone interaction and compressor settings as possible contributors. Find which stage makes the consonant objectionable.
- Sharp before the mix chain: try de-essing early so the following processors receive a more controlled consonant.
- Sharp only after compression or a bright boost: try DeEsser 2 after that stage. Recheck Frequency and Threshold because its input has changed.
- Sharp only in a reverb or delay: compare the dry vocal with the effect return before processing the lead more heavily. The bus, send and aux workflow explains how to address a return independently.
Change one position at a time. A threshold that behaved well before a compressor may behave differently after it. If the compressor itself is flattening the voice or lifting breaths, fix that in the Compressor controls before asking the de-esser to conceal it.
Fix missed S sounds and excessive reduction
Nothing seems to happen
Confirm that DeEsser 2 is active on the channel carrying the vocal. In Split, use Filter Solo briefly to check the band. Then watch Detection during the offending consonant. If it stays inactive, revisit Frequency and Threshold, and in Absolute mode compare Relative on the quieter line. When Detection does activate, check that Max Reduction allows a useful amount and read the Reduction meter.
The processor works almost all the time
The detector may be responding to ordinary brightness rather than exceptional sibilance. Adjust Threshold toward less frequent activation, narrow or reposition the band, and compare the ordinary word in your loop. Don’t compensate by adding a high shelf afterward: that can reintroduce the balance you were trying to fix.
The voice sounds dull or lispy
Reduce Max Reduction first, then check how much of each word triggers the processor. Try a more focused band. If Wide is pulling down the whole syllable, compare Split. Keep enough consonant energy for the words to remain intelligible.
One word still needs much more treatment
Don’t force every line through an aggressive setting for one exception. Isolate that consonant for a small gain edit or automate the necessary change, keeping the edit and processor state reversible. Avoid turning down the whole word if its vowel already sits correctly. Another route is to marquee-select just that consonant in the Tracks area, choose Functions > Selection-Based Processing and run DeEsser 2 on the selection alone. Logic Pro writes a new processed file and keeps the original available if you want to revert. The automation guide covers parameter changes over time.
If the tutorial shows Sensitivity or Smoothing
You’re looking at a different processor. Apple’s Legacy DeEsser reference lists separate Detector and Suppressor sections, Sensitivity, Strength and Smoothing. DeEsser 2 uses Threshold, Max Reduction, Frequency, Mode, Range and Filter instead. It has no separate attack or release knobs in its documented controls.
Keep an old project’s existing sound unless there’s a reason to change it. For a new DeEsser 2 setup, follow the current controls above instead of translating legacy knob values. The stock processor is available inside Logic Pro, so this workflow doesn’t require a separate de-esser download.
Before moving on, check three passages: the worst consonant, a normal line and a quiet line. Filter Solo should be off, the lyric should remain clear, and bypass should reveal the sharpness you meant to fix. If another part is masking the vocal, return to balance and arrangement in the Mix & Master hub.


