Automatic Double Tracking in Logic Pro: Vocals and Guitars
Record a real double or build a stock Pitch Shifter ADT return, then use Logic's Gain and Correlation Meter to catch phase problems.

If the singer or guitarist can perform the part again, record a real second take. Its timing, pitch and tone differ from the first performance; an edited copy cannot recreate that. If you only have one take, build artificial double tracking on a stereo aux with Logic Pro's stock Pitch Shifter. Keep the original in the center and check the blend in mono. Neither method guarantees a problem-free mono mix.
This guide uses Logic Pro for Mac. The stock method combines a send, a stereo aux and Pitch Shifter; you do not need to buy a dedicated doubler. It is a mixing technique, not a command that generates another human performance.
What automatic double tracking is
Double tracking means recording the same part twice. Artificial double tracking, often shortened to ADT, starts with one performance and creates a related copy with small timing and pitch changes. The name comes from a tape technique developed by Ken Townsend at Abbey Road for The Beatles. Abbey Road's account of the original ADT system explains how a second tape path and controlled speed variation made the copy move around the source.
The stock method below uses a separate wet path with small timing and pitch differences. The movement stops the copy from behaving like a perfectly identical waveform. It still won't become a new performance. Consonants, pick attack, breath and vibrato all come from the same take.
Copying a region to a second track and panning the two copies left and right doesn't create a real double. The samples remain identical. You mainly get more level, and the result returns to the same mono signal when both sides are combined. iZotope's vocal-doubling explanation reaches the same practical distinction: stereo width needs a difference between the two signals, not another copy of the same file.
Choose the right kind of double
| Situation | Best first choice | Reason |
|---|---|---|
| Lead vocal in a sparse verse | Single lead or a quiet real double | Words stay focused and the second performance adds texture without obvious modulation |
| Large chorus vocal | Center lead plus two real doubles, or a low artificial return | You can widen the support while keeping the lyric anchored |
| Heavy rhythm guitars | Two separately played takes | Independent pick attack and fret noise create the size that copied audio cannot |
| Lead guitar that needs movement | Artificial double or Chorus | A controlled effect can suit a featured line without requiring another perfect solo |
| Only one usable take exists | Artificial double on an aux | The source stays untouched and the wet return remains easy to reduce or mute |
| Mono playback loses the part | Reduce or rebuild the artificial path | More width is not useful when the part becomes hollow on a phone or single speaker |
Record a real double when you still can
To record a genuine double, select the source track and choose Track > Other > New Track With Duplicate Settings. Record a new performance on the empty track; do not copy the original region. Apple's Duplicate Track guide distinguishes this from duplicating settings and content. The toolbar button can be configured either way, so check that the new track is empty before recording.
For vocals
- Finish the lead comp first so the singer doubles the performance you will keep.
- Create an empty track with the same mono input and cue mix.
- Record complete phrases. Match word endings and consonants before chasing tiny pitch differences.
- Edit only the distractions. A double that is quantized and tuned into the lead can lose the movement you recorded it for.
- Keep the lead in the center. Place one supporting double near the center for thickness, or record two doubles and pan them apart for width.
- Bring the doubles up until the chorus grows, then pull them back until the lead remains the voice you follow.
The Logic Pro vocal-recording workflow covers input gain, monitoring and take folders. This page starts after you already have a clean lead.
For guitars
- Keep the same arrangement and tuning, but record a second performance from the start.
- Check that stops, palm mutes and chord releases agree musically. Do not line up every transient by sight.
- Pan the two takes apart and balance their levels in context.
- If the pair feels blurry, tighten the performance or edit the obvious miss. Changing one amp preset does not replace a second take.
- Listen in mono before adding more layers. Two real takes can still interfere, but they do not share a sample-identical waveform.
Use the guitar recording guide if the problem starts at the input, amp patch or monitoring path rather than at the double.
Build stock ADT with Pitch Shifter
This method keeps the lead track unchanged and places the artificial voices on a separate stereo return. You can automate or mute that return without touching the original vocal or guitar.
1. Create a parallel aux
- Open the Mixer and locate the source vocal or guitar channel strip.
- Click an empty Send slot and choose an unused bus.
- Logic creates an aux channel strip with that bus as its input. Rename it ADT.
- Keep the source's existing output destination, whether that is Stereo Out or a vocal/guitar subgroup. Route the ADT aux to the intended mix output. The send adds a parallel path; do not route the aux back into its own input bus.
- For a centered source, choose Post Fader from the Send menu so the effect follows source-fader changes without following its pan. Start with a low send level and check that signal reaches the aux; set the final blend after configuring the plug-in.
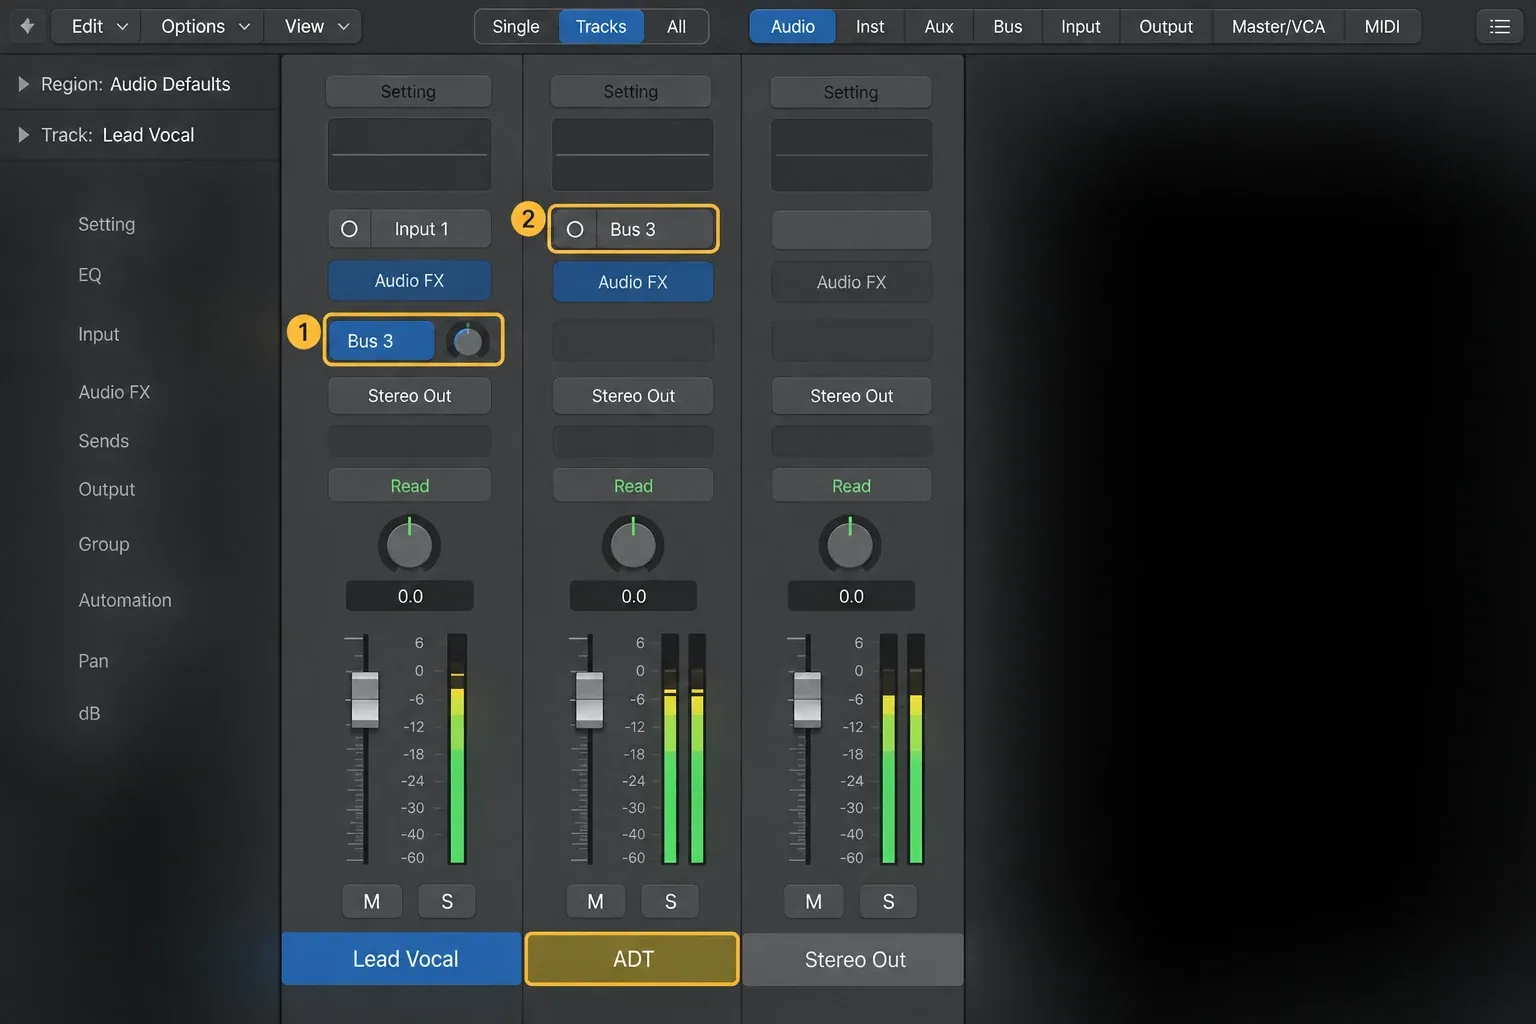
Apple's send-effect routing guide confirms the signal flow: the main channel continues to its output while a split travels through a bus to an aux. That recoverable parallel path is safer than editing or moving the only region.
2. Insert Pitch Shifter as Dual Mono
- Click and hold the ADT aux's Channel Mode button and choose Stereo. Look for two interlocked circles and a two-column level meter.
- In the aux's Audio Effect slot, open Pitch > Pitch Shifter and choose Dual Mono from the format submenu. If that format is missing, recheck the aux's channel mode.
- Turn Couple off in the plug-in header, then use the left and right channel buttons to edit each side separately. With Couple on, changing one side can change the other too.
- Set Semi Tones to 0 on both sides.
- Start one side around -3 to -6 cents and the other around +3 to +6 cents.
- Set Mix to 100% in both channel panes. The original track supplies the dry signal; the aux supplies only the processed voices.
- Choose a suitable Timing algorithm on one side; Vocals is a starting option for a sustained vocal. On the other side, choose Manual and try the Delay control around 12–25 ms. Listen for artifacts and a distinct echo, then adjust or change the algorithm if either distracts from the part.
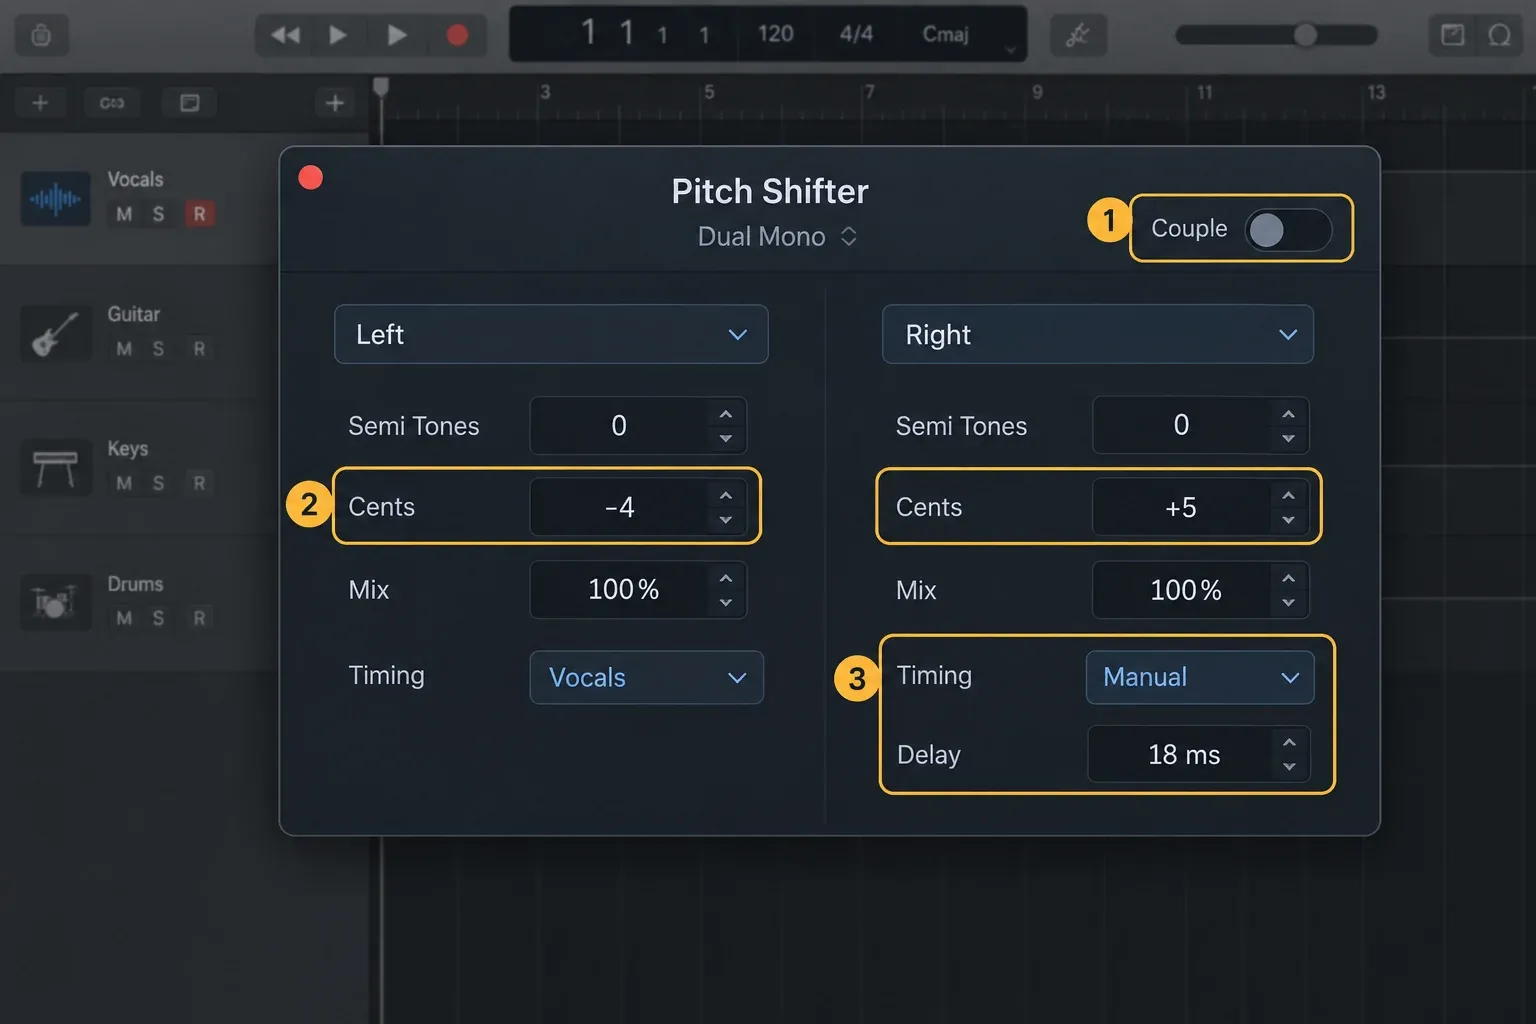
Apple's current Pitch Shifter overview documents Cents, Mix and Timing, including the Delay and Crossfade controls that become active in Manual mode. Apple's Pitch Shifter task page explains how to set transposition, detuning and the source-appropriate timing algorithm. Apple also documents Dual Mono as a plug-in format that loads multiple instances on a stereo channel strip.
If you cannot find the format controls, Apple's channel-mode instructions show how to switch an aux to Stereo. The multi-mono header adds Couple and channel buttons so you can adjust the two instances independently.
Apple's multi-mono guide explains why Couple must be off for different left and right settings. Changing Stereo Link inside Pitch Shifter is not the same as uncoupling the two plug-in instances.
The detune and delay figures are starting ranges, not target numbers. Pitch Shifter's Manual Delay is part of its processing algorithm, not a promise that the audible voice will arrive exactly that many milliseconds after the dry track. Apple notes that lower-pitched material can require a longer delay for effective shifting. Do not keep shortening it if the shifted voice starts to break up. Compare algorithms and lower the return when the effect competes with the performance.
3. Blend the return under the source
- Pull the ADT aux fader all the way down.
- Play the densest section and raise the return until the part becomes wider.
- Mute the ADT aux, then unmute it to compare. Do not merely bypass Pitch Shifter: that leaves another unprocessed copy coming through the aux. Keep the comparison at similar loudness.
- If words blur or guitar attacks smear, shorten the delay, reduce detune or lower the return.
- Automate the aux for a chorus or selected phrase instead of leaving maximum width on every line.
You can place a high-pass filter on the ADT return when low-frequency pitch shifting muddies the center, but choose the cutoff by ear. The original track should carry the weight. Continue with the stock Logic Pro vocal mix after the double itself is stable.
Use Chorus for a simpler moving double
Chorus is quicker when you want motion rather than a convincing second person. Apple's Chorus documentation says the effect mixes a modulated delay with the dry signal to imitate small timing and pitch differences between performers.
- Choose Modulation > Chorus in an Audio Effect slot. Use it instead of Pitch Shifter on the aux when comparing methods, or use a separate insert on the source for a lighter effect.
- On an aux, set Mix to 100% and control the amount with the return. On the source, keep Mix low enough to retain the dry voice. The interface example below is not a fully wet aux setting.
- Start with a slow Rate and low Intensity.
- Raise the effect until you hear movement, then reduce it until the source stops sounding seasick or metallic.
- Check the result in mono. Chorus also changes phase over time.
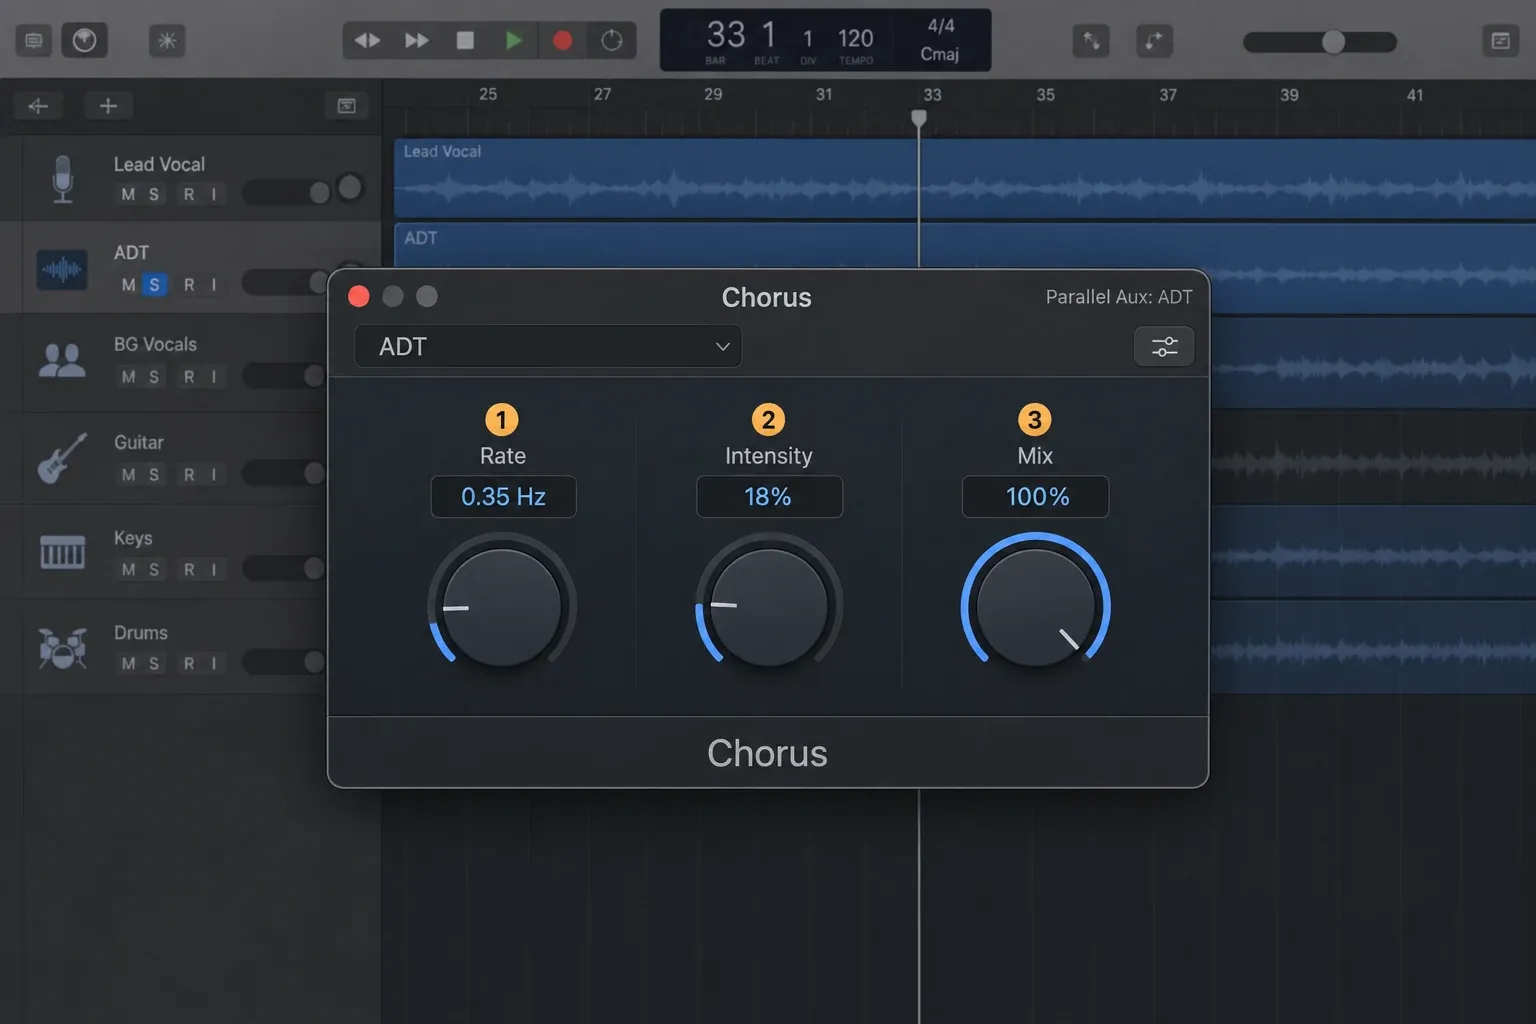
Chorus works well on backing vocals, pads and featured guitar lines that can tolerate color. It's less convincing when the listener should believe that two independent singers or guitar takes exist.
Why Sample Delay alone can sound phasey
The fast shortcut is to duplicate a region, pan the copies apart and delay one side. That creates an arrival-time difference in stereo, but the two sides still carry the same performance. When they collapse to mono, the delayed waveform combines with the original at different phase angles across the spectrum. You hear that as comb filtering: some frequencies reinforce while others weaken.
Sample Delay can set an offset in samples or milliseconds, with a Link L & R control for matching the two sides. Apple's Sample Delay reference explains those controls. A fixed offset is not a guarantee of safe width. Keep experiments on a separate return and compare the summed-mono sound at similar loudness; adding detune or modulation changes the interaction but does not remove the need to check it.
Check phase and mono before export
- Insert Metering > Correlation Meter near the end of the Stereo Out chain, after any stereo-widening processing.
- Listen to the original and ADT return together without unrelated instruments, then check the full mix. Play a representative doubled phrase and watch for repeated values below 0. Other centered tracks can make the whole-mix reading look reassuring while the doubled part still sounds hollow.
- Insert Utility > Gain in Stereo format after the meter and turn on Mono. Apple's Gain reference confirms that it sums the signal to both outputs; the Mono control is unavailable in a mono instance.
- Match loudness as closely as you can before deciding. Louder playback can make a worse setting feel better.
- Listen for lost body, hollow vowels, thin guitars, vanishing consonants and an effect return that jumps forward.
- If the part weakens, lower the return first. Then reduce delay or detune. Record a real double if the artificial path still carries too much of the sound.
- Turn the Gain Mono button off before the final stereo bounce.
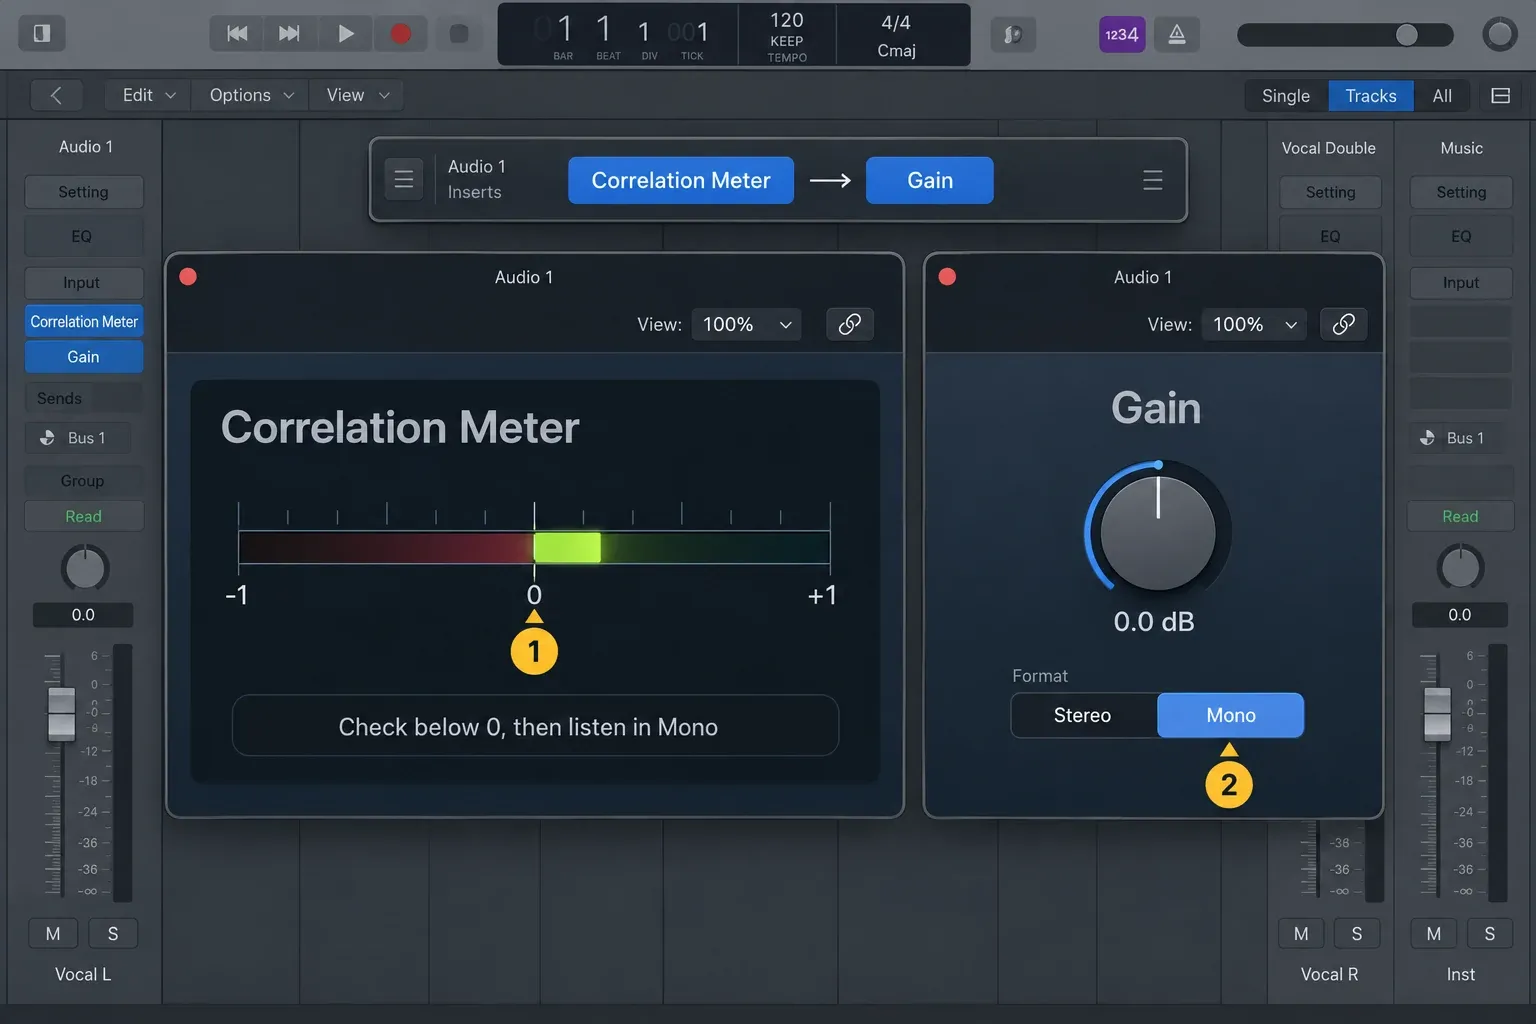
Apple's Correlation Meter guide defines +1 as fully correlated, 0 as the widest permissible divergence and values below 0 as out-of-phase material that can cancel in mono. Do not mix to a permanently fixed meter position. A moving arrangement can cross zero briefly. The audible mono result decides whether the effect survives.
Fix common double-tracking problems
| What you hear | Likely cause | First fix |
|---|---|---|
| The copies are louder but not wider | The same region is playing on both sides with no useful difference | Record a new take or add controlled timing and pitch variation on a wet path |
| The vocal sounds like a chorus pedal | Detune or modulation is too deep | Reduce Cents, Intensity or the ADT return |
| You hear a slap echo | The artificial delay is too long for the phrase | Shorten the delay or lower the return |
| The guitar loses body in mono | Short-delay comb filtering | Lower or mute the artificial path; use a real second take for the main width |
| Consonants blur | The double is too loud or too late | Lower the return and shorten the timing offset |
| The lead pulls to one side | The return is not truly stereo or the left/right settings are unbalanced | Check the aux channel mode, Dual Mono channel settings and return balance |
| The meter looks safe but mono still sounds worse | Correlation is an indicator, not a listening verdict | Trust the level-matched mono comparison and rebuild the effect |
Frequently asked questions
Does Logic Pro have automatic double tracking?
You can create artificial double tracking with Logic Pro's stock tools: send the source to a stereo aux, use separate left and right Pitch Shifter settings in Dual Mono format, and check the blend in mono. Turn Couple off to adjust the two sides independently. Chorus is another option when you want more obvious movement.
Is duplicating a track the same as double tracking?
No. Logic's Duplicate Track button can be configured to create an empty track with duplicate settings or a track that also includes the content. Recording a new performance on an empty duplicate is double tracking. Copying the original region or duplicating it with content creates another instance of the same audio, not an independent take.
What delay should I use for automatic double tracking?
A 12–25 ms setting is a starting experiment, not a required value. In Pitch Shifter, Manual Delay also affects the shifting algorithm, so its displayed value is not a guaranteed dry-to-wet arrival offset. Listen for artifacts, echoes and loss of body in mono, then adjust the timing, algorithm or return level to suit the phrase.
Should I double-track vocals or use a doubler?
Record a real double when the singer is available and the part matters. Use an artificial doubler when only one take exists or when you want controlled movement. A center lead with quiet supporting doubles usually keeps lyrics clearer than making the entire lead wide.
Can I double-track guitar with the same take?
You can create an artificial stereo effect from one guitar take, but it will not behave like two performances. For rhythm guitars that provide the main width, record the part twice. Use artificial doubling for texture, lead lines or a session that cannot be re-recorded.
How do I stop a doubled track from sounding phasey?
Lower the artificial return, shorten its delay, reduce detune or modulation, and compare in summed mono. If the part still loses body, remove the artificial width and record a real second take. Do not use a phase-invert button as a random cure; polarity inversion is a different operation.
Final ADT checklist
- The original vocal or guitar remains intact on its own channel.
- You chose a real second take for an independent performance, or an artificial double for a controlled effect from the existing take.
- The artificial path uses a separate stereo aux and a fully wet return.
- Semi Tones stays at 0; Cents and timing changes remain small enough to avoid obvious warble or echo.
- The lead still carries the words, attack and low-mid body when the ADT return is muted.
- Correlation Meter does not live below zero through the important section.
- The doubled part keeps its weight in a level-matched mono check.
- The Gain plug-in's Mono button is off before the final stereo export.
Use the Logic Pro Mixing and Mastering hub for the next steps in EQ, compression, routing and final delivery.


