How to Use Reference Tracks in Logic Pro
Import, route and level-match reference tracks in Logic Pro, then compare low end, vocal, punch, width and depth without double-processing.

To use reference tracks in Logic Pro, import a comparable song onto its own stereo track, keep it out of your mix processing, and match the listening level before switching between the two. Compare similar sections: your chorus against a reference chorus, not its quiet intro.
A reference helps you hear a specific difference, such as a buried vocal, an overlong bass note or a chorus that never opens up. Decide which difference matters to your song before changing EQ, compression or stereo width.
This guide is for stereo projects in Logic Pro for Mac. If you use Mastering Assistant or have a complicated output chain, the separate comparison-project method below lets you reference without rebuilding the working mix.
Reference tracks in Logic Pro: the complete workflow
- Save your production project and keep a recoverable copy before changing its routing.
- Choose a permitted local reference file with a comparable arrangement and sound.
- Choose Keep Project Tempo before importing the reference.
- Import the reference onto a dedicated stereo Audio track named REFERENCE, then set that region’s Smart Tempo to Off.
- Use a clean comparison project with a bounced mix, or the premaster route below that preserves existing subgroups.
- Reduce the louder source after its sound-changing processing until loudness matches.
- Play only one source at a time, compare the same musical role, then test one change in the production project.
- Before delivery, restore the intended mix level and processing, exclude the reference and monitoring correction, and audition the exported file.
For example, ask: “Can I still follow the lead vocal when the chorus fills up?” That gives the next listen a purpose and the next edit a test.
Choose a reference that makes a fair comparison
Genre is useful, but it’s too broad by itself. Match the production problem:
- Arrangement density: sparse vocal and piano should not be judged against a packed electronic drop.
- Low-end design: compare sub-led music with another sub-led release, or live kick and bass with a similar acoustic balance.
- Vocal role: choose a song where the lead occupies the position you want, whether intimate, embedded or dominant.
- Tempo and energy: attack, sustain and perceived punch change with groove and note length.
- Release era and aesthetic: a deliberately dry, narrow record is a poor width target for a modern spacious production, and the reverse is also true.
One reference can be enough. Add another when it answers a different question: low-end weight, vocal placement or the amount of space around the instruments. You do not need a fixed number of songs.
Prepare the reference file before importing
Use a local file you have permission to use for comparison. Prefer an original lossless release in WAV, AIFF or Apple Lossless; converting an MP3 into WAV does not recover discarded detail. A permitted AAC or MP3 can still be useful when it is the release you know. Logic can import compressed audio files for playback without another lossy encode. Do not bypass a service’s access restrictions or include someone else’s recording in a project you distribute without permission.
Before import, choose Keep Project Tempo in the LCD tempo display. After import, select the reference region and set Smart Tempo to Off in the Region inspector; older versions call this Flex & Follow. Apple’s Smart Tempo overview distinguishes the two: Keep preserves the project tempo, while Off prevents that region from following it.
These two checks keep Logic from redefining the session around the commercial song or stretching that song to your grid. A reference should play at its released speed unless time-aligned analysis is an explicit part of the task.
Import the reference into Logic Pro
- Create a stereo audio track and name it REFERENCE.
- Press F, open All Files, and find the local audio file.
- Preview it, then drag it to the new track in the Tracks area. You can also use File → Import → Other.
- Place the useful section near the corresponding verse, chorus or drop in your project, or leave the full song later on the timeline.
- When the placement is final, show Protect through Track > Configure Track Header, then click the track’s Protect button so its lock turns green. Turn Protect off again when you need to move or edit the region.
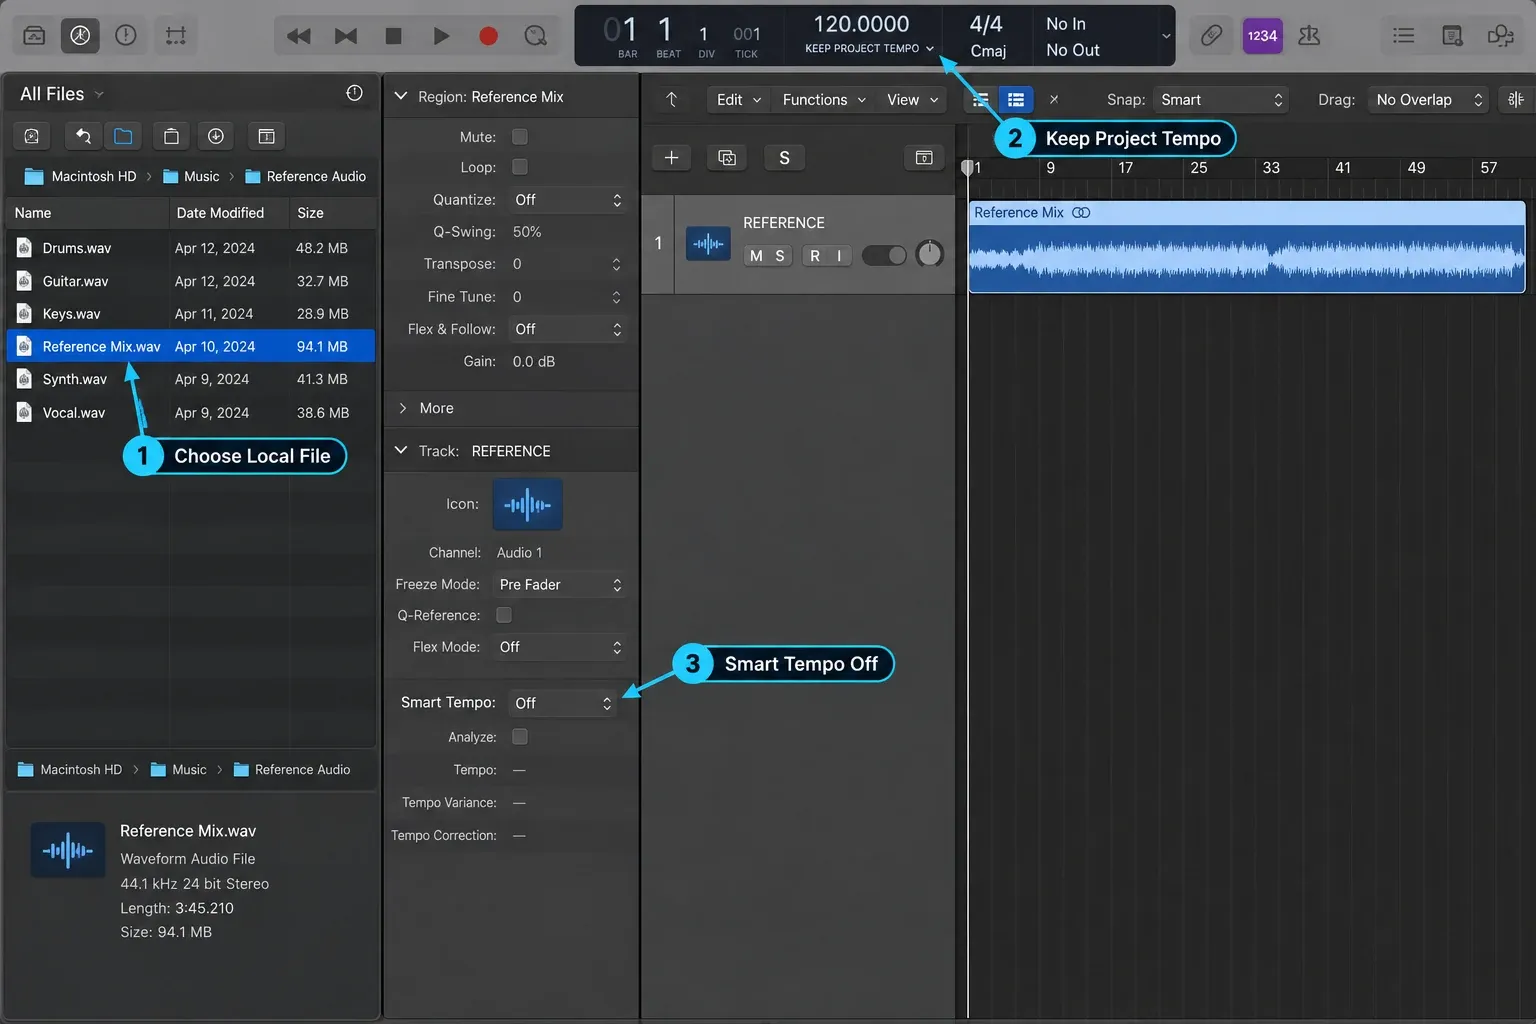
Do not put the reference inside a Track Stack that feeds your mix bus. Give it an independent channel strip so its route and gain remain obvious.
Apple’s Protect control prevents accidental region edits on that track. It is not a backup of the source audio file.
Route the reference so the master chain does not process it
Simple project with no Stereo Out processing
With no sound-changing inserts on Stereo Out, both sources can feed it directly. Keep the reference on its own track and play only one source at a time. If muting the whole working mix is awkward, use the two-track comparison project below. Shared meters can stay on Stereo Out. Room or headphone correction is for listening only and must not be printed into a delivery file.
Mastering Assistant or a complex output chain
Apple places Mastering Assistant on the stereo output. Do not treat it as an ordinary insert that this setup requires you to move to an aux. The same caution applies to output automation or a routing layout you cannot confidently change.
- Leave the production routing intact. With any reference muted, bounce the mix through its intended processing using File > Bounce > Project or Section. Turn Mastering Assistant’s Loudness Compensation off for the bounce and exclude room/headphone correction. Check the intended Start and End range.
- Open a new empty comparison project. Choose Keep Project Tempo and import the bounced mix and the reference onto separate stereo Audio tracks named MIX and REFERENCE.
- Set Smart Tempo to Off for both regions. Route both tracks directly to Stereo Out with no sends. Keep the tracks and Stereo Out free of sound-changing inserts; add a shared Loudness Meter.
- Place comparable sections where you can switch between them, lower the louder track, and use the exclusive mute steps below.
- Make any resulting edits in the production project, bounce a new comparison copy and replace the old mix file in the comparison project.
A premaster aux for a straightforward manual chain
Use this in a saved copy when you want to compare inside the production project and can verify the routing. First keep a bounce of the original mix. If the project has output-level automation, or if moving inserts would change automation, sidechains or the sound, keep the original setup and use the comparison-project method instead.
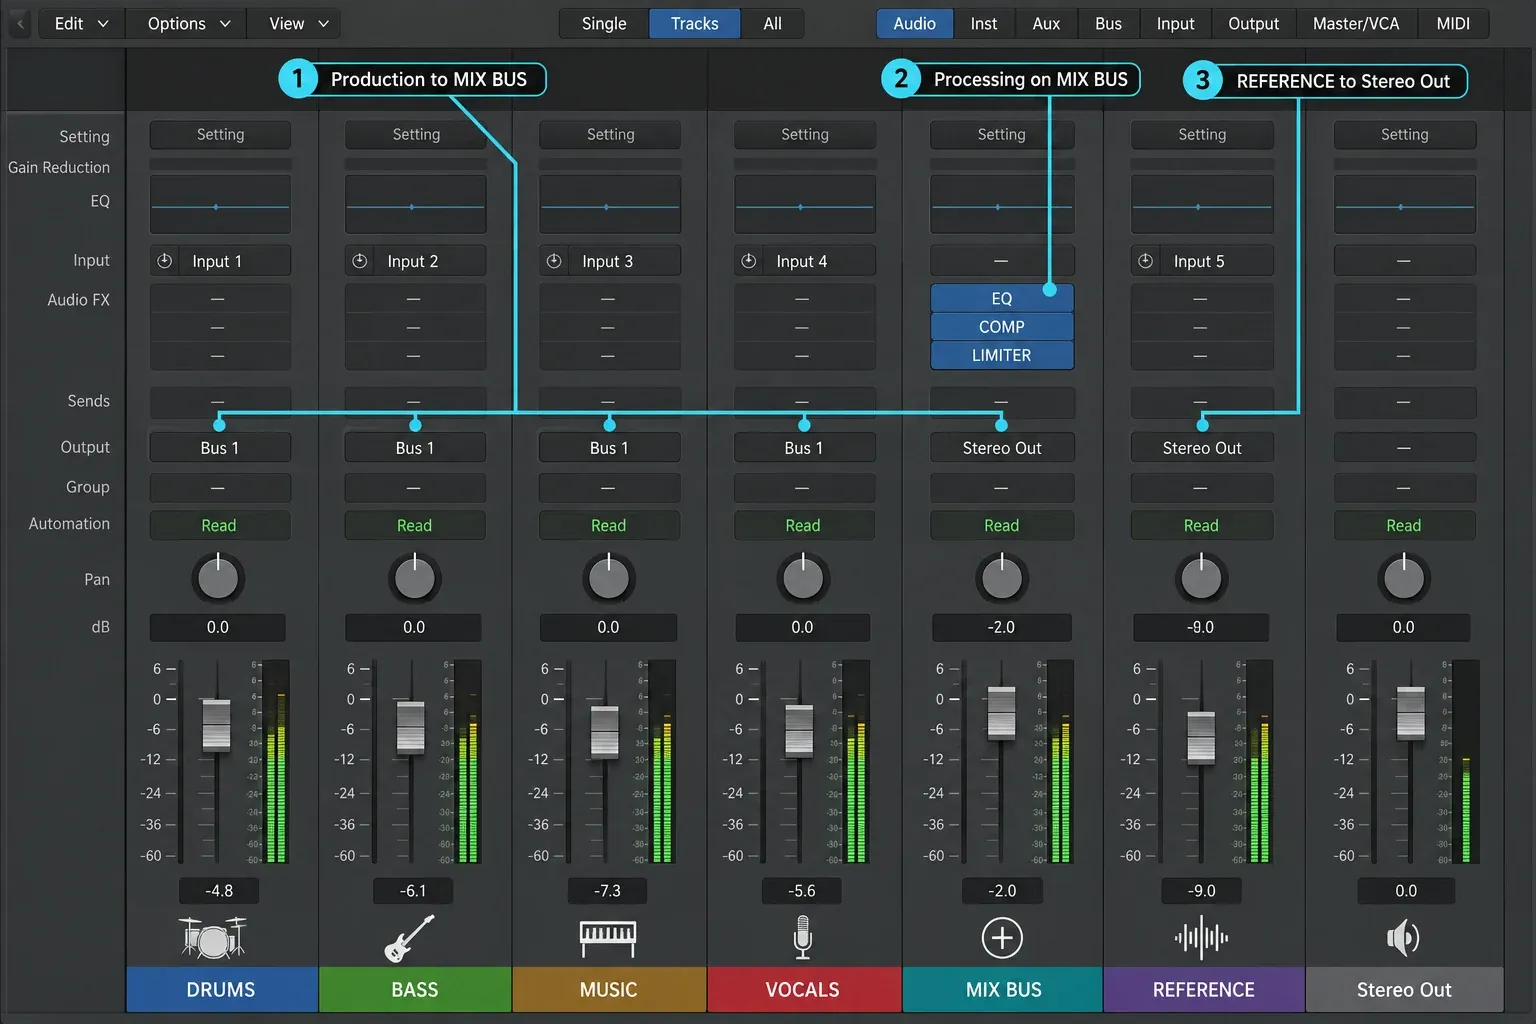
- Identify only the channel strips whose Output currently feeds Stereo Out: this can include individual tracks, subgroup auxes and reverb/delay returns. Exclude REFERENCE and Stereo Out itself.
- Leave every track already feeding a drum, vocal or other subgroup on its existing bus. For example, keep drum tracks feeding DRUM BUS; reroute DRUM BUS’s output, not the individual drums as well.
- Change the final-feeding channels’ Output slots to an unused bus. Logic creates an aux; name it MIX BUS and set its output to Stereo Out. Include effect returns that previously reached Stereo Out directly.
- Move only the ordinary manual mix-bus inserts from Stereo Out to MIX BUS, preserving order and settings. Check their automation and sidechain sources; do not assume they transferred correctly.
- Route REFERENCE directly to Stereo Out with no sends into the production effects. Leave shared metering on Stereo Out, but no EQ, dynamics or other mastering processing that would alter the reference.
- With REFERENCE muted, bounce the rerouted mix. Compare that file and the original bounce in a clean comparison project. Check dry balance, effect returns, automation and transitions. If the sound changed, undo the routing changes rather than making reference decisions from a different mix.
Apple’s mix subgroup instructions describe channels feeding an aux through a bus and the aux feeding the final output. Keeping those existing connections preserves the subgroup processing. Apple’s plug-in controls cover moving ordinary inserts. The Logic Pro buses, sends and aux guide explains the signal path in more detail.
In this layout, production tracks and their effects reach MIX BUS first; REFERENCE bypasses it. Both then reach the same Stereo Out meters and listening system. Lower the MIX BUS output fader, not the input to its compressor, if the working mix is the louder source during comparison. Note that temporary trim so you can restore it before delivery.
Level-match before every A/B decision
A released master is often louder than a mix in progress. Reduce whichever source is louder for the comparison. If you change the production’s comparison level, do it after its processing so a compressor or limiter does not react differently. Do not add limiting solely to make the loudness match.
- Insert Metering > Loudness Meter on the shared Stereo Out.
- Play a representative section of your mix alone and let the Short-term reading settle.
- Play the equivalent section of the reference alone. Reduce its fader or use Utility > Gain if it is louder. If the mix is louder, attenuate its post-processing output or its bounced comparison track instead.
- Repeat until the Short-term readings are close and switching no longer causes an obvious jump in perceived loudness.
- For a complete-song Integrated measurement, stop playback, click Reset, enable Start/Pause, and play the song from start to finish. Pause the measurement, note the result, then reset and repeat for the other song.
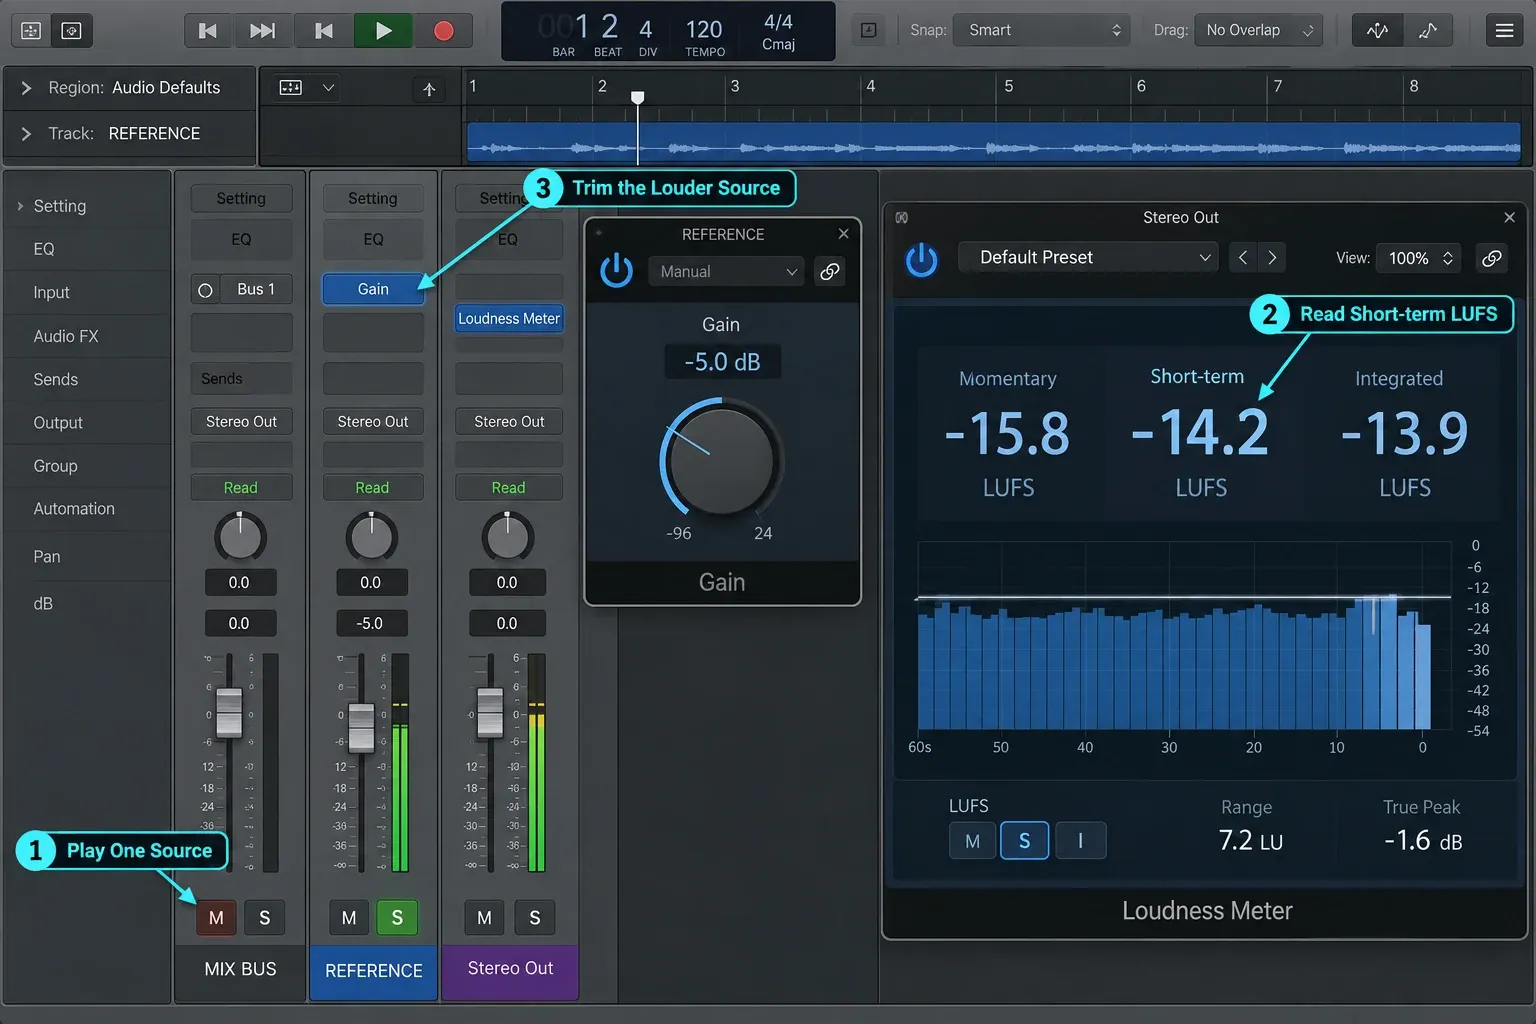
The whole-song workflow above is a comparison method, not a limitation of Integrated metering. Apple also allows Integrated and LU Range measurements over a defined portion: use Reset and Start/Pause for each matching excerpt. Do not compare one song’s full run with a short excerpt of the other.
There is no universal LUFS target for an A/B. Match these two sources at a comfortable listening level and let your ears confirm the meter. Apple’s Gain plug-in gives you a reversible trim; keep its balance, phase and mono controls unchanged when you only want a level adjustment.
Build a fast A/B switch
Use mutually exclusive mutes first; do not depend on Solo overriding a muted reference. In the two-track comparison project, switch the bounced MIX track and REFERENCE. In the premaster layout, switch the MIX BUS channel strip and REFERENCE.
- To hear the mix, mute REFERENCE and unmute MIX or MIX BUS.
- To hear the reference, mute MIX or MIX BUS first, then unmute REFERENCE.
- To return, mute REFERENCE first, then unmute MIX or MIX BUS. Check that no reference sends or other paths are still audible.
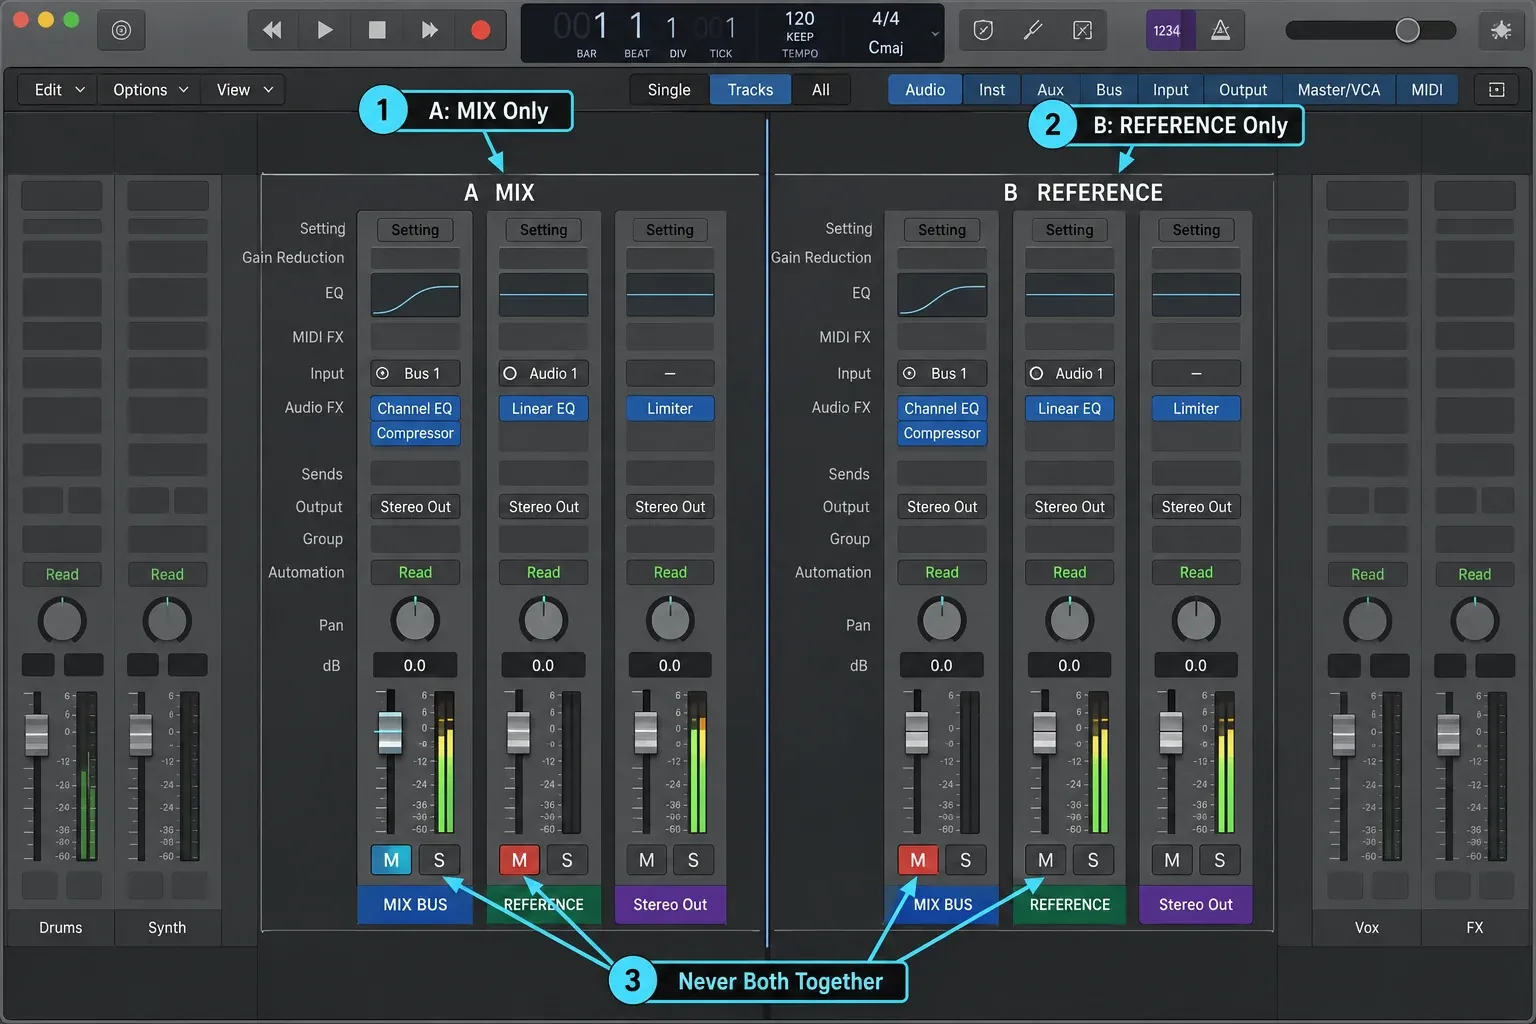
Clear unintended Solo states before using this method. Apple’s Mute and Solo controls include Solo Safe, which can leave another channel audible during a solo. Verify each state at low listening volume; you should never hear the mix and reference together.
Keep each listen focused on the same part of the arrangement. Short switches make small differences easier to remember, but allow the Short-term meter to settle before trusting a new reading.
Run five focused comparison passes
| Pass | Question | Possible mix action |
|---|---|---|
| Balance | Which element owns attention at the same arrangement density? | Move a fader or automate the section before reaching for EQ |
| Low end | Is weight coming from kick, bass, sub or their timing? | Change level, envelope, octave, sidechain or arrangement |
| Punch | Do transients speak, or does sustain cover them? | Revisit compression, clipping, attack, release or layer length |
| Width | What stays centered and what opens at the sides? | Adjust panning, stereo source choice or effect return |
| Depth | Which sounds are dry, near, dark, delayed or reverberant? | Change send level, pre-delay, decay, filtering or automation |
Add vocal intelligibility as a separate pass when the song has a lead. Compare consonants during dense sections instead of judging the level of a soloed vocal. The goal is to identify a cause you can act on.
For a closer low-end listen in the separate two-track comparison project, temporarily put one Channel EQ on the shared Stereo Out. Apple identifies Band 8 as the low-pass filter, which passes frequencies below its cutoff. Choose a cutoff that isolates the question you are investigating, then use the same filter for both sources and keep the mutually exclusive A/B switch. Listen for kick and bass balance, sustain and timing; no cutoff or bass level is a universal target. Bypass this comparison-only filter afterward and keep it out of the production export.
Turn each difference into one decision
Use a three-column note:
- Difference: “Reference chorus keeps the vocal readable when guitars widen.”
- Likely cause: “Our guitars mask the vocal’s upper mids and remain wide through every line.”
- Next test: “Automate guitar level down 1 dB under the phrase before changing vocal EQ.”
Make the smallest plausible change, then A/B the mix against itself before returning to the reference. If the song improved, keep it. If it only became more similar, undo it.
Reference differently while mixing and mastering
During mixing
Prioritize arrangement, balance, low-end ownership, vocal placement, punch, dynamics, width and depth. Match the listening levels without forcing the mix to the master’s loudness. Keep processing that is part of the sound you intend; do not add compression just to win the A/B.
During mastering
Compare finished tonal balance, peak behavior, integrated loudness, Loudness Range and translation. Use multiple playback levels. The Logic Pro mastering workflow covers the manual chain and Mastering Assistant without turning a reference into an automatic preset.
Reference-track troubleshooting
The reference still sounds better after level matching
Name the difference. If it’s punch, compare attack and sustain. If it’s size, separate low-end weight from stereo width and reverb. If you can’t name it, switch to one frequency range or one element rather than moving random controls.
Importing the reference changed the project tempo
Undo the import and confirm that the original Tempo track is restored. Choose Keep Project Tempo, import again, then set the reference region’s Smart Tempo (Flex & Follow in older versions) to Off. If subsequent edits make Undo unsafe, return to the saved project copy rather than guessing the previous tempo map.
The reference is hitting my limiter
Check whether REFERENCE reaches a processed Stereo Out or sends into MIX BUS. In the manual premaster layout, it should bypass MIX BUS and feed an unprocessed Stereo Out. With Mastering Assistant or a complex output chain, compare a rendered mix and the reference in a clean project instead of moving the working master chain.
The reference channel clips after a Gain adjustment
Reduce the louder source, then inspect the reference track for accidental boosts, duplicate routes or sends. If the mix is louder, lower its comparison level after processing instead of boosting the reference into clipping.
Before you bounce or share the project
- Return to the production project if you used a separate comparison project. Restore any temporary comparison trim and keep the intended mix/master processing active.
- Make sure REFERENCE is muted and not soloed, and that the production path is unmuted. Check for sends or other reference routes that could still be heard.
- Bypass room/headphone correction in the export path. With Mastering Assistant, turn Loudness Compensation off; if the mix changed after its analysis, click Reanalyze before the final bounce.
- In File > Bounce > Project or Section, check Start and End and the effect tail. A reference parked later on the timeline must not extend the delivery range.
- Listen to the bounced file outside the comparison setup: correct song, complete beginning and ending, no reference and no monitoring correction.
- Before sharing a project package or folder, inspect its copied audio assets and exclude the commercial reference unless you have redistribution permission. Muting its track does not remove the file from a package.
Apple’s bounce instructions explain output routing and range, while its project-saving options explain which audio assets are copied.
The Logic Pro Mixing hub connects this A/B method to gain staging, routing, EQ, compression and mastering.
Frequently asked questions
How do I import a reference track into Logic Pro?
Create a stereo Audio track, press F, choose All Files, locate the permitted local file and drag it into the Tracks area. Choose Keep Project Tempo first, then set the reference region’s Smart Tempo to Off in the Region inspector. Older versions call the region control Flex & Follow.
How do I make a reference track bypass the master chain?
For a simple manual chain, route only the production channels currently feeding Stereo Out through a MIX BUS aux, preserving existing subgroups and effect returns. Put ordinary mix-bus inserts on that aux and send the reference directly to an unprocessed Stereo Out. For Mastering Assistant or complex output automation, compare a bounced mix and reference in a separate clean project instead.
How do I level-match a reference track in Logic Pro?
Play similar sections one at a time through a shared Loudness Meter. Lower the louder source using a fader or Gain trim after its processing, then compare Short-term readings and perceived loudness. Do not force either track to a universal LUFS number. Restore any temporary production trim before export.
Should Smart Tempo be on for a reference track?
For a normal released-song comparison, choose Keep Project Tempo and set the reference region’s Smart Tempo to Off. Older versions call that region setting Flex & Follow. These are separate controls: Keep protects the session tempo, while Off keeps the reference from following it.
How many reference tracks should I use?
Use the fewest that answer your questions. One well-matched track may be enough. Add another only when it supplies a distinct target, such as low-end design, vocal placement or spatial depth.
Should I copy the reference track’s EQ curve?
No. Different arrangements, keys, instruments and masters can require different spectra. Use the reference to identify a perceptual difference, then solve the cause inside your own production.


