Logic Pro Smart Tempo: Match Recordings to Tempo
A practical Smart Tempo workflow for deciding the timing reference, building or preserving a tempo map, correcting analysis and avoiding Flex artifacts.

Smart Tempo can make Logic Pro follow a freely played performance, or make a recording follow the project grid. Decide which you want to preserve before choosing a mode: the performance’s timing or the project’s tempo map.
Checked September 12, 2026 against Apple’s current Mac guide and Logic Pro 12.3.1 release notes. Work on a separate project copy with copied audio files. A new tempo map can change how MIDI, loops and tempo-synced processing play. Apple also stores Smart Tempo analysis in the audio file, so keeping only a second project document is not the same as preserving untouched audio.
Fast answer: use Adapt for an initial free performance that should set the project tempo, with the click off and no competing musical reference. Use Keep when the project tempo must stay fixed; enable the region’s Smart Tempo setting if the audio should follow it. Check the detected BPM and first downbeat, then switch back to Keep after approving the map. For a recording already in the project, apply its region tempo explicitly instead of expecting a mode change alone to analyze it.
Keep, Adapt, and Automatic
| Mode | What stays fixed | Best use |
|---|---|---|
| Keep Project Tempo | The project tempo map | Make imported or recorded audio follow an existing grid |
| Adapt Project Tempo | The timing of the reference performance | Build a project tempo map from free playing |
| Automatic | Logic decides between Keep and Adapt | Capture when its reference rules match your session |
Apple’s Project Tempo mode reference explains the distinction. Keep preserves the project map, but does not by itself force every audio region to follow it. The region setting matters too. The current guide calls that Region inspector menu Smart Tempo; older guides call it Flex & Follow.
If you already know the BPM and only need one fixed value, a section change, or a gradual ramp, use the project tempo and Tempo Track workflow instead. Smart Tempo is for analysis and conformity, not basic BPM entry.
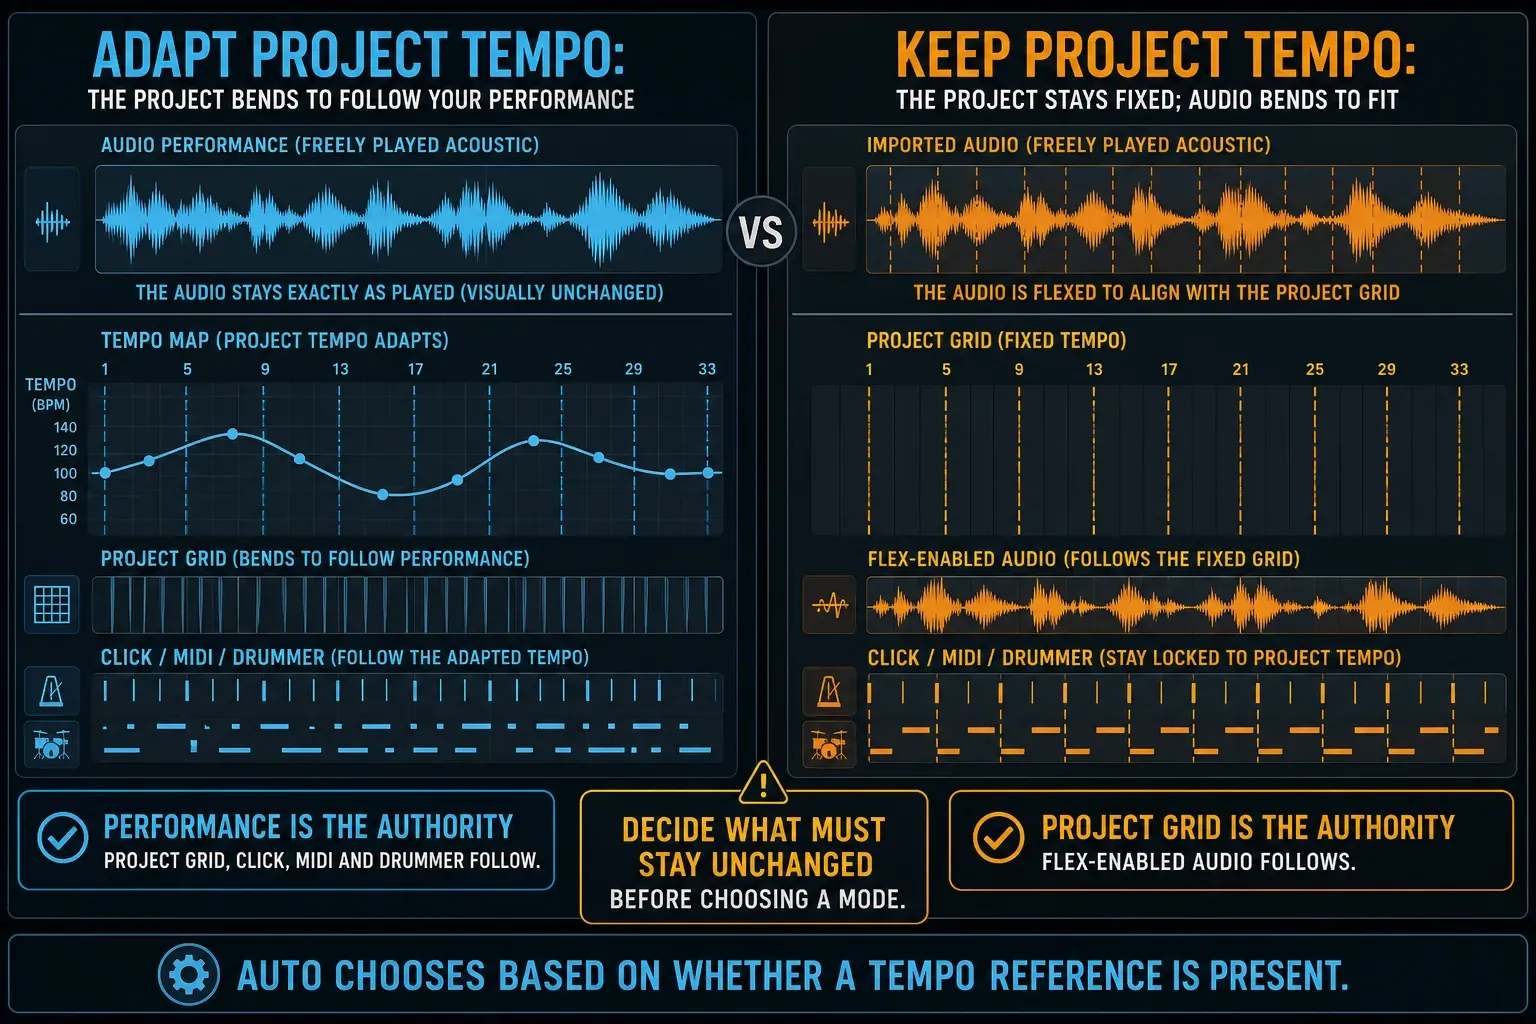
In an empty project, Auto uses Keep behavior with the metronome on and Adapt behavior with it off. Existing musical material can also supply a tempo reference. Even explicit Adapt preserves the tempo while recording over an existing reference; a take extending beyond that range can create new tempo changes. Adapt and Cycle are mutually exclusive: Logic turns Cycle off and starts recording at the cycle’s beginning. This also happens when Auto chooses Adapt behavior.
Decide what should follow what
The project should follow a human performance
Use this for a rubato piano, singer-songwriter take, live band, or other performance whose natural push and pull should remain intact. Smart Tempo analyzes the performance and creates a changing project tempo map. The click, Drummer, MIDI, Apple Loops, tempo-synced effects, and later Session Player arrangement can then follow that map.
The recording should follow a fixed project
Use this for an imported loop, percussion part or free take that must fit an existing song. Keep the project tempo, verify the detected file tempo, then choose On or one of the alignment options in the Region inspector’s Smart Tempo menu.
For an established production, decide which region is the timing reference before importing anything in Adapt. For a free live take, a fixed project grid will not follow the performance just because the recording sounds in time on its own.
How to match a free recording with Smart Tempo
- Save a protected project copy before changing tempo behavior.
- Use a new project or an isolated reference performance, and turn the metronome off.
- Click the Tempo display in the LCD and choose Adapt Project Tempo.
- Record or import the performance that should define the tempo map.
- Select the region and choose Window → Open Smart Tempo Editor; preview the analysis with the editor metronome.
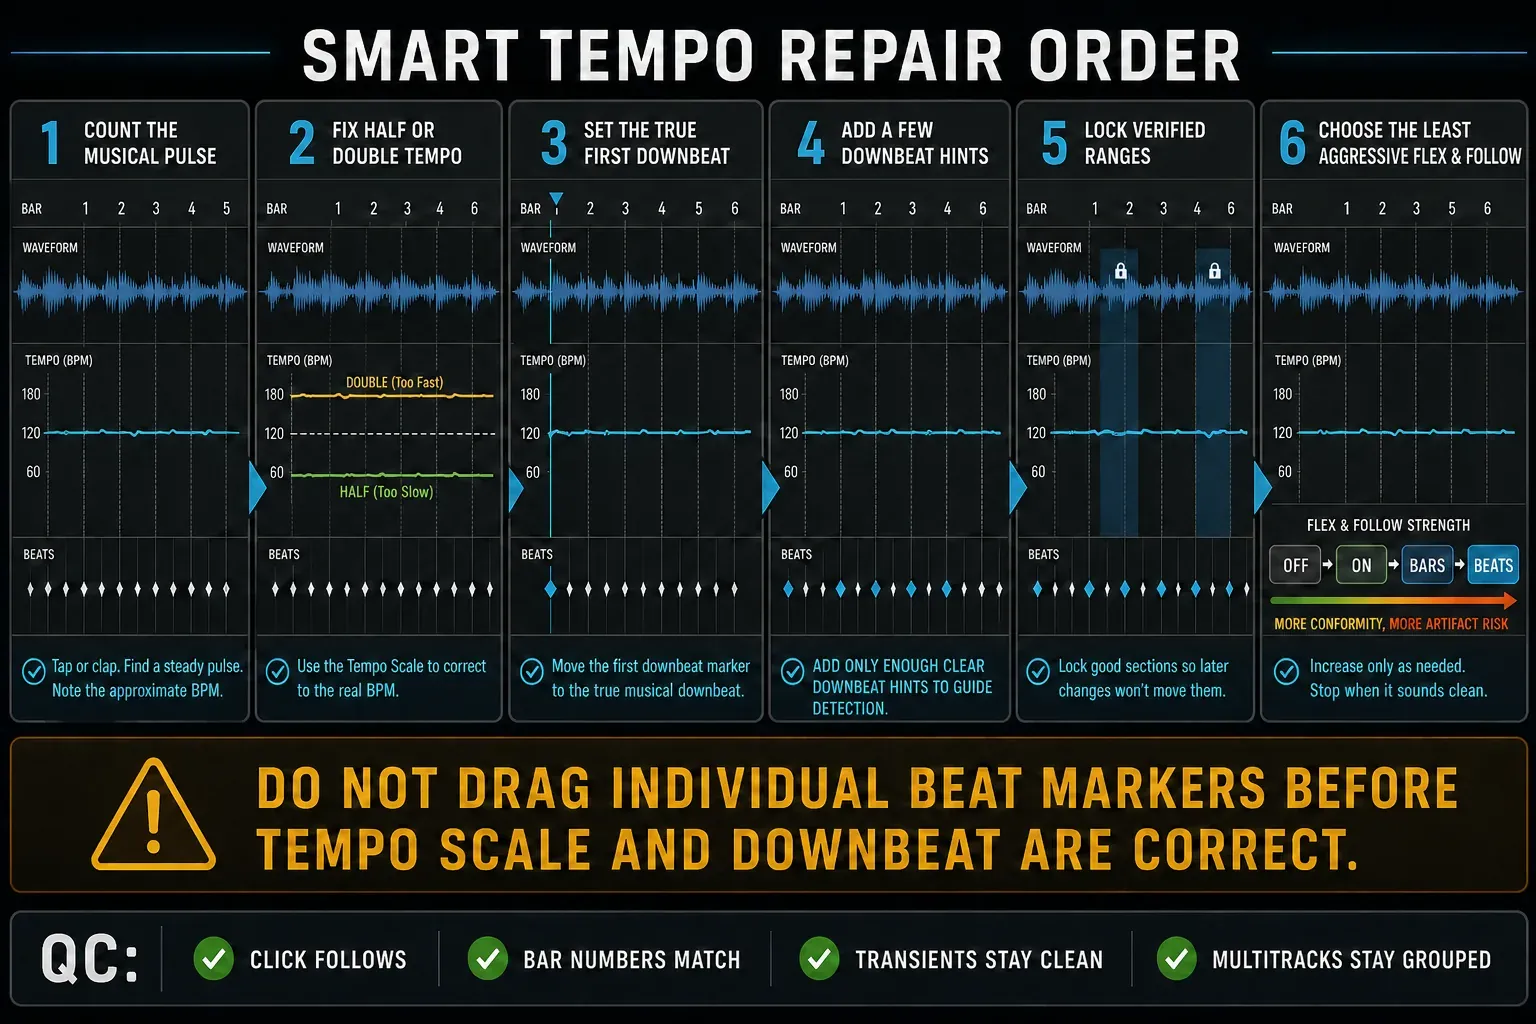
- Correct half-time or double-time detection and set the true first downbeat.
- Add downbeat, beat, or time-signature hints only where the analysis needs help.
- Lock verified ranges before reanalyzing later sections.
- When the map is approved, switch the project to Keep or an intentional Auto workflow.
- Add Drummer, MIDI, loops, and tempo-synced effects only after the reference map is stable.
Apple’s current automatic tempo-matching instructions describe this Adapt workflow. They also recommend returning to Auto or Keep after the initial recording, so later takes don’t replace the original tempo map.
Use Free Tempo Recording for a clean first take
To add the button, Control-click the control bar, choose Customize Control Bar and Display, then select Free Tempo Recording in the Transport column. Click it and play; recording starts immediately, without a count-in. Logic turns the click off and solos the selected track. Press Space to stop. The result dialog appears unless you have selected a different default in Smart Tempo project settings.
Apple’s Free Tempo Recording guide describes four choices. Apply region tempo to project keeps the performance’s changing tempo and sets region Smart Tempo to On. Apply average region tempo to project uses one average tempo; Apply project tempo to region uses the existing project map. Those latter two set the region to Beats, so listen for stretching. Don’t analyze region tempo or change project tempo leaves Smart Tempo Off.
Make imported audio follow the project tempo
- Choose Keep Project Tempo in the LCD. Before importing, open File → Project Settings → Smart Tempo and set imported audio files to On if you want them to follow the project automatically.
- Import the audio and select its region.
- Select the region and choose Window → Open Smart Tempo Editor. Check the detected tempo and first downbeat against playback.
- Correct the analysis before tightening the region’s alignment.
- In the Region inspector’s Smart Tempo menu, choose On, On + Align Bars, or On + Align Bars and Beats. Off ignores the file tempo; it is not the option for automatic matching.
- Listen for stretching artifacts at transients, sustains, fills, and transitions.
Apple’s current Smart Tempo region-setting reference separates this menu from the Flex checkbox:
- Off: ignores the file tempo. You can still use Flex Time to stretch, edit and quantize the region; Off does not mean all Flex processing is disabled.
- On: uses the file tempo to flex the region to the project tempo and subsequent tempo changes.
- On + Align Bars: also conforms the detected downbeats to the project’s bars.
- On + Align Bars and Beats: conforms at each beat as well as each bar. Check the analysis before using this tighter setting.
More alignment isn’t automatically better. On + Align Bars and Beats can tighten rhythmic material, but it can over-stretch a performance that should breathe. Start with the least aggressive setting that solves the musical problem.
Fix half-time and double-time detection
A recording can be detected at twice or half the pulse you would count. That changes the bar grid and the timing reference for MIDI and effects, even before you hear stretching. Check the musical pulse rather than accepting a plausible-looking number.
- Open the region in the Smart Tempo Editor.
- Compare the detected BPM with the pulse you would count for the song.
- Use the Double Tempo or Half Tempo control for the file or selected range.
- Recheck downbeats and bar numbers rather than checking the numeric BPM alone.
Apple’s Smart Tempo Editor guide documents the ×2 and ÷2 controls. In Hint mode they define a tempo range and can overwrite hints not yet applied, so correct the broad tempo interpretation before detailed hints. The editor stores tempo analysis in the audio file; MIDI analysis stays with the project. Keep a separate audio copy before experimenting.
Correct the first downbeat and pickup
A correct average BPM with a wrong first downbeat still produces a useless grid. Find the first real bar downbeat. That isn’t always the beginning of the audio file. A pickup note may occur before bar 1, and silence at the file start isn’t musical timing information.
In Hint mode, click the upper part of the waveform display to add a downbeat hint; click the lower part for an ordinary beat hint. During preview, D adds downbeats and T adds beats. To add a time-signature change, click the signature above a downbeat hint. Apple’s hint-mode instructions recommend starting with a few downbeats, then correcting individual beat markers only if needed. Edit → Snap to Transients can help place hints on attacks, but an attack is not automatically the right musical beat.
Use hints, beat markers, and locked ranges in that order
- In Hint mode, mark the true downbeats and any essential beats or time-signature changes.
- Let automatic analysis apply the hints, or deselect Edit → Apply Changes Automatically and click Apply Changes when ready. Listen against the editor metronome.
- Switch to Beat Marker mode only for specific residual errors.
- Select a verified range, Control-click it and choose Lock Range before reanalyzing another section.
Time-signature changes require hints. Reanalysis can move or remove unprotected beat markers, which is why detailed marker edits come after hints. Apple’s range-lock instructions confirm that locked ranges are protected from edits and reanalysis. Select the range and Control-click → Unlock Range when you need to revise it.
Smart Tempo with multitrack recordings
Use files recorded together at the same tempo and with the same start point. Select their regions and choose Edit → Tempo → Create Smart Tempo Multitrack Set; confirm the file list and click Analyze. For a simultaneous import, drag the files together and select All selected files are stems from one project in the import dialog. Do not combine unrelated takes just because their BPM numbers match.
In the multitrack window, use Contributes to Analysis to exclude a pad or noisy microphone from the downmix without removing that file from the set. The analysis still applies to every file in the set. Refine the downmix in the Smart Tempo Editor, not each microphone independently. Apple’s multitrack guide also documents Create matching Edit group when creating Smart Tempo Multitrack Set under File → Project Settings → Smart Tempo. Check phase-sensitive recordings by listening after edits; sharing a map is not an automatic quality guarantee.
Why Smart Tempo may sound wrong
The wrong source defines the map
Use the rhythmically reliable performance as the main reference, not a pad, reverb-heavy vocal, or noisy room microphone.
Auto or Adapt did not change the tempo
Check whether the metronome or an existing region supplied the reference. Recording over that reference does not behave like the first free take in an empty project. For audio already recorded, use the explicit region-to-project command below.
For an existing recording: select the region, check its analysis, then Control-click → Tempo → Apply Region Tempo to Project Tempo. In the dialog, check Align downbeat to nearest project downbeat and Maintain relative position of all other regions according to the intended result, then Apply. These options can move material; test them on the copied project and inspect the other tracks afterward. This command works regardless of the current Project Tempo mode.
The region ignores the analyzed file tempo
Select the region and check its Smart Tempo menu in the Region inspector. Off ignores the stored file tempo, even though manual Flex Time edits remain possible. Choose an On option for automatic matching and verify the analysis before aligning every beat.
The map is half-time, double-time, or one beat late
Correct tempo scale and the first downbeat before moving individual markers.
More hints made the map worse
Check that the hints mark real beats and the right time signature. A tempo range continues until the next hint; stray later hints can therefore matter. Start with downbeats in three consecutive bars or one fully marked bar, then add detail where the click leaves the performance.
The audio is stretched too far
Large tempo differences and beat-level conformity can create artifacts. Choose a closer project tempo, use Bars instead of Beats, or preserve the original performance.
If analysis or Flex processing causes overloads, use the Logic Pro system-overload guide. More timing and production tools sit in the Logic Pro Create Music hub.
Frequently asked questions
What is the difference between Keep and Adapt in Smart Tempo?
Keep preserves the project tempo and can make enabled audio follow it. Adapt preserves the reference performance’s timing and changes the project tempo map to match.
Why did Smart Tempo detect twice the BPM?
The analysis may have interpreted a subdivision as the main pulse. Use Half Tempo in the Smart Tempo Editor if that matches the song, then confirm the downbeats and bar numbers. Correct the scale before adding detailed hints.
Does Smart Tempo change the original audio file?
It saves tempo analysis and edits in the audio file; MIDI-region analysis is stored with the project. Do not treat that as an untouched source file. The tempo data guides how the region is conformed, and Flex playback can sound different. Preserve a separate copy of the audio before making changes.
Should I use Align Bars or Align Bars and Beats in Flex & Follow?
The current Region inspector calls this menu Smart Tempo. Start with On or On + Align Bars to retain more timing within each bar. Use On + Align Bars and Beats when every detected beat should follow the grid, after checking that the analysis and stretched playback sound right.
Can Smart Tempo analyze a live multitrack recording?
Yes, for related files recorded together at the same tempo and with the same start point. Select the regions and choose Edit → Tempo → Create Smart Tempo Multitrack Set. Analyze and refine the shared downmix, and use a matching edit group for later group edits.
Should I leave Smart Tempo in Adapt after recording?
Usually not after the reference performance has created the approved tempo map. Apple recommends switching to Keep or an intentional Auto workflow so later recordings do not replace or reshape that original map. Save a protected copy before changing an established production.


