Logic Pro Session Players and Chord ID Explained
A practical Logic Pro 12 workflow for turning audio or MIDI into a checked Chord track and directing bass, keyboard, synth, and drum performances.

Chord ID turns a recorded audio or MIDI progression into chords that Logic Pro’s Bass Player and Keyboard Player can follow. The useful part is getting accompaniment around music you already have: analyze a region, correct the detected chords, then choose how busy each player should be. Drummer contributes rhythm rather than pitched harmony.
Last verified September 12, 2026 against Apple’s current Mac guide and Logic Pro 12.3.1 release notes. The steps below are for Mac. Apple also documents Chord ID on iPad, with touch-specific controls.
For the full Session Players workflow below, Apple lists a Mac with Apple silicon in its current feature requirements. The separate Intel Chord ID fix discussed below is not a promise that every Session Player feature works on Intel. Check your installed build and our Logic Pro compatibility guide before updating.
Fast workflow: drag a clean audio or MIDI region to the Chord track, correct any wrong roots, extensions, inversions, or change points, add a Session Player region, make it follow the global Chord track, then adjust style, complexity, intensity, rhythm, and fills. Don’t convert the result to MIDI until the musical direction is settled.
What Session Players actually do
Session Players generate performances inside editable regions on software instrument tracks. The top-level player types are Drummer, Bass Player, and Keyboard Player. In Logic Pro 12, Synth Players are styles inside Bass Player and Keyboard Player rather than a fourth top-level region type. Apple calls Session Players AI-driven, but the practical control model is direct: you set the harmony, rhythm, style and intensity, then Logic regenerates a performance within those constraints.
Apple’s Session Players overview confirms that bass and keyboard performances can follow either the project’s global Chord track or chords stored inside one Session Player region. Different regions on the same track can use different styles too, so a restrained verse doesn’t have to share the chorus settings.
A region’s playing style and the track’s instrument sound are separate choices. Changing style can load a new patch for the entire track, including the other regions. In the editor, open the Session Player button and turn Change Patch off to keep the instrument. Use a separate instrument track when the chorus needs a different sound. Apple’s style and patch controls explain that distinction.
| Player | Main job | Most useful direction |
|---|---|---|
| Drummer | Drum and percussion performance | Complexity, intensity, fills, kit pieces, and another track’s rhythm (not the Percussion genre) |
| Bass Player | Bass line following the harmony | Chord track, complexity, intensity, slides, mutes, and Pickup Hits where available |
| Keyboard Player | Piano and keyboard accompaniment | Chord voicing, rhythmic pattern, range, complexity, and intensity |
| Synth Player styles | Electronic bass, chord, sequence, or texture performances inside Bass Player or Keyboard Player | Chord source, Synth style, style-dependent LFO controls (not Simple Pad), rhythm, range, complexity, and intensity |
What Chord ID changes
Chord ID can analyze an audio or MIDI region and store the detected chords on the region. Dragging one or more regions to the Chord track analyzes them and adds a chord group at each region’s position. Apple’s current analysis guide also documents the region shortcut Chords → Analyze Chords.
Apple’s June 2026 Logic Pro update says Chord ID was rebuilt to improve extended-chord and inversion analysis, including distorted guitar and slightly out-of-tune piano. The separate Logic Pro 12.3 release notes confirm that Chord ID now identifies chords reliably on Intel-based Macs. Neither claim makes every result authoritative. Dense full mixes, distortion, ambiguous bass notes, non-chord tones, and rapid changes can still produce a label that’s plausible and musically wrong. Treat Chord ID as a transcription starting point.
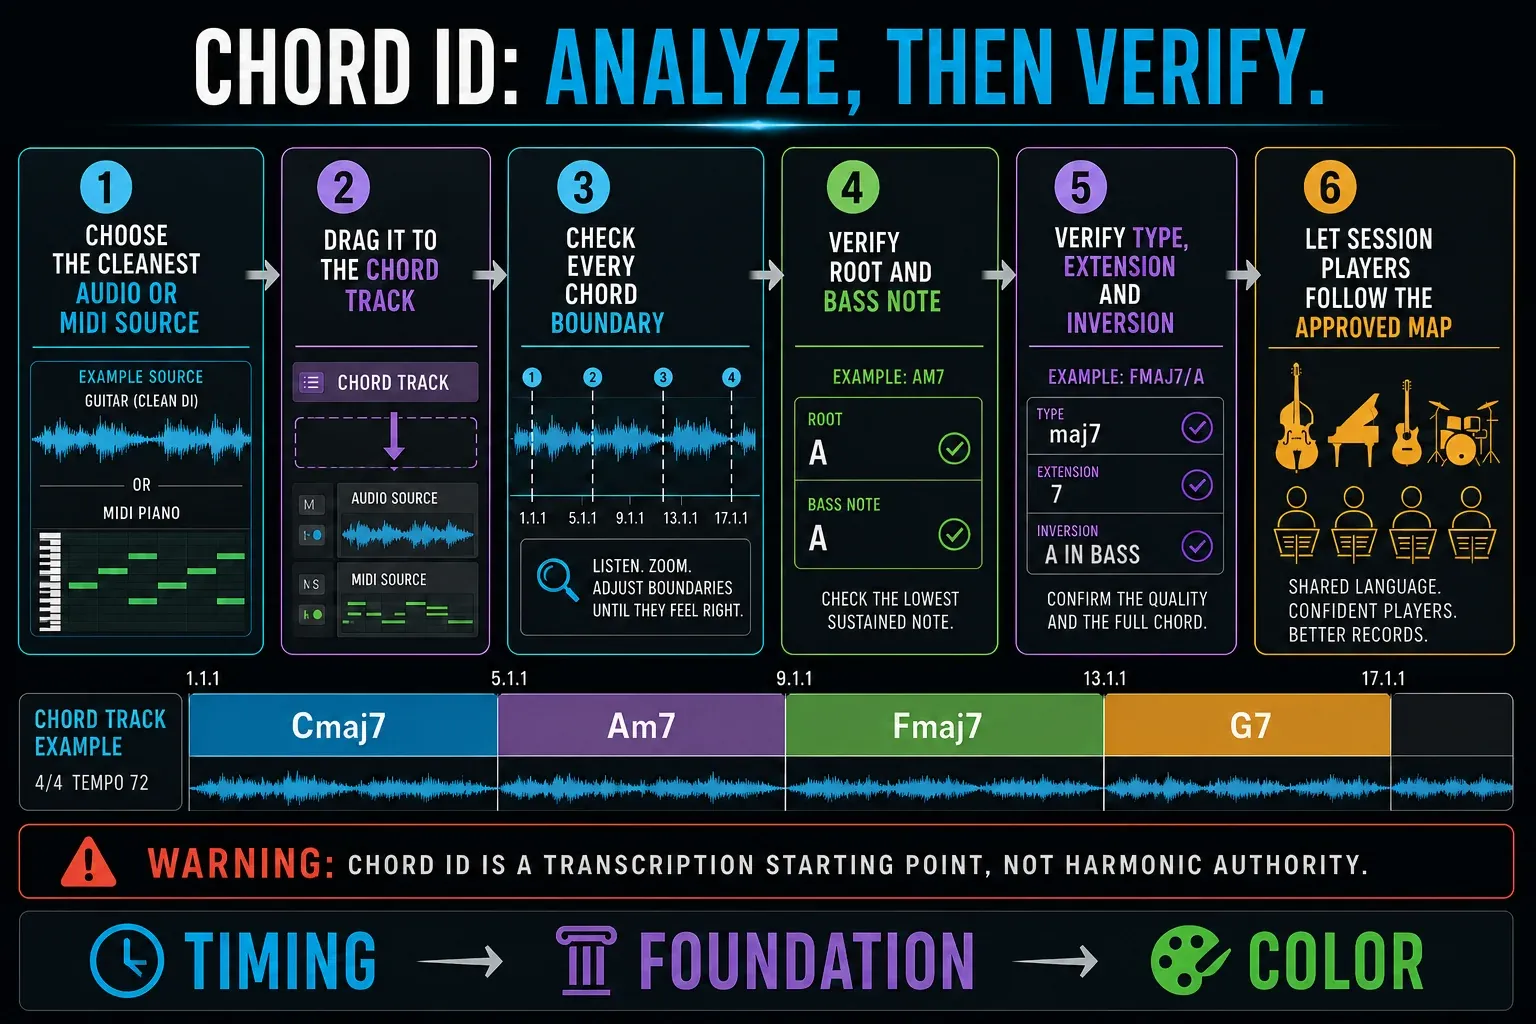
How to use Chord ID with Session Players
- Save a duplicate of the project before changing the global harmony map.
- Choose the cleanest region that contains the full progression.
- Choose Track → Global Tracks → Show Chord Track. You can also open Global Tracks with G and enable Chord from its header shortcut menu.
- Drag the audio or MIDI region onto the Chord track.
- Wait for analysis, then compare every chord and change point with the recording.
- Select the detected chord group, then double-click an individual chord to correct Root Note, Chord Type, extensions or Bass Note. Check its timing too.
- Choose Track → New Tracks, select Bass Player or Keyboard Player, and open Details to choose a Style. Deselect Use Default Chord Progression for New Regions, then click Create.
- Control-click the region and choose Chords → Follow Global Chord Track, or set Pitch Source to Chord Track in the Region inspector. Apple’s chord-source guide documents both controls.
- Double-click the new Session Player region to open its editor. Adjust the Complexity and Intensity sliders, then use Patterns and the controls available for that style.
- Listen in the full arrangement and correct the chords before polishing the generated part.
For the menu route, select the source region and Control-click → Chords → Analyze Chords. Then choose Chords → Apply Region Chords to Chord Track. Analysis alone stores the result on the region; the second command puts it on the global track. When Cycle is on and you drag regions under the cycle area, only that part transfers. Turn Cycle off if you want the whole progression.
Choose the best source for analysis
Start with MIDI when it represents the harmony
A simple MIDI piano or block-chord region usually gives Chord ID less ambiguity than a mastered stereo mix. Work on a duplicate if you remove decorative melody notes to reduce false changes; keep the original performance intact. You’re not trying to feed Logic the richest arrangement. You’re giving the detector the clearest harmonic evidence.
For audio, isolate the harmonic information
A clean piano, guitar, or keys track usually beats the full mix as a source. If all you have is a stereo demo, analyze a section with audible harmony and minimal noise. Chord ID can work on a mix, but kick transients, moving bass notes, vocal suspensions, and distorted overtones all complicate the label.
Analyze sections when the song is complex
Verse, pre-chorus, and chorus may need separate passes. Shorter regions make it easier to tell whether a wrong change point came from the source or the analysis. Check each section before combining its chords into the song-wide progression.
Correct the Chord track before editing performances
If the detected chords are grouped, select the group first, then double-click the individual chord. In Edit Chord, use Root Note, Chord Type, the extension buttons and Bass Note. Scale controls which non-chord tones a player can use in fills. Apple’s chord editing reference also explains text entry and MIDI input. Listen to the recording while you edit; an unusual voicing is not automatically a mistake.
To move a chord, drag its center left or right. To change its length, drag a lower corner. Watch the adjacent chords: Logic may resize them, and an overlap can overwrite part or all of another chord. Apple’s move and resize instructions distinguish these actions. Undo a move that changes more harmony than you intended.
Check the project key before inserting a preset progression: it adapts to the key at the insertion point. The no-chord fallback also uses that key’s tonic. This does not mean changing the key will reanalyze your recording. Check three things in order:
- Timing: does the chord begin on the correct beat?
- Foundation: are the root and bass note correct?
- Color: are the extension, inversion, and scale useful for the players?
Fixing the source harmony first is faster than papering over it with dozens of performance edits. Every bass and keyboard region that follows the global track updates when those chords change.
Global chords versus region chords
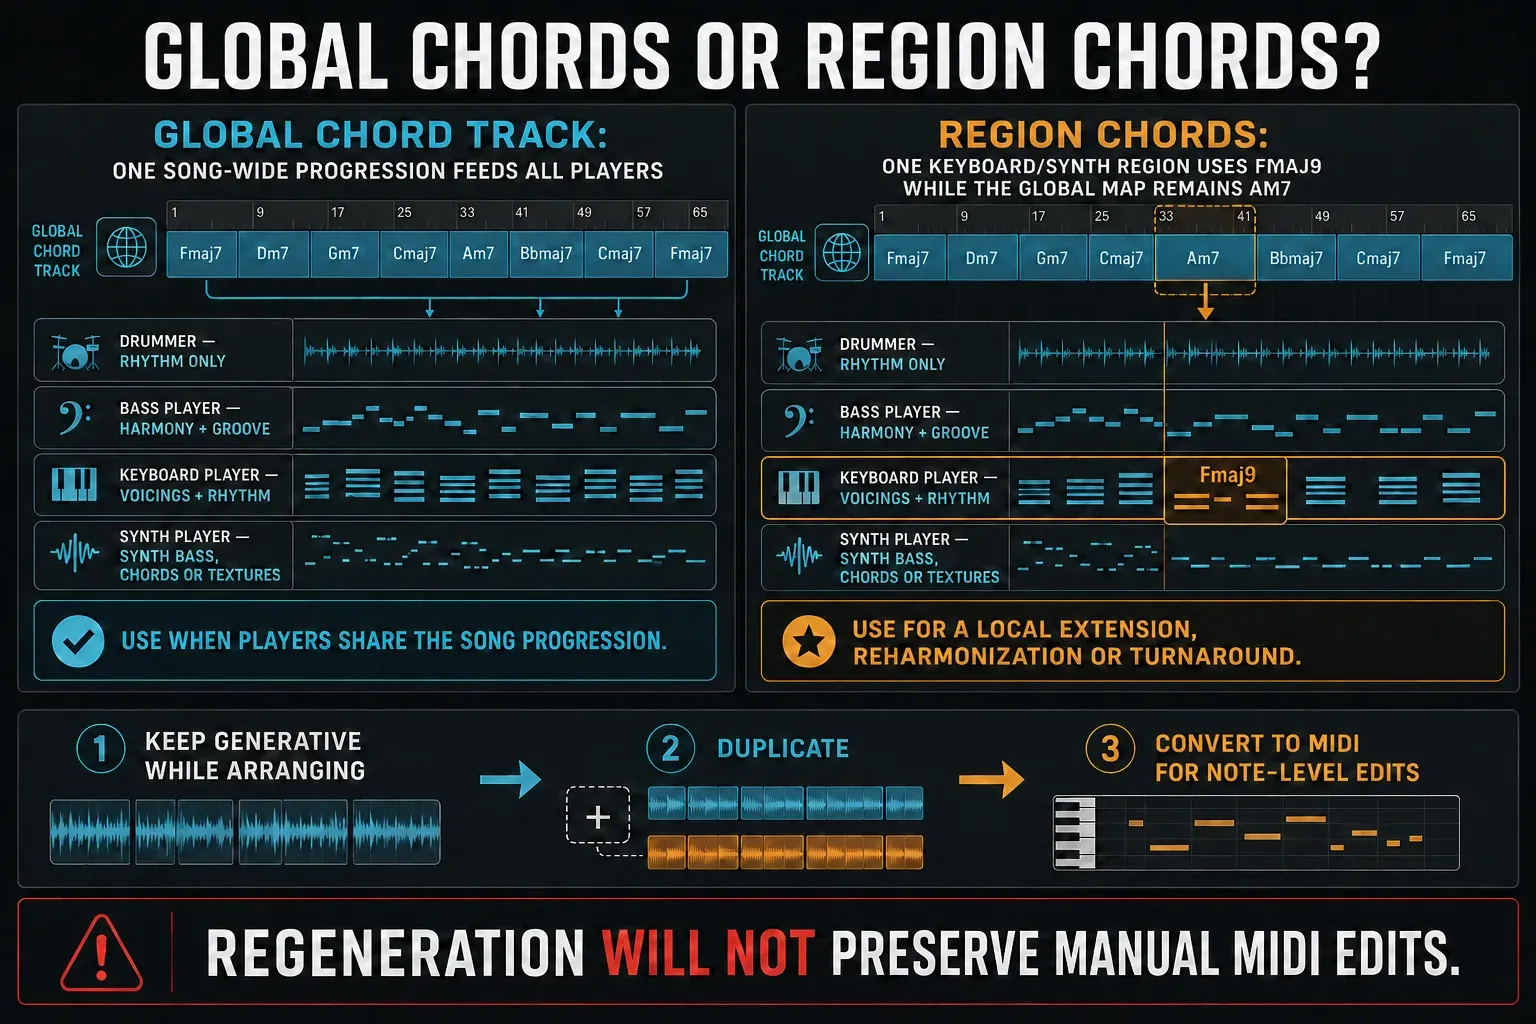
Use the global Chord track when several Session Players should follow one song-wide progression. Use region chords when one player needs a deliberate variation: a keyboard can add an extension while the bass holds a simpler foundation, or a turnaround region can take a different final chord without rewriting the whole arrangement. A region that contains region chords follows them by default; a region without them follows the Chord track. One region uses one chord source for its full duration. Selecting Chord Track does not delete the stored region chords; you can switch back to them later.
Apple’s guide to chords and Session Players explains the tonic fallback when there are no relevant chords. Logic can also add an eight-bar preset progression to an empty Chord track when a Session Player is created. That is a starting pattern, not analysis of your song.
To stop that behavior for new regions, turn off Chords → Default Chord Progression for New Regions in the Session Player Editor, as shown in Apple’s progression settings. The creation dialog has the corresponding Use Default Chord Progression for New Regions checkbox. For an existing region, still check Pitch Source: changing the default does not replace its existing chords or choose the right source for it.
Shape a part that supports the song
Start with less activity under the vocal. In the editor, lower Complexity or Intensity, then increase them only in sections that need more movement. Fill Amount controls the amount and length of fills; Fill Complexity changes their detail. These performance controls are attached to the selected region, so select the verse or chorus before adjusting them.
For bass, inspect Details for Slides, Dead Notes and Pickup Hits where the style provides them. Pickup Hits are percussive string hits, not a control for an upbeat melody. For keyboard, adjust the hand-position and voicing controls to leave room for the bass and vocal. Synth controls vary too: Simple Pad has no LFO. Keep those differences in mind instead of looking for every control on every style.
To follow another track’s rhythm, select the Session Player region and open Patterns in its editor. Under Follow Rhythm Of, choose the reference in the Track menu. For Drummer, use the Kick and Snare Patterns button; the Track menu and Chords switch are unavailable in the Percussion genre. Apple’s rhythm-following instructions show both routes. For a free-time reference recording, check its Smart Tempo map before building parts around it.
When to convert a Session Player region to MIDI
Keep a Session Player region while changing the harmony and arrangement. For individual note edits, Control-click it and choose Convert → Convert to MIDI Region, as shown in Apple’s conversion guide. You can then use the Piano Roll. Merely choosing a different instrument plug-in does not always require conversion; a Session Player can drive another instrument while remaining editable as a player.
Before converting, preserve a copy of the original region on a muted track and save the project. Confirm the copy contains the region, not just duplicated track settings. Replacing edited MIDI with a Session Player region discards the MIDI edits; it does not teach the player your hand-edited notes.
Common problems
The detected chords are too busy
Analyze a cleaner source, shorten the analysis range, or simplify a MIDI guide. Passing tones and suspensions can be musically valuable without earning a new chord event every time they show up.
The player ignores the progression
Confirm the region follows the Chord track rather than its own region chords. Check Pitch Source, remove an overlapping default progression, confirm the chord events cover the Session Player region, and verify that Cycle did not limit a drag-to-Chord-track transfer.
The result is correct but sounds generic
Give the verse a simpler region and the chorus a busier one. Reduce fills under the vocal, change the rhythmic reference, or leave a section without the player. Those contrasts usually matter more than repeatedly regenerating the same dense part.
Chord ID misses an inversion
Edit the bass note by hand and check it by ear. Detection has improved in current Logic Pro, but the lowest audible note in a full arrangement isn’t always the intended harmonic bass of the chord.
A practical quality check
- Solo the analysis source and confirm every chord boundary.
- Listen to bass and keys separately for clashes, then together for voicing density.
- Check the part under the lead vocal as well as in solo.
- Vary or remove generated parts between sections.
- Keep a duplicate before MIDI conversion.
- Recheck the Chord track after changing the source arrangement.
When the harmony and generated parts are approved, return to Create Music in Logic Pro for the next job: tempo, MIDI editing, drums, sampling, or arrangement. If this is your first complete project, the Logic Pro beginner workflow keeps those decisions in a practical order.
Frequently asked questions
Does Chord ID work with both audio and MIDI?
Yes. Logic Pro 12 can analyze chords in either an audio or MIDI region and add the result to the region or global Chord track.
Are Chord ID results always correct?
No. Clean, simple sources tend to analyze more reliably, while full mixes, distortion, inversions, extensions, and passing notes can need manual correction.
Why does my Session Player stay on one chord?
Check Pitch Source and whether the region follows the global Chord track or its own region chords. Without relevant chord events, harmonic players fall back to the project tonic. An old default progression can also override the harmony you expected.
Should I use global chords or region chords?
Use the global Chord track for a shared song-wide progression. Use region chords when one Session Player needs a local reharmonization, extension, or turnaround.
Can I edit a Session Player performance as MIDI?
Yes. Control-click the region and choose Convert → Convert to MIDI Region when the arrangement is settled. Duplicate the Session Player original first because replacing the edited MIDI with a generated region discards those note-level edits.
Does Drummer follow the Chord track?
Drummer can emphasize chord changes rhythmically, but it does not generate pitched harmony from chord symbols. Bass Player and Keyboard Player, including Synth styles, provide that harmony. Drummer’s Track menu and Chords switch under Follow Rhythm Of are not available in the Percussion genre.


