How to Use Drummer in Logic Pro: Current Workflow
Build a Drummer part with the current Session Player Editor, make each song section respond differently, and convert only when you need exact note control.

Checked September 8, 2026 against Apple's current Session Player documentation and Logic Pro for Mac 12.3.1 release notes.
You don't need to program every kick and hi-hat to get a useful drum part into a Logic project. Drummer can sketch a performance while you're still deciding where the verse ends, then stay editable as the arrangement changes.
Here's the confusing part: plenty of tutorials still show the old Logic Pro X interface. In current Logic Pro 12.3, Drummer lives inside Session Players. The old XY pad has been replaced by separate Complexity and Intensity controls. You can also enter a custom rhythm in Manual view before deciding whether you need MIDI editing.
If you also want the bass and keyboard players to follow a song's harmony, the separate Session Players and Chord ID guide covers that wider workflow. Drummer doesn't need a chord map to create a drum performance, so this page stays on rhythm.
The short workflow: add a Drummer Session Player, give each song section its own region, choose a pattern before adding detail, use Follow Rhythm only where the groove needs a clear anchor, and convert a copy to MIDI or a Pattern region when the arrangement is stable.
What Drummer does in current Logic Pro
Drummer creates a performance. It decides how a selected style plays inside a Session Player region, based on the controls you set. That's a different job from the drum instrument or the note editor.
- Drummer shapes the performance: pattern, intensity, complexity, fills, swing and feel.
- Drum Kit Designer supplies acoustic-kit sounds.
- Drum Machine Designer supplies electronic kits and pad-based sounds. Our Drum Machine Designer guide covers that job.
- Step Sequencer or Piano Roll takes over when you want to place or move exact events. Use the Step Sequencer tutorial for a grid-based pattern or the Piano Roll workflow for detailed MIDI editing.
This separation matters. If the groove is wrong, changing the snare sample won't fix it. And if the groove is right but the kit sounds wrong, pushing Complexity around is the wrong tool too.
1. Add a Drummer Session Player
Choose Track > New Tracks, press Option-Command-N, or use Option-Command-P to create a new Session Player software-instrument track. In the New Tracks dialog, choose Drummer, open Details if you want to select a style immediately, then click Create.
Without arrangement markers or a selection, Logic creates an eight-bar Session Player region. Arrangement markers create matching sections. An active cycle area takes priority over those markers, and a marquee selection takes priority over the cycle area. Apple documents all of this in the current Session Players overview.
If an old video tells you to create a special Drummer track with a different shortcut, check its Logic version before you assume your installation is missing something. In Logic Pro 12.3, the track is a software-instrument track holding Session Player regions.
2. Build regions around the song, not one long loop
Start with the arrangement you can already hear: intro, verse, chorus, bridge and ending. Give sections that need different energy their own regions. A verse can stay restrained while the chorus uses a stronger pattern and more intense playing. A short region before the chorus can carry a fill without making every earlier bar busy.
To add a region, Control-click an empty part of the track and choose Create Session Player Region, or use the plus button that appears after the final region or inside a gap. If you want a related starting point, duplicate a region, then change the copy. For an exact transfer of performance settings between regions, the current editor also has Copy and Paste commands in the Preset menu.
If the same pattern runs through the whole song, try changing it at the chorus before adding Humanize. Separate regions let you make that comparison without changing the verse.
3. Choose the style, then shape the performance
Double-click a Session Player region to open the Session Player Editor. Pick a Drummer style and patch that fit the role of the section, then work from broad choices to small ones:
- Complexity: increase it when the part needs more activity, not simply because the project feels empty.
- Intensity: set how forcefully the performance is played. Treat this as musical energy, not a mix fader.
- Patterns: choose the rhythmic basis for the kit pieces. Bright dots mark main accents and dim dots indicate probable accents at higher Complexity. For hi-hat, cymbal, tom and percussion patterns, brightness instead distinguishes stronger and weaker accents.
- Fill Amount: controls how many fills appear and how long they are.
- Fill Complexity: changes how involved those fills become.
- Swing: adds shuffle based on eighth or sixteenth notes. There is no universal percentage that makes a groove human.
Apple's current Session Player performance guide documents these as separate, interacting controls. That's why copying an old XY-pad position is not a reliable way to reproduce a current Drummer part.
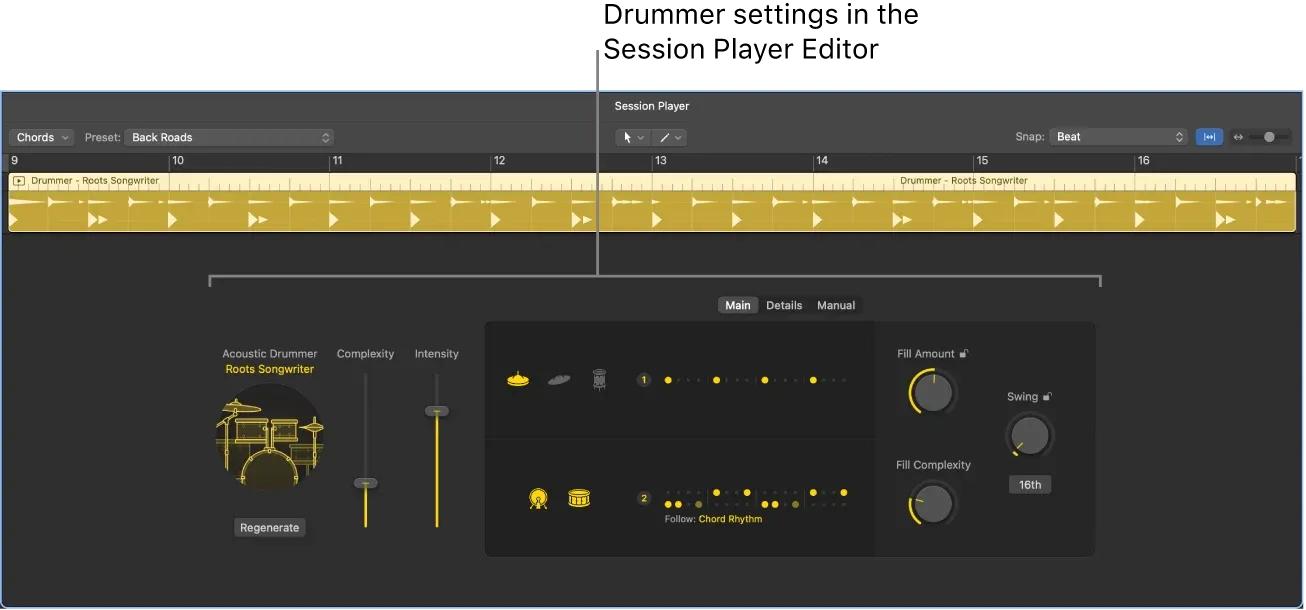
Listen in context while you adjust. A sparse kick pattern can feel empty in solo and land perfectly once the bass enters. A lively hi-hat can sound exciting alone and fight the vocal when the full section plays.
Enter your own rhythm in Manual view
Click Manual in the Session Player Editor, then click steps to turn them on or off. Drummer gives you separate rows for kit pieces; each step represents a sixteenth note. Use Length to choose the pattern length in bars or steps, and the kit-piece button at the start of a row to mute or unmute that part.
This changes the pattern that Drummer follows. It is not the same as moving an individual generated MIDI note or setting its exact velocity. Choose a predefined pattern to leave the custom pattern, or keep working in Manual while the rest of the performance remains a Session Player region.
For the step controls and pattern length options, see Apple's custom-pattern instructions.
4. Make Drummer follow the part that carries the groove
Follow Rhythm earns its keep when a riff, bass line or rhythmic keyboard part should influence the drums. It isn't a global “make this musical” switch.
- Select the Drummer region you want to change.
- In the Session Player Editor, open the Patterns control for the kick and snare.
- Under Follow Rhythm Of, choose the source track.
- Play the section with the rest of the arrangement, then compare it with Follow Rhythm turned off.
The setting belongs to the selected region, so a verse can follow the bass while a chorus follows a guitar part. Apple notes that the track selector isn't available for Drummers in the Percussion genre. The current Follow Rhythm instructions also put the control inside the kick and snare pattern view, not beside the old XY pad you'll see in older tutorials.
Choose a source with a clear rhythmic role. If the source part is loose, heavily layered or rhythmically ambiguous, Drummer has less useful information to respond to. Follow won't repair the timing of the source track. If recorded audio is drifting, settle its tempo and timing first.
5. Make the part feel played instead of randomized
A convincing drum part has intention between sections. Random movement isn't the same thing as a human performance. Start with these musical checks:
- Let the verse and chorus disagree. Change intensity, pattern or kit-piece activity when the arrangement changes.
- Keep fills attached to transitions. If a fill is distracting, lower Fill Amount before trying to tame every other control.
- Use Follow Rhythm selectively. A section that already feels good may become too literal when tied to a busy source.
- Make one change at a time. A new style, more swing, more humanization and a different kit in one move leave you unable to tell what improved the part.
Open the Details view for smaller adjustments. Feel can place the performance ahead of or behind the beat. Dynamics adjusts the volume range. Humanize loosens the pattern's quantization as you raise it. The Tempo setting changes how fast the rhythm plays, and Automatic can pick half-time or double-time when the project tempo sits far from the style's default.
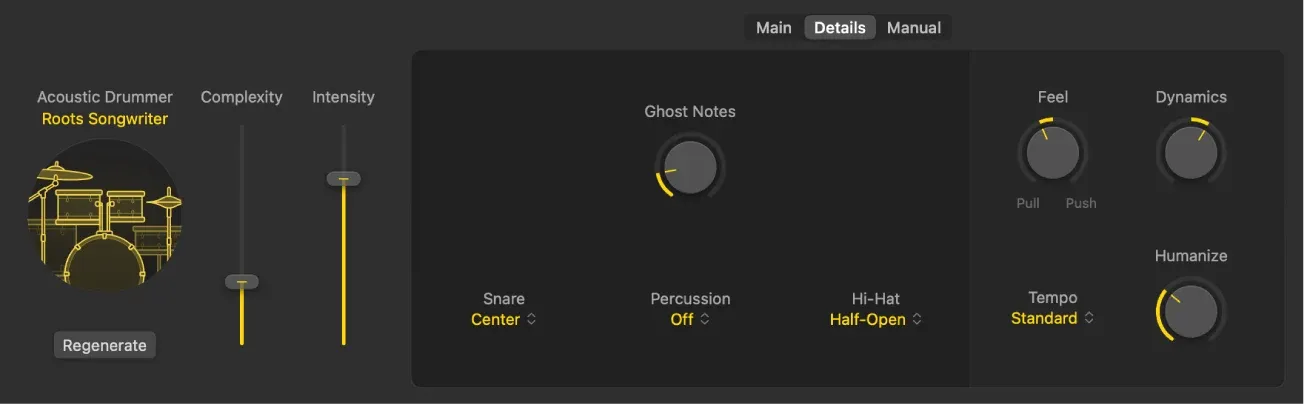
Don't copy numeric “sweet spots” from another producer's song. Swing depends on subdivision, the source parts and the genre. Humanize can loosen a rigid part, though too much of it blurs the pocket. The clean test: do the drums support the bass, vocal and transitions at normal listening level?
6. Change the kit without rewriting the performance
Once the part behaves properly, decide whether the sound fits. Acoustic Drummers use Drum Kit Designer. Electronic Drummers use Drum Machine Designer. You can change a patch or edit kit pieces while keeping the Session Player performance. Apple's current Drummer performance guide keeps those instrument roles separate as well.
For an electronic kit built from your own samples, follow the custom Drum Machine Designer workflow. For a full production that also needs bass, harmony, arrangement and bounce, return to How to Make a Beat in Logic Pro. This guide deliberately stops at the drum performance.
7. Convert to MIDI or a Pattern region at the right time
Stay in Session Player regions while you're still changing sections, style, patterns and fills. Use Manual for a custom step pattern. Convert a copy when you need to edit the exact notes generated by the performance, such as moving one snare slightly later or changing that note's velocity.
Control-click the region and choose Convert > Convert to MIDI Region for note-level editing in Piano Roll or Event List. Choose Convert > Convert to Pattern Region if you want to continue in Step Sequencer. Apple notes that a Session Player region longer than four bars becomes multiple Pattern regions, each no longer than four bars.
Conversion is not strictly irreversible in current Logic Pro. You can Control-click the MIDI or Pattern region and choose Convert > Replace with Session Player Region. But the edits made to the converted region are lost. That return path gives you a new generative region, not your edited notes translated back into Drummer instructions.
The practical safeguard is simple: save the project and duplicate the stable Session Player region before converting. Then edit the copy. Apple's current conversion guide confirms both the MIDI and Pattern routes and the loss of edits when replacing them with a Session Player region.
Drummer, Step Sequencer or Piano Roll?
Choose Drummer to generate a part and adjust its style, pattern, intensity, complexity, fills and feel. Manual view lets you specify a step pattern without leaving the Session Player.
Choose Step Sequencer for a repeatable grid pattern and per-step editing. Choose Piano Roll when you need to change individual MIDI notes, their timing or velocity.
Choose Drum Machine Designer to change the electronic kit, samples and processing. It is the sound source, not a replacement for the performance editor.
A fast workflow can move through more than one tool: Drummer for the performance, MIDI conversion for two awkward hits, then Drum Kit Designer or Drum Machine Designer for the sound. The mistake is switching editors before you know what problem you're solving.
Fix the common Drummer problems
The controls do not match the tutorial
Check the tutorial's version. Current Logic Pro uses the Session Player Editor with separate Complexity and Intensity sliders. Logic Pro X guides built around the old XY pad can still explain musical ideas, but their clicks and labels may be wrong.
Follow Rhythm barely changes the beat
Confirm that the intended Drummer region is selected, open the kick and snare Patterns control, and choose a track under Follow Rhythm Of. Try a clearer rhythmic source. The selector doesn't appear for Percussion Drummers.
Changing style also changes the part too much
Use the lock beside Fill Amount to preserve both Fill Amount and Fill Complexity when changing presets or styles. Lock Swing separately if it must stay fixed. The Preset menu also offers Keep Settings when Changing Style. Save a copy of the region before browsing widely if the current part is close.
The beat is right except for one hit
If you need to change the repeating rhythm, try Manual view first. If you need to alter one exact generated hit without regenerating the part, duplicate the region, convert the copy to MIDI, and edit it in Piano Roll. Use a Pattern region instead if you want to continue in Step Sequencer.
The drums feel busy but the song still feels flat
Pull back Complexity and Fill Amount, then listen to the arrangement. More notes can't create contrast if every section has the same intensity. Change the section before adding more notes.
Frequently asked questions
Is Drummer still in Logic Pro 12.3?
Yes. Drummer is now presented as one of Logic Pro's Session Players. Add a Session Player software-instrument track and choose Drummer. Older Logic Pro X tutorials may show a separate Drummer track dialog and an XY pad that no longer match the current editor.
Can Logic Pro Drummer follow a guitar or bass track?
Yes. Select the Drummer region, open the Patterns control for the kick and snare, and choose the source track under Follow Rhythm Of. The choice is made per region, and the track selector is not available for Drummers in the Percussion genre.
How do I make Logic Pro Drummer sound less robotic?
Use separate regions for different song sections, choose an appropriate pattern before adding complexity, keep fills purposeful, and adjust Feel, Dynamics and Humanize in the Details view. Compare the verse and chorus together before pushing any one control to an extreme.
Can I edit individual Drummer hits?
You can turn steps on and off for kit pieces in Manual view without converting the Session Player region. To edit an exact generated MIDI note, including its timing or velocity, convert a copy to MIDI and use Piano Roll. A Pattern-region conversion lets you continue in Step Sequencer. Keep the original region if you may want to change the Drummer performance later.
Can I turn MIDI back into a Drummer region?
Logic Pro 12.3 can replace a MIDI or Pattern region with a Session Player region. The event edits made after conversion are not carried back, so the return route is not an undo for detailed MIDI work.
What is the difference between Drummer and Drum Machine Designer?
Drummer generates and reshapes the performance. Drum Machine Designer is the instrument and pad-based kit used by electronic Drummers. Changing the performance and changing the kit are separate jobs.
If you are building the rest of the song around this part, the Create Music in Logic Pro hub brings together the bass, chords and arrangement guides for your next step.


