How to Use Live Loops in Logic Pro: Cells to Song
Build a playable grid, keep cells in time, record new ideas, and turn the best scene changes into a normal Logic Pro arrangement.

To use Live Loops in Logic Pro, open the Live Loops grid, place musical ideas in cells, group compatible cells into scene columns, and trigger those scenes while the project runs. Set Quantize Start to 1 Bar for an easy first session, then use Enable Performance Recording to capture the scene changes as ordinary regions in the Tracks area.
What Live Loops is and is not
Live Loops is Logic's nonlinear workspace. Instead of placing every idea left to right on a timeline, you store phrases in a grid and decide which combination plays next. A cell holds one musical idea. A horizontal row belongs to one Logic track. A vertical scene launches a group of cells together, so it can behave like a verse, chorus, breakdown or transition.
Apple's current Live Loops overview confirms that each row shares the routing and channel-strip settings of the adjacent track in the Tracks area. That's why a bass cell and a bass region can use the same instrument, effects and mixer channel.
Live Loops isn't the same thing as Apple Loops. Apple Loops provide ready-made musical phrases. Live Loops is the grid where any compatible musical material can be played and combined. It can also work as a flexible Logic Pro looper, but out of the box it isn't a one-switch guitar loop pedal. Recording, launch timing and track activation still need to be set deliberately.
Learn the grid before you fill it
| Part | What it does | Practical rule |
|---|---|---|
| Cell | Holds audio, MIDI, a Pattern Region or other supported material | Keep one clear musical job in each cell |
| Row | Uses the track and channel strip beside it | Only one cell in a row can play at a time |
| Scene | Launches a vertical set of cells together | Build scenes as usable song sections |
| Divider column | Switches each track between its cell and Tracks-area region | Use it when a region goes silent unexpectedly |
| Quantize Start | Chooses the next musical boundary for a launch | Start with 1 Bar, then shorten only when the performance needs it |
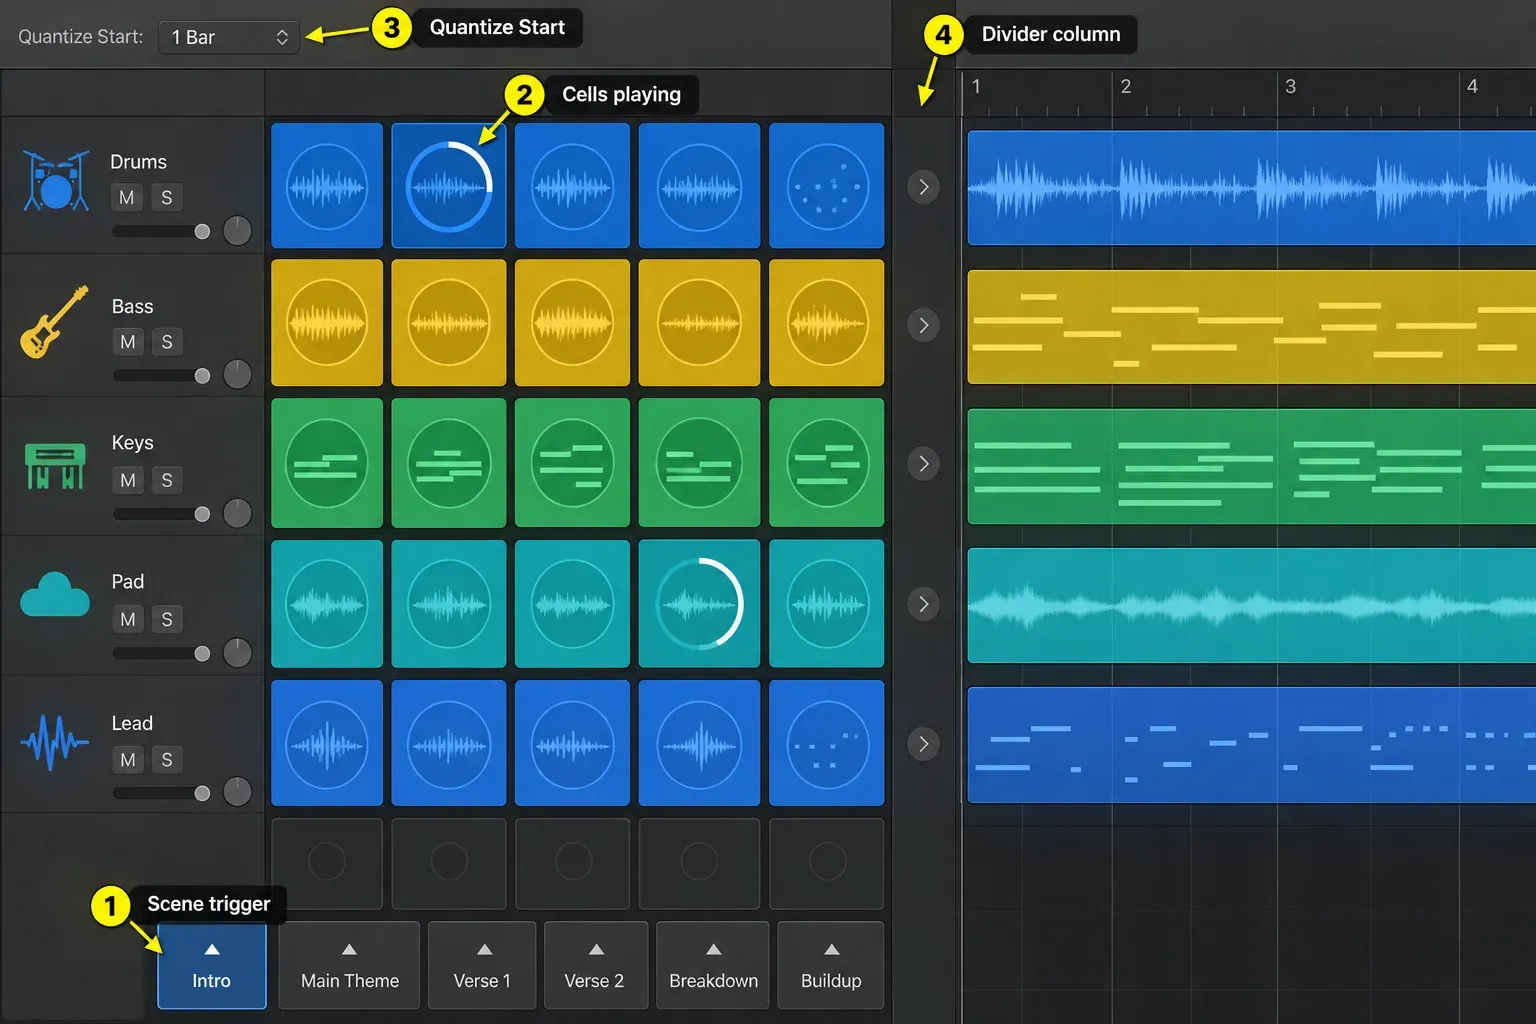
The one-cell-per-row rule prevents two cells from trying to use the same track at once. Trigger a new cell on the bass row and the previous bass cell stops at the chosen Quantize Start point. Cells on other rows can continue. To change just the bass without launching a whole scene, trigger the new bass cell on its own.
Build your first Live Loops grid
- Choose File > New from Template, then New Project > Live Loops for an empty grid. In an existing project, click Show Live Loops Grid in the Tracks-area menu bar. Option-B shows the grid and Tracks area together with the default key commands.
- Set the project tempo before filling the grid. You can revise it later, but a stable starting tempo makes recording and launch timing easier to judge.
- Choose 1 Bar from the grid's Quantize Start menu. It's a comfortable starting point, and you can change it later, even while cells are playing.
- Drag an Apple Loop, existing region or file into an empty cell. Logic can create the required track and row when you drag suitable material into the grid.
- Build one rhythm cell, one bass cell and one harmonic or melodic cell. Listen before adding more layers.
- Trigger each cell, then click the scene trigger below the column to hear the combination together.
- Select the scene, Control-click its trigger and choose Duplicate. Change one or two cells in the copy. Double-click a scene name to rename it, then press Return; Apple’s scene-editing guide covers these controls.
For a ready-filled example, choose Live Loops Grids in the New Project dialog and select a template. Apple’s quick-start article still calls these Starter Grids; its current user guide uses Live Loops Grids. I'd open a supplied grid first, because it lets you hear the controls immediately. An empty grid makes it easier to follow your own tracks.
Don't try to complete a full production on the first pass. Three contrasting scenes are enough to test the workflow. If you need to program a beat from individual steps, build the Pattern Region with the Step Sequencer workflow, then use that pattern as a cell. And if you want to browse included phrases, stay in the separate Apple Loops workflow instead of searching the Live Loops grid for media.
Launch cells and scenes in time
Hover over a cell and click its central Play button to launch it. Click a scene trigger to launch the cells in that column. The selected items flash while they wait for the next Quantize Start boundary. Apple documents Return as the Trigger Live Loops key command for selected or queued cells. Space stops project playback immediately.
For a first arrangement, leave cells and scenes on Global so they follow the grid's Quantize Start value. One bar gives you time to request the change before the next measure. A shorter value feels faster but is easier to mistime. Cell End is useful when a replacement should wait for the playing loop to finish rather than follow a bar boundary.
Apple's current start and stop guide explains one option that needs care: Smart Pickup can make a slightly late trigger start immediately at the musically correct position, but it may skip the beginning of the cell. If downbeats keep disappearing, turn Smart Pickup off and trigger earlier before changing the audio.
Use trigger modes only when the musical job needs them
- Start/Stop is the normal choice for scenes and repeating musical sections.
- Momentary requests playback while you hold the control and a stop when you release it. Both actions follow Quantize Start, so release does not necessarily stop the sound immediately.
- Retrigger restarts a playing cell rather than toggling it off. To stop it, use an empty cell’s Stop button on the same row or the grid Stop button; pressing Space stops the whole project immediately.
Start with Start/Stop for repeating sections. If you need to trigger several cells from different columns together, Shift-select them and press Return. The grid Stop button waits for the next Quantize Start point; Space stops all playback immediately. These are different actions.
Record audio or MIDI into a cell
Live Loops can hold ideas you record yourself as well as imported loops. The safe setup is the same as normal recording: select the correct track, input and monitoring path, record-enable the track, then record into an empty cell on that row.
- Create or select an audio or software-instrument track. For audio, choose the correct mono or stereo input and check monitoring. For MIDI, load an instrument and confirm it responds to your controller.
- Record-enable the track and select an empty cell on its row. This records audio or MIDI; you cannot record directly into a Pattern or Session Player cell.
- For a fixed four-bar phrase, set Cell Length to four bars in the Cell inspector, then set Rec-Length to Cell Length. Four bars is only an example. Automatic (Bars) and Automatic (Beats) set the length while you record instead.
- Set At Rec-End to Play Cell if you want recording to end and playback to start at that length. Continue Recording keeps recording instead. Older instructions may call the playback option Change to Play Mode.
- Hover over the empty cell and click its Cell Record button, or select it and press Option-R with the default key commands. Play when recording starts at the quantized boundary.
- Listen to the recorded phrase against the other rows. Correct its start and loop length before adding another part.
Apple’s cell-recording instructions distinguish Takes, Replace and Merge in the Recording settings. Merge is for software-instrument cells, not audio overdubbing. Choose Takes for separate attempts, or Replace when you intend to replace the previous recording. Set the length and end behavior before starting, so an intended single phrase does not keep recording.
If input setup is the problem, fix the signal path outside Live Loops first. The general Logic Pro audio-recording guide covers inputs and monitoring, and the MIDI path belongs to the MIDI recording workflow. A grid can't repair an unselected interface input or a missing controller.
Edit the cell, not the whole grid
Select a cell and press E with the default key commands to open its editor, or double-click the top of the cell. Trim the start, set the loop start and loop length, correct MIDI notes, or turn looping off when the cell should play once. A crash, vocal pickup or transition may be better as a one-shot than as a repeating loop.
Keep cell length and loop length distinct. Cell length is the full container. Loop length is the part that repeats. Apple's cell loop-settings guide also allows an opening phrase before the repeating section. That's useful for a pickup, but it can make the cell harder to read if the start and loop markers were changed accidentally. Start controls the first playback; Loop Start controls where later repeats begin. To hear a pickup from Start, use Play From: Start and check Quantize Loop Start. With Loop turned off, playback stops at Cell Length, which may extend beyond the audio itself.
When imported audio drifts or lands badly against the project, first confirm that the file has reliable tempo information. Logic can analyze files without tempo metadata, but the result isn't guaranteed to match every performance. Use the Smart Tempo guide when the file needs tempo analysis or correction, instead of forcing the launch quantization to hide a bad edit.
Turn scenes into a normal Logic arrangement
To place a whole scene without performing it, show both workspaces with Option-B, select the scene’s name or number, and position the Tracks-area playhead. Press Command-End to insert the scene, as described in Apple’s scene-to-timeline instructions. The playhead moves to the end of the inserted regions, ready for the next scene. Use performance recording instead when you want to capture the timing of your launches.
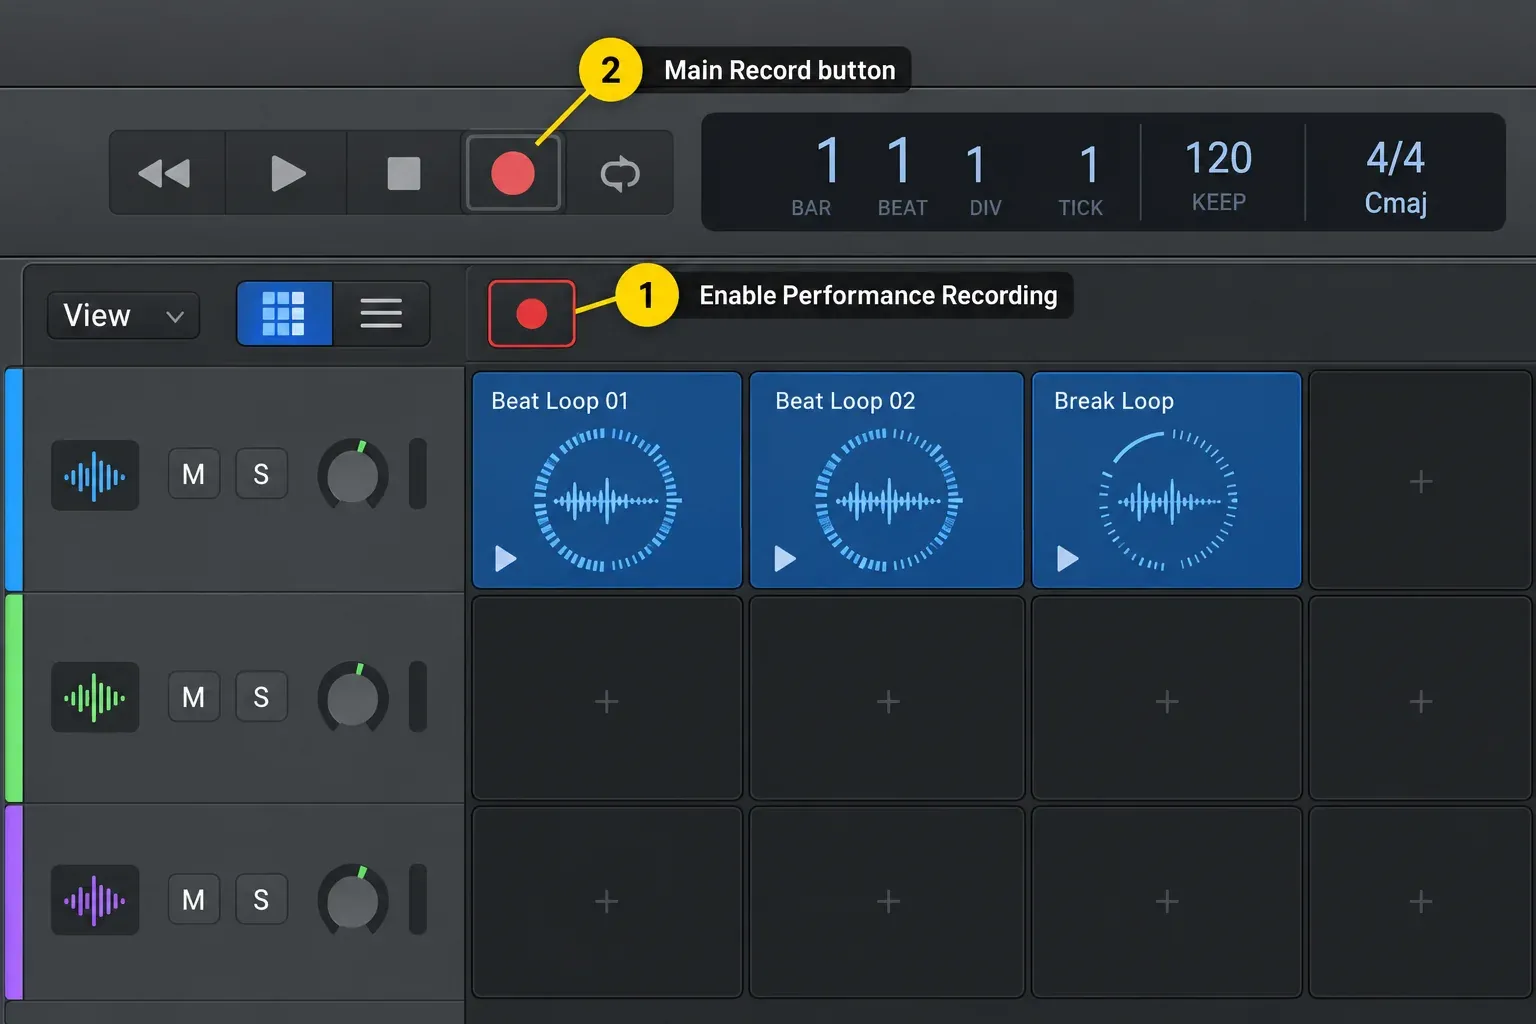
- Turn Cycle off.
- Place the Tracks-area playhead where the arrangement should begin.
- Click Enable Performance Recording at the upper-left of the grid.
- Press R.
- Launch scenes and individual cells in musical order.
- Press Space to stop. If the recorded regions are silent, activate the Tracks side using the Divider column as explained below, then edit the arrangement.
Apple's performance-recording guide confirms that played cells become regions in the Tracks area. It also documents the important boundary: you cannot record into a cell while recording a Live Loops performance. You can record a normal audio or software-instrument track alongside the performance, but cell creation and performance capture are separate operations. Session Player cells are written to the Tracks area as MIDI regions, so you can edit the resulting notes after capture.
Once the regions exist, you can edit the song without repeating the performance. Move sections, shorten transitions, add automation and clean the ending in the Tracks area. The song-arrangement guide continues from that point.
Understand why a cell or region went silent
A Logic track can play its Live Loops cell or its region in the Tracks area, but not both at once. Apple states this directly in its grid and Tracks-area interaction guide. The Divider column shows which side is active for each track and lets you switch the track back to its regions.
Stopping a cell does not automatically reactivate the regions on that track. After stopping it, click that row’s Track Activation button in the Divider column to return playback to Tracks. If the cell is still playing, Option-click its Pause control in the Divider to pause it and activate the regions at the next Quantize Start point. Check this before changing volume, routing or plug-ins.
Control Live Loops without living on the mouse
Start with the mouse or trackpad until the grid makes sense. Then use Logic Remote or a controller if it improves performance. Apple says Logic Remote can start, stop, queue and edit cells and scenes, record to cells, operate track controls, add Apple Loops and enable performance recording. Its current controller guide also documents a dedicated profile for Novation Launchpad devices. If the same performance has to leave the studio and run as a dependable live rig, the MainStage guide for Logic Pro users explains when a concert is a better home than the production project.
For a custom pad assignment, select the cell or scene, choose Logic Pro > Control Surfaces > Learn Assignment, then send the MIDI control you want to use. Exit Learn Mode afterward. A dedicated Launchpad profile has its own setup; do not add conflicting manual assignments just because a pad is not doing what you expected. Name your scenes and rehearse their order before using the controller live.
Fix the problem by the symptom
| Symptom | Check first |
|---|---|
| A cell starts one bar late | Trigger earlier, then check Quantize Start and whether Smart Pickup is appropriate |
| The beginning of a cell is missing | Check Smart Pickup, Play From and Quantize Loop Start; these can change where playback begins |
| A new cell does not layer with the old one | Cells are on the same row; only one cell per track can play |
| Tracks-area regions are silent | Use the Divider column to return that track from cell playback to region playback |
| Scene changes are not recorded | Turn Cycle off and enable Performance Recording before pressing R |
| You cannot record into a cell | Check track record-enable and input, choose an audio or MIDI cell, and stop performance recording before recording into it |
| Imported audio drifts | Check the file's tempo information, cell start and loop length, then use Smart Tempo if needed |
| A controller triggers the wrong cell | Check the controller assignment or dedicated support profile before changing the scene |
Frequently asked questions
What is Live Loops in Logic Pro?
Live Loops is a grid-based workspace for arranging and playing musical ideas in real time. Cells hold musical material, rows belong to tracks, and vertical scene columns launch groups of cells together. The same project can also use the normal Tracks area.
Is Live Loops the same as Apple Loops?
No. Apple Loops are ready-made musical phrases available from the Loop Browser. Live Loops is the grid that can play Apple Loops, your own recordings, existing regions, Pattern Regions and other supported material. One is content; the other is a performance and arrangement workspace.
Can Logic Pro work like a looper pedal?
Live Loops can record and repeat audio or MIDI cells and can be controlled from Logic Remote or suitable hardware. It is more flexible than a simple pedal, but it is not automatically a hands-free one-switch looper. You still need to configure the input, cell recording length, launch timing and control assignments.
How do I record Live Loops into the Tracks area?
Turn Cycle off, place the playhead, click Enable Performance Recording, press R, then launch the cells and scenes. Logic writes the performance as regions in the Tracks area, where you can edit and mix it like a normal arrangement.
Why does my Live Loops cell start late?
Quantize Start makes a trigger wait for the next chosen beat or bar boundary. Trigger earlier or choose a shorter value when the music needs a faster response. Smart Pickup can catch a slightly late trigger, but it may skip the cell's beginning to preserve the musical position.
Can Live Loops and Tracks-area regions play together?
Yes across different tracks, but one track plays either its current Live Loops cell or its Tracks-area region, never both at the same time. Use the Divider column to choose which side is active for each track. Stopping a cell alone does not reactivate its track regions; click that row’s Track Activation button to return to Tracks.
Finish the song outside the grid
Live Loops is best when it answers a musical question quickly: which beat, bass line and harmony belong together, and what should happen next? Once the scene order works, capture it and finish the details in the Tracks area. Keep the grid as a sketchpad or performance surface, not a reason to postpone the arrangement.
The Create hub connects Live Loops to Apple Loops, Drummer, Drum Machine Designer, Step Sequencer, sampling and arrangement. Choose the guide for the part you want to build next.


