How to Use Apple Loops in Logic Pro
Use the Loop Browser as a writing tool, not a slot machine: choose the right loop type, make it fit the song, then turn repetition into an arrangement.

To use Apple Loops in Logic Pro on Mac, press O to open the Loop Browser, search or filter, click a result to preview it, then drag it below the existing tracks. Logic creates a track for the loop. Drag the region’s upper-right edge to repeat it. Before adding the first loop to an empty project, check the tempo and key rule below: that first loop can set both.
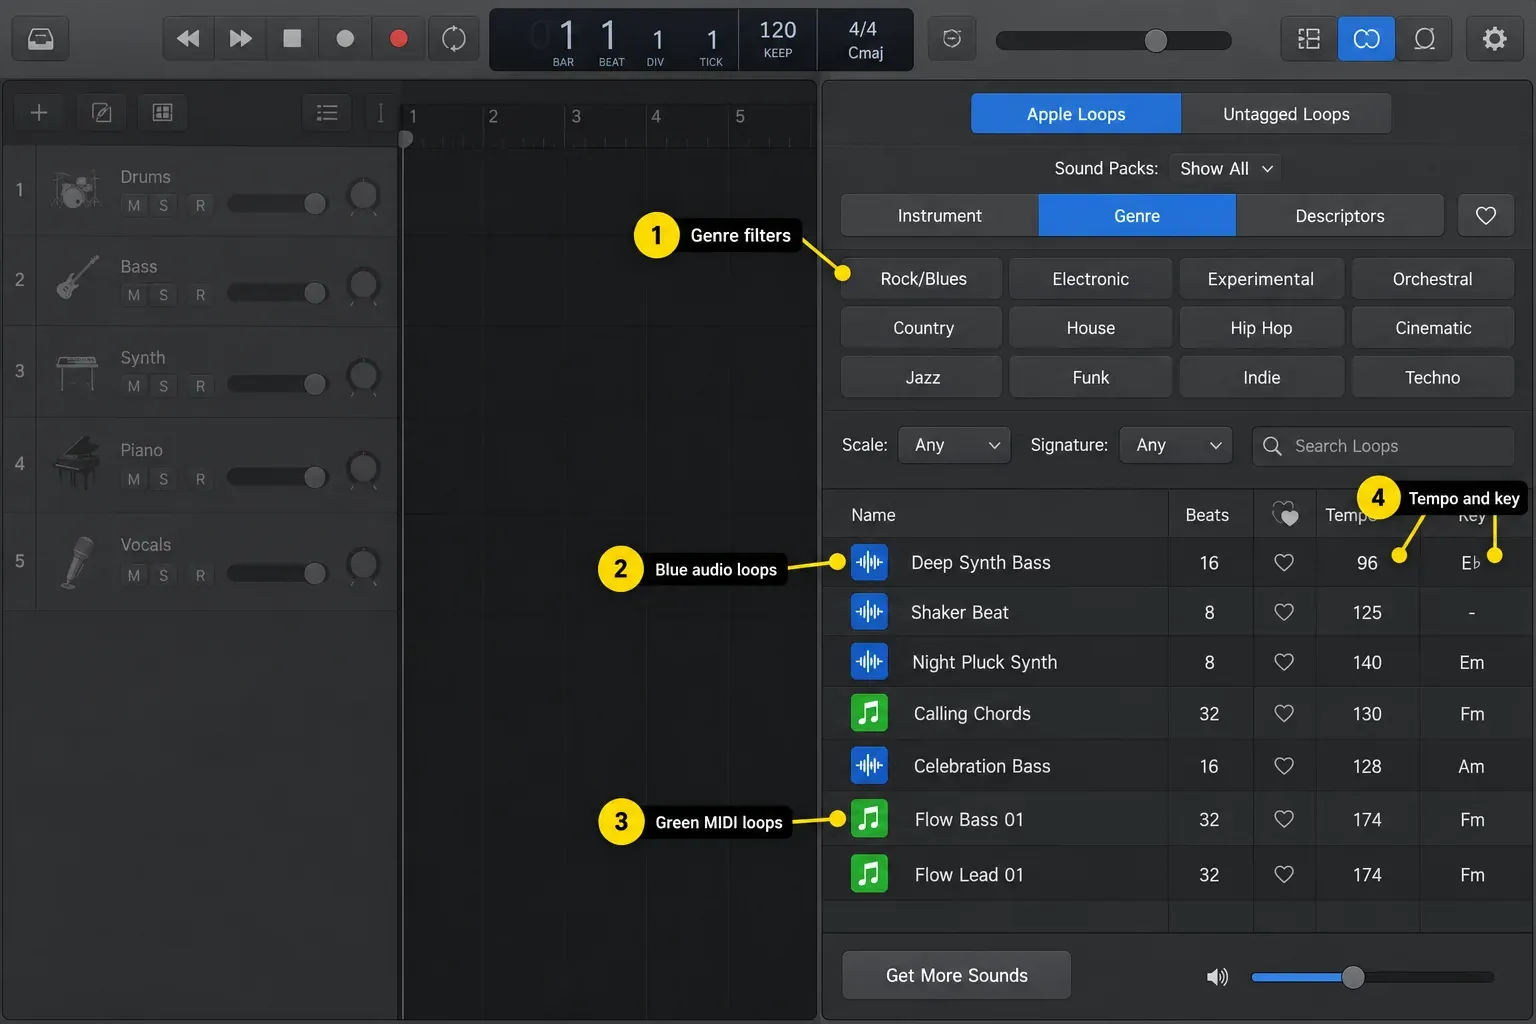
Choose the loop type before you drag: blue audio, green MIDI, a violet Step Sequencer pattern or a yellow Session Player performance. The type determines whether you can edit individual notes, pattern steps or player controls. Tempo and pitch follow the loop’s type, metadata and region settings; one-shots keep a fixed duration.
Know the four current Apple Loop types
| Color and type | What it contains | What you can edit |
|---|---|---|
| Blue audio | An audio recording | Region edits, audio processing, Flex behavior |
| Green MIDI | Notes plus an instrument setting | Individual notes, timing, velocity, instrument sound |
| Violet pattern | Step Sequencer notes and pattern data | Pattern steps and Step Sequencer parameters |
| Yellow Session Player | Performance and player settings | Style and parameters in the Session Player Editor |
Current Logic Pro documentation uses MIDI, pattern, and Session Player terminology. Older tutorials may call the green type a software instrument loop or the yellow type a Drummer loop. Use the color and the editor Logic opens, not an old video label. Apple's current Apple Loops overview documents the four present types and their conversions.
Find and preview loops without losing the song
Press O or choose View > Show Loop Browser. Enter a name or descriptive term in the search field and press Return. For broader choices, use Button View categories or Column View filters. The Loop Browser search controls also include Loop Types: choose a specific type or All Loops.
Click a loop to preview it and click again to stop. Play it against the project so you can hear whether it leaves room for the kick, chord rhythm or vocal. Drag the Volume slider at the bottom of the browser to compare candidates at a sensible level. To keep a useful result, select its checkbox in the Favorites column.
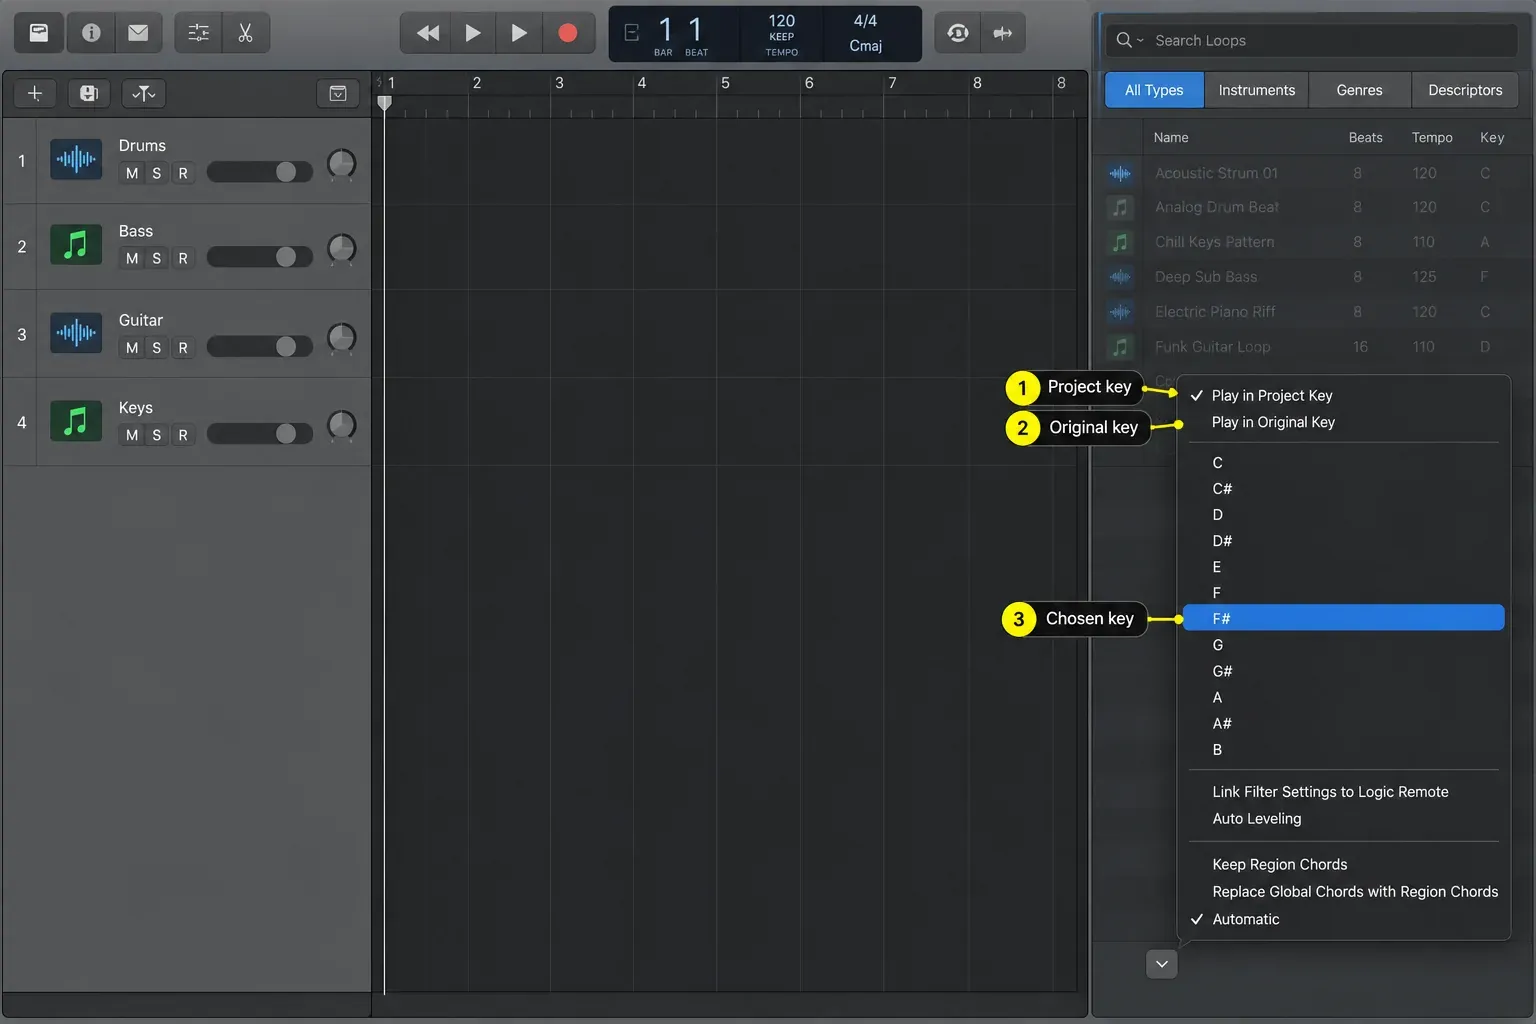
Logic also enables Auto Leveling by default. It's a non-destructive gain adjustment for previews and newly added loops: blue audio loops get region gain, while green, violet, and yellow loops use track volume. Turn Auto Leveling off from the Play in Key menu when you need to hear the loop at its unadjusted level. Changing the setting doesn't alter loops already placed in the Tracks area. Apple's current loop preview guide documents the behavior and the control.
Filters combine. If the results look incomplete, click Reset to clear keyword choices, clear the search field with its small x and check Loop Types. The Sound Packs menu at the top also limits which collection you are browsing.
Add a loop without changing the project by accident
- Decide whether the first loop should set the project tempo and key. If you need to keep chosen values, start with a project that already contains recorded or imported audio or MIDI, then confirm those values before adding the loop.
- Open the Loop Browser, search or filter, and click a candidate to preview it. Before dragging a loop with chord data, check its chord-import choice described below.
- Drag the loop into the empty Tracks area below existing tracks to create a new track. Dropping onto an existing track can instead convert the loop, depending on the track type.
- Place it at the intended bar, recheck the project tempo, key and any affected chords, then listen through the transition into and out of the region.
- Drag the region's upper-right edge to repeat it only as far as the section needs.
- Change or remove something at the next section boundary so repetition supports the arrangement.
A new project defaults to 120 BPM and C major. Apple states that when an Apple Loop is the first audio or MIDI content added, the project tempo and key change to match it. In a project that already contains recorded or added material, loops conform to the existing tempo; pitch behavior also depends on their Pitch Source setting. The add-loops instructions describe the first-content rule.
Control tempo and key instead of trusting every transpose
For a pitched loop, matching the project key is a starting point, not a guarantee that every note fits the chord progression. Compare it against the actual harmony. Large tempo or pitch changes can also affect an audio phrase’s sound, so audition the adjusted result before building an arrangement around it.
At the bottom of the Loop Browser, use Play in Key to choose Play in Project Key, Play in Original Key or a specific key. Once the loop is in the project, select its region and inspect Pitch Source in the Region inspector. Apple distinguishes Off, Key Signature, Region Chords and Chord Track; available options depend on region type. Non-pitched loops normally use Off, and one-shots ignore tempo and key information.
For blue audio loops, confirm transient clarity after a tempo change. For green MIDI and violet pattern loops, you can edit notes rather than forcing the original phrase to fit. That editability is often more valuable than finding a loop with a perfect name.
Decide what a loop should do with the Chord track
A Chord symbol in the Loop Browser’s Key column identifies loops with chord data. Before dragging one into the Tracks area, choose how its progression should be used. Apple’s add-loops page locates these choices in Play in Key; its Pitch Source reference calls the control Loop Chords in the More menu. If you do not see them in Play in Key, check More > Loop Chords. The choices have these effects:
- Keep Region Chords leaves the global Chord track alone and lets the new region use the progression stored in the loop.
- Replace Global Chords with Region Chords copies the loop's chords to the Chord track at the drop position.
- Automatic adds the loop chords only where the Chord track is empty; where global chords already exist, the region normally keeps its own chords.
Under Automatic, Session Player loops behave differently from the other loop types: if global chords already exist at the drop position, the player follows those chords. Check the Chord track before using Replace, because other player regions can follow it too. Apple’s add-loops guide documents the three choices and this exception.
Edit the loop according to its type
- Blue audio: cut the region, add fades, process the track, adjust gain, and use audio editing tools. You cannot expose original MIDI notes because there are none.
- Green MIDI: open the Piano Roll to change notes, timing, length and velocity, or replace the software instrument while keeping the phrase.
- Violet pattern: open Step Sequencer to change notes and pattern parameters. The Step Sequencer guide explains the grid controls.
- Yellow Session Player: adjust the player, style, complexity, and performance controls instead of treating it like fixed audio.
Dragging a MIDI, pattern or Session Player loop to an audio track converts it to audio. Dragging a Session Player loop to a software instrument track converts it to MIDI for note editing. Keep an editable player or pattern version if you may need those controls later; a rendered audio region does not preserve them as editable MIDI.
Turn a loop into an arrangement
Start with a short section that works, then change something at the next section boundary:
- remove the kick or bass before a chorus;
- shorten the final repeat to leave space for a fill;
- change one MIDI note that fights the chord;
- filter or thin a copied audio section;
- replace a busy loop with a simpler variation under the vocal;
- use automation so a repeated texture changes over time.
Check whether the loop belongs to a numbered family. For example, “Classic Rock Guitar 01” and “Classic Rock Guitar 02” are related alternatives. Click the up and down arrows at the region’s upper-left corner and choose another family member. It replaces the current loop, so listen through the change before keeping it.
For the larger song structure, follow the arrangement guide. The beat-making guide shows how to combine drums, bass and harmony before arranging sections.
Use Apple Loops in Live Loops
Drag an Apple Loop into a Live Loops cell to try combinations before placing them on the timeline. Use a cell on the matching track type, or drag into an empty grid area to create a new track and row. Click the cell’s play button to audition it; only one cell per track plays at a time. Apple’s Live Loops guide describes these routes.
Once a combination works, use the Live Loops workflow to record the performance or copy cells into the Tracks area for arrangement. Apple Loops are the source material; Live Loops is the grid used to play and organize it.
Create your own Apple Loop
Select one or more audio or MIDI regions, then choose File > Export > Region/Cell to Loop Library. You can also Control-click the selected regions and choose Export > Add to Loop Library, drag them into the Loop Browser, or press Control-Shift-O. These actions open the Add Region to Apple Loops Library dialog.
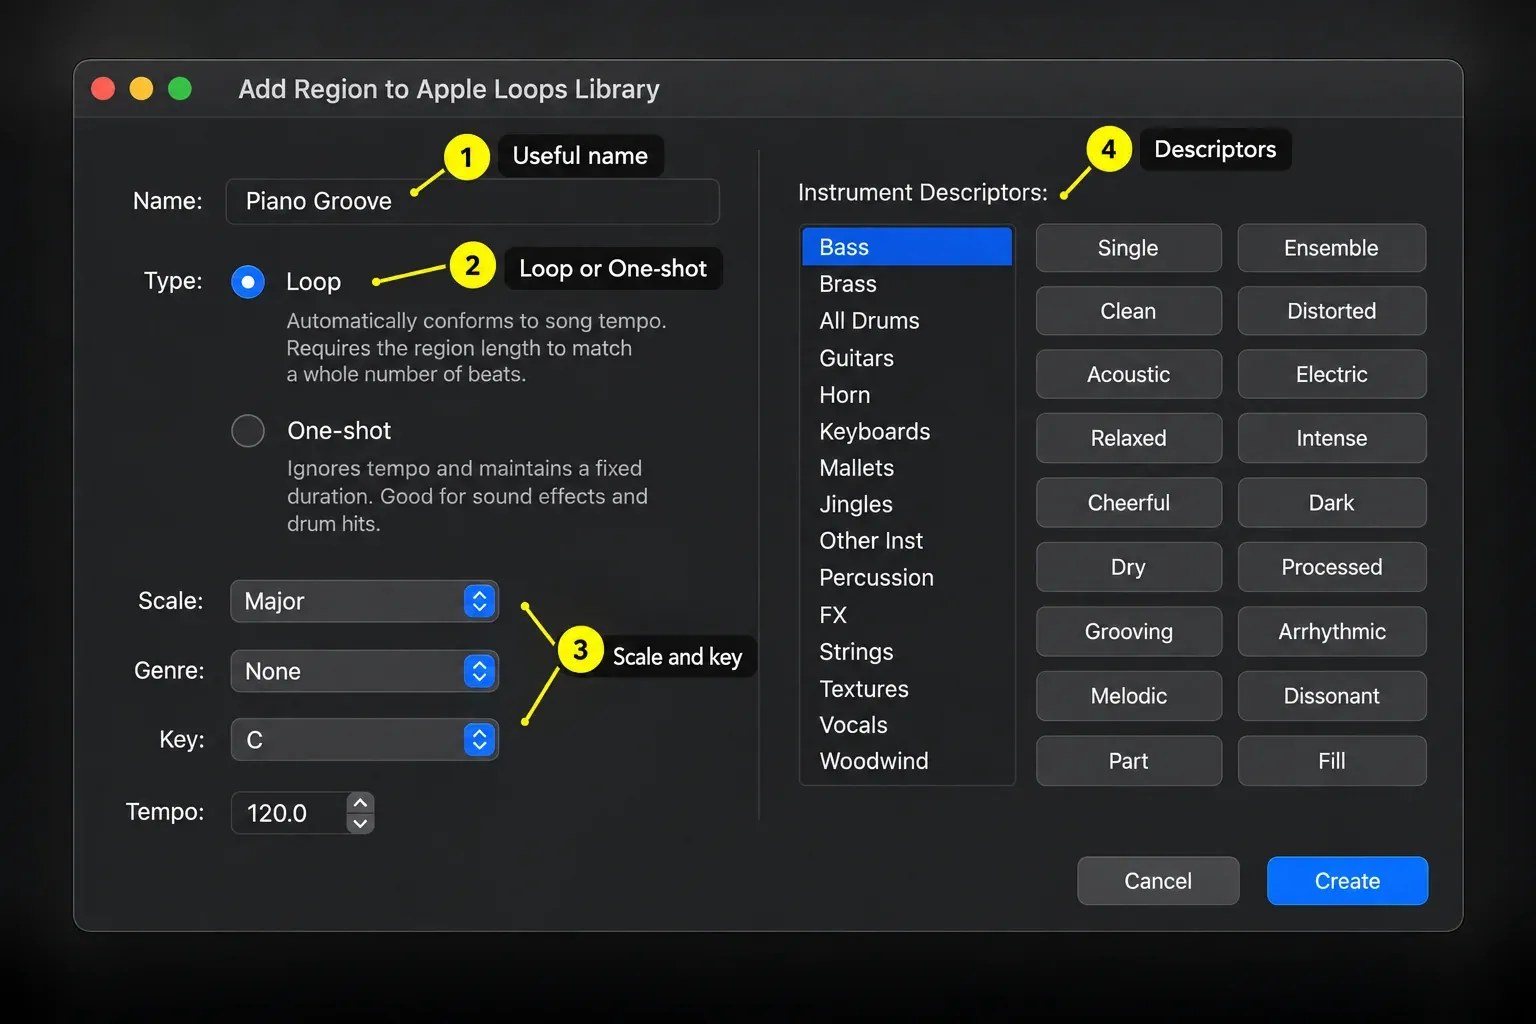
Choose Loop for musical material that should conform to project tempo, scale and key. Its length must span a whole number of beats. Choose One-shot for fixed-duration material that should ignore that information. If only One-shot is available, check that the selected regions start and end exactly on beats.
Enter a searchable name and set the scale, genre, key, instrument and mood descriptors. When exporting several regions, their existing names are retained. The tempo comes from the project, including tempo changes affecting those regions. Click Create, then choose My Loops in the Sound Packs menu and preview the new result. Apple’s creation instructions explain the descriptors and User Loops storage.
Add your own sample folders as untagged loops
For audio folders without Apple Loop metadata, drag a folder into the Loop Browser and choose Add to Untagged Loops. The Untagged Loops button appears after content is added. To keep files in their original location, right-click the folder in the All Files Browser and choose Add to Untagged Loops Library; this creates an alias. In Untagged Loops, right-click a loop, choose Preview > At Project Tempo or At Original Tempo, then click Play. These files do not gain all Apple Loop features, including full key metadata, just by being listed there. Apple’s untagged-loops instructions explain the distinction.
Can you use Apple Loops commercially?
Apple permits the included royalty-free sample content to be used in original soundtracks for film, video, and audio projects, and those soundtracks may be broadcast or distributed. Apple does not permit individual sample-content assets to be redistributed on their own or repackaged as sample libraries, sound effects, music beds, or similar assets.
Using Apple’s included loop content in an original song is different from selling the loop by itself or repackaging it. The commercial-use support article gives Apple’s license wording. Third-party packs have their own terms; importing them into Logic does not grant Apple’s license to those files.
A usage license is also different from Content ID eligibility. YouTube requires exclusive rights to reference material and excludes non-exclusively licensed content and production loops as references. If your distributor offers Content ID enrollment, disclose the Apple Loop and check its eligibility or reference-exclusion procedure. Do not submit shared loop material as exclusively yours. YouTube’s Content ID reference rules explain what can be submitted.
Fix common Apple Loops problems
The Loop Browser is empty or missing sounds
Clear the search and keyword filters, select All Loops in Loop Types and check Sound Packs. Click Get More Sounds at the bottom of the browser to open the Sound Library if content is missing; the Sound Library guide covers downloads and library location. If loop files were moved, choose Sound Packs > Reindex All Loops. Reindexing updates the catalog; it does not replace missing files.
The first loop changed my tempo or key
If the loop was the first content added, remove that addition with Undo and recheck the project. Set the intended tempo and key, add or record audio or MIDI content, then add the loop again and verify the values. Merely previewing a loop is not the first-content action described by Apple.
The loop follows tempo but sounds smeared
Compare the phrase near its original tempo. If the artifacts diminish, try a closer source tempo, an editable MIDI or pattern loop, or another audio recording. A large time change is one possible cause, not a diagnosis of every distorted loop.
The loop is in key but the notes clash
A key signature does not specify the full chord progression. Check the region’s Pitch Source and its relationship to the Chord track, then listen to the notes. Edit a MIDI or pattern phrase that clashes, or choose a different audio loop.
The loop became louder or quieter after I added it
Check Auto Leveling in the Loop Browser's Play in Key menu. It adjusts region gain for blue audio loops and track volume for MIDI, pattern, and Session Player loops. The adjustment is non-destructive, and changing the setting won't revise loops already placed in the project.
Frequently asked questions
How do I open Apple Loops in Logic Pro?
Press O, choose View > Show Loop Browser, or click the Loop Browser button in the control bar. Enter a search term and press Return, then click a result to preview it.
Do Apple Loops automatically match tempo and key?
Musical Apple Loops can follow the project tempo, but pitch behavior depends on loop type and Pitch Source. One-shots keep a fixed duration and ignore tempo and key data. If an Apple Loop is the first audio or MIDI content added to a new project, it can set the project tempo and key instead.
Can I edit the notes in an Apple Loop?
Edit green MIDI loops in the Piano Roll and violet pattern loops in Step Sequencer. A yellow Session Player loop can be converted to MIDI by adding it to a software instrument track. Blue audio loops contain audio, not editable MIDI notes.
Can I use Apple Loops in commercial music?
Apple allows included sample content in original soundtracks that you distribute or broadcast. You may not redistribute individual loop assets or repackage them as a sample library or similar standalone content.
Can Apple Loops trigger a Content ID claim?
A shared loop can contribute to a matching conflict. Apple’s permission to use included content in an original soundtrack does not make the loop exclusive to you. YouTube excludes non-exclusive content and production loops as Content ID references. Disclose loop use to a distributor before enrollment and follow its eligibility or exclusion process.
How do I make my own Apple Loop?
Select one or more audio or MIDI regions, choose File > Export > Region/Cell to Loop Library, enter the name and descriptors, choose Loop or One-shot, then click Create. Find and preview the result under Sound Packs > My Loops.
Where are my custom Apple Loops?
Choose My Loops from the Sound Packs menu in the Loop Browser. If they do not appear after files were moved, reindex the loop library.
What is the difference between an Apple Loop and a one-shot?
A Loop conforms to project tempo, scale, and key and must span a whole number of beats. A one-shot keeps its fixed duration and ignores tempo, scale, and key information.
Check the loop in the finished section
Replay the section after changing the loop. Check its entrance, ending, level and harmony, then listen across the next section boundary. The Create Music hub connects this work to sampling, instruments and song arrangement.


