How to Arrange a Song in Logic Pro
Turn a loop into a full song, shape the energy between sections, and use Logic Pro's Arrangement track without losing regions or automation.

Documentation checked September 8, 2026 against Apple’s Logic Pro for Mac User Guide.
To arrange a song in Logic Pro from a loop, first lay it across a rough timeline. Pull parts out to make room for an opening and a contrasting section, then change what happens when the main idea returns. Label the sections in the Arrangement track; once the sketch works, its markers let you move or copy whole sections.
Your starting point can be a beat, a loop or any short idea worth developing. Let the musical change decide where each section ends; there is no fixed bar count. The steps below cover both that decision and the Logic controls that make it happen.
Before you arrange: protect the idea
Save the project, then choose File > Project Alternatives > New Alternative and enter a name such as “Arrangement 1.” Click Done. Apple describes Project Alternatives as separate cuts or mixes saved inside the same project. They share the project assets, so an alternative is useful for structural experiments, but it is not a separate backup of your audio files.
Now play the loop without touching the mixer. Identify three things:
- The hook: the part a listener should remember after one play.
- The anchor: the rhythm, bass movement or harmony that keeps the section coherent.
- The optional layer: the part you can remove without breaking the idea.
If every track feels essential, mute them one at a time. Arrangement becomes much easier when you know what can disappear.
Turn the loop into a full song
- Duplicate the core material across a rough timeline. Select the regions in the Tracks area, then Option-drag them to the next section on their existing tracks. Check the new start positions before repeating. Sketch an opening, your main sections, a contrast section and an ending; adjust their lengths as you listen.
- Build the opening by subtraction. Keep the hook hidden or incomplete. Start with one rhythm, texture, chord or vocal fragment that establishes the song without spending its biggest moment.
- Make the first main section state the idea clearly. Bring in the anchor and the hook. Do not add every available layer simply because the section is called a chorus or drop.
- Change the return. When the section comes back, alter a drum ending, bass note, octave, harmony, vocal response, sound choice or moment of silence. The listener should hear a reason for the section to return, even if most of its regions are copies.
- Create one real contrast section. Remove the kick, change the harmonic rhythm, shorten the phrases, thin the low end or move attention to a different sound. A breakdown does not have to be quieter, but it must change the listener's expectation.
- Signal important boundaries. A fill, pickup, held note, reverse sound, automation move or one-beat dropout can prepare the next section. Use the smallest cue that makes the change readable.
- Write an ending. Resolve the hook, strip the texture back, stop sharply or leave a deliberate tail. Do not let the last loop repeat until the project happens to end.
- Listen from the start without editing. Mark the moment attention drops, then fix that moment with an arrangement decision before adding another plug-in.
If the source is an Apple Loop, use the Apple Loops workflow for its editing options. If you still need to create the drums, bass or musical part, start with How to Make a Beat in Logic Pro. A simple beat can be enough to begin arranging; it does not need a finished mix.
Use copies when sections need to change
To loop a region, drag its upper-right edge with the Loop pointer, or select Loop in the Region inspector. If the pointer is missing while track automation is visible, hold Option while pointing at that corner. Apple’s region-looping guide explains that continuous looping stops at the next region on the same track or at the project end.
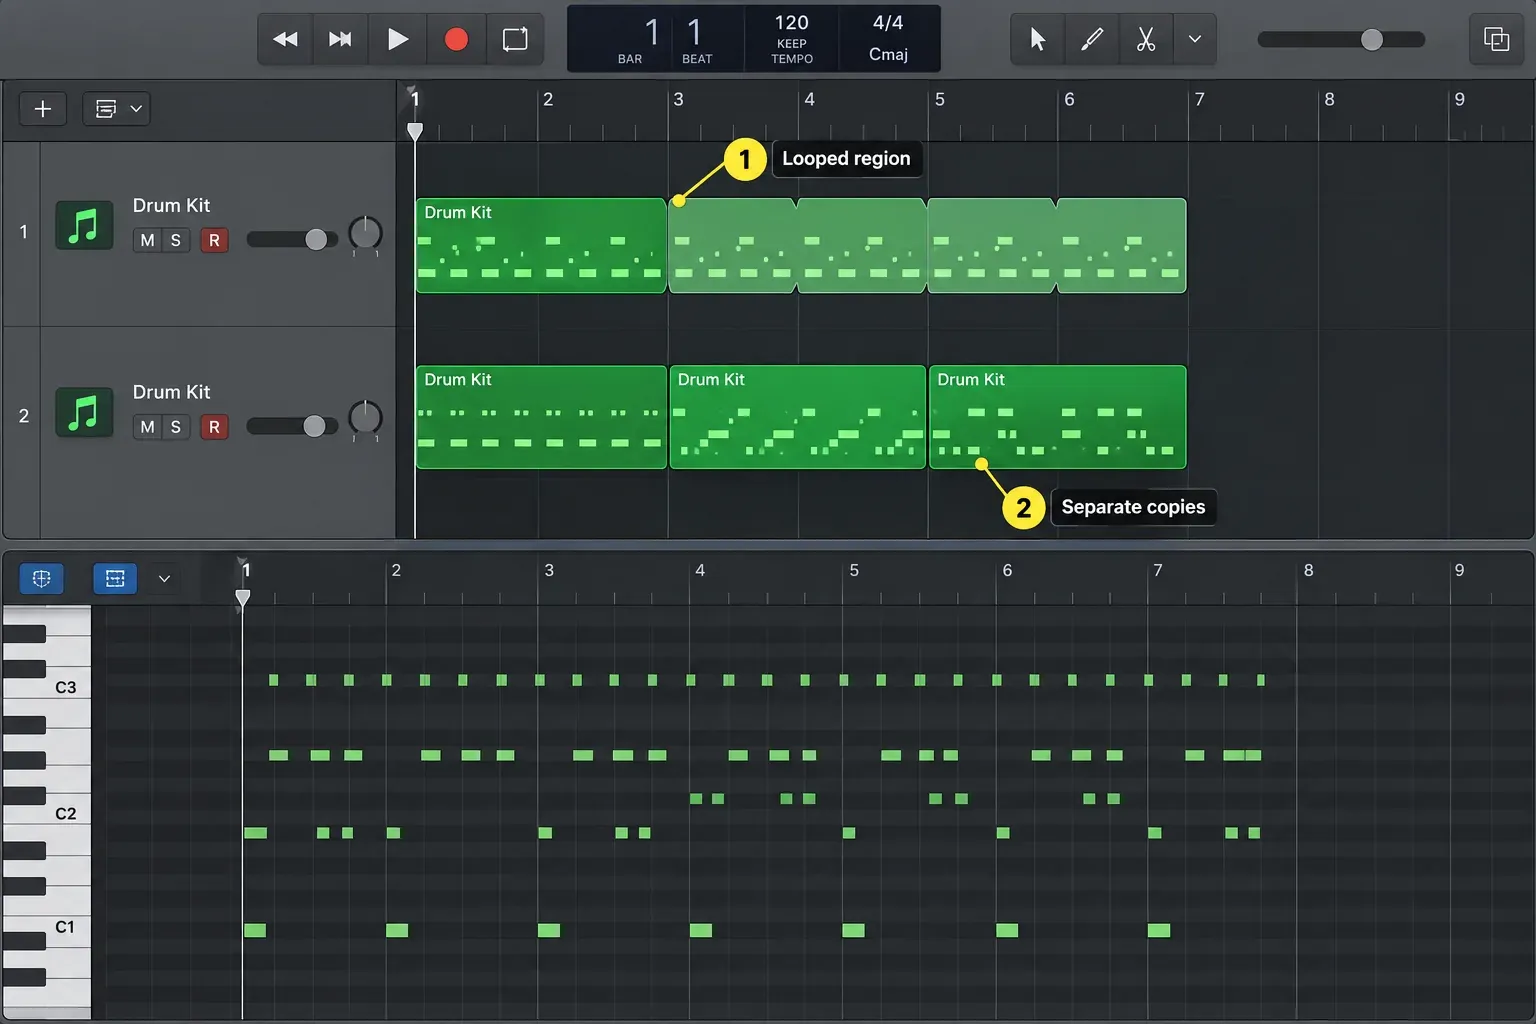
For MIDI loop repetitions, select the looped region and choose Edit > Convert > Loops to Regions to make separate regions. For an audio part, turn off Loop in the Region inspector before making section-specific copies. Select the source region and Option-drag it to the required position. To make several repeats at once, choose Edit > Repeat > Multiple, enter the number of copies and choose As Copies. Avoid As Aliases for MIDI parts you want to vary independently. Apple documents these choices in Cut, copy, and paste regions.
Separate MIDI copies let you change a note or drum ending in one return. Audio regions can still refer to the same source file: copying a region is not a backup of that file. Keep arrangement edits in the Tracks area and take a separate file backup before destructive audio-file editing.
Map the song with the Arrangement track
Press G with the default key commands, or choose Track > Global Tracks > Show Global Tracks. If Arrangement is hidden, Control-click the global-track header area and select Arrangement. Click the plus button in that track to add a marker.
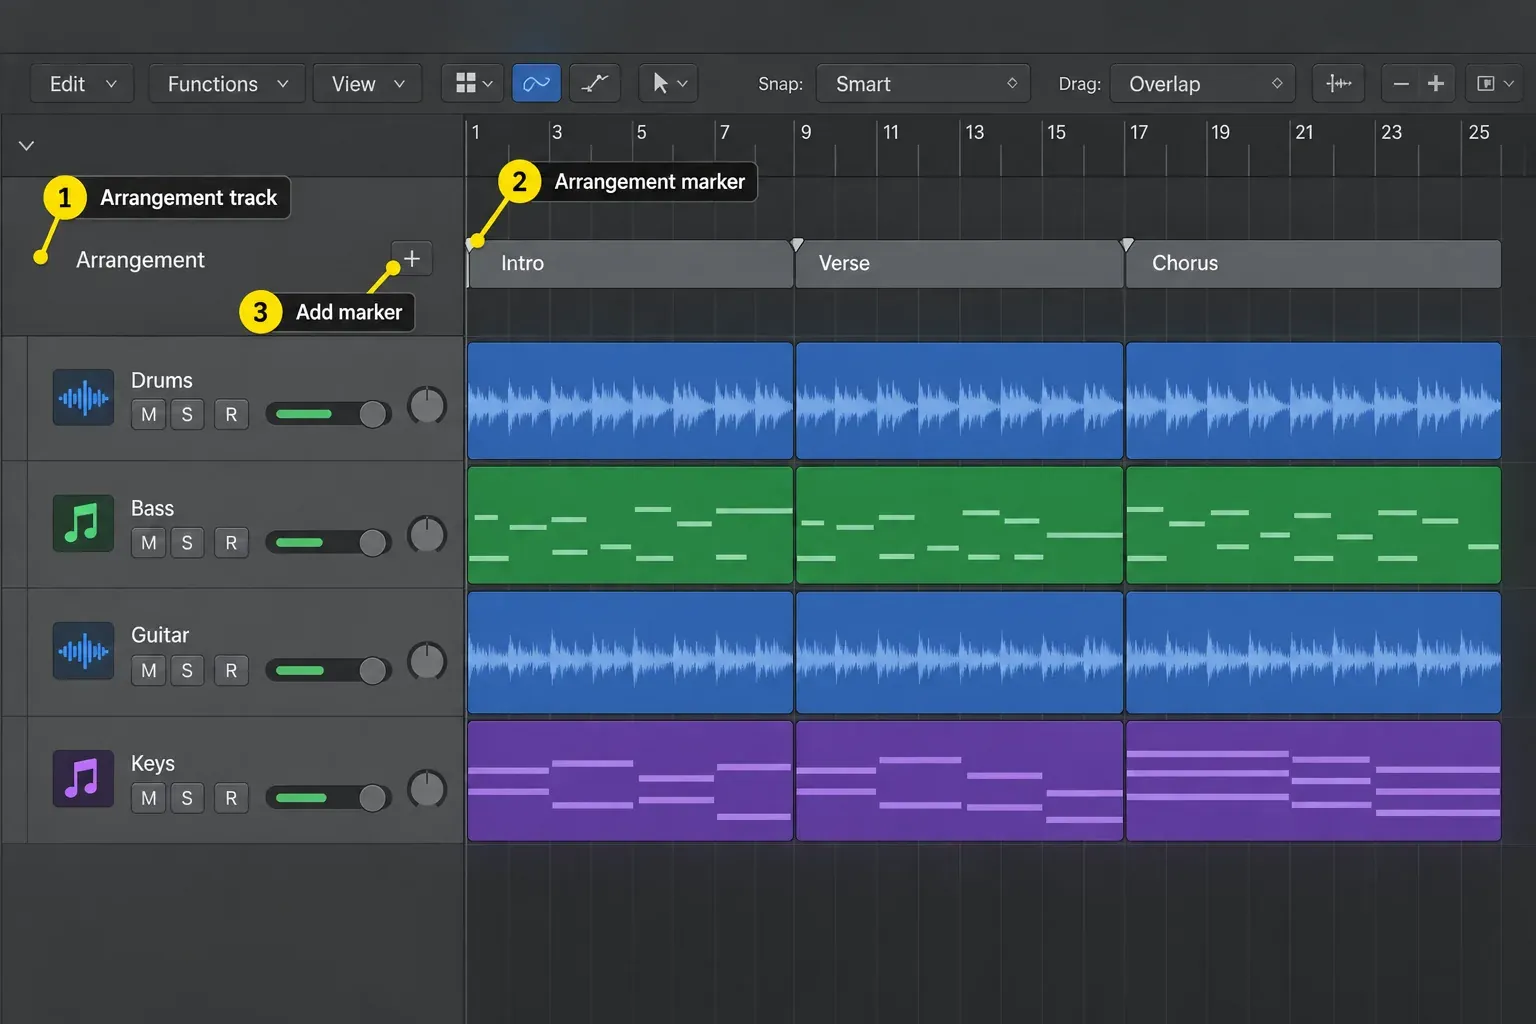
A new arrangement marker is eight bars long. Drag its edge to match your section; moving the boundary between adjacent markers resizes both. Click the marker name and choose a preset label, or choose Rename and type your own. Apple’s arrangement-marker instructions describe these controls. The eight-bar default is not a rule for verses or choruses.
The plus button adds the first marker at the project start and later markers after the last existing marker, regardless of the playhead position. If you are only mapping music already recorded, suspend the content connection before repositioning the labels, as explained below. Otherwise, a marker move can rearrange the music too.
Apple's regular marker overview describes them as labels and navigation points. Arrangement markers have another job: while their content connection is active, they can move the regions and automation beneath a whole section. Use regular markers when you only need notes or jump points. Use arrangement markers when you intend to restructure the timeline.
Move and copy complete sections safely
Before moving anything, unlock locked tracks and create another Project Alternative if the change is large. Then use the Arrangement track:
- Drag a marker to move the section.
- Option-drag a marker to copy the section.
- Drag one marker directly over another to swap their positions.
- Command-drag one marker over another to replace the destination section.
Apple’s Arrangement marker editing guide confirms that connected markers carry the regions and automation points in their section. Inserting a marker or copy between sections makes room to its right; moving or deleting a section closes the gap behind it. Check later sections as well as the edit itself. To delete, select the arrangement marker and press Delete once to remove the regions beneath it, then again to remove the empty marker. Save first and use Command-Z immediately if you remove material you wanted to keep.
To move, resize or delete arrangement labels without changing the music, click Arrangement in the track header and choose Suspend Content Connection. The header becomes Arrangement (suspended). Choose the same command again to reconnect the content before moving or copying a song section.
Keep automation attached to the right moment
A connected arrangement marker moves the automation points within its section. For an individual region move, track automation follows the Move Track Automation with Regions setting: Never leaves it in place, Always moves it, and Ask prompts you. Region automation stays attached when you move or copy its region.
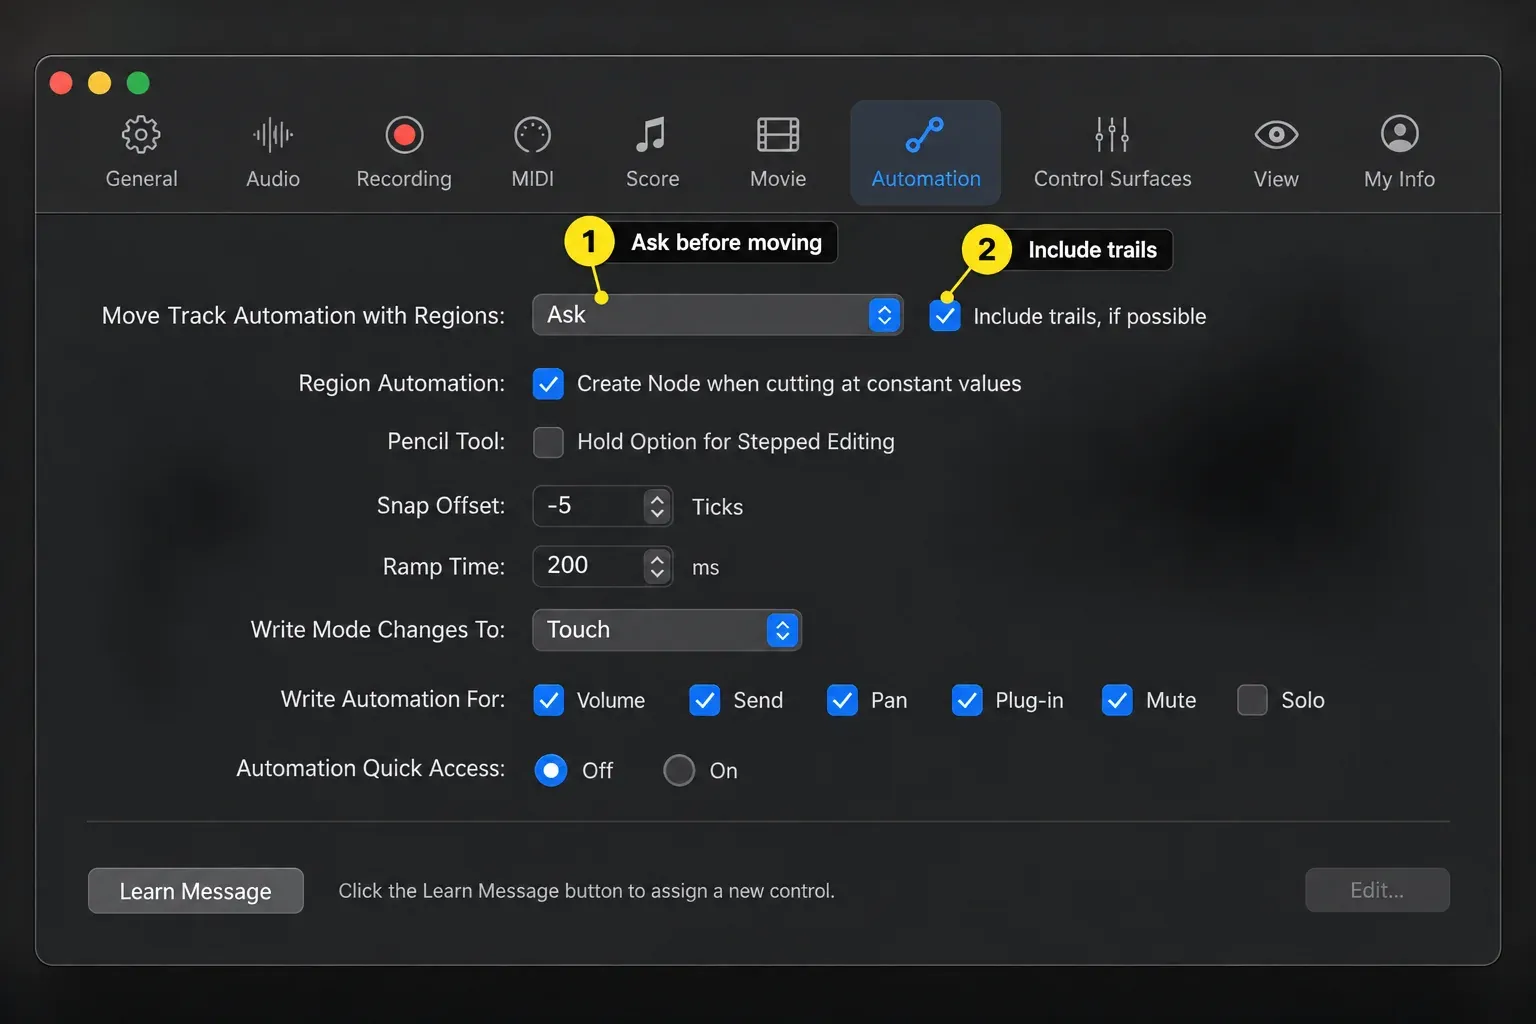
Choose Logic Pro > Settings > Automation and set Move Track Automation with Regions to Ask if you want to decide on each move. Apple’s Automation settings reference also explains Include trails, if possible: when selected, moves and copies can include track automation in the empty space after a region. This is separate from region automation. Inspect volume, pan, sends and plug-in lanes at both the old and new boundaries, then play through the transition.
Make each section earn its place
For example, take a beat with drums, bass, chords and a vocal hook. Open with chords and a vocal fragment; introduce the bass and full groove in the main section; remove the drums for the contrast section. On the next return, keep the groove but change the last vocal response. This is one possible sketch, not a required song form. At each marker, ask:
- What becomes the focus here?
- What disappears or steps back?
- What changes during the section instead of only at its start?
- Why should the next section arrive now?
For drums, variation can be as small as a missing kick, a different final snare or a quieter hat row. The Logic Pro Step Sequencer guide shows how to create pattern changes without rebuilding the whole groove. For harmony or melody, change the register, inversion, phrase ending or response. For vocals, leave room for the lyric rather than filling every gap.
Transitions work best when they explain the next section. A riser can build expectation. Silence can make the downbeat feel larger. A reverb throw can close a phrase. None of them repairs two sections that have the same density, hook and rhythm.
Use a reference for proportions, not imitation
Listen to a reference with a similar musical purpose on its own, not mixed with your song. If you import an audio file onto a separate track, mute your other tracks while listening to it. Add regular markers where its sections change. Lining up the first downbeat is only a starting reference; it does not synchronize the tempo of the whole recording with your project.
Compare when the hook arrives, how long each return takes and where the texture changes. Then mute the reference, restore your own tracks and listen to your arrangement. For a detailed comparison setup, follow our reference-track workflow. Keep the reference muted when bouncing your own song.
Know when the arrangement is finished
Play the song from start to finish three ways:
- Normal level: mark every moment where attention drops for the wrong reason.
- Very quiet: check whether the main focus still changes clearly between sections.
- Without watching the screen: confirm that you can hear the boundaries instead of merely seeing colored blocks.
Then check the timeline for clipped pickups, doubled regions, automation left at an old location, reverb tails cut by a move, and an ending that runs into accidental silence. Don't start mastering while you're still deciding whether the second chorus should exist. Continue to the Mix & Master hub only after the form survives a complete listen.
Why the arrangement still feels like a loop
Every section has the same density
Mute one important layer in the opening and one different layer in the contrast section. If the full arrangement plays from bar one, later sections have nowhere to grow.
The copied chorus feels identical
Change one detail you can hear at the end of the phrase: shorten a bass note, remove a kick, change the last snare hit or leave a gap before the hook. Compare the two returns without adding another track.
Moving a marker does not move the music
Content connection may be suspended. Click the word Arrangement in the track header and check the setting. Also confirm that the marker covers the regions you expect and that relevant tracks are unlocked.
Regions moved but automation did not
Check whether you moved an arrangement marker or an individual region. For a region move, check Logic Pro > Settings > Automation > Move Track Automation with Regions. For a marker move, check its boundaries and content connection. Inspect the affected automation lanes before making another edit.
The song has transitions but no direction
Remove the risers and crashes temporarily. If the sections still feel identical, change the instrumentation, rhythm, harmony, register or silence. Transition effects should clarify contrast that already exists.
Frequently asked questions
How long should each song section be in Logic Pro?
There is no universal length. Logic creates new arrangement markers at eight bars, but that is a software default, not a songwriting rule. Let the phrase, lyric, tempo and energy decide when the section has completed its job.
How do I turn an eight-bar loop into a full song?
Duplicate it across a rough timeline, build the opening by removing parts, state the full idea once, create one contrasting section, change the returning sections and write a deliberate ending. Convert repeated material into editable copies where local variation is needed.
What is the difference between markers and arrangement markers in Logic Pro?
Regular markers label positions and help with navigation. Arrangement markers label complete sections and, while content connection is active, can move or copy the regions and automation beneath those sections.
How do I copy a chorus in Logic Pro?
Create an arrangement marker covering the chorus, unlock affected tracks and make sure content connection is active. Option-drag the marker to the new position. Check the copied regions, automation and section boundaries immediately afterward.
Why did my regions not move with an arrangement marker?
The Arrangement track may have Suspend Content Connection enabled, the marker may not cover the intended material, or a track may be locked. Reconnect the track, check the marker edges and unlock relevant tracks before trying again.
Should I arrange with loops or copied regions?
Loops are useful for laying out a first timeline. Use separate copies when a returning section needs different notes, a fill or a shorter phrase. For audio, remember that separate regions can share the same source file; for automation, check whether it belongs to the region or track.
Should I mix while arranging?
Make rough level, pan and sound-choice decisions when they help you judge the song. Leave detailed processing and mastering until the section order, contrast and ending survive a complete listen.
Does every song need an intro, verse, chorus and bridge?
No. Those names are useful labels, not compulsory parts. Instrumental, electronic, cinematic and experimental music can use different forms. Every section still needs a clear role and a reason to arrive when it does.
Finish the structure before polishing it
Save another Project Alternative, bounce a rough version with the reference muted, and listen away from the editor. Note the section and moment you want to change. That gives you a specific next edit instead of another round of adjustments to the whole mix.
If the arrangement is still just one part of a larger first project, the Create Music in Logic Pro hub connects the work on drums, samples and instruments to this finished structure.


