How to Use EFM1 for FM Synthesis in Logic Pro
EFM1 gets easier when you separate the ratio, FM intensity and two envelopes. Build a useful starting sound before adding detune, velocity or modulation.

To use EFM1 in Logic Pro, load it in a software instrument track’s Instrument slot, set the Modulator and Carrier Harmonic controls, then raise the large FM knob to add overtones. Shape the brightness with Modulation Env and its FM depth control. Use the separate Volume Env to shape how loudly the note starts, sustains and ends.
I’d learn those controls before touching Randomize. A simple ratio and two deliberate envelope shapes explain more than a complicated preset does. EFM1 is especially useful for exploring bell-like tones, electric keys and basses without the routing system of a larger synth.
Find EFM1 and get a playable starting point
- Create or select a software instrument track. An audio track’s Audio FX menu is the wrong place.
- Show the channel strip in the Inspector or Mixer. Click its Instrument slot and choose EFM1. On an occupied slot, use the arrows at the right to choose a replacement; the center opens the current instrument.
- EFM1 sits in the ordinary menu with the other current synths, so you don’t need to Option-click the Instrument slot; that only reveals the Legacy folder of older, simplified instruments. Apple documents this legacy plug-in menu behavior.
- Play a few notes with a MIDI controller. Without one, use Window > Show Musical Typing, or Command-K, to play from the Mac keyboard.
- Save a sound you want to keep before replacing or resetting it. For a plain starting point, choose Settings > Reset Setting in the plug-in header, then establish the controls below.
Keep the listening level modest while changing unfamiliar FM settings. On the first pass, turn off Unison, return Stereo Detune and Sub Osc Level to zero, center both oscillator Fine controls, and leave Fixed off. Set Voices to a polyphonic value if you want to play chords. This isolates the main tone before the extra layers change it.
This walkthrough uses the Mac interface. Apple also includes EFM1 in Logic Pro for iPad, where Tile view exposes a smaller control set and Details view gives access to the full instrument. The Mac’s Option-click menu and lower-left disclosure arrow are not iPad instructions.
Choose the ratio, then add FM intensity
EFM1 has a multiwave modulator and a sine-wave carrier. The modulator changes the carrier’s frequency at audio rate, creating additional overtones. The ratio sets the basic overtone relationship. FM intensity controls how strongly those overtones appear. Apple’s modulator and carrier reference explains this core signal path.
Read a ratio here as modulator:carrier. Set both Harmonic knobs to 1 for 1:1, then raise FM gradually while holding a note. Compare that with Modulator 2 and Carrier 1. Apple describes these as sawtooth-like and square-like starting ratios. Those labels point to a tonal direction. They don’t guarantee that every Wave, envelope and FM setting produces the same sound.
For a controlled comparison, leave the modulator Wave knob fully left. That selects a sine wave. Turning it clockwise introduces more complex digital modulator waveforms. Change Wave after you understand what the current ratio and FM amount are doing.
- Harmonic: changes the oscillator relationship. It is not the same job as transposing the whole patch.
- Fine: moves between adjacent harmonics over a range of ±0.5 harmonic. Small offsets can create beating; larger offsets introduce more complex, potentially inharmonic overtones. It is not a cents control.
- Transpose and Tune: set the overall pitch. Tune is the global fine-tuning control measured in cents, as Apple’s global parameter guide specifies.
- Fixed: disconnects the carrier from keyboard pitch, pitch bend and LFO modulation. Leave it off when learning a normally pitched keyboard sound.
If changing Harmonic seems to do little, check FM intensity before changing everything else. With little modulation, the carrier’s plain sine tone dominates. When the sound turns brittle, reduce FM or simplify the modulator waveform before trying to rescue it with effects.
Give brightness and volume different envelopes
The Modulation Env has Attack, Decay, Sustain and Release sliders. Its shape reaches the sound only through the destination amounts: FM depth controls its effect on FM intensity, while modulator pitch controls its effect on the modulator’s tuning. At zero depth, moving that envelope doesn’t change the corresponding destination.
These depth knobs are bipolar. Clockwise applies a positive envelope; counterclockwise inverts it. Start with a modest positive FM depth and modulator pitch at zero so that brightness movement is easy to separate from pitch movement. Apple’s modulation parameter reference documents both destinations.
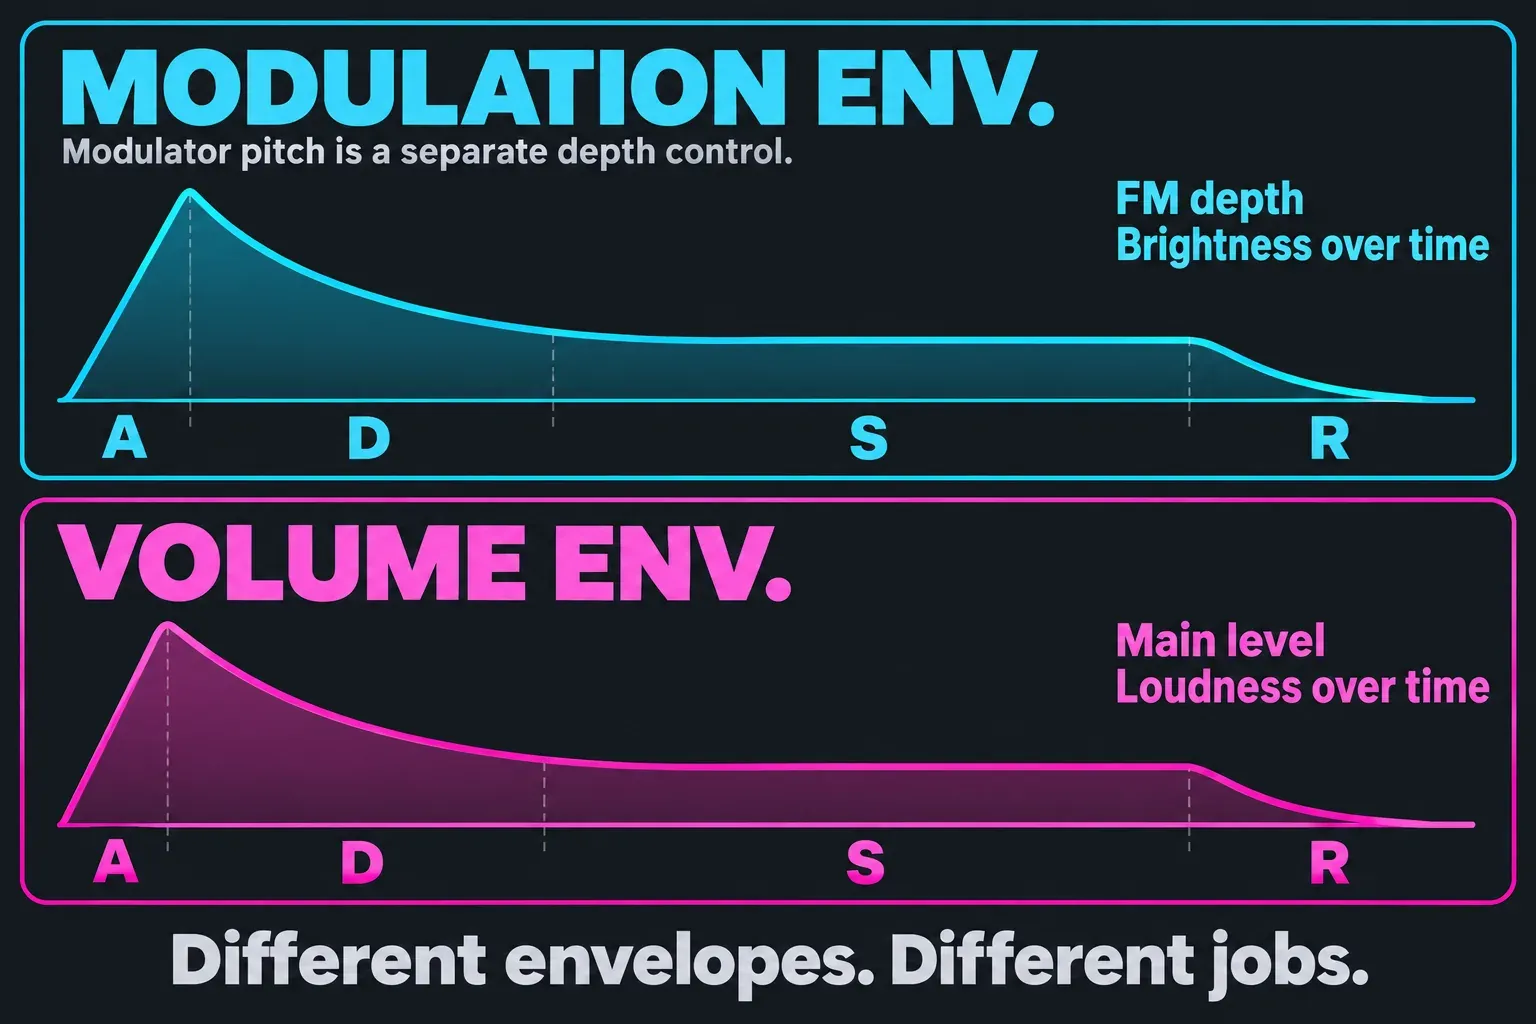
For an electric-key direction, try a fast modulation attack, a decay that lets the bright onset soften, and low modulation sustain. Then give the Volume Env enough decay or sustain for the body of the note to remain audible. A short brightness decay doesn’t have to mean a short note.
The Volume Env’s Attack sets the rise to maximum level, Decay moves toward the Sustain level, and Release sets the fade after note-off. Sustain is a level, not a duration. Use the Main Level knob for overall output. These are separate controls in Apple’s EFM1 output reference.
Three sound-design starting points
These are exercises to adapt to the phrase and note range. They aren’t factory preset names or measured sound recipes. Keep one MIDI phrase while changing a single control so a different performance doesn’t disguise the effect.
A soft electric-key tone
Begin with sine modulation, a 1:1 ratio and restrained FM intensity. Use a fast Modulation Env attack, positive FM depth, low sustain and a decay that softens the initial brightness. Let the Volume Env decay more slowly. Increase Velocity sensitivity if harder notes should be both brighter and louder. Reduce it if changes in playing strength overwhelm the part.
A bell-like accent
Start from that simple patch, raise the modulator Harmonic value and compare a small Fine offset with the centered position. Keep modulator pitch depth at zero at first, so its envelope doesn’t sweep the ratio. Give the volume a fast attack, low sustain and a longer decay or release. Adjust the amount of FM until the accent has enough edge, then reduce it if the upper notes become harsh. The useful balance depends on the register. A bell patch doesn’t need to cover the whole keyboard.
A focused FM bass
Try 2:1 with a restrained FM amount, little release and one voice for a single-note line. Add a small amount of Sub Osc Level only if the low end needs support. That control adds a sine one octave below the FM engine, so it changes the weight as well as the level. Leave Stereo Detune low while establishing a stable bass part, and compare notes in the intended octave before adding width.
Add movement without losing the part
Velocity changes both brightness and loudness. Turning it fully counterclockwise removes velocity response. If a patch becomes too sharp only on strong notes, inspect this control before redesigning the ratio.
The LFO amount knob has two directions: clockwise modulates FM intensity, while counterclockwise adds vibrato. The center applies neither. Rate sets the speed. Start with a small amount. Strong vibrato can make a useful tone seem out of tune even when the global Tune is correct.
Voices offers Mono, Legato and polyphony from 2 to 16. Unison layers two complete voices and limits maximum polyphony to eight. Long releases still need room alongside new notes. Glide changes the travel time between pitches and works in both monophonic and polyphonic modes, so check it when notes seem to slide unexpectedly.
Stereo Detune adds a doubled, detuned FM engine for a chorus-like width. Apple warns that it can reduce mono compatibility. Check the part in mono before relying on the widened sound, especially for a bass or exposed hook.
For a hardware control, expand the Mac plug-in’s lower-left disclosure arrow and choose the controller in Ctrl FM or Ctrl Vibrato, then set the associated amount. Apple’s MIDI controller assignment instructions recommend an unused controller. A correct menu choice with an amount of zero will not produce the intended movement.
Save the patch and diagnose the right control
Use Settings > Save Setting As to keep a reusable version under a new name. Save Setting overwrites the existing setting. Plug-in settings are also stored with the project. Apple’s plug-in settings guide covers these different save operations.
Randomize is useful once you have something worth keeping. A low variance, such as below 10%, makes subtler changes than a high value. Save useful results before another click. That’s the job of Apple’s Randomize amount control. It isn’t a substitute for learning the patch.
- The modulation envelope seems inactive: check FM depth or modulator pitch depth. A destination amount of zero blocks that envelope’s effect.
- The note gets dull but never quieter: you changed brightness. Adjust Volume Env when the job is to shorten or fade the audible note.
- Pitch stops following the keyboard normally: check Fixed first, then global Transpose, Tune, Glide and modulation amounts.
- Chords lose notes: inspect Voices, Unison and long release tails. Raising Main Level cannot restore a missing voice.
- Every synth is silent: move to the MIDI input diagnostic. A routing problem is different from a quiet EFM1 envelope or output setting.
Stay with EFM1 while the job is a direct modulator/carrier patch. Choose Retro Synth when comparing several synthesis engines, or ES2 for a larger oscillator and modulation system. The Create Music hub connects the resulting sound to recording, MIDI editing and arrangement.


