How to Export GarageBand to MP3 on Mac, iPhone and iPad
Get an MP3 out of GarageBand: the Mac export dialog, the WAV-then-convert route for iPhone and iPad, which quality to pick for email, podcasts and masters, exporting one section or track, and fixes for common export problems.

To export GarageBand to MP3 on a Mac, choose Share > Export Song to Disk, pick MP3 as the format, choose a setting from the Quality menu, pick where to save it and click Export. Apple’s Export Song to Disk steps list MP3 next to AAC, AIFF and WAVE, and the result is a stereo file with the silence at either end trimmed off.
GarageBand on iPhone and iPad has no MP3 option. There you export the song as an audio file, preferably Uncompressed WAV, move it to a Mac and turn it into an MP3 with the Music app or GarageBand. Below are both routes, the quality to pick for email, podcasts and masters, and fixes for the usual export problems.
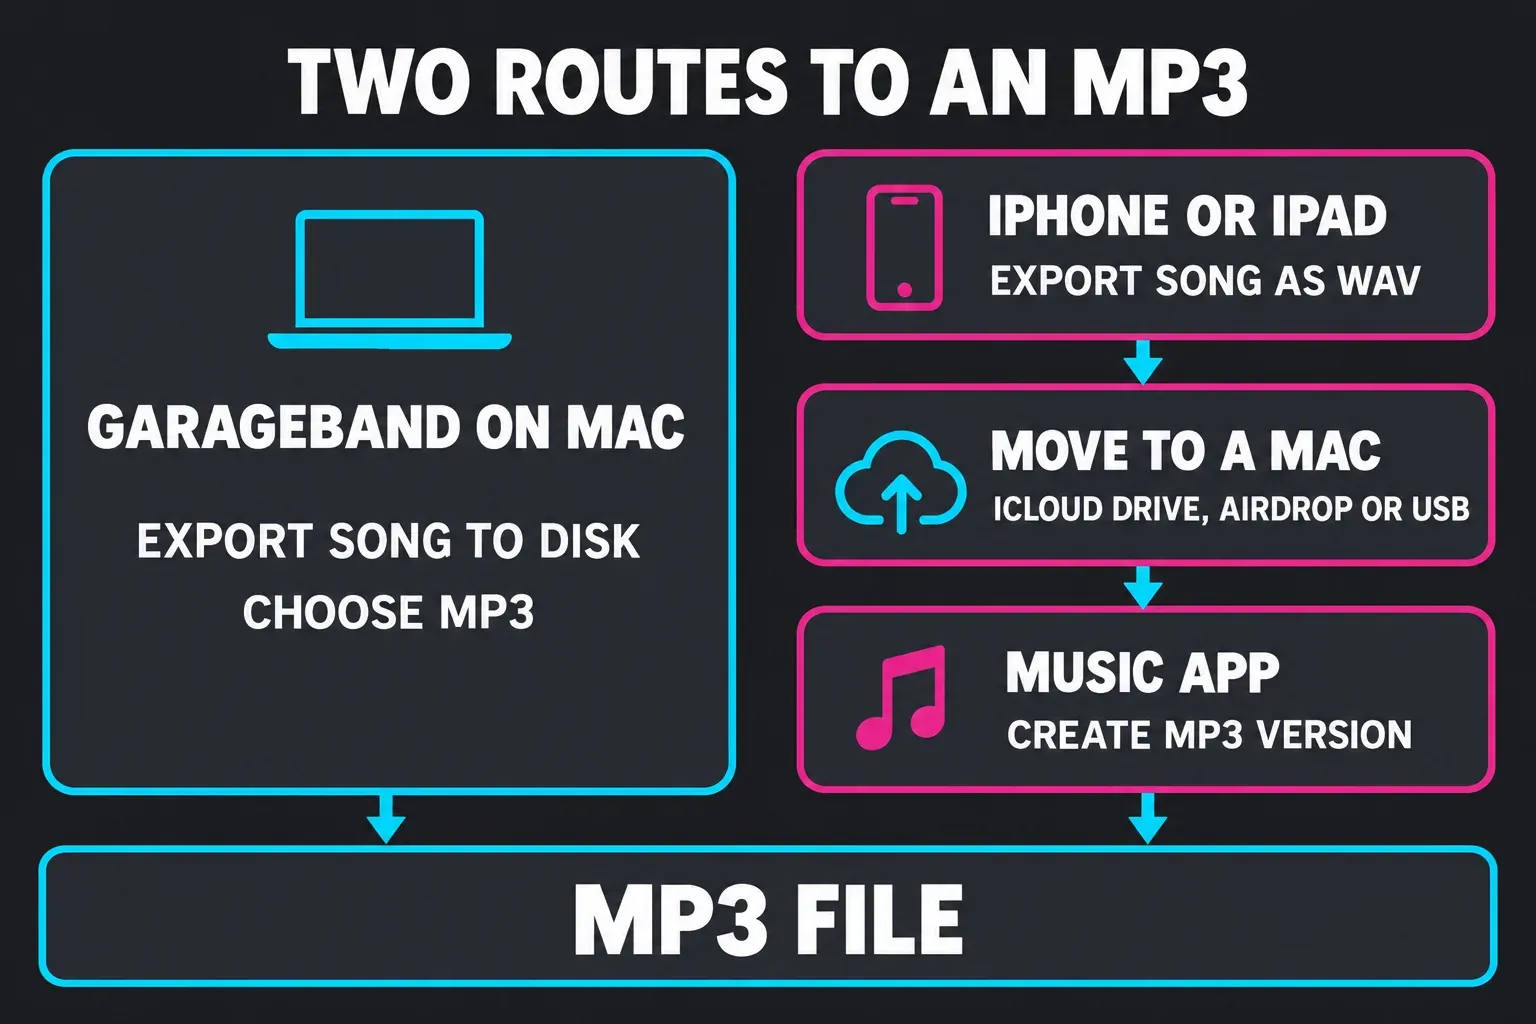
How do you export an MP3 from GarageBand on a Mac?
Open the project and check one thing first: everything you want in the file should be audible when you press play from the start. The export records what the master output plays, so a muted track stays silent and a soloed track silences the rest. Then:
- Choose Share > Export Song to Disk.
- Type a file name in the Save As field.
- Pick a folder from the Where pop-up menu, or click the down arrow for more locations, including iCloud Drive.
- Select MP3 as the format.
- Choose a setting from the Quality pop-up menu. For a finished song, take the highest one.
- Leave the checkbox “Export cycle area, or length of selected regions (if Cycle is turned off)” clear to export the whole song.
- Click Export.
GarageBand writes one stereo file, whatever the number of tracks. Apple’s guide for GarageBand 10.4 is more specific about the length: the full export runs from the beginning to the end of the last region, and silence at the start or end is trimmed. That second point matters if you send stems, which comes up below.
If MP3 is missing, first check that you’re using GarageBand on a Mac. The iPhone and iPad apps need a conversion step. Before updating the Mac app, back up your projects and check its current macOS requirement. The current Mac export steps list MP3 alongside AAC, AIFF and WAVE.
Which format and quality should you choose?
Choose by where the file goes next. If someone will only listen to it, an MP3 at the top quality setting is fine. If anyone will process it again, such as a mastering engineer, a distributor or you in another project, export WAV or AIFF and make MP3s from that file later.
The reason is in Apple’s note on converting music file formats: data a compressed format throws away can’t be recovered, and converting MP3 to an uncompressed format only makes the file bigger. Each extra lossy encode costs a little more, so the master you keep should never be the MP3.
| Where the file goes | Export as | Why |
|---|---|---|
| Email, messages, a quick listen | MP3 or AAC, highest quality | Small file, plays almost anywhere |
| Apple Podcasts Connect | MP3 stereo at 128 to 256 kbps, 44.1 or 48 kHz, or WAV | Apple’s recommended range for stereo MP3 |
| Podcast RSS feed | AAC or MP3 at 128 to 256 kbps stereo | Apple prefers AAC for feeds |
| Mastering, mixing or a distributor | WAV or AIFF | Nothing is lost before the next stage |
| Your own archive | WAV or AIFF | Every later MP3 starts from full quality |
The podcast rows come from Apple’s audio requirements for podcasters. Connect accepts WAV, FLAC or MP3, recommends 128 to 256 kbps for stereo MP3 at 44.1 or 48 kHz, and wants a stereo source for WAV and FLAC. For RSS feeds Apple writes that it strongly recommends AAC instead of MP3, because AAC sounds better at the same bit rate. For the format background, see AIF vs AIFF vs WAV.
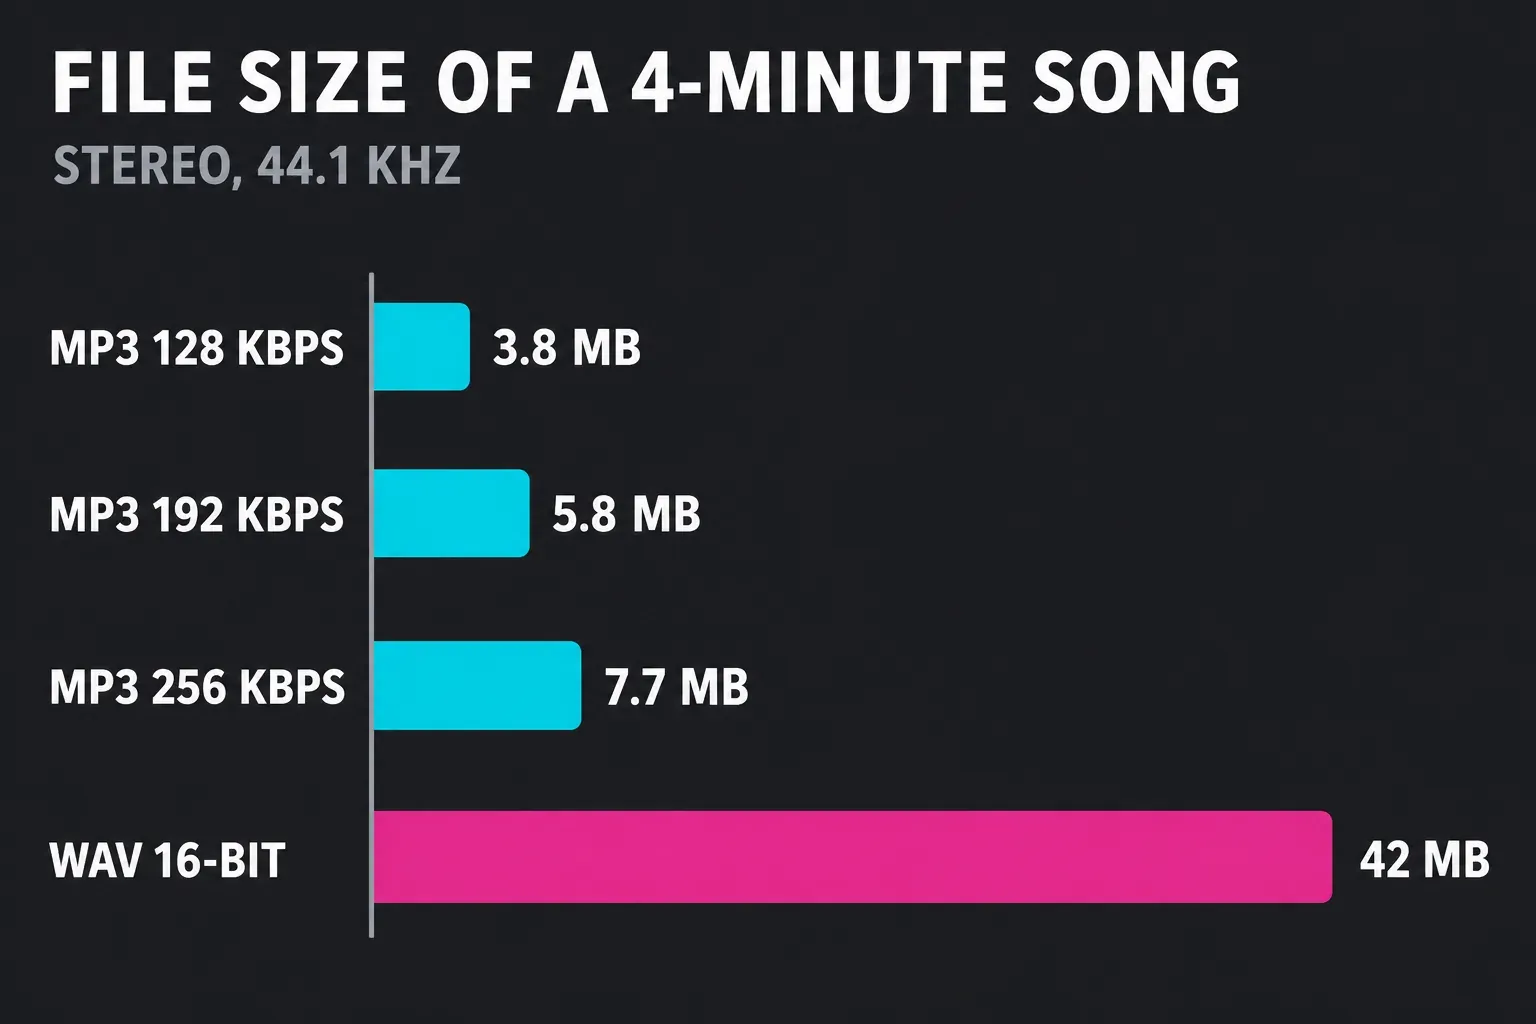
File size follows directly from the bit rate. An MP3 at 128 kbps takes about 0.96 MB per minute, while a 16-bit, 44.1 kHz stereo WAV takes about 10.6 MB. A four-minute song therefore lands near 3.8 MB as a 128 kbps MP3, 7.7 MB at 256 kbps and 42 MB as a WAV. The chart below is that arithmetic, not a measurement of GarageBand’s presets.
How do you export only part of a song or a single track?
For one section, use the cycle area. Press C or click the Cycle button, then drag across the top part of the ruler. The section appears as a yellow strip, and you can drag its edges to resize it, as Apple’s cycle area guide shows. In the export dialog, tick “Export cycle area, or length of selected regions (if Cycle is turned off).” With Cycle off, the same checkbox exports the length of the regions you selected.
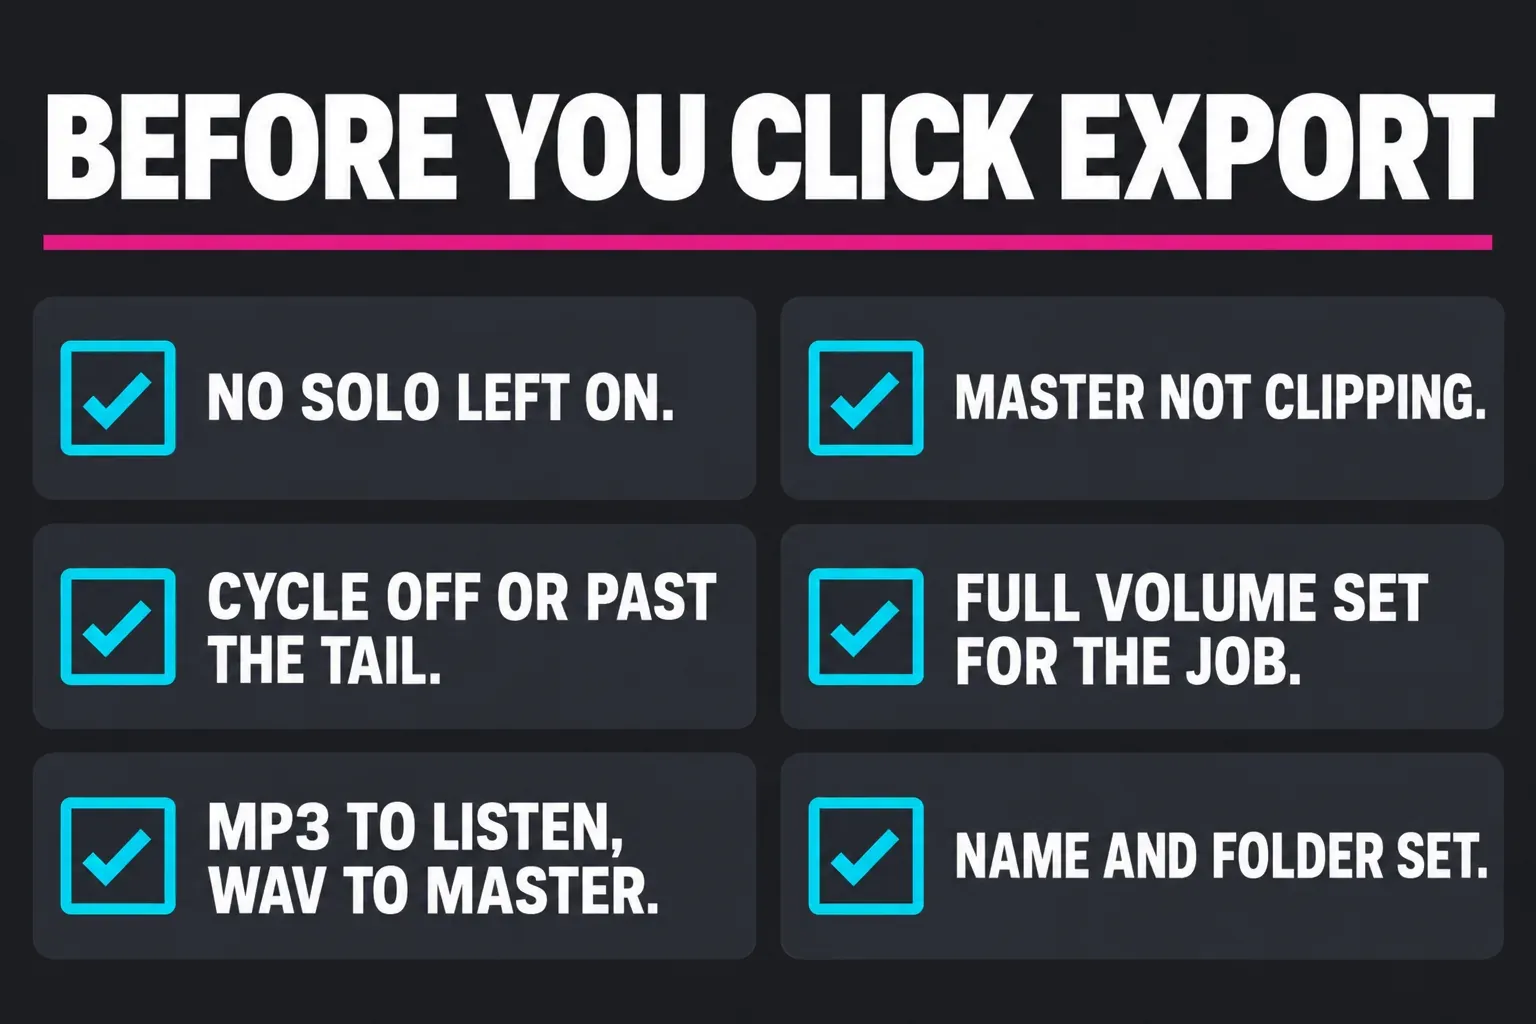
Leave room at the end when the song finishes on reverb or delay. A cycle area that stops on the last note cuts the tail off, so Violet Recording’s export checklist sets it a beat or more past the last sound. The checklist also says to clear accidental solos and mutes and to check that the master isn’t clipping.
For one track, click its Solo button in the track header. It turns yellow, and Apple’s solo instructions say every track that isn’t soloed goes silent. Export, click Solo again to release it, and repeat for the next track. RoEx’s stem export steps follow the same loop and pick WAV, which is the right format for files someone will mix.
Check where each stem starts before you send it. Because GarageBand trims silence at the start, a part that enters at bar 9 may not line up with a drum file that starts at bar 1. Tell your mixer where each file begins, or move the job to Logic Pro, whose stem export writes every track in one pass.
How do you get an MP3 from GarageBand on iPhone or iPad?
Export the song as an audio file and convert it later, because the iPhone and iPad apps don’t write MP3. Their Song export offers compressed AAC quality levels, which save as .m4a, plus Uncompressed WAV and AIFF. Apple’s article on sharing GarageBand songs gives the steps and the format advice:
- In the My Songs browser, touch and hold the song, then tap Share. On some devices you tap Select instead (sometimes behind More), tap the song, then tap the Share button.
- Tap Song to export a stereo audio file for MP3 conversion. Ringtone is a separate export for clips up to 30 seconds.
- Choose the audio quality. Apple’s advice is Uncompressed (WAV) or Uncompressed (AIFF) for best results.
- Enter the song details, then tap Share.
- Tap Save to Files and pick iCloud Drive or a folder on the device. Apple says not to choose the default GarageBand for iOS folder, where your projects live.
I’d take Uncompressed WAV here even though the file is much bigger. The AAC options are already lossy, so an AAC-encoded M4A converted to MP3 goes through two lossy encodes, while a WAV goes through one.
Then move the file to the Mac. With iCloud Drive, it shows up in iCloud Drive in Finder. AirDrop also works, and on a Mac AirDropped items usually land in the Downloads folder. For a cable transfer, Apple’s sharing guide for iPhone saves the file into the GarageBand File Transfer folder, then on the Mac you select the iPhone in Finder, click Files, open GarageBand and drag the file out. The iPad version of that guide uses the same steps.
No Mac at all? A browser-based converter can turn the file into an MP3. An upload-based converter sends your audio to that service. Use the WAV as the input to avoid another lossy encode before the MP3 conversion.
How do you convert the file to MP3 on a Mac?
The Music app is the quickest route. Apple’s M4A to MP3 instructions run like this:
- In Music, choose Music > Settings, click Files, then click Import Settings.
- Choose MP3 Encoder from the Import Using pop-up menu and click OK. The Setting menu below it holds the quality presets and a custom option.
- Drag the file from Finder into Music if it isn’t in your library yet. Recently Added in the sidebar finds it.
- Select it and choose File > Convert > Create MP3 Version.
- Select the new copy and choose File > Show in Finder.
The same Apple article gives a GarageBand route, useful when you also want to trim or fade. Choose File > New, select Empty Project, pick Mic or Line for the track and drag the file into the Tracks area. Turn off the metronome, select the region, then use Share > Export Song to Disk with MP3 and the cycle checkbox ticked.
If you start in GarageBand on the Mac, skip all of this and export MP3 directly. Share > Song to Music can also send a compressed or AIFF copy straight into your Music library, where the same Convert command works.
How do you set the level before you export?
Start with the master track. Choose Track > Show Master Track, play the loudest part and watch the clipping indicators in the master level meter. Apple’s master track guide says to set the output high enough to cover background noise but not so high that it clips. A clipped export stays distorted in every copy you make from it.
GarageBand also has a level setting that only affects exports. In GarageBand > Settings > Advanced (Command-Comma), “Export projects at full volume” makes GarageBand export at the highest level, 0 dBFS, at which no distortion occurs, and leaves playback in the app unchanged, according to Apple’s Advanced settings page. Turn it on when a song exports too quiet.
For podcasts I’d leave it off. Apple Podcasts asks for loudness around -16 dB LKFS and true peaks no higher than -1 dBFS, and warns that encoders can clip a signal that ignores the peak limit. A file normalized to 0 dBFS has no room for that. Clipping indicators tell you about peaks, not loudness. To hit an LKFS number, measure the export with a loudness meter like the one in Logic Pro, covered in our LUFS guide.
A fade belongs on the master track too. Mix > Fade Out adds four volume points: 10 seconds before the end of the last region, then at 7 seconds, at 4 seconds and at the end. Choose Mix > Show Automation and move those points to make the fade shorter or longer.
How do you fix common GarageBand MP3 export problems?
| Problem | Likely cause | Fix |
|---|---|---|
| No MP3 in the format list | Using the iPhone or iPad app | Check the Mac export dialog, or export WAV on iOS and convert |
| Only one instrument in the file | A Solo button left on | Click the yellow Solo button again and export |
| A part is missing | That track is muted | Unmute it. Command-click a muted track’s Mute button to unmute every muted track at once |
| The file is a short section | Cycle checkbox ticked with a small cycle area or a selected region | Clear the checkbox, or widen the cycle area |
| The reverb tail is cut off | Export stops at the end of the last region or cycle area | Set a cycle area past the tail and tick the checkbox |
| The song ends early or late | The cycle range omits wanted audio or includes extra material | Reset the cycle range and the export checkbox, then check the file |
| The export is distorted | The master clips | Lower the master volume until the clipping indicators stay off |
| The export is too quiet | Low master level | Turn on Export projects at full volume, or raise the master without clipping |
| The file is too big to email | WAV or AIFF attachment | Send an MP3, or let Mail Drop deliver the large file |
| You can’t find the file | Saved to a different Where location | Search Finder for the name. Check Downloads for AirDropped files |
For playback, new GarageBand projects are 32 bars long by default, and the end-of-project marker stops playback where it sits. For a section export, set the cycle range and the export checkbox explicitly. Mail Drop comes from Apple’s page on sharing GarageBand songs by email, which also lets you export only the cycle area.
When does Logic Pro make more sense?
GarageBand’s export is enough for most songs. Move up when you want finer MP3 encoder settings than GarageBand’s Quality menu, export every track in one pass, or check loudness before the file leaves the computer. Logic Pro opens GarageBand projects directly with no import or conversion, and its bounce dialog is covered step by step in how to export Logic Pro as MP3. For the bigger picture, Logic Pro vs GarageBand compares the two.
GarageBand MP3 export FAQ
Can GarageBand export MP3?
Yes, on a Mac. Choose Share > Export Song to Disk and select MP3. GarageBand on iPhone and iPad exports AAC, WAV or AIFF instead, so an MP3 needs a conversion step.
How do I export GarageBand to MP3 on iPhone?
Share the song as a Song with Uncompressed (WAV) quality, save it to Files, move it to a Mac and use Create MP3 Version in the Music app. Without a Mac, an online converter is the fallback.
What MP3 quality should I choose?
The highest setting for music people will listen to. For Apple Podcasts, Apple recommends 128 to 256 kbps for stereo MP3 at 44.1 or 48 kHz. Keep a WAV or AIFF copy as your master either way.
Does converting M4A to MP3 lose quality?
Converting an AAC-encoded M4A to MP3 applies another lossy encode. M4A is a container and can also hold lossless audio; the quality change depends on its codec and the MP3 settings. Apple notes that data lost in compression can’t be recovered. That’s why the iPhone route starts with an Uncompressed WAV.
Can I export GarageBand to MP3 on Windows?
No. GarageBand runs only on Apple devices, and Apple says a GarageBand project can’t be opened on a Windows computer. An MP3 or WAV exported on a Mac or iPhone plays on Windows like any other audio file.
Why does my GarageBand MP3 have only one instrument?
Check whether a track is soloed, which silences tracks that aren’t also soloed or solo safe. Click the yellow Solo button to release it, check the Mute buttons and export again.


