How to Fade In and Fade Out in GarageBand on Mac, iPhone and iPad
On a Mac, Mix > Fade Out adds four volume points over the last 10 seconds; on iPhone and iPad, the Fade Out switch fades the last ten seconds. Here is how to change the length, draw fade-ins and single-track fades, remove a fade, export it, and whether a song should fade at all.

To fade out a whole song in GarageBand on a Mac, choose Mix > Fade Out. GarageBand puts four volume points on the master track, starting 10 seconds before the end of the last region, and you drag those points to make the fade longer or shorter. On iPhone and iPad, open the song settings and turn on Fade Out, which fades the last ten seconds of the song to silence. Fade-ins and fades on a single track are drawn by hand as volume automation on both.
I’d use the one-click fade for demos and draw the fade by hand for anything you release, because the automatic version always starts exactly 10 seconds before the last region ends, whether that lands on the final chorus or on a tail of silence. Below are the Mac steps for the whole song and for single tracks, the iPhone and iPad steps, how to edit and remove fade points, exporting with the fade intact, and what Billboard number ones from 1958 through January 2025 suggest about whether your song should fade at all.
Which GarageBand fade method should you use?
GarageBand has one automatic fade-out on each platform. Everything else, including every fade-in, is volume automation that you draw.
| Job | Mac | iPhone and iPad |
|---|---|---|
| Fade out the whole song | Mix > Fade Out, on the master track | Song settings > Fade Out |
| Fade length | 10 seconds; drag the points to change it | Ten seconds; the switch has no length setting |
| Fade in the whole song | Volume points at the start of the master track | Volume points at the start of each track |
| Fade one instrument or vocal | Volume automation on that track | Volume automation on that track |
| Fade a single region with a curve | Not in GarageBand; Logic Pro has a Fade tool | Volume automation over that region |
On a Mac I’d do every whole-song fade on the master track, because one set of points fades the full mix together and leaves each track’s own volume moves alone. On iPhone and iPad the Fade Out switch is the only whole-song fade, so I’d use it unless the song needs a fade-in or a different length.
How do you fade out a song in GarageBand on a Mac?
- Show the master track. Choose Track > Show Master Track (Shift-Command-M). It appears below the last track in the Tracks area.
- Add the fade. Choose Mix > Fade Out. Apple’s master track page says this adds four volume points to the master track: the first 10 seconds before the end of the last region, the second at 7 seconds, the third at 4 seconds and the fourth at the end of the last region.
- Show the points. Choose Mix > Show Automation (or press A), then choose Volume from the Automation menu in the master track header.
- Change the length. Drag the points at the end of the master volume curve. Drag the first point left for a longer fade or right for a shorter one.
Some guides still call this command Create Volume Fade Out On Main Output, as Producer Society’s automation tutorial does. In Apple’s current guide it’s Mix > Fade Out.
The fade is measured from the end of the last region, not from the last note. Unused silence at the end can shorten the audible fade, while sustained instrument or effect decay remains part of the musical ending. Keep the instrument, reverb and delay decay you want to hear inside the export range. Trim only unused silence after that tail, then position the fade points over the musical ending; don’t automatically cut at the final note.
For the shape, engineer Jeff Rothschild told Slate’s William Weir that a natural fade has to “go down a little quicker at first, and then it’s a longer fade.” In GarageBand that means dragging point 2 lower than a straight line from point 1 to point 4 would put it, so the level drops early and then trails off. Hold Control while you drag for finer steps.
How do you fade in or draw your own fade on a Mac?
A fade-in, or a fade-out of any length you choose, is the same job by hand. Apple’s master track page says to add volume points to the beginning of the curve for a fade-in or to the end for a fade-out, then move them to set the length and depth.
- Pick the curve. For the whole song, show the master track (Shift-Command-M). Choose Mix > Show Automation (or press A) and choose Volume from the Automation Parameter pop-up menu in the track header.
- Add the first point. On an empty curve, click anywhere in the automation track. Apple’s automation points page says this adds a point at the project start using the current value.
- Add more points. Once the curve has points, click the curve or double-click an empty area of the lane to add a point where you click. For a fade-in you need two: one at the start dragged to the bottom, and one where the music should reach full level.
- Set level and timing. Drag a point up or down to change its value, holding Control for finer steps, or left and right to move it in time. Use the ruler to line the last point up with a beat or bar.
- Or draw it. Command-click and drag along the lane to draw a curve in one stroke.
I’d keep a fade-in short and finish it on the first downbeat, so the first full bar plays at full level. A slow fade-in under a vocal entry makes the first words sound too quiet.
How do you fade one track in GarageBand on a Mac?
Use the same volume automation on that track instead of the master track. Apple’s GarageBand for Mac guide covers fades only through volume automation; there is no Fade tool for regions like the one in Logic Pro.
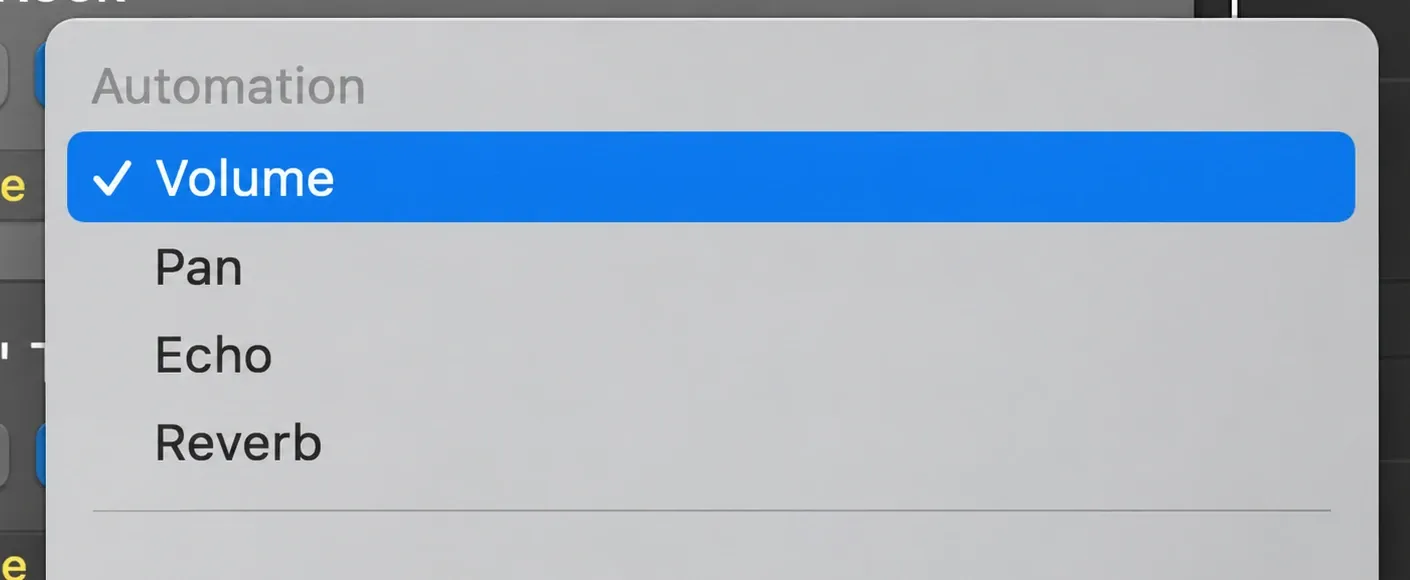
Turn on Mix > Move Automation with Regions before you rearrange anything. Apple’s copy and move automation page says the points then stay with a region when you move or copy it. I’d switch it on as soon as a part has a fade, because a fade that stays put while its region moves ends up fading the wrong bars.
If a curve looks dimmed, the Track Automation button in that track header is off. Apple’s automation curves page says turned-off curves aren’t deleted, just inactive, so click the button again to bring the fade back.
You don’t need to split a region to fade part of it, because automation sits on the track. Split only when you want the faded tail as its own region to move or delete: select the region, move the playhead to the split point and choose Edit > Split Regions at Playhead (Command-T). Apple’s split regions page notes that only the selected region splits, even if a region on another track sits under the playhead.
How do you fade in and out in GarageBand on iPhone and iPad?
The fade-out is a switch:
- Open the song and tap the Settings button in the control bar. On iPhone SE, tap the Settings button, then Song Settings.
- Turn Fade Out on. Apple’s song settings page for iPhone says the last ten seconds of the song then fade to silence.
- Play the end of the song to hear it. The fade plays when you play or share the song, but not while you record.
If you add or move regions so the song runs longer, the fade follows the new end. Tap Fade Out again to turn it off. The iPad version of the page has the same switch. The switch has no length setting, and the song settings have no fade-in switch, so for either one you draw volume automation:
- Tap a track header, then tap Automation. The tracks expand and a volume curve appears over each one.
- Touch and hold the Edit Automation button on the left side of the control bar, tap the curve, then drag vertically to set the point’s level. Drag the button right to lock it so you don’t have to keep holding it.
- Drag points left or right to move them in time.
- Check the Bypass button in the lower-right corner of the track header. Yellow means the automation plays; white means it’s off and the track plays without your fade.
- Tap Done in the upper-right corner of the control bar.
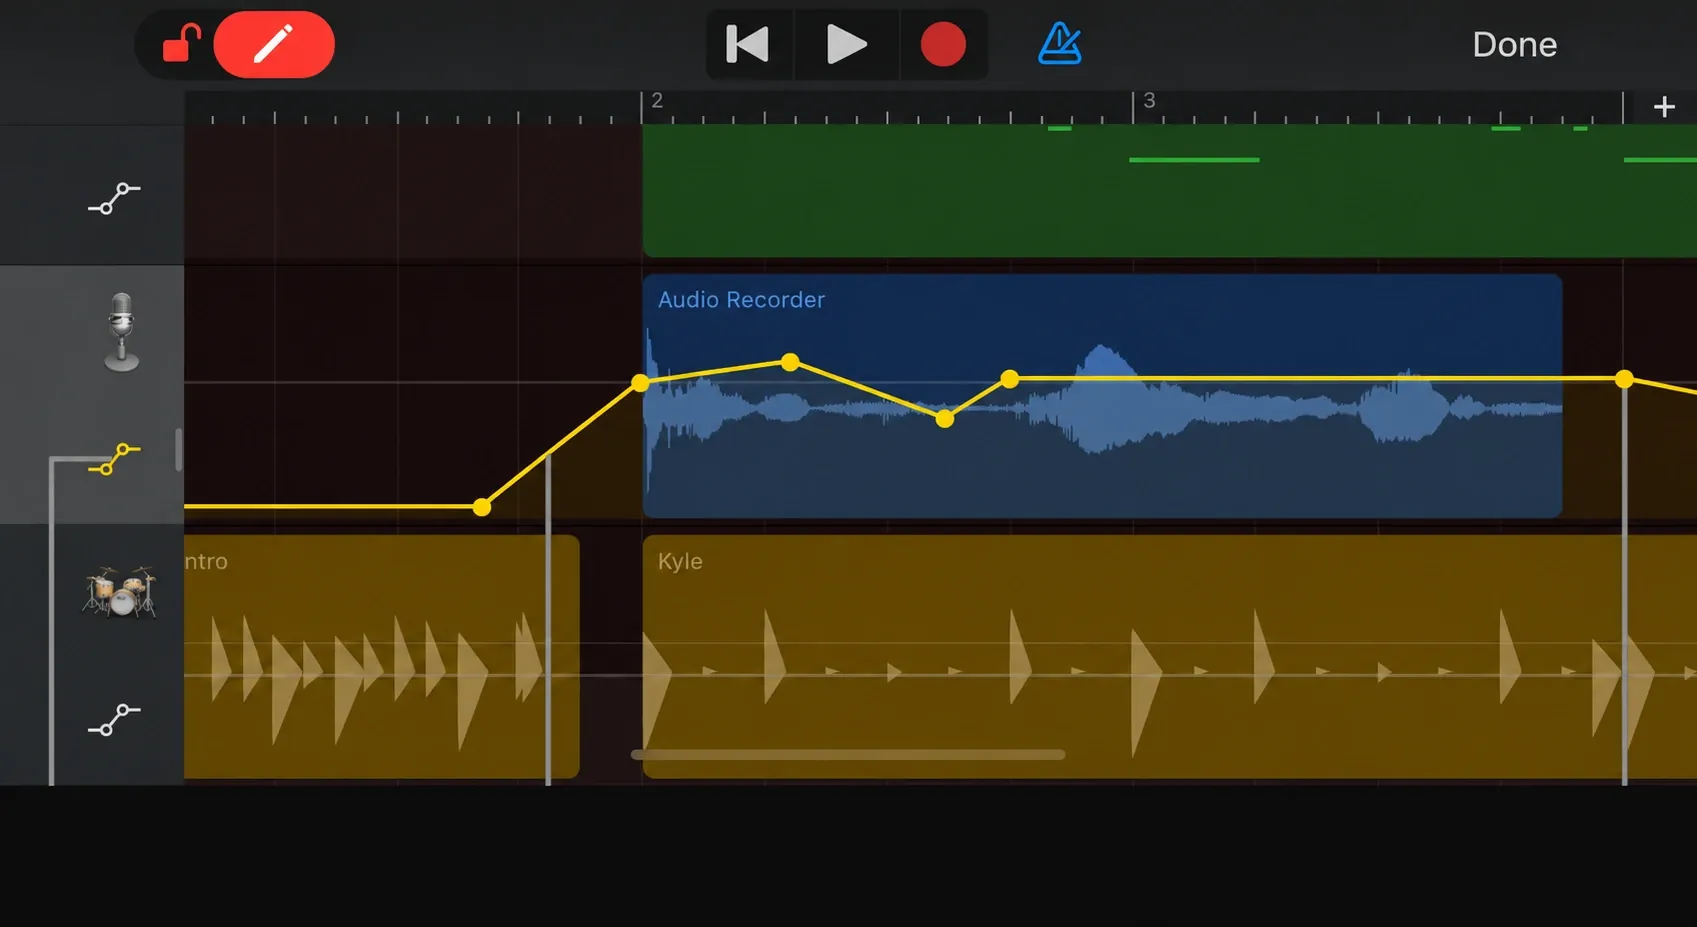
Automation on iPhone and iPad works track by track: Apple’s automate volume changes page shows a curve over each track and no master track. For a whole-song fade-in, draw it on one track, select its points, tap one and tap Copy, put the playhead at the start of the song, tap the next track and tap Paste. Repeat for every track that plays at the start, then adjust each copied curve so it reaches that track’s intended level. Copying the same volume values to every track can change the balance of the mix.
On iPhone I’d use the Fade Out switch for the ending and keep hand-drawn automation for fade-ins and single parts, because copying points across eight tracks is slow and one missed track comes in at full volume.
To cut off a faded tail as its own region, split it: tap the region, tap it again, tap Split, drag the Split marker with the scissors icon to the point, then drag it down, as Apple’s edit regions page describes.
How do you edit, copy or remove fade points?
On a Mac:
- Select. Click a point. Shift-click to add points to the selection or take them out, or drag in the background of the automation track to select a run of points.
- Copy on the same track. Option-drag the selection to a new spot. Any points already there are deleted.
- Copy to another track. Hold Shift while you drag over the points, choose Edit > Copy (Command-C), select the other track, move the playhead to where the copy should start and choose Edit > Paste (Command-V).
- Delete one point. Double-click it, or select it and press Delete.
- Delete several. Select them and press Delete. Apple warns that any selected regions are deleted too, so click an empty part of the automation track first.
- Clear the track. Choose Mix > Delete All Automation on Selected Track (Control-Shift-Command-Delete).
To remove the automatic fade-out, delete its four points on the master track. I’d delete those points one by one or as a selection and keep Delete All Automation for a real restart, because it also clears every other volume or pan move on that track.
On iPhone and iPad, turn Fade Out off in the song settings to remove the automatic fade. For drawn points, touch and hold the Edit Automation button (or lock it) and tap a point to delete it. To delete several, select them by touching and holding one and tapping the others, tapping the curve between two points, or touching and holding an empty part of the track and dragging around them; then tap one and tap Delete.
Does the fade stay when you export?
Yes. On a Mac, choose Share > Export Song to Disk, pick AAC, MP3, AIFF or WAVE, choose a setting from the Quality pop-up menu and click Export. Leave the “Export cycle area, or length of selected regions (if Cycle is turned off)” checkbox off for the full song: with it on, a cycle area or region selection that stops before the last bars cuts the fade. Apple’s export page adds that any silence at the start or end of the project is trimmed, so the file doesn’t carry extra seconds after the fade.
On iPhone and iPad the fade is in what you share. In the My Songs browser, touch and hold the song, tap Share, tap Song, choose the audio quality and tap Share, as Apple’s sharing page lays out.
Should your song fade out at all?
For a pop single, I’d end cold. In the number-one chart sample below, fade-outs are much less common after 2010 than in the 1980s.
Chris Dalla Riva logged whether each song fades out for every Billboard Hot 100 number one from August 4, 1958 to January 11, 2025, and the TidyTuesday release of his database includes that field for all 1,177 songs. Counted by decade, the share that fades out climbs to a peak in the 1980s and then falls hard:
| Period | Number ones | Fade-outs | Share |
|---|---|---|---|
| 1958 to 1959 | 23 | 10 | 43.5% |
| 1960s | 203 | 131 | 64.5% |
| 1970s | 253 | 178 | 70.4% |
| 1980s | 231 | 165 | 71.4% |
| 1990s | 140 | 67 | 47.9% |
| 2000s | 129 | 46 | 35.7% |
| 2010s | 116 | 14 | 12.1% |
| 2020 to January 2025 | 82 | 13 | 15.9% |
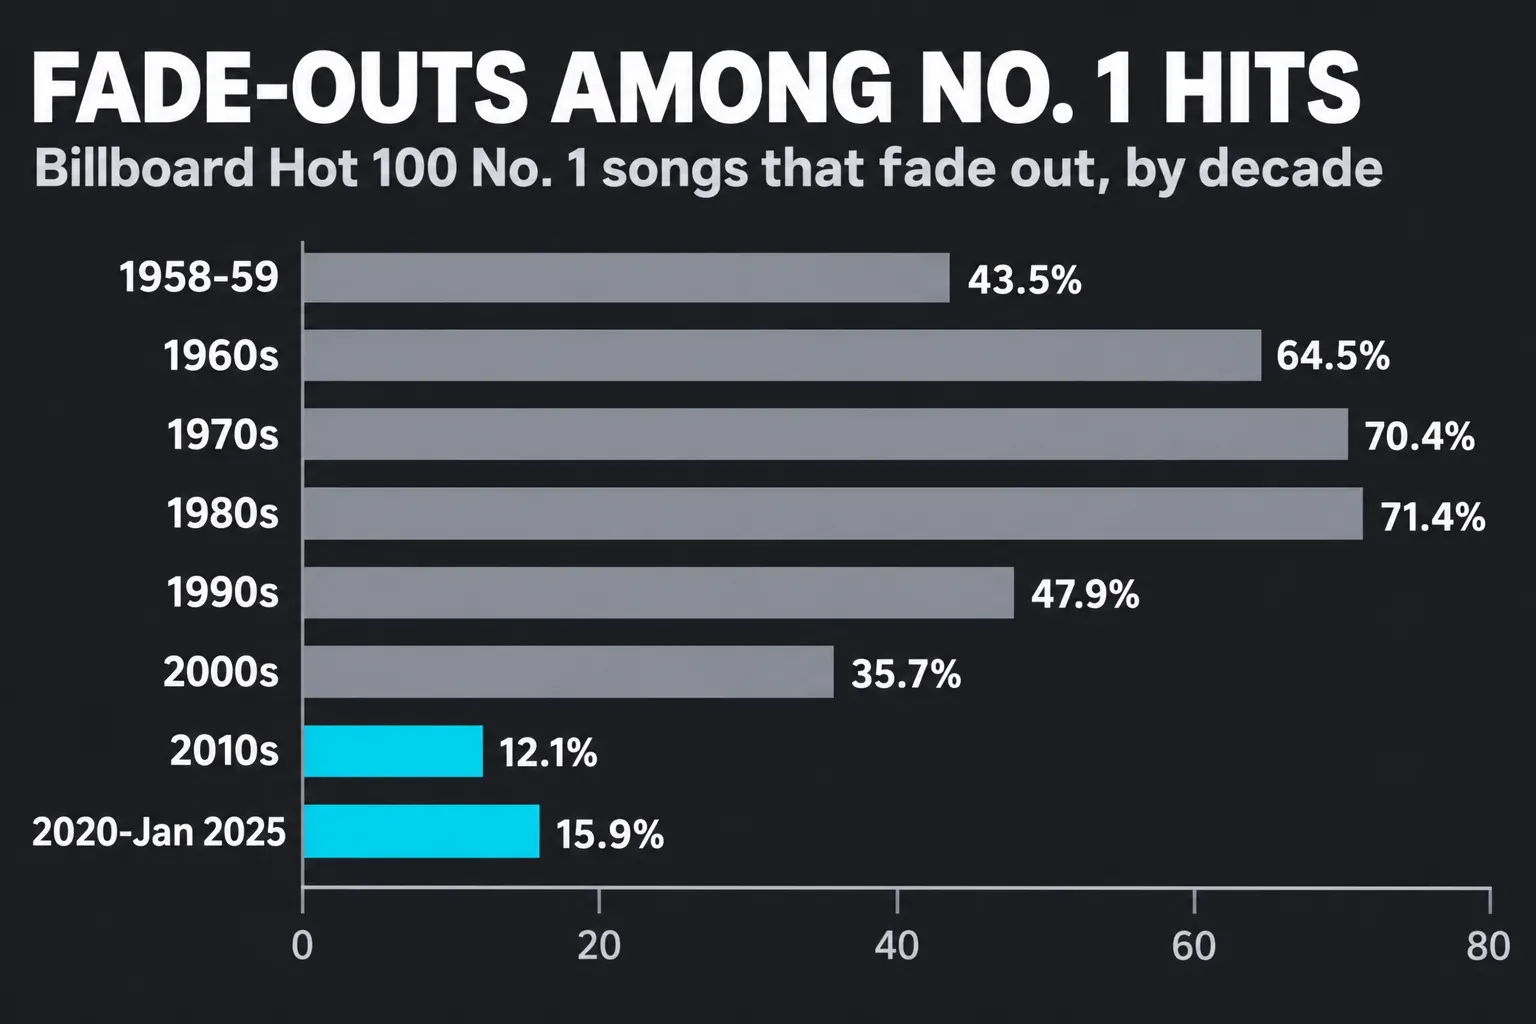
Keep the recent song groups separate. Number ones from the 2010s fade out 12.1% of the time and those from 2020 to January 2025 15.9%. Weir’s count of the year-end top 10 for 2011, 2012 and 2013 found one fade-out in 30 songs, Robin Thicke’s “Blurred Lines”, or 3.3%. The two number-one groups together contain 27 fade-outs among 198 songs, or 13.6%, from 2010 through January 11, 2025. The separate year-end top-10 sample uses a different selection rule, so it is not part of that percentage.
The 2010s were not even. No number one from 2012, 2014 or 2015 fades out, while 6 of the 11 songs that reached number one in 2018 do. The long view is clearer: the 1980s rate of 71.4% is 5.9 times the 2010s rate, and Weir told NPR the fade peaked in 1985, when every song in the year-end top 10 faded out.
A fade also changes how the ending feels. Slate describes an experiment at the Hanover University of Music in which music students tapped along to versions of the same song, one with a fade-out and one with a cold ending. With the cold ending they stopped tapping an average of 1.4 seconds before the end; with the fade-out they kept tapping 1.04 seconds after it. The study, published in Psychology of Music by Reinhard Kopiez and colleagues, played three versions of one pop song to 80 listeners and calls the effect the pulse continuity phenomenon.
My verdict: end a pop single, or anything aimed at playlists, cold, with a final hit or a held chord, because about 86% of number ones from 2010 through January 11, 2025 end without a fade. Fade grooves, loops, songs built on a repeated hook and demos that don’t have a written ending yet. The one-song tapping study suggests why a fade can work there: listeners may carry the pulse beyond the audible ending.
When should you move the fade to Logic Pro?
When you need a fade on a single region with its own curve. Logic Pro fades the start or end of an audio region with the Fade tool or the Fade In and Fade Out settings in the Region inspector, as Apple’s Logic Pro fades page describes, and our Logic Pro fade guide walks through both, plus crossfades and whole-song fades.
Logic opens GarageBand projects, as covered in moving a GarageBand project to Logic Pro, and your automation habits carry over to the Logic Pro automation basics. Apple’s sharing page also covers a specific round trip: share an iPhone-compatible version from GarageBand or Logic Pro for Mac, add new tracks on the iPhone, then reopen it on the Mac to add those tracks to the original project. A standard GarageBand for Mac project cannot be opened directly in GarageBand for iPhone.
GarageBand fade FAQ
How do I make a song fade out at the end in GarageBand?
On a Mac, choose Mix > Fade Out; GarageBand adds four volume points to the master track over the last 10 seconds of the last region. On iPhone and iPad, tap the Settings button in the control bar and turn on Fade Out.
How long is the GarageBand fade-out?
Ten seconds on both. On a Mac, drag the first of the four master track points left or right to change it. The iPhone and iPad switch has no length setting, so for any other length turn it off and draw volume automation.
Why can’t I hear the fade in GarageBand?
On iPhone and iPad the automatic fade doesn’t play while you record, and drawn automation is off when a track’s Bypass button is white. On a Mac, a dimmed curve means that track’s automation is turned off. When an exported file has no fade, check the cycle area checkbox in the export dialog.
How do I remove a fade in GarageBand?
On a Mac, delete the four fade points on the master track: double-click each one, or select them and press Delete with no region selected. On iPhone and iPad, tap Fade Out in the song settings to turn it off, and delete drawn points with the Edit Automation button.
Can you fade in on GarageBand for iPhone?
Yes, but not automatically. The song settings only have a Fade Out switch, so draw volume points at the start of each track that plays, starting low and rising to full level.


