Logic Pro Auto Sampler: Sample Hardware and Build an Instrument
Capture a software instrument or hardware synth with Logic Pro Auto Sampler, then verify mapping, loops and sample files before you rely on the patch.

Logic Pro Auto Sampler turns a playable software instrument or external hardware synth into a multisampled Sampler instrument. Put Auto Sampler in the source channel strip, define the notes and dynamics worth recording, run the capture, then inspect the result in Sampler before saving it. The setup is quick; choosing the wrong range, interval or velocity plan is what wastes time and storage.
This guide gives you a clean route for both software and hardware sources. It also shows how to estimate the size of the job before you press Sample, find silent or clipped captures, and move the finished instrument without leaving its audio files behind.
On this page
- Choose the source
- Route MIDI and audio
- Plan the capture
- Set Auto Sampler
- Run the capture
- Check mapping and loops
- Save a portable instrument
- Fix common problems
Choose the source before you open Auto Sampler
Auto Sampler is the right tool when the sound is already playable from MIDI and you want Logic to record a systematic set of notes. That may be a layered software patch, a CPU-heavy instrument, an older synth you cannot keep connected, or a hardware preset you want inside the project.
For a software source, create a Software Instrument track and load the instrument first. Effects placed before Auto Sampler in the channel strip are recorded into the samples; effects after it remain part of playback instead. Apple documents that signal-flow distinction in the Auto Sampler overview. Decide whether reverb, delay and modulation define the patch or should stay editable. Long ambience baked into every key can multiply the instrument size and make loops harder to clean.
For a hardware source, use an External Instrument channel strip. You need two working paths: MIDI from Logic to the synthesizer, and audio from the synthesizer back into Logic. If either side is wrong, Auto Sampler can complete a pass full of silence. Get the synth responding to a normal MIDI region first; get a stable audio return second; only then add Auto Sampler.
Auto Sampler is not the fastest choice for a single drum hit, vocal chop or one-shot texture. Use Quick Sampler when one audio file is the instrument. Use the full Sampler when you already have an organized set of samples and want to map them by hand. The Sampler and Quick Sampler comparison explains where those two workflows split.
Route MIDI and audio before the first capture
On a software instrument track, insert Auto Sampler in an Audio FX slot after the instrument and any effect you want printed. Play several notes across the intended range and listen for tails, velocity response and changes in timbre. A patch that only sounds useful over three octaves should not be sampled over the entire keyboard.
For hardware, create an External Instrument track and set its MIDI Destination and MIDI Channel to the synth. Select the audio interface input receiving the synth output. Apple's hardware Auto Sampler workflow requires both connections to be ready before capture. If the routing is unfamiliar, set up the device with the guides to MIDI controllers in Logic Pro and connecting an audio interface first.
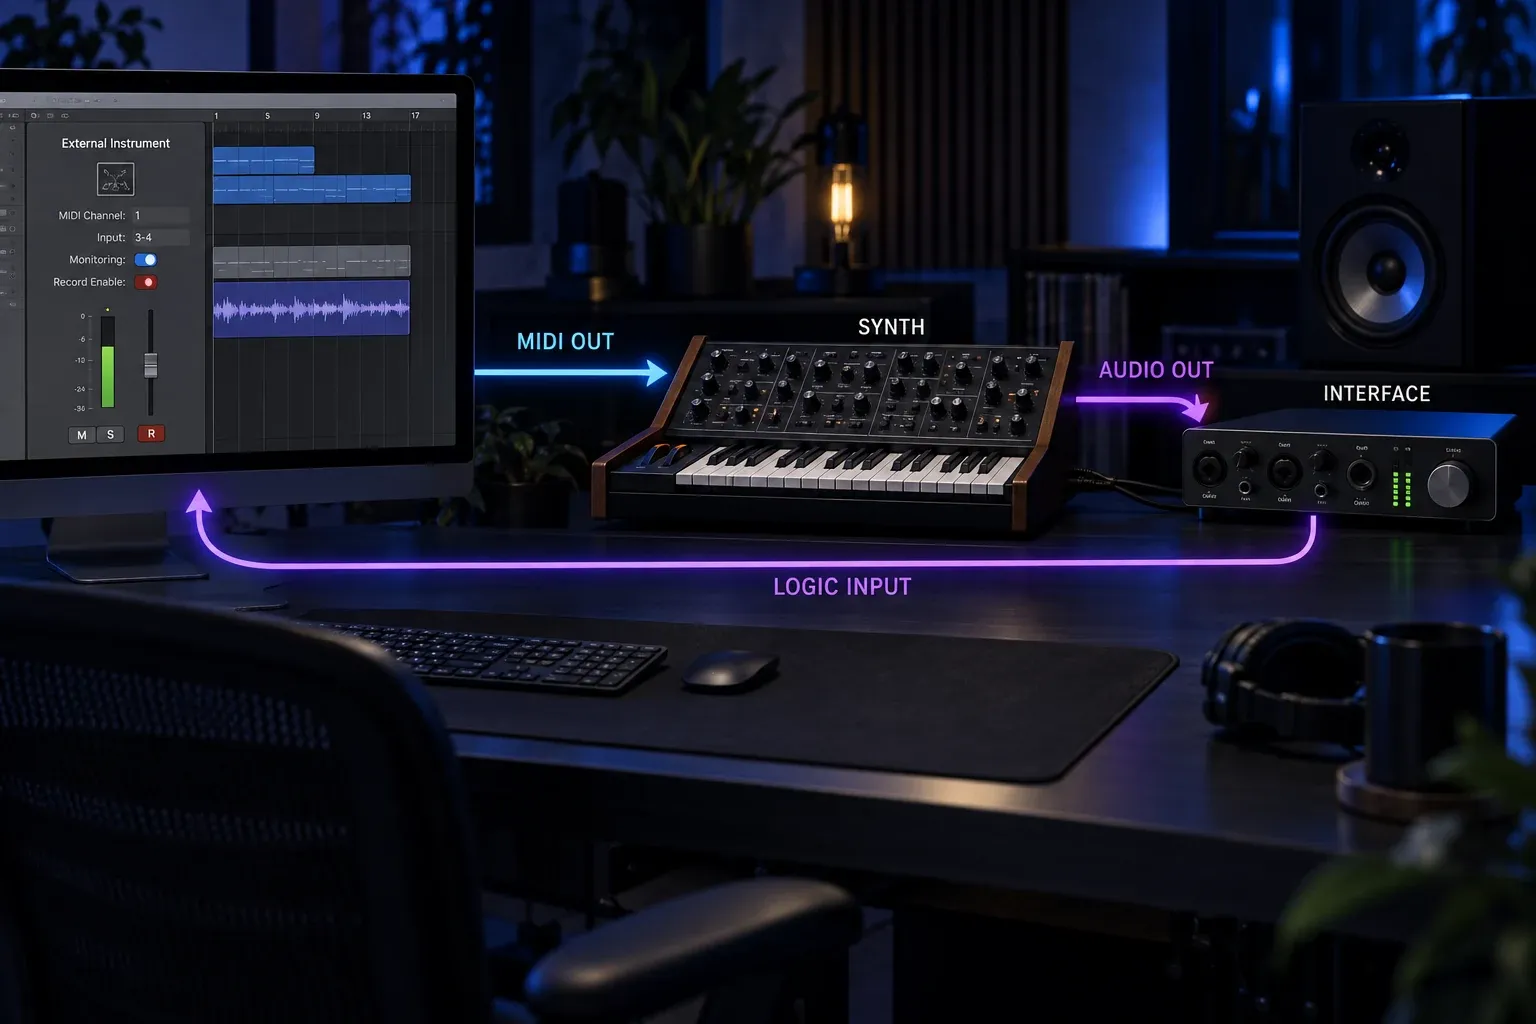
Set a healthy input level with headroom. Auto Sampler's Input Gain changes the level received by the plug-in, and Apple's interface guide identifies red meter values as clipping. Lower the synth output, interface gain or Auto Sampler Input Gain until the loudest note and velocity stay below red. Do this with the actual patch, because resonance and filter envelopes can make one part of the keyboard much louder than another.
Estimate the job before you press Sample
The capture size is controlled by four decisions: keyboard range, semitone interval, velocity layers and round robins. A useful planning estimate is:
sampled notes ≈ floor((highest note − lowest note) ÷ semitone interval) + 1
total captures = sampled notes × velocity layers × round robins
This is simple planning arithmetic, not a Logic Pro readout. A C2–C6 range contains 49 MIDI notes including both endpoints. Sampling every three semitones gives about 17 sampled notes. Two velocity layers and two round robins turn that into roughly 68 recordings. Each recording also includes sustain, release and the pauses needed around capture, so a long evolving pad can take far longer than a short pluck with the same note count.
Use the narrowest range that preserves the musical role of the patch. Sample chromatically when every key has a distinct transient, formant or tuned artifact. For stable oscillator patches, intervals of two to four semitones often reduce work without leaving large pitch shifts between zones. The right interval depends on how much the source changes across the keyboard; there is no universal “best” number.
Velocity layers deserve the same restraint. Add them only when the source actually changes with MIDI velocity. If velocity merely changes volume, Sampler can provide a continuous level response without recording several nearly identical versions. Add round robins when repeated notes expose a mechanical sameness and the source genuinely varies between triggers.
Set note range, interval, dynamics and tails
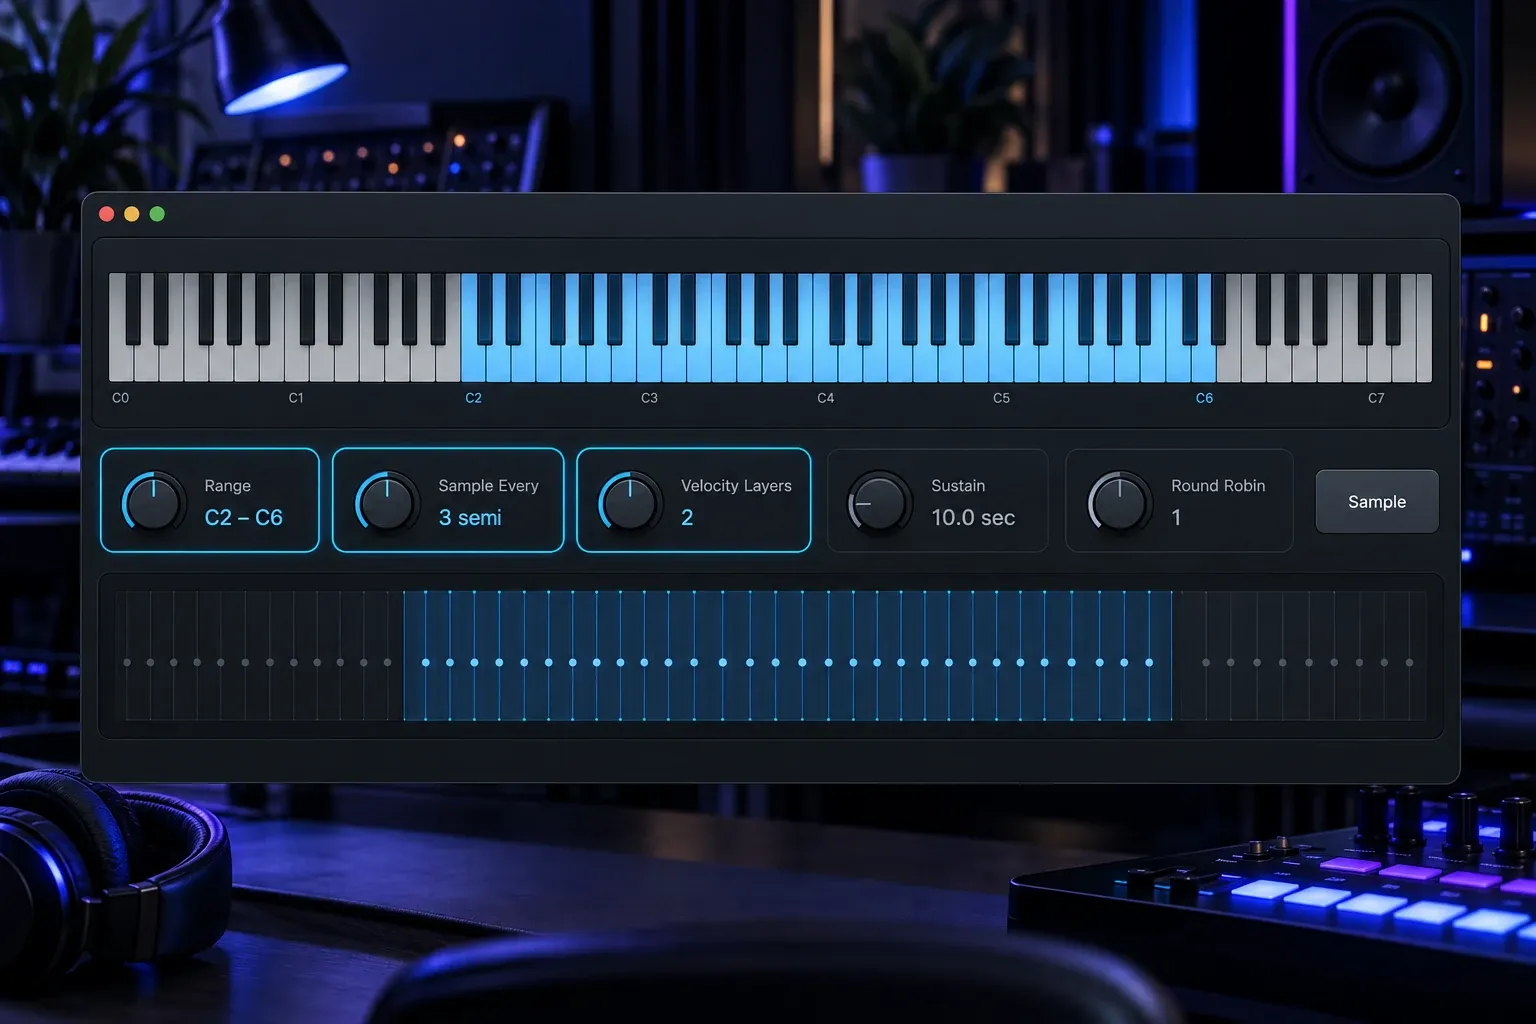
Open Auto Sampler and set these controls in order:
- Range: choose the lowest and highest playable notes. Test both endpoints from the keyboard in the Auto Sampler window.
- Sample Every: choose the semitone spacing between recorded notes. Smaller intervals create more zones and less transposition inside each zone.
- Velocity Layers: set one layer for a static patch; add layers only when the attack, filter, articulation or other timbre changes with velocity.
- Round Robin: use more than one capture per note only when repeated triggers should alternate between real variations.
- Sustain: allow enough time for the body of the sound to develop before note-off. Apple recommends 10 seconds or more for pitched sounds in its Auto Sampler control reference, but a short percussive patch needs far less.
- Release: leave enough time to record the audible tail after note-off. A release that ends abruptly will be baked into every mapped sample.
- Loop: use One Shot for percussion and effects that should play through. For sustained tones, begin with an automatic search mode and plan to inspect the loop afterward.
Apple lists None, Search, crossfade search options, Penrose Machine and Bidirectional among the available loop modes. Treat any automatic loop as a starting point. Vibrato, chorus, moving filters and stereo modulation can produce a technically valid loop that still pulses or clicks in context.
Run the automatic capture and watch the state
Click Sample, enter an instrument name, then click Start. Auto Sampler steps through the requested notes and velocities. The active key is highlighted, while the window shows the incoming waveform, current velocity, progress and estimated remaining time. Apple's capture instructions recommend checking the on-screen keyboard, range endpoints and sampled-note indicators before committing to the run.
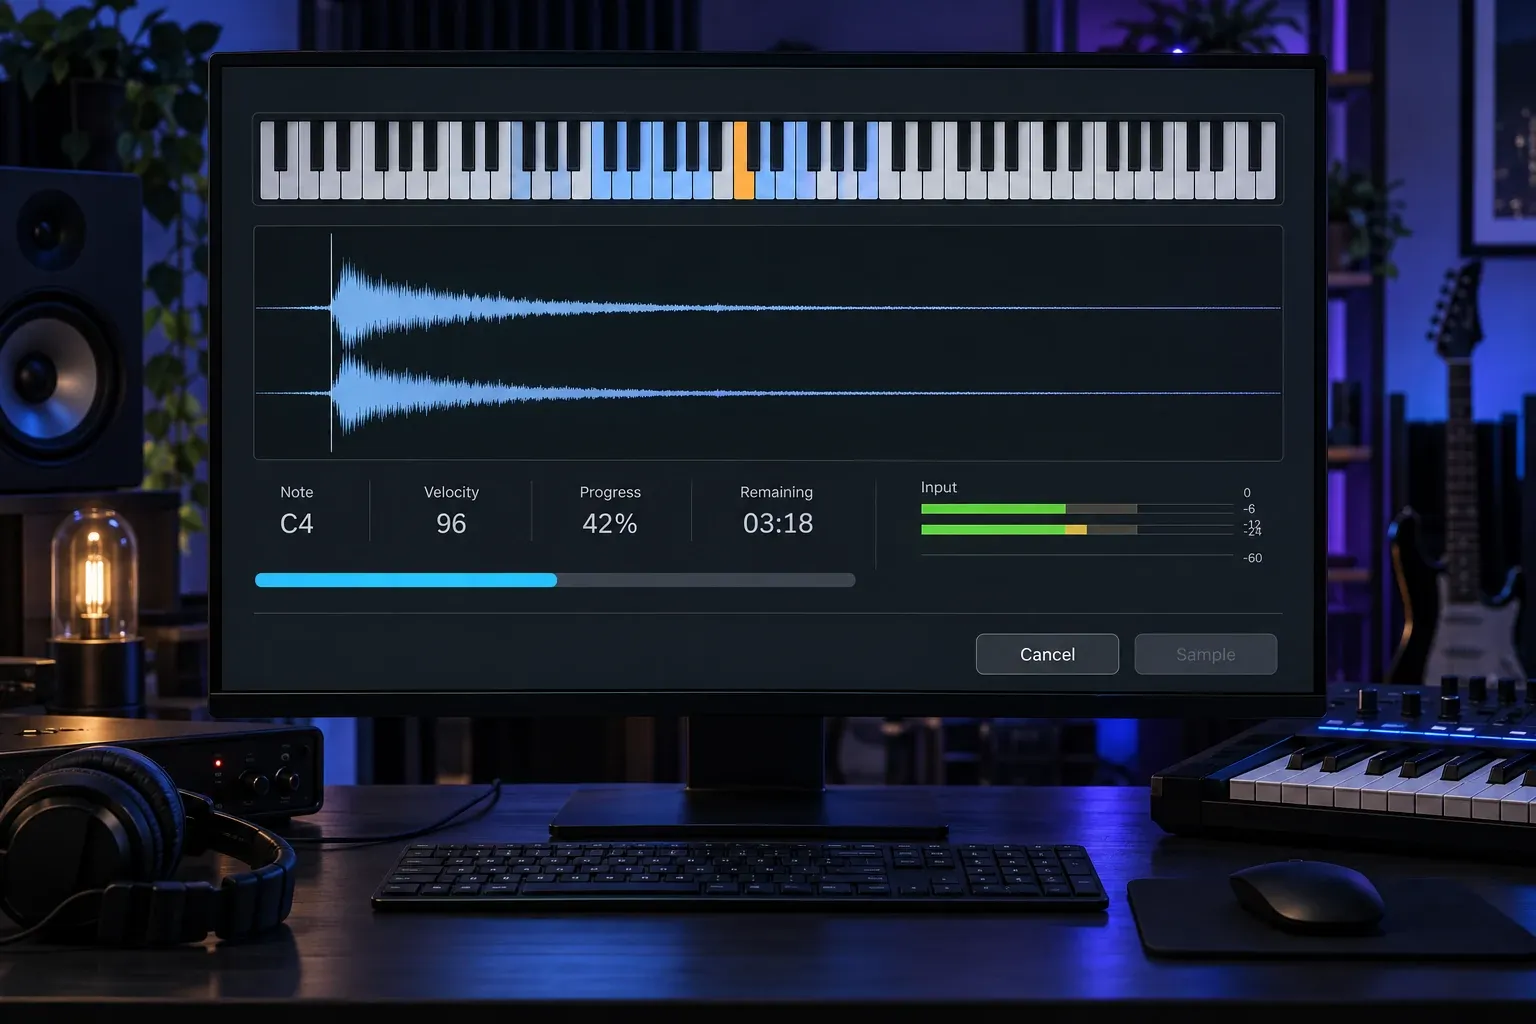
Do not walk away immediately. Listen to the first low, middle and high captures if the source level varies widely. Stop when the waveform is flat, clipped or obviously routed from the wrong sound. Choosing Cancel ends the process without creating the instrument, so an early restart is cheaper than cleaning a full bad pass.
Keep the project otherwise quiet during hardware capture. Do not change presets, MIDI channels, interface inputs or clocking while Auto Sampler is running. For software instruments, avoid automation or random modulation that you do not want frozen into the new patch.
Open the result in Sampler and verify the mapping
When capture finishes, Logic creates a Sampler instrument and makes it available under Auto Sampled Instruments. Open the new patch in Sampler rather than assuming the automatic map is finished. Apple's guide to working with auto-sampled instruments places the finished result in the Sampler workflow, where zones and groups can be edited.
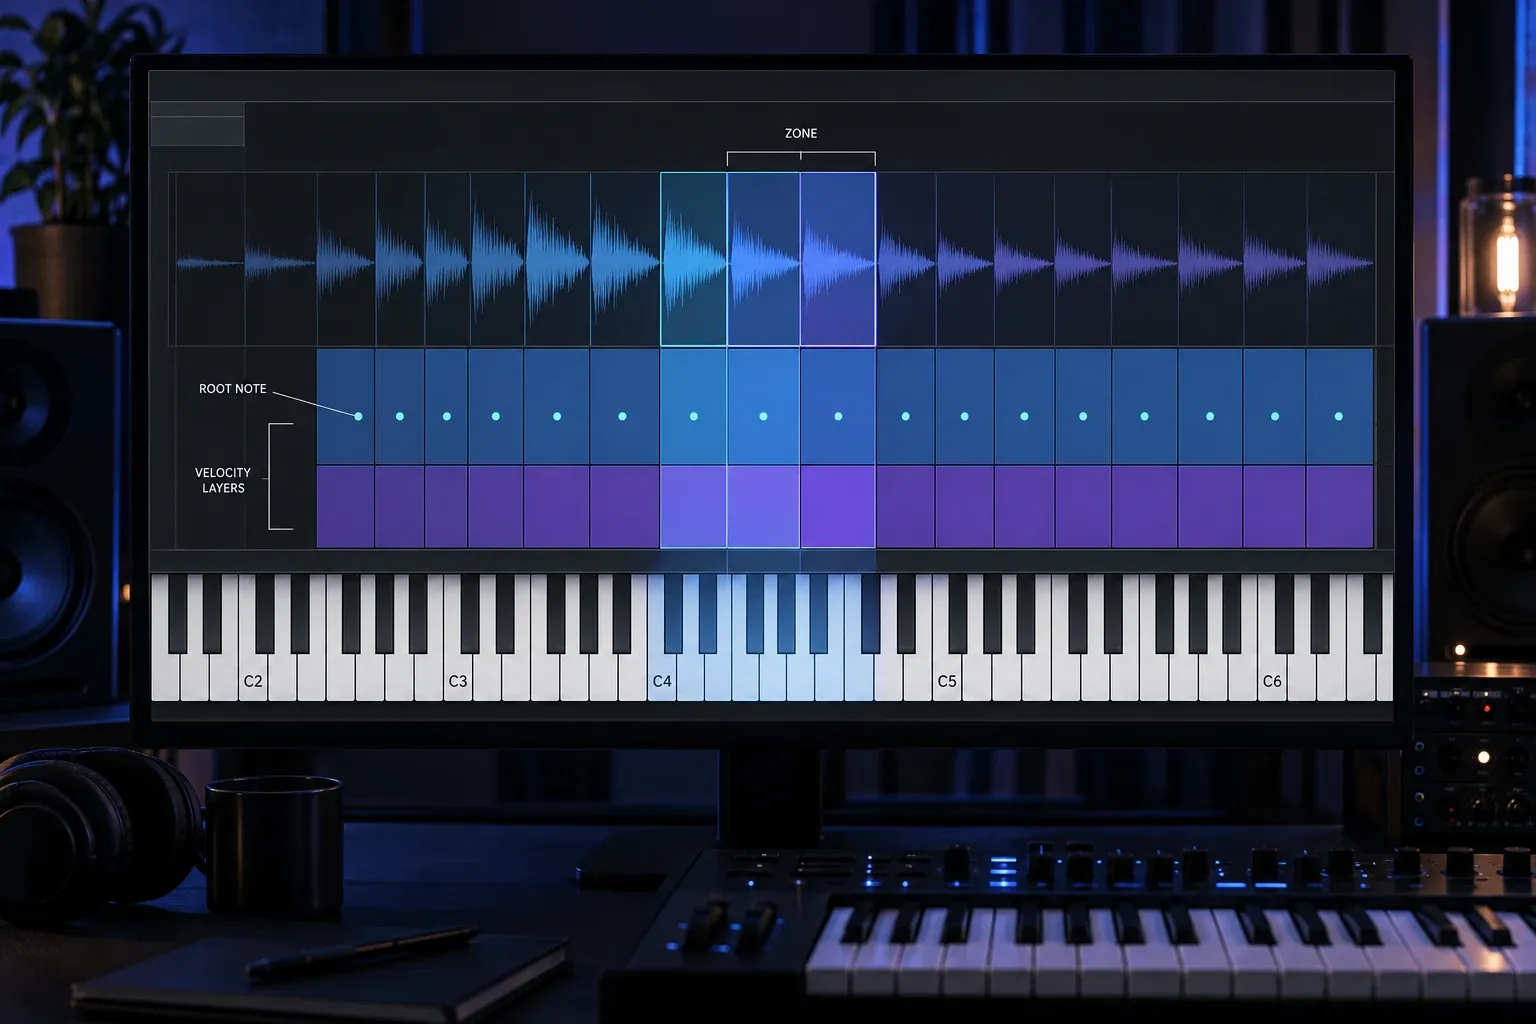
Play chromatic scales slowly across every transition. Listen for a note that changes level, stereo position, envelope or brightness more than its neighbors. In the mapping view, verify that each captured sample has the correct root note and that adjacent zones cover the keyboard without gaps or accidental overlaps. If you used velocity layers, play repeated notes from soft to hard and check that the change between layers sounds intentional.
A wide Sample Every interval asks Sampler to transpose each recording farther. That may be harmless on a simple waveform and obvious on a vocal-like or resonant patch. If one area sounds artificial, you do not always need to repeat the whole instrument. Narrow the capture range to the failed region, use a smaller interval there, then replace or supplement the affected zones manually.
Trim starts, repair loops and keep release natural
Open suspicious zones in Sampler's waveform editor. Move the sample start past unwanted silence without cutting the attack. Check the end and release so the sound does not stop early or carry excess noise. For sustained material, solo one key at a time and listen through several loop cycles.
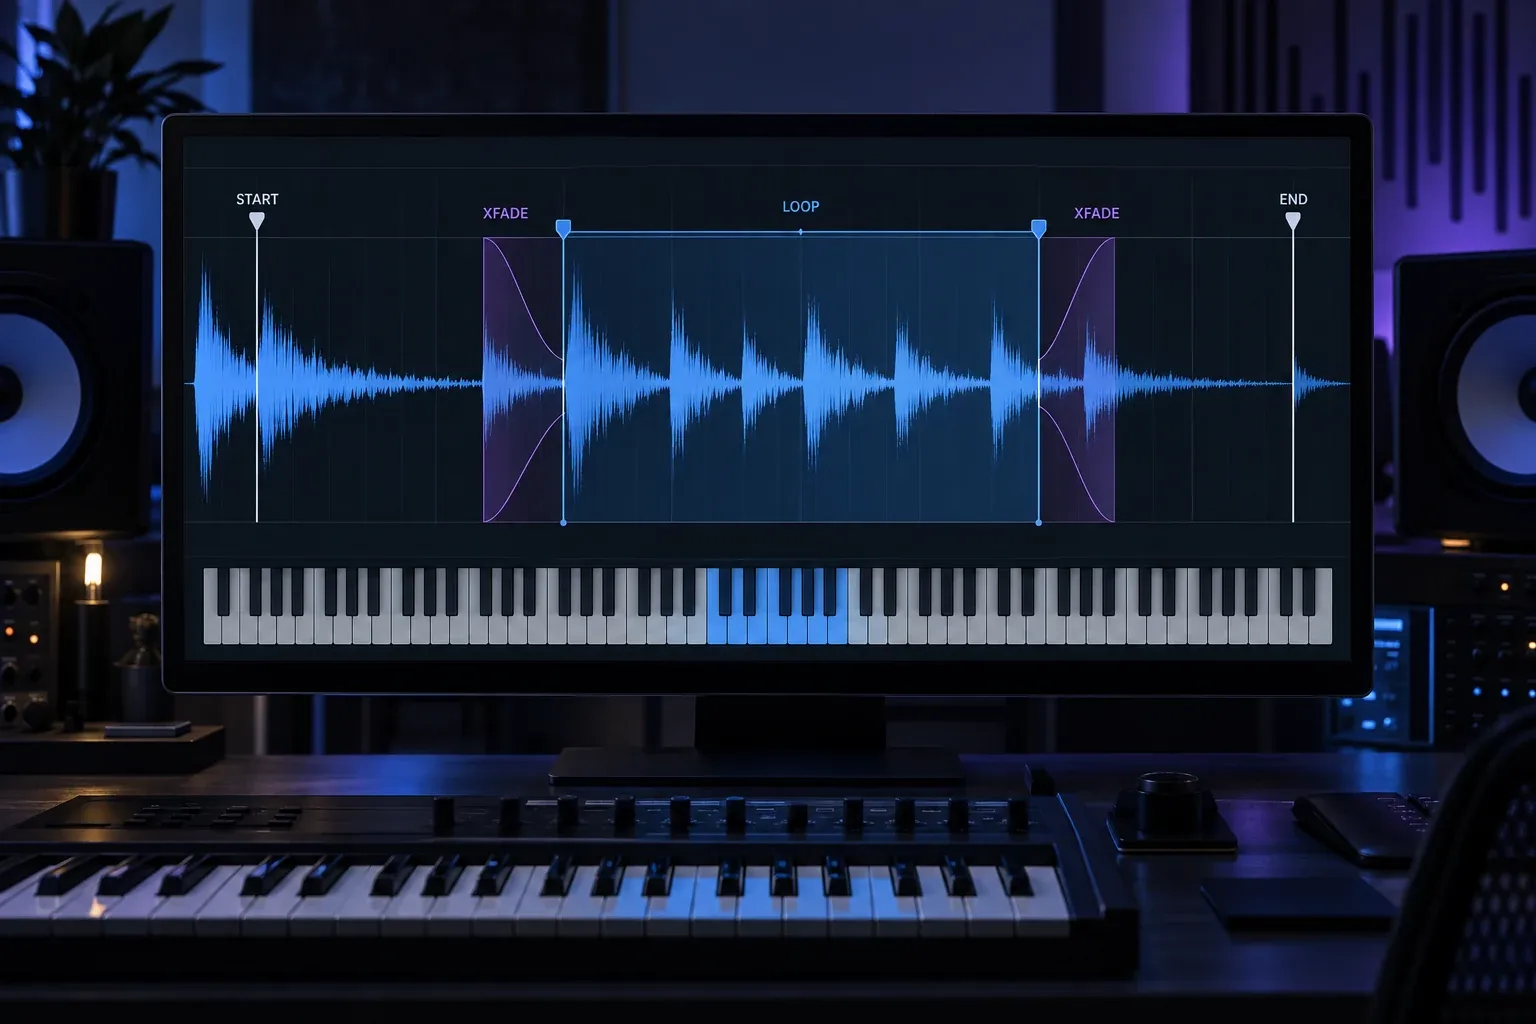
A click at the loop point usually means the boundaries do not meet cleanly. Move the loop start or end to a steadier part of the waveform, then add only enough crossfade to hide the join. A rhythmic swell suggests the loop spans incompatible phases or modulation states; a different loop region may work better than a longer crossfade. If the original patch has irregular motion that never settles, a long one-shot sample can sound more honest than a forced loop.
Save the instrument with the sample assets it needs
The instrument definition and recorded audio are separate files. Apple stores auto-sampled instrument files in Audio Music Apps/Sampler Instruments/Auto Sampled Instruments and their recordings in Audio Music Apps/Samples/Auto Sampled/[instrument name]. The Sampler instrument overview explains that an instrument keeps references to audio files rather than embedding every sample inside the instrument file.
That separation matters when you rename folders, clean a drive or move the patch to another Mac. Keep the Sampler instrument and its matching sample folder together. Do not rename individual audio files after mapping unless you are prepared to relink them. When archiving a project that depends on the patch, include its audio assets rather than copying only the small instrument definition.
A descriptive instrument name makes this easier. Include the source and patch role, such as Juno Soft Brass or Alchemy Glass Pad, instead of a generic “Auto Sample 1.” If the source is an Alchemy patch you built, the Alchemy guide can help you simplify the sound before committing it to samples.
Fix silent notes, wrong MIDI, clipping and oversized captures
Every captured note is silent
Check the audio return first. On hardware, confirm the External Instrument input matches the physical interface input and that the synth output reaches that channel. Then verify MIDI Destination and MIDI Channel. A synth listening on channel 2 will ignore a track sending on channel 1 even though the interface meters and cables look normal.
Only part of the range is silent
The source patch may not respond over the full requested range, or a split/layer may leave holes. Play the lowest and highest notes from Auto Sampler's keyboard before capture. Narrow the range to notes the source can produce cleanly.
Some samples distort
Watch the loudest velocity and the most resonant part of the keyboard. Lower Input Gain or the upstream hardware/interface level until no capture reaches red. Do not repair avoidable clipping by turning the finished zone down; the distorted waveform remains distorted.
The instrument sounds stepped across the keyboard
The semitone interval is too wide for that source. Reduce Sample Every in the problem area or recapture the full patch with closer notes. Formant-heavy, acoustic and sharply resonant sounds expose transposition sooner than simple synth tones.
The file set is much larger than expected
Recheck the capture equation. Unnecessary velocity layers and round robins multiply every note in the range. Long sustain and release settings then multiply the length of those recordings. Remove dimensions the patch does not audibly use before shortening every sample.
The instrument opens with missing files
Restore the matching Samples/Auto Sampled folder or relink the audio in Sampler. Copying the instrument file alone is not a portable backup.
Auto Sampler, Quick Sampler or manual Sampler?
Use Auto Sampler when a MIDI-playable source should become a mapped multisample instrument and automatic capture saves repetitive work.
Use Quick Sampler when one recording is enough: a drum hit, vocal fragment, texture or short phrase.
Use Sampler directly when the samples already exist, zone boundaries need careful manual design, or different files require different mapping rules.
Auto Sampler handles the repetitive recording; Sampler remains the place where you judge the finished instrument. A good capture plan reduces cleanup, but it does not replace listening across the full range and dynamics.
Once the patch is mapped, cleaned and stored with its audio folder, it behaves like a normal Logic instrument you can call up for future sessions. Continue with the Logic Pro creation guides to place it in a writing, arrangement or sound-design workflow.


